
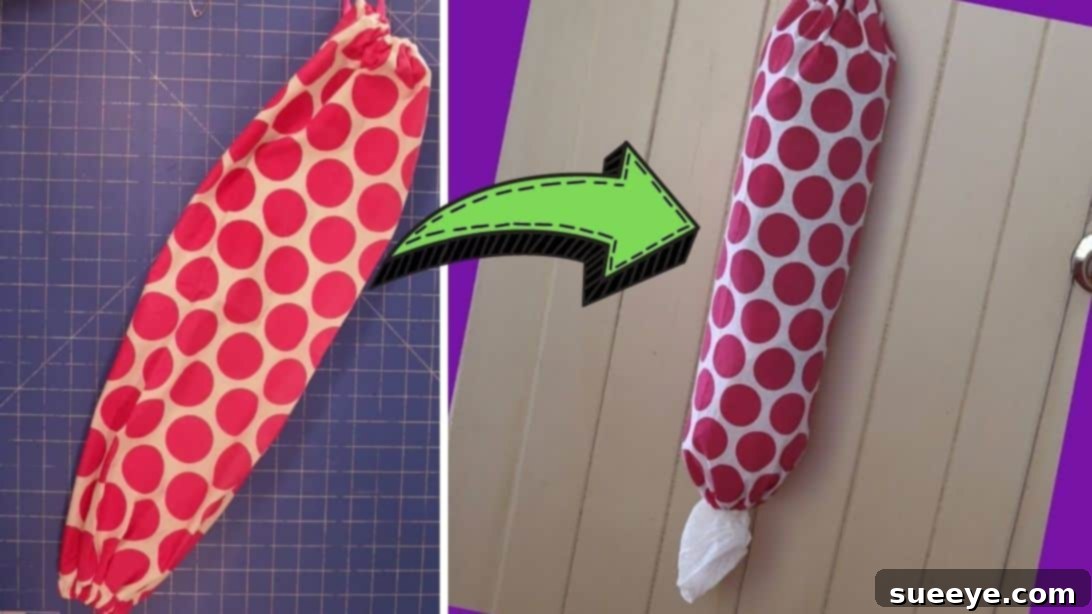
DIY Easy Grocery Bag Holder: A Beginner’s Sewing Project for Sustainable Living
Are you looking for a simple, practical, and eco-friendly sewing project that even absolute beginners can tackle? Look no further! This comprehensive guide will walk you through creating your very own grocery bag holder. Not only is it incredibly easy to make with just a few basic materials and minimal sewing skills, but it also offers a fantastic way to organize those pesky plastic (or reusable) grocery bags that tend to accumulate in drawers and cupboards. Say goodbye to clutter and hello to a smart, stylish storage solution!
This project is designed for everyone, especially those new to sewing. You won’t need any specialized tools or advanced techniques. All you need is a willingness to learn, a few common household items, and the desire to create something useful. Follow our detailed steps, inspired by the excellent tutorial from Easy Sewing for Beginners, and you’ll have a functional and charming grocery bag dispenser in no time.
Why Make Your Own Grocery Bag Holder?
In an age where sustainability is paramount, reducing our reliance on single-use plastics and finding clever ways to reuse items is more important than ever. A handmade grocery bag holder addresses several common household needs and environmental concerns:
- Eco-Friendly Storage: Provides a neat way to store your reusable shopping bags or collected plastic bags for repurposing, reducing environmental impact.
- Declutter Your Home: No more bags overflowing from cabinets or stuffed into random corners. This holder keeps them tidy and accessible.
- Beginner-Friendly Project: It’s an excellent way to practice fundamental sewing skills like straight stitching, creating casings, and threading elastic, building confidence for future projects.
- Cost-Effective: Utilize materials you might already have, like an old tea towel, saving you money compared to buying a store-bought dispenser.
- Customizable: Choose fabrics that match your kitchen decor or personal style, making it a unique and personalized item.
- A Sense of Accomplishment: There’s immense satisfaction in creating something useful with your own hands.
This project is not just about sewing; it’s about embracing a more organized, sustainable, and creative lifestyle.
Materials You’ll Need
Gathering your materials before you begin will make the sewing process smoother and more enjoyable. Most of these items are likely already in your home or can be easily found at any craft store.
- An Old or New Tea Towel: This is the primary fabric for your bag holder. A standard size (approx. 18×28 inches or 45×70 cm) works well. Choose a durable cotton or linen for best results.
- 25 inches (or 63 cm) of Ribbon: This will create the hanging loop at the top. A sturdy ribbon, about 0.5 to 1 inch wide, is ideal.
- 11 inches (or 28 cm) of Elastic: This forms the gathering at the bottom opening of your holder, making it easy to pull bags out. Use a 0.25 to 0.5-inch wide elastic.
- Sewing Machine: Any basic sewing machine will do. Ensure it’s threaded with a matching or coordinating all-purpose thread.
- Scissors: Sharp fabric scissors are essential for clean cuts.
- Lighter or Flame of Some Sort: For sealing the ends of your ribbon to prevent fraying. Use with caution and adult supervision.
- Pins: To hold fabric pieces in place while sewing.
- Fabric Clips (Optional but Recommended): Great for holding thicker fabrics or when you prefer not to use pins.
- Safety Pin: An indispensable tool for threading the ribbon and elastic through the fabric casings.
- Iron and Ironing Board (Recommended): For pressing seams and folds, which gives a professional finish.
Step-by-Step Directions: Crafting Your Grocery Bag Holder
Let’s dive into the creation process. Take your time with each step, and remember that practice makes perfect. Don’t be afraid to make mistakes – that’s how we learn!
Step 1: Preparing the Fabric and Sewing the Casings and Side Seam
This initial stage involves preparing your tea towel to form the main body and the channels (casings) where your ribbon and elastic will go.
- Prepare Your Tea Towel: Begin by laying your tea towel flat on your work surface with the wrong side facing up. If your tea towel has a distinct right and wrong side, make sure the wrong side is visible. Pressing the towel with an iron at this stage can help ensure crisp, accurate folds.
- Create the Top and Bottom Casings: Take one of the shorter ends of the tea towel and fold it inward by about 1 inch (approximately 2.5 cm). This fold will create a channel for your ribbon or elastic. Press the fold firmly with an iron to create a sharp crease. Secure this fold with pins or fabric clips.
- Sew the Folded Edges: Using your sewing machine, sew along the inner edge of the folded fabric, very close to the raw edge, creating a neat hem. This stitch should be about 0.75 inches (about 2 cm) from the original short end of the tea towel. Make sure to backstitch at the beginning and end of your seam to secure the stitches. Repeat this exact process for the other short end of the tea towel. You now have two finished edges, ready for threading.
- Form the Bag’s Body: Once both short ends are hemmed, fold the entire tea towel in half lengthwise, bringing the two long sides together. Make sure the right sides of the fabric are facing each other. Align the edges carefully, ensuring the top and bottom hemmed sections (the casings you just created) are perfectly matched up. Pin the long raw edges together along the length of the towel.
- Sew the Long Side Seam: Using your sewing machine, sew a straight seam down the pinned long edge. A standard seam allowance of 0.5 inches (1.25 cm) is usually sufficient. It is crucial to avoid sewing over the folded fabric sections at both the top and bottom ends. These are your open casings and must remain open for the ribbon and elastic. Start and stop your seam just beyond the folded edges, backstitching at the beginning and end for strength.
- Turn the Bag Right Side Out: Carefully turn the fabric tube you’ve created right side out. Use a blunt object, like a chopstick or turning tool, to gently push out the corners (if any) and smooth the seams. Give it a good press with your iron to make sure the seam lies flat and the bag has a neat shape. You should now have a fabric tube with an open casing at the top and bottom.
Step 2: Inserting the Ribbon and Elastic Drawstrings
Now that the body of your bag holder is complete, it’s time to add the functional elements that allow it to hang and dispense bags effectively.
- Prepare the Ribbon: Take your 25-inch (63 cm) length of ribbon. To prevent it from fraying over time, carefully use a lighter or a flame to lightly singe (melt) each end of the ribbon. Be quick and cautious to avoid burning the ribbon excessively. This step creates a clean, durable finish.
- Thread the Ribbon (Top Casing): Attach a safety pin to one end of the prepared ribbon. Insert the safety pin into one of the openings of the top casing you created in Step 1. Gently push and gather the fabric along the safety pin, working it through the entire casing until it emerges from the other opening. This method makes threading incredibly easy.
- Secure the Ribbon: Once the ribbon is fully threaded through the top casing, pull both ends of the ribbon out evenly. Tie the two ends of the ribbon together in a secure knot. This knot will form the loop by which you’ll hang your grocery bag holder. Ensure the knot is tight and neat.
- Prepare and Thread the Elastic (Bottom Casing): Take your 11-inch (28 cm) length of elastic. Attach a safety pin to one end of the elastic, just as you did with the ribbon. Insert this safety pin into one of the openings of the bottom casing of your bag holder. Carefully thread the elastic through the entire casing until it emerges from the other opening.
- Important Note for Elastic: As you thread the elastic, be very careful not to lose the other end of the elastic inside the casing. It’s a good idea to temporarily pin the starting end of the elastic to the fabric near the casing opening before you begin threading, ensuring it doesn’t slip through.
- Secure the Elastic: Once the elastic is fully threaded and both ends are outside the casing, pull the elastic taut until the bottom opening gathers nicely. You can either tie the two ends of the elastic together in a very secure double knot, or, for a more permanent solution, overlap the ends by about half an inch and sew them together securely with a zigzag stitch on your machine.
- Conceal the Elastic Knot/Seam: After securing the elastic, gently pull on the fabric of the casing to tuck the knot or sewn seam of the elastic neatly inside the casing. This hides it away for a clean and professional finish. The gathered bottom allows for easy insertion and removal of grocery bags.
Tips for a Flawless Finish and Beginner Success
- Pressing is Key: Don’t underestimate the power of an iron! Pressing your fabric after each major step (folding, sewing seams) will make your project look much more professional and is easier to sew.
- Use Good Quality Thread: A strong, all-purpose polyester thread will provide durability for your bag holder.
- Backstitch at the Beginning and End: Always backstitch (sew a few stitches forward, then a few backward, then forward again) at the start and end of each seam to prevent it from unraveling.
- Go Slow: Especially when you’re a beginner, there’s no need to rush. Guide the fabric gently through your machine and maintain a consistent speed.
- Check Your Bobbin: Always ensure your bobbin has enough thread before starting a long seam to avoid running out mid-stitch.
- Matching Thread: While not strictly necessary for a beginner project, using a thread color that matches your fabric will make your stitches less noticeable and give a cleaner look.
Customization Ideas for Your Bag Holder
While this tutorial provides a basic design, feel free to get creative and personalize your grocery bag holder:
- Fabric Choices: Experiment with different types of fabric. Old denim, colorful quilting cotton, or even a repurposed pillowcase can work. Consider fabric with fun prints or patterns.
- Embellishments: Add decorative trim, appliques, embroidery, or fabric paint to make your holder unique.
- Size Variations: Adjust the dimensions of your tea towel to create a larger holder for more bags or a smaller one for specific purposes. Just maintain the relative proportions for the ribbon and elastic lengths.
- Different Closures: Instead of a ribbon loop, you could add a fabric loop or even a snap closure.
Caring for Your Handmade Grocery Bag Holder
To keep your bag holder looking its best, simply machine wash it on a gentle cycle with like colors, using cold water. Tumble dry on low or air dry. Iron as needed to smooth out wrinkles, especially if you want to maintain a crisp appearance.
Conclusion: Your New Favorite Organization Tool!
Congratulations! You’ve successfully created a practical, eco-friendly, and stylish grocery bag holder. This beginner-friendly sewing project is not only satisfying to complete but also serves as a fantastic step towards a more organized and sustainable home. You’ve honed basic sewing skills and produced a useful item that reduces clutter and encourages mindful consumption.
We hope you enjoyed this sewing journey. Share your creations, experiment with different fabrics, and keep exploring the wonderful world of DIY. For more inspiring projects and helpful tutorials, we highly recommend visiting the Easy Sewing for Beginners YouTube channel. Happy sewing!