
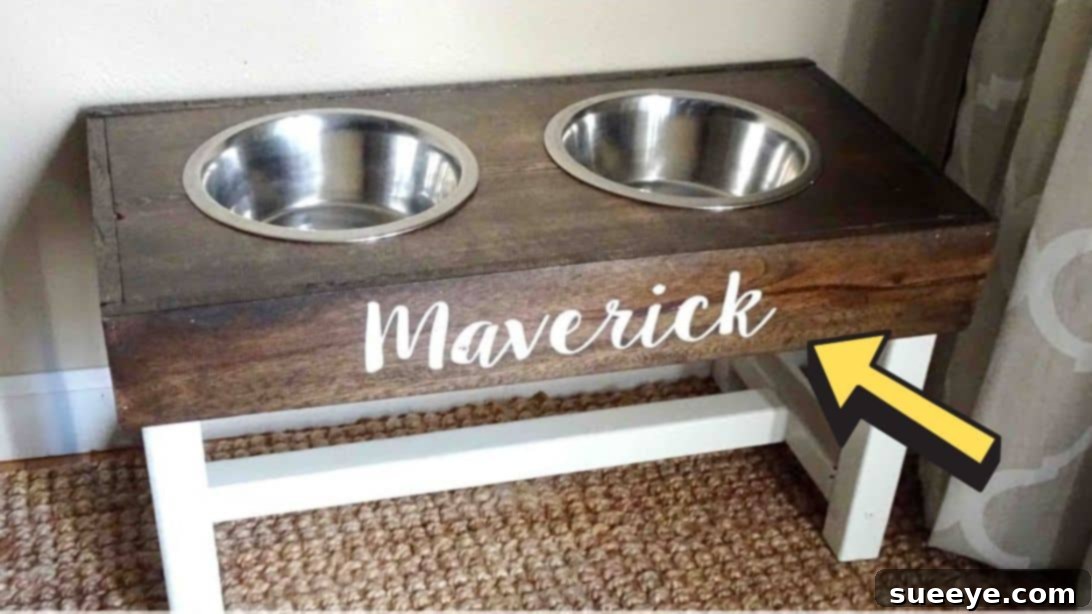
Crafting the Perfect DIY Elevated Dog Bowl Stand: A Comprehensive Guide
Are you looking for a fun, rewarding weekend project that benefits your beloved canine companion? Look no further! Building a DIY elevated dog bowl stand is an excellent way to provide your furry friend with a comfortable, healthier eating experience while also adding a touch of personalized charm to your home. Inspired by the creative insights of The Daily DIYer on YouTube, this comprehensive guide will walk you through creating a stylish and sturdy dog bowl stand using readily available materials, including scrap wood and affordable bowls from your local dollar store.
Elevated feeders aren’t just about aesthetics; they offer significant health advantages for dogs of all sizes and ages. From improving digestion to reducing strain on joints, a raised feeding station can make a noticeable difference in your pet’s well-being. Plus, tackling this project yourself means you can customize the stand to perfectly match your dog’s height and your home’s decor, all while saving money. Get ready to gather your tools and transform simple wood pieces into a functional masterpiece for your four-legged family member!
Why Choose an Elevated Dog Bowl Stand? Benefits for Your Canine Companion
Before diving into the construction, let’s explore why an elevated dog bowl stand is more than just a fancy accessory. Understanding these benefits will reinforce why this DIY project is a fantastic investment in your pet’s health and happiness:
- Improved Digestion: For many dogs, especially larger breeds or those prone to bloat (gastric dilatation-volvulus), eating from a raised position can help reduce the amount of air swallowed during meals. This can lead to better digestion and a decreased risk of potentially life-threatening conditions.
- Enhanced Comfort and Posture: Eating off the floor requires dogs to stoop, which can put strain on their neck, back, and joints. An elevated stand allows them to eat in a more natural, comfortable standing position, reducing stress on their musculoskeletal system. This is particularly beneficial for older dogs, those with arthritis, or dogs recovering from injuries.
- Cleaner Eating Area: Raised bowls are less likely to be kicked over by energetic pups, minimizing spills and messes around the feeding station. This also helps keep dirt, dust, and insects out of your dog’s food and water.
- Prevents Pests: Elevating food and water bowls can deter crawling insects and pests from accessing your dog’s meals, contributing to a more hygienic feeding environment.
- Personalization and Style: A DIY stand offers unparalleled customization. You can choose colors, finishes, and even add decorative elements that complement your home decor, making it a unique piece of pet furniture.
- Cost-Effective: Building your own stand often costs significantly less than purchasing a ready-made elevated feeder, especially if you utilize scrap wood and affordable bowls.
Gathering Your Materials: What You’ll Need for This Project
The beauty of this DIY project lies in its simplicity and the accessibility of its materials. Most items can be found at your local hardware store, craft shop, or even salvaged from around your home. Here’s a detailed list of what you’ll need to create your dog bowl stand:
- Wood for the Base (Top Surface): A 1×12 piece of wood. This will form the main platform where the dog bowls will sit. Ensure it’s sturdy and free of major defects.
- Wood for the Frame/Apron: 1×4 pieces of wood (you can use pallet wood for an rustic look, just ensure it’s clean and safe). These will create a decorative and supportive frame around the base.
- Scrap Wood for the Legs: Any sturdy scrap wood can be used, as long as it’s sufficient for four legs of equal length. The height will depend on your dog’s size.
- Wood Glue: Essential for strong, durable bonds between wood pieces.
- Measuring Tools: A ruler or tape measure and a pencil for accurate marking.
- Electric Jigsaw: Crucial for cutting the circular openings for the dog bowls and shaping the base.
- Nail Gun or Hammer & Nails: For securing the frame and braces. Screws can also be used for extra durability.
- Sander or Sandpaper: For smoothing rough edges and preparing surfaces for finishing.
- Painter’s Tape: To protect areas you don’t want to paint or stain.
- White Chalk Paint: For painting the legs, offering a charming, matte finish.
- Wood Stain: To enhance the natural beauty of the wood base and protect it. Choose a pet-safe, low-VOC option if possible.
- Polycrylic (or other wood sealant): To seal and protect the finished wood surfaces from moisture and wear.
- Dog Bowls: Two standard dog bowls, preferably from a dollar store or similar budget-friendly source. These will dictate the size of your circular cuts.
Step-by-Step Construction Guide: Building Your Elevated Dog Bowl Stand
Step 1: Preparing the Base and Creating Bowl Openings
The foundation of your dog bowl stand is its top platform, which requires precision for the bowls to fit perfectly. This step ensures both functionality and a clean aesthetic.
- Determine Base Dimensions: Begin by placing your two dog bowls upside down on the 1×12 piece of wood. Arrange them with enough space between them and around the edges. Using your ruler or tape measure and pencil, mark the length and width required to comfortably accommodate both bowls, ensuring a generous allowance around them. This will be the overall size of your top base.
- Cut the Base: Carefully cut out the marked rectangle using your jigsaw. Once cut, give all edges a preliminary sanding to remove any splinters or rough spots.
- Trace and Cut Bowl Openings: Place the cut wooden base on your workbench. Position the dog bowls on top once more, spacing them as desired. Now, with the bowls facing down, trace the outer rim of each bowl onto the wood base.
- Add Allowance for Fit: This is a critical step. To ensure the bowls don’t fall through but sit snugly, you’ll need to cut a circle slightly smaller than your tracing. Aim for approximately a ½-inch allowance *inside* your traced line. This means your cut circle will be ½ inch smaller in diameter than the bowl’s rim, allowing the bowl’s lip to rest on the wood.
- Cut the Circles: Carefully use your electric jigsaw to cut out these smaller circles. Take your time for clean, smooth cuts.
- Test Fit and Refine: Slide your dog bowls into the freshly cut openings. They should sit securely without falling through. If a bowl is too tight, you can carefully sand the inside edge of the circle a little more. If it’s too loose, you might need to adjust your approach for the second hole or consider a decorative lip later.
- Final Sanding of the Base: Once satisfied with the bowl fit, thoroughly sand both the top and underside of your wooden base. Smooth surfaces are key for both aesthetics and safety.
- Frame the Base: Grab your 1×4 pallet wood pieces. Measure and cut four pieces to frame the perimeter of your base. These pieces will run along all four sides, creating a slight lip and enhancing stability. Sand each piece nicely. Apply wood glue to the edges of the base and carefully attach the frame pieces around it using nails or screws. Ensure flush corners for a professional finish.
Step 2: Constructing the Legs, Braces, and Finishing
Now that your base is ready, it’s time to give your stand the height and stability it needs with strong legs and supportive braces, followed by protective and decorative finishes.
- Cut and Prepare the Legs: Take your scrap wood for the legs. The ideal height for your dog bowl stand depends on your dog’s size. As a general rule, the top of the stand should be roughly level with your dog’s lower chest or slightly below their shoulders. A common starting point is around 12 inches for medium-sized dogs, but measure your dog for the perfect fit. Cut four pieces of wood to your chosen height. Sand each leg thoroughly to ensure they are smooth and free of splinters.
- Stain the Base: Apply your chosen wood stain to the entire top base and its frame. *Do not stain the legs at this point, as they will be painted.* Follow the product instructions for application and drying times. Staining brings out the natural grain of the wood and adds a layer of protection.
- Attach Braces for Stability: For enhanced stability and structural integrity, add braces between the legs. Cut two shorter braces to fit between each pair of legs (running along the shorter sides of the stand), and one longer brace to connect them in the middle (running along the longer side). Attach these braces securely using wood glue and nails or screws. These braces prevent wobbling and reinforce the entire structure.
- Prepare for Painting: Before painting the legs, apply painter’s tape meticulously along the bottom edge of the stained base and around any areas of the frame you wish to protect from paint. This ensures clean lines between your stained and painted sections.
- Paint the Legs: Apply two coats of white chalk paint to the legs and the braces. Chalk paint provides a beautiful, matte, and slightly distressed look if desired. Allow ample drying time between coats according to the paint manufacturer’s instructions.
- Allow for Curing: Let the painted legs dry completely, and allow the wood stain to cure overnight or for the recommended duration. Proper curing ensures the finish is durable and long-lasting.
- Seal for Protection: Once all paint and stain are fully dry and cured, apply two to three coats of polycrylic (or your chosen wood sealant) to all wood surfaces – the base, frame, legs, and braces. Polycrylic provides a strong, clear, protective finish that resists moisture, spills, and general wear and tear, making the stand easy to clean and more durable. Lightly sand with fine-grit sandpaper between coats for an extra smooth finish.
- Final Assembly: Once the sealant is completely dry and cured, remove the painter’s tape. Place your dog bowls into their designated openings. Your custom-built, elevated dog bowl stand is now ready for your furry friend to enjoy!
Customization Ideas and Finishing Touches
This DIY dog bowl stand is a canvas for your creativity! Here are some ideas to make it truly unique:
- Paint and Stain Combinations: Experiment with different stain colors for the base and various paint colors for the legs. You could even use a gradient effect or incorporate multiple colors.
- Stenciling and Decals: Add your dog’s name, paw prints, or a cute design to the front or sides of the stand using stencils or vinyl decals.
- Distressed Look: Achieve a rustic, farmhouse aesthetic by lightly sanding the painted legs after they dry to expose some of the wood underneath, creating a distressed finish.
- Decorative Knobs or Hooks: Attach small decorative knobs to the sides for hanging leashes or small bags of treats.
- Storage Compartment: If you’re feeling ambitious, you could modify the design to include a small drawer or shelf beneath the bowls for storing dog toys or food.
- Different Wood Types: While scrap wood is economical, consider using specific wood types like pine, oak, or cedar for different looks and durability.
Maintenance and Care for Your DIY Dog Bowl Stand
To ensure your elevated dog bowl stand lasts for years, proper maintenance is key:
- Regular Cleaning: Wipe down the stand regularly with a damp cloth to remove any food or water splashes. The polycrylic finish makes this easy.
- Avoid Harsh Chemicals: Use mild soap and water for cleaning. Avoid abrasive cleaners or strong chemicals that could damage the wood finish.
- Check for Wear: Periodically inspect the stand for any signs of wear, loose joints, or chipping finish. Touch up paint or sealant as needed.
- Indoor Use: This stand is primarily designed for indoor use. If used outdoors, ensure it’s in a covered area and apply a marine-grade sealant for extra weather protection.
Conclusion: A Project That Pays Off in Wagging Tails
Building your own DIY elevated dog bowl stand is a wonderfully rewarding project that combines practicality with a personal touch. Not only do you get to engage in a fun crafting activity, but you also create a functional piece that significantly contributes to your pet’s health and comfort. With improved digestion, better posture, and a cleaner eating area, your dog will surely thank you with many happy tail wags.
Remember, the process is just as enjoyable as the outcome. Don’t be afraid to experiment with designs and finishes to make this stand truly yours. We encourage you to share your creations and inspire other pet owners to embark on their own DIY journey!
*All image credit belongs to The Daily DIYer via YouTube. Follow and subscribe to her channel for more inspiring DIY projects!