
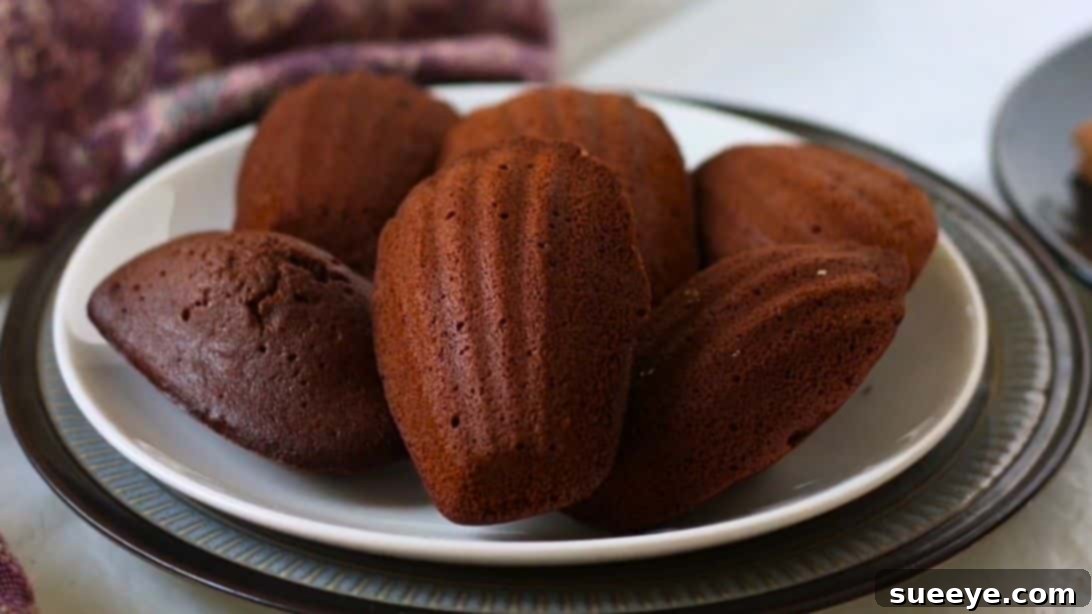
Indulge in Elegance: The Ultimate Guide to Baking Irresistible Chocolate Madeleines
Step into the delightful world of French patisserie with our easy-to-follow recipe for exquisite chocolate madeleines. Have you ever experienced the tender, cake-like texture, the rich cocoa flavor, and the distinctive shell-shaped charm of a perfectly baked madeleine? If not, prepare to embark on a culinary journey that will capture your heart and tantalize your taste buds. These iconic French treats brilliantly bridge the gap between a delicate cake and a satisfying cookie, offering a unique pleasure that’s simply unmatched.
Often enjoyed as an elegant accompaniment to your morning coffee or afternoon tea, chocolate madeleines are surprisingly simple to create at home. Forget complicated techniques or extensive ingredient lists; this recipe has been crafted for simplicity without compromising on flavor or that signature delicate crumb. You’ll be amazed at how easily you can bring these sophisticated delicacies to life in your own kitchen.
This comprehensive guide, inspired by the approachable methods often shared by renowned culinary channels like The Cookbook, will walk you through every step. From gathering your pantry staples to mastering the subtle art of the madeleine “hump,” we’ll ensure your baking adventure is a resounding success. Get ready to impress your friends and family with these melt-in-your-mouth chocolate wonders!
What Makes Chocolate Madeleines So Special?
Madeleines are small, shell-shaped sponge cakes with a distinctive bump on one side, a tell-tale sign of a perfectly baked batch. Hailing from the Lorraine region of France, they are steeped in tradition and renowned for their light, airy texture and delicate sweetness. When infused with rich cocoa powder, they transform into an even more indulgent treat, offering a deeper flavor profile that chocolate lovers simply can’t resist.
The beauty of chocolate madeleines lies in their subtle sophistication. They are not overly sweet or heavy, making them a perfect palate cleanser or a delightful sweet bite without being overwhelming. The tender interior, combined with a slightly crisp edge, provides a textural contrast that makes each bite a unique experience. Plus, their elegant appearance makes them ideal for special occasions, gifts, or simply elevating an everyday moment.
Why You’ll Love This Easy Chocolate Madeleines Recipe
Our recipe for chocolate madeleines stands out for its straightforward approach and delicious results. You don’t need to be a seasoned baker to achieve perfection. Here’s why this recipe will become your new favorite:
- Simplicity at its Best: With only a handful of common ingredients and clear instructions, anyone can master these French classics.
- Quick Preparation: The active preparation time is minimal, allowing you to whip up a batch whenever a craving strikes.
- Incredible Flavor: The balance of rich cocoa, subtle sweetness, and a hint of vanilla creates an unforgettable taste experience.
- Perfect Texture: Expect light, fluffy, and tender madeleines with that coveted crisp edge and characteristic hump.
- Versatile Treat: Ideal for breakfast, tea time, dessert, or as a thoughtful homemade gift.
Looking for more easy chocolate treats? Don’t miss these other fantastic recipes:
RELATED: Easy 3-Ingredient Chocolate Cake Recipe
RELATED: No-Bake Chocolate Balls Recipe
Essential Ingredients for Perfect Chocolate Madeleines
Crafting these delectable chocolate madeleines requires a few simple ingredients, each playing a crucial role in achieving the perfect flavor and texture. Quality ingredients always lead to superior results, so opt for the best you can find.
- All-Purpose Flour: The structural backbone of your madeleines. Sifting the flour is key to a light, airy texture, preventing lumps and ensuring even mixing.
- Cocoa Powder: This is where the rich chocolate flavor comes from. Using a good quality unsweetened cocoa powder, whether natural or Dutch-processed, will make a noticeable difference. Dutch-processed cocoa tends to be darker and milder, while natural cocoa is fruitier and more acidic. For this recipe, either will work beautifully.
- Granulated Sugar: Provides sweetness and helps achieve that delicate crispness on the edges. Ensure it’s fully dissolved for a smooth batter.
- Large Eggs: Act as a binder, provide structure, and contribute to the rich color and tender crumb of the madeleines. Room temperature eggs blend more easily.
- Melted Butter: Unsalted butter is preferred, allowing you to control the salt content. Melting the butter and then letting it cool prevents it from scrambling the eggs when added to the batter, and contributes to a moist, rich madeleine.
- Baking Powder: The leavening agent that helps your madeleines rise and develop their signature hump. Make sure it’s fresh for optimal activation.
- Salt: A small amount of salt enhances all the other flavors, particularly the chocolate, balancing the sweetness.
- Vanilla Essence (or Extract): Adds a beautiful aromatic depth, complementing the chocolate and rounding out the overall flavor profile.
- Honey (Optional but Recommended): A secret ingredient mentioned in the instructions, honey adds a subtle complexity, helps keep the madeleines moist, and contributes to a lovely golden-brown finish.
Gathering Your Tools: Beyond the Madeleine Pan
While the madeleine pan is undeniably the star tool for achieving the iconic shell shape, a few other essential items will ensure your baking process is smooth and enjoyable:
- Madeleine Pan: Absolutely crucial! A non-stick pan with shell-shaped indentations is highly recommended. Properly greasing and flouring your pan is vital to prevent sticking and ensure beautifully defined shells.
- Mixing Bowls: You’ll need at least two – one for dry ingredients and another for wet.
- Whisk: For thoroughly combining the wet ingredients and ensuring the sugar dissolves.
- Fine-Mesh Sieve: Essential for sifting flour, cocoa powder, baking powder, and salt to remove lumps and aerate the dry ingredients, leading to a lighter crumb.
- Rubber Spatula: Ideal for folding the dry ingredients into the wet and gently incorporating the butter, preventing overmixing.
- Piping Bag (Optional but Recommended): While you can spoon the batter into the molds, a piping bag offers more precision and less mess, ensuring an even distribution of batter.
- Cooling Rack: For allowing your baked madeleines to cool completely, preventing them from becoming soggy from trapped steam.
- Pastry Brush: Useful for thoroughly greasing your madeleine pan, especially into all the intricate shell details.
Chocolate Madeleines Ingredients
- 3/4 cup of all-purpose flour (sifted)
- 3 tablespoons of unsweetened cocoa powder (sifted)
- 1/2 cup and 1 tablespoon of granulated sugar (approximately 110g)
- 2 large eggs (at room temperature)
- 1/2 cup of unsalted butter, melted and cooled (113g)
- 1/2 teaspoon of baking powder
- 1/8 teaspoon of salt
- 1/2 teaspoon of vanilla essence
- 1 tablespoon of honey (optional, but highly recommended for flavor and texture)
Step-by-Step Guide: How to Make Chocolate Madeleines
Follow these detailed steps to create perfectly tender and delicious chocolate madeleines every time. Pay close attention to the tips for achieving that signature “hump”!
Step 1: Preparing the Dry Ingredients
Begin by meticulously sifting your dry ingredients. In a large bowl, sift together the all-purpose flour, baking powder, cocoa powder, and salt. Sifting is not just about removing lumps; it also aerates the dry ingredients, contributing to a lighter madeleine texture. Once sifted, give them a quick whisk to ensure they are thoroughly combined and set the bowl aside. This prevents clumps of baking powder or salt in your finished product.
Step 2: Combining Wet Ingredients for a Silky Batter
In a separate, medium-sized bowl, crack the two large eggs. Add the granulated sugar, vanilla essence, and the optional (but recommended) honey. Whisk these ingredients vigorously until the sugar is completely dissolved and the mixture is light, pale, and slightly frothy. This step is crucial for incorporating air and ensuring a smooth, uniform batter. The honey will add a lovely nuanced flavor and help with the madeleines’ characteristic browning.
Step 3: The Art of Folding and Chilling
Now, it’s time to bring the two mixtures together. Gradually add the dry mixture to the wet mixture in two or three batches. Use a rubber spatula to gently fold them until just combined. Be careful not to overmix, as this can develop the gluten in the flour, leading to tough madeleines. Once the dry ingredients are mostly incorporated, gently fold in the cooled melted butter until no streaks remain. The butter should be cool to the touch, not hot, to avoid cooking the eggs prematurely. Cover the bowl with plastic wrap and refrigerate the batter for at least one hour, or even overnight. This chilling period is a crucial secret to developing the madeleines’ iconic hump, as it allows the butter to solidify and the flavors to meld.
Step 4: Preparing the Madeleine Pan and Piping the Batter
While your batter chills, prepare your madeleine pan. Generously grease each shell cavity with softened butter, ensuring you get into every crevice, then dust lightly with flour, tapping out any excess. This step is vital to prevent sticking and ensure your madeleines release cleanly with their beautiful shell pattern intact. Preheat your oven to 356°F (180°C). Once the batter is chilled, transfer it to a piping bag (or a sturdy ziploc bag with a corner snipped off). This makes filling the molds much easier and neater. Squeeze the batter into the greased madeleine pan, filling each cavity approximately two-thirds full. Do not overfill, or your madeleines will overflow and lose their distinct shape.
Step 5: Baking to Perfection and Cooling
Place the madeleine pan into the preheated 356°F (180°C) oven. Bake for 10 to 15 minutes. The baking time can vary depending on your oven, so keep a close eye on them. The madeleines are done when they are golden brown around the edges and have developed their characteristic hump on top. A toothpick inserted into the center should come out clean. Once baked, remove the pan from the oven and let the madeleines sit in the pan for about 5 minutes. This allows them to firm up slightly before handling. After 5 minutes, gently invert the pan onto a wire cooling rack to release the madeleines. Let them cool completely on the rack to prevent them from becoming soggy. Serve immediately and enjoy the fruits of your labor!
Serving Suggestions: Elevate Your Chocolate Madeleines
While delicious on their own, chocolate madeleines can be further enhanced with simple elegant finishes:
- Simple Dusting: A classic approach is to dust them lightly with confectioners’ sugar (icing sugar) just before serving. This adds a touch of visual appeal and a delicate sweetness.
- Melted Chocolate Dip: For an extra layer of decadence, dip one end of each cooled madeleine into melted dark, milk, or even white chocolate. You can then sprinkle with chopped nuts, sprinkles, or cocoa nibs for added texture and visual flair.
- Glazed Perfection: A simple vanilla or orange zest glaze can add a bright contrast to the rich chocolate. Mix powdered sugar with a tiny bit of milk or citrus juice until you reach a drizzling consistency.
- Pairing Partners: Serve with a hot cup of coffee, a fragrant tea, a glass of cold milk, or even a scoop of vanilla bean ice cream for a delightful dessert experience.
- Citrus Zest: A little sprinkle of orange or lemon zest over the finished madeleines can add a refreshing counterpoint to the chocolate.
Tips for the Best Chocolate Madeleines
Achieving madeleine perfection is within reach with these key tips:
- Don’t Overmix: Overmixing develops gluten, leading to tough madeleines. Mix until just combined.
- Chill Your Batter: This is arguably the most important step for the “hump.” The cold batter hitting the hot oven creates a thermal shock that pushes the batter upwards.
- Thoroughly Grease Your Pan: Don’t skimp on butter and flour (or baking spray). Ensure every crevice of the shell molds is covered for easy release and beautiful definition.
- Don’t Overfill: Fill each cavity about two-thirds full. Overfilling will result in misshapen madeleines.
- Know Your Oven: Ovens vary, so the baking time might need slight adjustment. Watch for the golden edges and the prominent hump.
- Room Temperature Ingredients: Eggs and other dairy blend more smoothly when at room temperature, creating a more uniform batter.
- Fresh Leavening: Ensure your baking powder is fresh for optimal rise.
Storage and Shelf Life
Madeleines are truly best enjoyed fresh, ideally on the day they are baked, when their texture is at its peak. However, if you have leftovers:
- Room Temperature: Store cooled madeleines in an airtight container at room temperature for up to 2-3 days. They might lose a bit of their crispness, but the flavor will remain.
- Refrigeration: Not typically recommended, as refrigeration can dry out delicate baked goods.
- Freezing: For longer storage, freeze unadorned (without glazes or chocolate dips) madeleines in a single layer on a baking sheet until solid, then transfer to a freezer-safe bag or container for up to 1 month. Thaw at room temperature. You can gently warm them in a low oven for a few minutes to refresh their texture.
Chocolate Madeleine Variations to Explore
Once you’ve mastered the classic chocolate madeleine, feel free to experiment with these delightful variations:
- Zesty Chocolate: Add 1-2 teaspoons of finely grated orange or lemon zest to the wet ingredients for a bright, citrusy note that beautifully complements the chocolate.
- Nutty Madeleines: Fold in 1/4 cup of finely chopped toasted nuts (like pecans, walnuts, or almonds) with the dry ingredients for added crunch and flavor.
- White Chocolate Chip: Gently fold in 1/4 cup of mini white chocolate chips into the batter before chilling for pockets of creamy sweetness.
- Double Chocolate: After baking, dip the madeleines in melted chocolate and then sprinkle with cocoa nibs or chocolate shavings.
- Spice it Up: A pinch of cinnamon, cardamom, or even a tiny dash of cayenne pepper can add an interesting warmth and depth to the chocolate flavor.
Frequently Asked Questions About Madeleines
How do I get the “hump” on my madeleines?
The “hump” is the signature characteristic of a perfectly baked madeleine. It’s primarily achieved by two factors: chilling the batter thoroughly (at least an hour, preferably longer) and baking in a preheated hot oven. The cold batter hitting the hot pan creates a thermal shock, causing the edges to set quickly while the center continues to rise, forming that distinctive bump.
Why are my madeleines sticking to the pan?
Sticking is usually a result of insufficient greasing and flouring. Ensure you generously brush softened butter into every crevice of the madeleine pan and then dust thoroughly with flour, tapping out the excess. A non-stick pan is also highly recommended. If using an older pan, a thin layer of baking spray followed by a light dusting of flour can also work wonders.
Can I make the madeleine batter ahead of time?
Absolutely! In fact, making the batter ahead of time and chilling it for several hours or even overnight (up to 24-48 hours) can enhance the flavor and contribute to an even better hump. Just give it a gentle stir before piping into the molds if it has become too firm.
Are madeleines considered cookies or cakes?
This is a common debate! While they have a cookie-like appearance due to their small, individual size and often crisp edges, madeleines are technically considered miniature sponge cakes. Their light, airy, and tender crumb, along with their leavening agent (baking powder), aligns them more with cakes than with traditional cookies.
Conclusion: Your Journey to Madeleine Mastery
Baking chocolate madeleines is a rewarding experience that yields a truly elegant and delicious treat. With this detailed guide, you now possess all the knowledge and tips to create these French classics with confidence. From understanding the importance of chilling your batter to mastering the art of the perfect hump, you’re well on your way to becoming a madeleine connoisseur. Whether served plain, dusted with sugar, or dipped in chocolate, these delicate cakes are sure to bring joy to any occasion.
So, gather your ingredients, preheat your oven, and prepare to fill your kitchen with the irresistible aroma of freshly baked chocolate madeleines. Happy baking!