
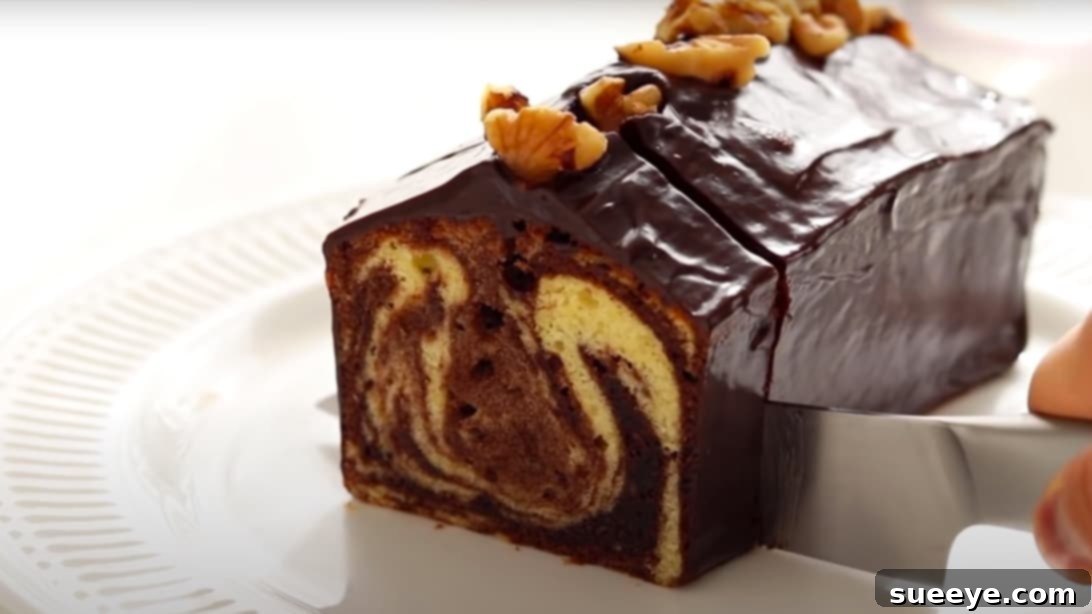
Easy & Decadent Chocolate Pound Cake Recipe: Your Guide to Perfection
As a lifelong chocoholic, I’ve always cherished the idea of ticking off every delightful chocolate creation from my culinary bucket list. From the comforting warmth of hot chocolate to the indulgent richness of a perfectly baked cake, the world of chocolate offers endless joys. One particular delight that long eluded me was the creation of a truly moist and wonderfully crunchy chocolate pound cake – until I stumbled upon the incredible HidaMari Cooking channel on YouTube. Their detailed guide helped me master the perfect balance of texture and flavor, finally allowing me to cross off a truly satisfying chocolate dish from my list!
This recipe isn’t just about baking a cake; it’s about crafting an experience. Imagine a dense yet tender crumb, infused with deep cocoa flavor, perfectly complemented by a luscious chocolate ganache and the subtle crunch of walnuts. Whether you’re a seasoned baker or just starting your culinary journey, this guide is designed to make the process enjoyable and the results absolutely irresistible. Get ready to impress yourself and your loved ones with this decadent treat that promises to be a new favorite.
Why This Chocolate Pound Cake Recipe is a Must-Try
What makes this chocolate pound cake stand out? It’s more than just a simple dessert; it’s a symphony of textures and flavors that will captivate your taste buds. Here’s why you’ll love baking and devouring this recipe:
- Unrivaled Moisture: Thanks to carefully balanced ingredients and precise techniques, this pound cake boasts an incredibly moist interior that practically melts in your mouth.
- Rich Chocolate Flavor: Utilizing both cocoa powder and high-quality couverture chocolate ensures a deep, complex chocolate profile that true enthusiasts will adore.
- Delightful Texture Contrast: The addition of almond flour provides a tender crumb, while the chocolate ganache and walnuts offer a satisfying crunch with every bite.
- Beginner-Friendly: While the results are gourmet, the steps are broken down into easy-to-follow instructions, making it accessible for bakers of all skill levels.
- Perfect for Any Occasion: Whether it’s a casual family gathering, a festive celebration, or just a treat for yourself, this pound cake is always a welcome addition.
The Essential Ingredients for Your Decadent Chocolate Pound Cake
Quality ingredients are the cornerstone of any great recipe. For this chocolate pound cake, choosing the right components will elevate your baking from good to extraordinary. Here’s what you’ll need:
- 7x16cm Pound Cake Pan: The perfect size for a classic loaf.
- 100g Unsalted Butter: Using unsalted butter allows you to control the salt content precisely. Ensure it’s at room temperature for optimal creaming.
- 40g Granulated Sugar: For sweetening the initial butter mixture.
- A Pinch of Salt: Enhances the chocolate flavor and balances the sweetness.
- 2 Egg Yolks: Adds richness, moisture, and helps with emulsification.
- 2 Egg Whites: Whipped separately, they introduce air for a lighter texture.
- 60g Granulated Sugar: For stabilizing and sweetening the egg whites to create a meringue-like icing.
- 70g Cake Flour: Low in protein, cake flour creates a tender, fine crumb, ideal for pound cakes.
- 30g Almond Flour: Contributes to the cake’s moistness and unique, delicate texture.
- 10g Pure Cocoa Powder: Provides the intense chocolate flavor. Opt for unsweetened Dutch-processed cocoa for a darker color and milder flavor.
- 50mL Heavy Cream (for cake batter): Adds moisture and richness to the batter.
- 80g Couverture Sweet Chocolate: High-quality couverture chocolate, with its higher cocoa butter content, melts smoothly and provides a superior taste for the ganache.
- 50mL Heavy Cream (for ganache): The base for your luxurious chocolate ganache.
- Walnuts (optional, for garnish): For an added crunch and elegant presentation.
Tip on Ingredients: Always measure your ingredients accurately, preferably by weight using a kitchen scale, for the most consistent results. Ensure eggs and butter are at room temperature as this helps them emulsify better, leading to a smoother batter and a more uniform cake texture.
Crafting Your Perfect Chocolate Pound Cake: A Step-by-Step Guide
Part 1: Preparing the Luxurious Cake Batter
Begin by preheating your oven to 170 degrees Celsius (approximately 340 degrees Fahrenheit). This ensures the oven is at the correct temperature when your batter is ready, promoting an even bake.
Take 100g of unsalted butter, ensuring it’s softened to room temperature, and place it in a large mixing bowl. Using an electric mixer or a whisk, beat the butter until it’s light, creamy, and has a paste-like texture. This process is crucial for creating air pockets that will contribute to the cake’s tenderness. Gradually add 40g of granulated sugar and a pinch of salt to the butter. Continue mixing until the sugar is fully incorporated and the mixture becomes pale and fluffy, about 3-5 minutes. Scrape down the sides of the bowl periodically to ensure even mixing.
In a separate bowl, crack two eggs and carefully separate the yolks from the whites. Add the two egg yolks to your creamed butter and sugar mixture, whisking well after each addition until fully incorporated. The mixture should become smooth and homogenous. Once the yolks are blended in, set the bowl aside.
Now, it’s time to prepare the egg whites. In a clean, dry bowl, beat the two egg whites with your electric mixer on medium-high speed until soft peaks form. Gradually add 60g of granulated sugar, a tablespoon at a time, while continuing to beat. Increase the speed to high and beat until stiff, glossy peaks form. This meringue-like mixture will add significant lightness to your pound cake.
Gently fold a large spoonful of the whipped egg whites into your butter and egg yolk mixture. This helps to lighten the heavier batter, making it easier to incorporate the remaining whites without deflating them. Next, sift together 70g of cake flour and 30g of almond flour directly over the batter. Sifting ensures there are no lumps and helps aerate the flours. Gently fold the dry ingredients into the batter using a spatula until just combined. Be careful not to overmix, as this can develop the gluten in the flour, resulting in a tough cake.
In a small bowl, combine 10g of pure cocoa powder with 50ml of heavy cream. Mix this with a spatula until smooth and lump-free. Add this cocoa-cream mixture to the main batter, along with the remaining whipped egg whites. Using a gentle folding motion, combine all ingredients until just uniformly blended. The goal is to retain as much air as possible in the batter. Prepare your 7x16cm pound cake pan by lining it with parchment paper, ensuring it overhangs slightly on the sides for easy removal. Pour the exquisite batter into the prepared mold, smoothing the top with your spatula.
Part 2: Baking to Golden Perfection
Carefully place the pound cake mold into your preheated oven at 170 degrees Celsius. Bake for 45 to 50 minutes. Baking times can vary depending on your oven, so keep an eye on it. To check for doneness, insert a wooden skewer or toothpick into the center of the cake; if it comes out clean, your cake is ready. The top should be golden brown and spring back when lightly touched.
Once baked, remove the cake from the oven and let it cool in the pan for about 10-15 minutes. Then, using the parchment paper overhang, gently lift the cake out of the mold and transfer it to a wire rack to cool completely. Allowing the cake to cool fully before glazing is crucial to prevent the ganache from melting or sliding off. Once cooled, cover the cake loosely with plastic wrap to prevent it from drying out while you prepare the ganache.
Part 3: The Decadent Chocolate Ganache
While your cake cools, it’s time to prepare the rich chocolate ganache. Finely chop 80g of couverture sweet chocolate. The smaller the pieces, the faster and more evenly the chocolate will melt. You may also roughly chop some walnuts if you plan to use them as a topping. Place the chopped chocolate in a heatproof bowl.
In a small saucepan or microwave-safe bowl, gently heat 50ml of heavy cream until it reaches about 60 degrees Celsius (140 degrees Fahrenheit), or until small bubbles just start to form around the edges. Do not boil the cream. Pour the hot cream directly over the chopped chocolate. Let it sit for 2-3 minutes without stirring, allowing the heat from the cream to melt the chocolate. Then, starting from the center, gently whisk the mixture with a spatula or small whisk until it becomes smooth, glossy, and fully emulsified. If using, fold in the chopped walnuts into the ganache for an added texture and flavor dimension.
Part 4: Final Touches and Chilling
Once your pound cake is completely cool, unwrap it. Pour the prepared chocolate ganache over the top of the cake, allowing it to drip attractively down the sides. Use a spatula to gently spread the ganache evenly if needed. For a beautiful finish, artistically place the walnuts (if not mixed into the ganache) on the top center of the cake, pressing them slightly so they adhere. This not only adds visual appeal but also a delightful textural contrast.
To set the ganache, place the cake in the refrigerator for about 10-15 minutes. This quick chill will help the ganache firm up, making it easier to slice and handle. Once chilled and set, your magnificent chocolate pound cake is ready to be served. Slice into generous portions and prepare to enjoy every savory, sweet, and satisfying bite.
Tips for Baking the Best Chocolate Pound Cake
- Room Temperature Ingredients: Always ensure your butter and eggs are at room temperature. This helps them emulsify properly, creating a smoother batter and a finer-textured cake.
- Don’t Overmix: After adding the flour, mix just until combined. Overmixing develops gluten, which can lead to a tough, dry cake.
- Accurate Measurements: Baking is a science. Use a kitchen scale for precise measurements, especially for flour and sugar, to ensure consistent results.
- Oven Temperature: Ovens can vary. Consider using an oven thermometer to ensure your oven is truly preheated to 170°C (340°F).
- Parchment Paper is Your Friend: Lining the pan with parchment paper not only prevents sticking but also makes it incredibly easy to remove the cake from the mold.
- Cooling Patience: Allow the cake to cool completely on a wire rack before applying ganache. A warm cake will melt the ganache, creating a messy result.
- Quality Chocolate for Ganache: Using good quality couverture chocolate for your ganache makes a significant difference in taste and texture.
Delicious Variations and Customizations
While this recipe is perfect as is, feel free to get creative and customize your chocolate pound cake to suit your preferences:
- Coffee Infusion: Add 1-2 teaspoons of instant espresso powder to the cocoa powder mixture for a deeper, richer chocolate flavor that coffee lovers will adore.
- Citrus Zest: Incorporate the zest of one orange or tangerine into the batter for a bright, refreshing counterpoint to the chocolate.
- Nutty Twist: Instead of walnuts, try pecans, hazelnuts, or even toasted almonds in the ganache or as a topping.
- Spice It Up: A pinch of cinnamon or a tiny dash of cayenne pepper can add a subtle warmth and complexity to the chocolate.
- Boozy Treat: A tablespoon or two of Kahlúa, rum, or Grand Marnier can be brushed onto the cooled cake before adding the ganache, or mixed into the ganache itself.
- Cream Cheese Glaze: For a different topping, whip up a simple cream cheese glaze instead of ganache for a tangy contrast.
Storage and Serving Suggestions
This chocolate pound cake is delicious on its own, but here are some ideas to make it even more special:
- Storage: Store the cooled cake in an airtight container at room temperature for up to 3-4 days. If it’s warm, or if your kitchen is very warm, it can be refrigerated for up to a week, but bring it to room temperature before serving for the best texture.
- Serving: Enjoy slices with a scoop of vanilla bean ice cream, a dollop of fresh whipped cream, or a side of fresh berries like raspberries or strawberries. A hot cup of coffee or a cold glass of milk makes for a perfect pairing.
- Freezing: This pound cake freezes beautifully. Wrap individual slices or the whole cake (without ganache, if possible) tightly in plastic wrap, then in foil, and freeze for up to 3 months. Thaw at room temperature before serving.
Frequently Asked Questions (FAQ)
Q: Can I use all-purpose flour instead of cake flour?
A: Yes, you can substitute all-purpose flour, but your cake might be slightly denser. To mimic cake flour, remove 2 tablespoons of all-purpose flour per cup and replace it with 2 tablespoons of cornstarch, then sift it thoroughly.
Q: My ganache is too thin/thick. What can I do?
A: If your ganache is too thin, let it cool at room temperature for a bit longer, or refrigerate for 5-10 minutes, stirring occasionally, until it thickens. If it’s too thick, gently warm it over a double boiler or in the microwave for a few seconds, stirring until it reaches the desired consistency. You might need to add a tiny splash more warm cream.
Q: How do I know if my eggs and butter are at room temperature?
A: Butter should be soft enough to make a slight indentation with your finger, but not melted or greasy. Eggs should not feel cold to the touch. You can quickly warm eggs by placing them in a bowl of warm (not hot) water for 5-10 minutes.
Q: Can I make this cake in a different sized pan?
A: Yes, but you’ll need to adjust baking times. A wider pan might bake faster, while a smaller, deeper pan might take longer. Always use the toothpick test to confirm doneness.
Enjoy Your Homemade Chocolate Pound Cake!
There’s immense satisfaction in baking a delicious dessert from scratch, and this easy chocolate pound cake recipe is no exception. With its rich flavor, moist crumb, and simple preparation, it’s destined to become a beloved staple in your kitchen. So gather your ingredients, follow these steps, and prepare to indulge in a truly spectacular homemade treat. Happy baking, and enjoy every delightful slice!