
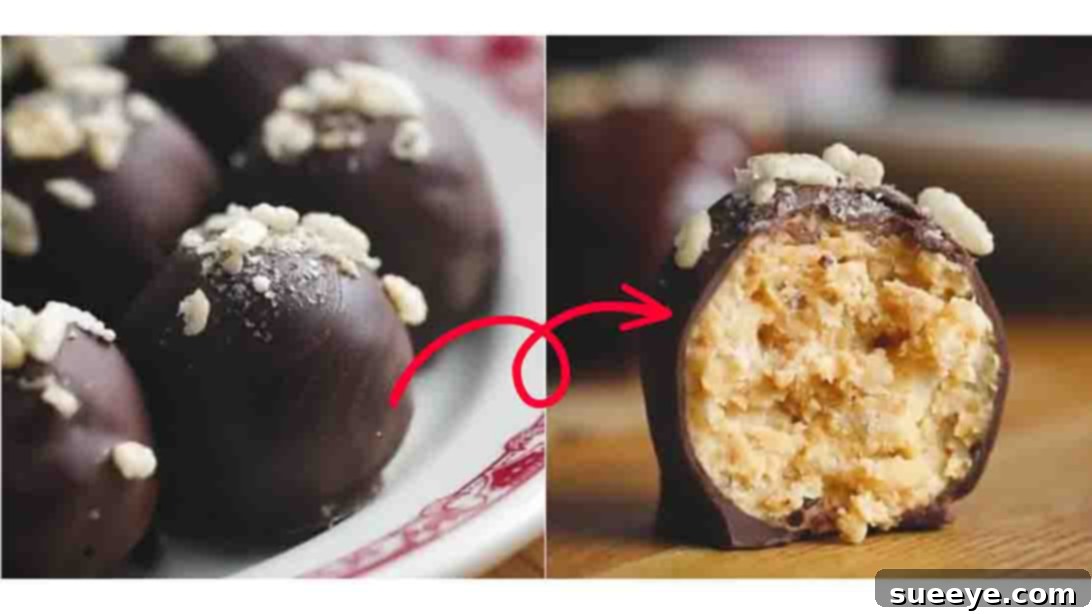
Irresistible No-Bake Chocolate Peanut Butter Balls: Your Ultimate Guide to a Quick & Delicious Dessert
Craving a delightful homemade treat that’s both easy to make and incredibly satisfying? Look no further than these crispy, decadent Chocolate Peanut Butter Balls. This no-bake recipe is a true game-changer, promising a burst of flavor and a perfect texture without ever needing to turn on your oven. In under 30 minutes, you can whip up a batch of these glorious confections, making them ideal for last-minute guests, a quick snack, or a delightful dessert for your family. They’re so utterly delicious, you might find yourself reaching for ‘just one more’ throughout the day!
Inspired by a fantastic recipe from Tasty on YouTube, these peanut butter balls require only five simple ingredients, most of which are likely already staples in your pantry. The combination of rich peanut butter, sweet powdered sugar, crunchy rice cereal, and a smooth chocolate coating creates an irresistible harmony that appeals to all ages. Once you try this recipe, we’re confident it will become a beloved fixture in your dessert repertoire. Get ready to impress your taste buds and loved ones with this effortlessly amazing treat!
Why You’ll Fall in Love with These No-Bake Delights
- Effortless & Quick: Say goodbye to long baking sessions! This recipe comes together in less than 30 minutes, making it perfect for busy schedules.
- No Oven Required: Keep your kitchen cool, especially during warmer months. No baking means less fuss and more fun.
- Irresistible Flavor Combination: The classic pairing of chocolate and peanut butter is a match made in heaven, guaranteed to satisfy any sweet craving.
- Kid-Friendly & Fun: A fantastic recipe to make with children. They’ll love helping to mix ingredients and roll the balls.
- Simple Ingredients: You likely have all five core ingredients in your pantry right now, making this a spontaneous dessert option.
- Perfect for Any Occasion: Whether it’s a casual snack, a party dessert, a potluck contribution, or a holiday treat, these balls are always a hit.
- Customizable: Easily adapt the recipe with various toppings or chocolate types to suit your preferences.
Ingredients You’ll Need
Gathering your ingredients is the first step to creating these delightful treats. Ensure your butter is softened for easy mixing!
- 1/2 cup of Salted Butter, softened: The butter helps bind the mixture and adds a rich, creamy texture. Salted butter perfectly complements the sweetness of the other ingredients, balancing the flavors.
- 2 cups of Creamy Peanut Butter: The star of the show! Opt for a smooth, creamy peanut butter for the best consistency. Natural peanut butter might be too oily and alter the texture, so a standard processed creamy variety is recommended here.
- 3 cups of Powdered Sugar: Also known as confectioners’ sugar, this finely milled sugar ensures a smooth, non-gritty texture in your peanut butter balls. It dissolves easily and contributes to the melt-in-your-mouth quality.
- 3 cups of Crispy Rice Cereal: This essential ingredient adds that satisfying crunch that elevates these treats from simply delicious to absolutely incredible. Have a little extra on hand for an optional topping, if desired.
- 2 cups of Chocolate Chunks, for coating: While the recipe calls for chunks, you can flexibly use high-quality chocolate chips, melting wafers, or even a good quality chocolate bar, finely chopped. Dark chocolate offers a sophisticated contrast, semi-sweet is a crowd-pleaser, and milk chocolate provides extra sweetness – choose your personal favorite!
Essential Kitchen Equipment
You won’t need much, just a few basic items to get started on your chocolate peanut butter ball adventure:
- Large Mixing Bowl
- Microwave-Safe Bowl (for melting chocolate and warming butter/peanut butter)
- Sturdy Spatula or Wooden Spoon (for mixing)
- Parchment Paper
- Baking Tray (or any flat tray that fits comfortably in your freezer)
- Small Saucepan (optional, if melting chocolate on stovetop using a double boiler method)
- Deep Bowl or Mug (for easy dipping of the peanut butter balls into chocolate)
Step-by-Step Directions to Heavenly Bites
Follow these simple instructions to create your own batch of irresistible no-bake chocolate peanut butter balls. For a comprehensive visual guide and additional insights, don’t forget to watch the original video from Tasty!
Step 1: Prepare the Peanut Butter Base and Chill
Begin by combining 1/2 cup of softened salted butter with 2 cups of creamy peanut butter in a generously sized mixing bowl. The butter should be at true room temperature for optimal blending, ensuring a smooth and consistent base for your treats. Place this mixture into a microwave and heat it for approximately one minute. This gentle warming process is key, as it helps to further soften both the peanut butter and butter, making them incredibly pliable and much easier to mix evenly. Once warmed, use a sturdy spatula or spoon to stir the ingredients vigorously until they are thoroughly combined, smooth, and creamy. This forms the foundational rich and flavorful texture of your peanut butter balls.
Next, progressively add 3 cups of powdered sugar and 3 cups of crispy rice cereal to the warm butter and peanut butter mixture. The powdered sugar should be added gradually to prevent a cloud of sugar dust. Gently fold these dry ingredients into the wet mixture using your spatula. The primary goal here is to incorporate everything without overly crushing the crispy rice cereal, as its crunch is vital to the final texture. Continue mixing until all ingredients are well combined and a firm, cohesive, and moldable dough-like consistency is achieved. The mixture should be sticky enough to hold together but manageable enough to roll by hand.
Once your mixture is perfectly combined, begin forming it into individual bite-sized balls. The size is entirely up to your preference, but aiming for consistency, such as balls approximately 1 to 1.5 inches in diameter, ensures even chilling and dipping. As you form each ball, place it neatly onto a baking tray that has been lined with parchment paper. The parchment paper serves a dual purpose: it prevents the balls from sticking to the tray and makes cleanup virtually effortless. Once all the balls are formed and arranged on the tray, transfer them to the freezer for a minimum of fifteen minutes. This crucial chilling step helps them firm up significantly, ensuring they maintain their perfect spherical shape and integrity when they are subsequently coated in chocolate.
Step 2: Coating with Delicious Chocolate and Finishing Touches
While your perfectly chilled peanut butter balls are firming up in the freezer, it’s the ideal time to prepare the luscious chocolate coating. In a separate microwave-safe bowl (or utilizing a double boiler method on the stovetop for more control), melt 2 cups of your chosen chocolate chunks. For those who prefer a richer, less intensely sweet flavor, dark chocolate is an excellent choice. However, semi-sweet or even milk chocolate will also yield wonderfully delicious results. If using a microwave, heat the chocolate in short, 30-second intervals, stirring thoroughly after each interval, until the chocolate is completely smooth, glossy, and fully melted. Exercise caution to avoid overheating the chocolate, which can cause it to seize or become grainy.
Once the fifteen minutes of chilling are complete, carefully retrieve your now firm peanut butter balls from the freezer. Working efficiently and quickly, take each ball and fully immerse it into the warm, melted chocolate, ensuring it’s completely coated. A fork, a specialized candy dipping tool, or even a sturdy toothpick can be invaluable at this stage, helping you achieve an even coating and allowing any excess chocolate to drip away cleanly. Gently tap the fork or tool against the side of the bowl to remove any drips before transferring the freshly coated ball back to your parchment-lined baking tray.
Repeat this dipping process for all your crispy rice peanut butter balls. As an optional but highly recommended step, immediately after coating each ball and before the chocolate begins to set, sprinkle some additional crispy rice cereal on top. This not only enhances the visual appeal but also adds an extra layer of delightful texture. Once all the balls are coated and topped (if desired), allow the chocolate to harden completely. This can be done at room temperature, which takes a bit longer, or by placing the tray in the refrigerator for quicker setting. Once the chocolate is firm and set, your delightful no-bake chocolate peanut butter balls are perfectly ready to be savored and enjoyed!
Tips for Perfect No-Bake Peanut Butter Balls Every Time
Achieving perfection with these simple treats is easy with a few insider tips:
- Ensure Butter is Softened, Not Melted: Your salted butter should be at room temperature, soft enough to easily indent but not oily or completely melted. This ensures proper emulsion and texture in your base mixture.
- Choose the Right Peanut Butter: For consistent results, stick to creamy, processed peanut butter (like Jif or Skippy). Natural peanut butter, especially the varieties that separate, tends to be runnier and can make the mixture too soft or greasy, affecting the final texture and stability of the balls.
- Gentle Mixing for Cereal: When incorporating the crispy rice cereal, fold it in gently with your spatula. Overmixing or stirring too vigorously can crush the cereal, diminishing that essential satisfying crunch that makes these balls so special.
- Chilling is Non-Negotiable: Do not skip or shorten the freezer step! Chilling the peanut butter balls thoroughly makes them firm and much easier to handle when dipping in chocolate. This prevents them from falling apart or becoming messy during the coating process.
- Melt Chocolate with Care: Whether using a microwave or a double boiler, melt chocolate slowly and stir frequently. This gradual approach prevents the chocolate from burning, seizing (becoming thick and clumpy), or becoming grainy. Low and slow is the key to perfectly smooth melted chocolate.
- Adjust Chocolate Consistency: If your melted chocolate appears too thick for smooth dipping, you can stir in a small amount (1/2 to 1 teaspoon) of coconut oil or vegetable shortening. This will thin it out and make it easier to achieve an even, thin coat.
- Work Efficiently During Dipping: Once the balls are out of the freezer, they will gradually begin to soften. Work relatively quickly when dipping them in chocolate. If they become too soft to handle, simply pop them back into the freezer for another 5-10 minutes to firm up.
- Utilize a Dipping Tool: A standard fork, a specialized candy dipping tool, or even a sturdy toothpick can be incredibly helpful for dipping. These tools allow excess chocolate to drip off, ensuring a smooth, even coating and minimizing mess on your hands.
Delicious Variations and Customizations
While the classic chocolate peanut butter ball is undeniably perfect, there’s always room to get creative and tailor them to your taste or occasion. Here are some fantastic ideas to customize your next batch:
- Experiment with Chocolate Types: Don’t limit yourself to just one! Experiment with white chocolate for a sweeter, creamier finish, milk chocolate for a classic familiar taste, or a blend of dark and semi-sweet for varied flavor profiles and complex notes.
- Toppings Galore: Before the chocolate sets, sprinkle with a variety of fun toppings. Ideas include shredded coconut, mini chocolate chips (milk, dark, or white), finely chopped nuts (peanuts, pecans, almonds, walnuts), colorful sprinkles for festive occasions, or even a delicate drizzle of contrasting chocolate.
- Flavor Extracts: Introduce an extra layer of flavor by adding a teaspoon of pure vanilla extract to the peanut butter mixture. For a seasonal twist, a few drops of peppermint extract during the holidays can be delightful, or almond extract for a marzipan-like hint.
- Spice It Up: A pinch of ground cinnamon can add a warm, comforting note to the peanut butter mixture. For the adventurous adult palate, a tiny dash of cayenne pepper introduces a surprising, subtle warmth that perfectly complements the chocolate.
- Nut-Free Alternative: For those with peanut allergies or dietary restrictions, this recipe can often be adapted using sunflower seed butter (like SunButter) or almond butter. Be aware that the texture might vary slightly, requiring minor adjustments to the amount of powdered sugar to achieve the desired consistency.
- Protein Boost: For a more substantial treat, mix in a scoop of your favorite protein powder (unflavored or vanilla works best) into the peanut butter mixture. You might need to adjust the amount of powdered sugar slightly to maintain the correct texture and sweetness.
Storage Instructions: Keeping Your Treats Fresh
These no-bake chocolate peanut butter balls are not only delicious but also store wonderfully, allowing you to enjoy them for days or even weeks!
- At Room Temperature: If stored in an airtight container in a cool, dry place away from direct sunlight and heat, these treats can last for up to 3-4 days. However, be mindful that the chocolate coating may soften, especially in warmer environments. For optimal firmness and freshness, refrigeration is usually preferred.
- In the Refrigerator: For peak freshness and to keep the chocolate coating perfectly firm, store your chocolate peanut butter balls in an airtight container in the refrigerator. They will remain fresh and delicious for up to 1-2 weeks. For the best texture, allow them to come to room temperature for a few minutes before serving, or enjoy them chilled straight from the fridge for a firmer bite.
- Freezing for Long-Term Storage: These balls freeze exceptionally well, making them an excellent make-ahead option! To freeze, first place the fully coated and set balls in a single layer on a parchment-lined tray and freeze until completely solid (this prevents them from sticking together). Once frozen, transfer them to an airtight, freezer-safe container or a heavy-duty freezer bag. They can be stored in the freezer for up to 2-3 months. When ready to enjoy, thaw them in the refrigerator for a few hours or at room temperature for a quicker treat.
Frequently Asked Questions (FAQs)
- Can I use natural peanut butter for this recipe?
- While it’s possible, we highly recommend using creamy, processed peanut butter (like Jif or Skippy) for the best results. Natural peanut butter, especially the “stir” varieties, tends to be oilier and can make the mixture too soft or greasy, altering the desired texture of the balls.
- My chocolate seized or became too thick after melting. What went wrong?
- Chocolate can seize if it comes into contact with even a tiny drop of water (including steam) or if it’s overheated. To attempt to salvage overly thick chocolate, you can try stirring in a small amount (1/2 to 1 teaspoon) of coconut oil, vegetable shortening, or a neutral oil like canola until it reaches a desired, smooth consistency. Be careful not to add too much at once.
- Can I make these chocolate peanut butter balls ahead of time for a party?
- Absolutely! These are fantastic make-ahead treats, perfect for parties, holidays, or meal prepping for snacks. You can prepare them several days in advance and store them in the refrigerator, or even freeze them for up to a few months, making entertaining a breeze.
- Are these no-bake chocolate peanut butter balls gluten-free?
- Yes, by nature, this recipe is often gluten-free. However, to ensure they are completely gluten-free, make sure to use certified gluten-free crispy rice cereal and verify that all your other ingredients, especially the chocolate, do not contain any hidden gluten-containing additives.
- How many balls does this recipe typically yield?
- The exact yield can vary slightly depending on the size you choose to make your peanut butter balls. On average, this recipe typically produces a generous batch of about 30-40 medium-sized (1 to 1.5-inch diameter) delicious treats.
Whip Up Your Own Batch of Happiness!
There you have it – a comprehensive, step-by-step guide to crafting the most delightful and irresistible no-bake chocolate peanut butter balls. This recipe beautifully proves that you don’t need to be a seasoned baker or spend countless hours in the kitchen to create something truly special and incredibly delicious. With minimal effort, straightforward ingredients, and maximum flavor, these crispy, rich, chocolate-covered treats are guaranteed to bring immediate smiles to faces and effortlessly satisfy even the most intense sweet cravings.
So, what are you waiting for? Gather your simple ingredients, follow these easy-to-understand steps, and prepare to embark on a delicious journey that culminates in a batch of homemade happiness. Whether you’re making them for your cherished family, a lively party, a thoughtful gift, or simply for your own personal indulgence, these chocolate peanut butter balls are sure to become a consistently cherished favorite. Don’t forget to check out the original video by Tasty on YouTube for more fantastic recipe inspiration and visual guidance!