
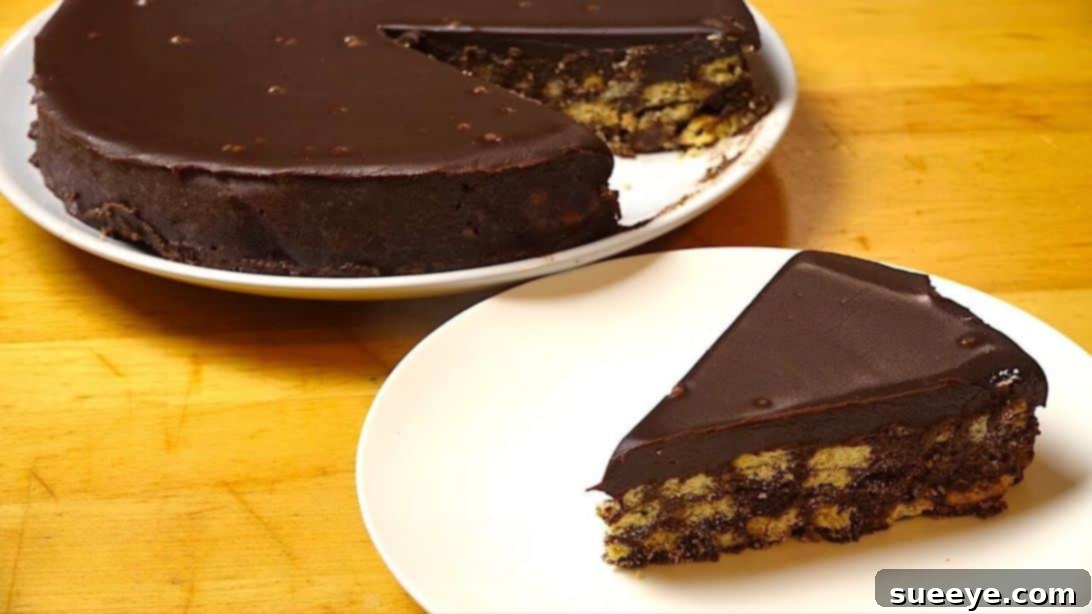
Are you craving an utterly delightful chocolate dessert that requires no oven and minimal effort? Look no further! This Easy No-Bake Chocolate Crunch Cake, inspired by the culinary brilliance of OnePotChefShow, is a true game-changer. It’s the perfect solution for satisfying your sweet tooth, impressing guests, or simply indulging in a rich, chocolatey treat without the hassle of traditional baking.
This remarkable crunch cake has quickly become a beloved staple in our recipe collection, celebrated for its incredible simplicity and the fact that it effortlessly comes together without ever touching an oven. It’s a dessert that perfectly marries two irresistible textures: a deeply satisfying, crunchy chocolate base, expertly contrasted with a velvety, smooth chocolate ganache that crowns it with pure decadence. The combination creates a harmonious symphony of flavors and textures that will leave you craving more, making it an ideal choice for any occasion.
Why Opt for a No-Bake Dessert? The Allure of Simplicity and Speed
In today’s fast-paced world, finding time for elaborate baking can often be a challenge. That’s precisely where no-bake desserts truly shine. They offer a fantastic, convenient alternative for busy schedules, for those warm summer days when you want to avoid heating up your kitchen, or for novice bakers looking for a foolproof recipe that guarantees success. This specific chocolate crunch cake embodies all these incredible benefits and more:
- Effortless Preparation: Say goodbye to complex techniques, precise oven temperatures, and specialized baking equipment. This recipe is designed for simplicity, making it accessible to everyone.
- Time-Saving: The active preparation time for this cake is remarkably minimal. Most of your waiting will be dedicated to the essential chilling process, allowing you to focus on other tasks.
- Foolproof Results: With fewer variables than traditional baking, there’s significantly less room for error. This makes it an ideal and confidence-boosting recipe, especially for beginners.
- Perfect for Any Season: While it’s a lifesaver in the summer, keeping your kitchen cool, its rich flavor profile also makes it a comforting treat in colder months.
- Always Impressive: Despite its incredible ease of creation, the final presentation of this cake is consistently stunning, making it a showstopper at potlucks, parties, or family dinners.
RELATED DELIGHTS: If you’re a fan of the convenience and deliciousness of no-bake treats, be sure to explore our No-Bake Coffee Chocolate Cheesecake Recipe for another fantastic dessert option that masterfully combines rich flavors with incredible ease. Additionally, for another quick and satisfying chocolate fix, don’t miss our No-Bake Chocolate Clusters Recipe.
To embark on your journey to creating this delectable no-bake chocolate crunch cake, you’ll need a handful of readily available, high-quality ingredients. These include plain sweet crackers or digestive biscuits, which form the satisfying crunch of the base, unsalted butter for binding, rich cocoa powder to infuse the base with deep chocolate flavor, white sugar for balanced sweetness, fresh milk to moisten, high-quality dark chocolate for the luxurious ganache, and luscious whipping cream to create that irresistible velvety topping. The beauty of this recipe lies not only in its simplicity but also in its flexibility; if plain sweet crackers aren’t on hand, digestive biscuits make an excellent, equally delicious substitute, offering a similar texture and mild sweetness that perfectly complements the robust chocolate elements.
The entire process of assembling this cake is incredibly straightforward, almost therapeutic in its simplicity. The only real “hard part,” if you can even call it that, is the patience required to allow it to properly set in the refrigerator. This chilling time is absolutely crucial for the cake to achieve its ideal texture and structure. But trust us, every moment of waiting is absolutely worth it when you take that first glorious bite. We wholeheartedly encourage you to give this cake a try – we are supremely confident that its delightful crunch, intense chocolate flavor, and smooth finish will win your heart and become a cherished recipe in your culinary repertoire!
Essential Ingredients for Your Easy Chocolate Crunch Cake
Crafting this phenomenal no-bake dessert begins with a careful selection of simple, yet high-quality ingredients. Each component plays a crucial role in building the layers of flavor and texture that make this chocolate crunch cake so special and utterly irresistible. Here’s a detailed look at what you’ll need to gather:
- 18 ounces of Plain Sweet Cookies or Crackers: These form the crunchy, foundational layer of your cake. Popular choices include digestive biscuits, Graham crackers, or even plain shortbread cookies. The key is to select a relatively mild-flavored biscuit that allows the rich chocolate to take center stage, and one that crushes easily to create the desired texture for the base.
- 1/2 cup and 3 tablespoons of Unsalted Butter: Butter is absolutely essential for binding the crushed cookie crumbs together, transforming them into a firm yet delightful base that holds its shape. Using unsalted butter is recommended as it gives you precise control over the overall saltiness of your dessert.
- 1/2 cup of Unsweetened Cocoa Powder: This ingredient is responsible for imparting that deep, rich chocolate flavor into your crunchy base. For the best possible outcome, opt for a good quality unsweetened cocoa powder. Both natural and Dutch-processed cocoa powder will work, though Dutch-processed typically yields a darker color and a slightly milder chocolate flavor.
- 3/4 cup of White Sugar: This amount of sugar is carefully calibrated to provide the perfect balance of sweetness to your chocolate base, effectively complementing the unsweetened cocoa and preventing the base from tasting too bitter.
- 1 cup of Milk: Milk serves a vital role by moistening the base mixture, ensuring that it comes together smoothly and sets correctly. While any milk will suffice, using whole milk will add an extra layer of richness to your base.
- 10.6 oz of Dark Chocolate: This is unequivocally the star ingredient for your luxurious ganache topping. Using a high-quality dark chocolate (ideally with a cocoa solid percentage between 60-70%) will bestow a profound, intense chocolate flavor upon your ganache. You can use chocolate chips, a finely chopped bar, or dedicated baking chocolate. Avoid using milk chocolate, as it tends to make the ganache excessively sweet and can alter its setting consistency.
- 1 cup of Whipping Cream: The essential partner to dark chocolate, whipping cream is crucial for creating that silky-smooth, pourable, and ultimately luscious ganache. Ensure you use heavy cream or whipping cream with a minimum fat content of 35%; this higher fat content is paramount for the ganache to properly emulsify and set into the desired decadent consistency.
Ingredient Quality Tip: While the overall recipe is straightforward, the quality of your ingredients, particularly the dark chocolate and cocoa powder, will significantly impact the final taste and luxuriousness of your cake. Investing in good quality chocolate will undoubtedly elevate your ganache from merely good to absolutely sublime and memorable.
Mastering the No-Bake Chocolate Crunch Cake: A Step-by-Step Guide to Decadence
Let’s dive into the simple, yet incredibly rewarding process of assembling this magnificent no-bake dessert. Follow these detailed steps carefully, and you’ll soon be enjoying a slice of chocolate heaven, crafted with ease and precision.
Step 1: Preparing Your Crunchy Base – The Cookie Foundation
The culinary journey begins with the creation of the perfect crunchy base. Take your chosen plain sweet cookies or crackers and gently break them into small, manageable pieces. You have a few options for this: you can break them by hand for a more rustic, varied texture, or for a more uniform crumb, place them in a sturdy Ziploc bag and crush them thoroughly with a rolling pin. Alternatively, a food processor can achieve a finer, more consistent crumb, but be cautious not to over-process them into a powder; the goal is to retain distinct small pieces to ensure that satisfying crunch. Once crushed to your liking, transfer these pieces into a spacious mixing bowl. This bowl will soon house the entire base mixture. Set it aside for a brief moment.
Step 2: Dry Ingredients for the Base – A Flavorful Start
In a separate, large mixing bowl, combine your dry ingredients for the base layer. Add 3/4 cup of white sugar and 1/2 cup of unsweetened cocoa powder. Using a whisk or a fork, stir these together thoroughly. It is essential to ensure there are no lumps of cocoa powder, as these can lead to an uneven chocolate distribution and an inconsistent flavor in your base. A well-mixed dry foundation is absolutely key to a uniformly flavored and appealing crunch layer. Once combined, set this bowl aside; it’s patiently waiting for its liquid partners.
Step 3: Melting the Wet Ingredients – Creating the Binding Liquid
Now, it’s time to bring the binding elements of your base to life. Place a medium-sized saucepan over a low to medium heat setting. Add the unsalted butter, which you should ideally cut into smaller chunks to facilitate faster and more even melting. Pour in 1 cup of fresh milk. Gently and continuously stir the mixture until the butter is completely melted and has seamlessly incorporated into the milk. The primary goal here is simply to warm the milk enough to melt the butter, not to bring it to a boil. Once the butter is fully melted and the mixture is warm and smooth, immediately remove the saucepan from the heat. Overheating at this stage can potentially affect the texture and overall flavor of your base.
Step 4: Combining Wet and Dry – Crafting the Chocolate Base Mixture
With careful precision, pour the warm butter-milk mixture from the saucepan directly into the bowl containing your dry ingredients (the sugar and cocoa powder). Using a whisk, vigorously combine the wet and dry ingredients. Whisk until the mixture is completely smooth, glossy, and all the sugar crystals have visibly dissolved. You might need to periodically scrape the sides and bottom of the bowl to ensure everything is thoroughly incorporated and no dry pockets remain. This process creates a rich, homogeneous chocolatey liquid that will perfectly bind your crushed cookie crumbs.
Step 5: Coating the Biscuits – Ensuring the Perfect Crunch Factor
Now, pour this smooth, lustrous chocolate liquid mixture directly over the broken biscuits or crackers you prepared in Step 1. Grab a spatula and gently, yet thoroughly, stir the mixture. Your primary aim here is to ensure that every single piece of biscuit or cracker is evenly and completely coated with the rich chocolate liquid. This step is absolutely crucial for achieving a uniform flavor throughout the base and for ensuring that the base holds its shape beautifully once chilled. Be mindful not to over-mix; you want to coat the pieces without crushing them further into a paste. The desired outcome is a cohesive, yet distinctly crunchy mixture.
Step 6: Assembling the Base – The Foundation for Decadence
Prepare your cake pan for perfection. Take a 9-inch spring-form cake pan – the spring-form design is incredibly beneficial as it allows for remarkably easy cake removal later without disturbing its structure. Lightly spray the entire inside surface of the pan with a cooking spray. Then, meticulously line both the bottom and the sides of the pan with parchment paper. This parchment paper acts as your secret weapon, ensuring a clean release and maintaining pristine, sharp edges for your cake. Carefully transfer the chocolate-coated biscuit mixture into the prepared pan. Using the back of a spoon or a flat spatula, gently but firmly press the mixture down, spreading it evenly across the entire bottom of the pan. Ensure the top surface is as smooth and level as possible. Once compacted, place the pan into the refrigerator for a minimum of 30 minutes. This crucial initial chilling time allows the butter in the base to firm up significantly, creating a solid, stable, and perfectly set foundation for your impending ganache layer.
Step 7: Crafting the Silky Chocolate Ganache – The Crown Jewel
While your base chills and firms up, it’s the perfect time to create the luxurious chocolate ganache that will crown your cake. In a microwave-safe bowl, combine your high-quality dark chocolate (whether in chip form or a finely chopped bar) and the whipping cream. Give the mixture a quick stir to ensure that the chocolate pieces are somewhat submerged in the cream. Place the bowl into the microwave and heat on the high setting for approximately 2 minutes. Please note that the exact heating time may vary slightly depending on your microwave’s wattage, so it’s always wise to keep a close eye on it. Once the microwave cycle is complete, resist the immediate urge to stir. Instead, let the bowl stand undisturbed for 1 minute; this crucial standing time allows the residual heat from the cream to thoroughly melt the chocolate. After 1 minute, use a whisk or spatula to gently stir the mixture. Begin stirring from the center of the bowl and gradually work your way outwards. Continue stirring patiently until the ganache is utterly smooth, beautifully glossy, and completely emulsified, with absolutely no visible lumps of chocolate remaining. Once smooth, allow the ganache to cool for a couple of minutes at room temperature. It should still be pourable but slightly thickened, ensuring it’s not piping hot when it meets your chilled base.
Step 8: The Grand Pour and Chill – Unifying the Layers
Retrieve your perfectly chilled chocolate crunch cake base from the refrigerator. Carefully and evenly pour the slightly cooled, silky chocolate ganache over the compacted biscuit base. Gently shake the pan from side to side to help the ganache spread uniformly and create a beautifully smooth, level top surface. For an even more professional finish and to eliminate any trapped air bubbles that might mar the surface, gently thump the pan a few times on your countertop. This helps release any bubbles that might otherwise create imperfections on the surface. Once you are satisfied with the spread, carefully place the cake back into the refrigerator. This is the most crucial chilling phase, allowing the ganache to firm up and set beautifully. Allow it to chill for a minimum of 2 to 3 hours, or ideally, until it is completely firm and set to the touch. Patience at this stage is absolutely key for achieving a picture-perfect, easy-to-slice dessert.
Step 9: Serving Your Masterpiece – The Moment of Truth
Once your no-bake chocolate crunch cake has thoroughly chilled and the ganache is completely firm and set, it’s finally time for the grand reveal! Carefully release the spring-form pan and gently peel away the parchment paper from both the sides and the bottom of the cake. This should be an effortless process thanks to your earlier preparation. Carefully transfer the pristine cake to a serving plate or stand. For clean, neat slices that do justice to your creation, use a sharp knife that has been warmed slightly under hot running water and then meticulously wiped dry between each cut. This simple trick will prevent the ganache from sticking to the knife and creating unsightly drags, ensuring every slice is as perfect as the last. Slice into generous portions, serve immediately, and prepare for a chorus of compliments from your delighted guests. Enjoy every single crunchy, intensely chocolatey, and wonderfully smooth bite!
Tips for No-Bake Chocolate Crunch Cake Perfection:
- Quality Matters: As emphasized, using good quality dark chocolate and unsweetened cocoa powder will profoundly enhance the flavor profile and luxuriousness of your cake. Don’t skimp on these key ingredients.
- Chilling is Crucial: Never rush the chilling process. A properly set cake is not only firm and easy to slice, but it also delivers the optimal texture contrast between the crunchy base and the creamy ganache. If you’re slightly short on time, placing the cake in the freezer for about 30-60 minutes can speed up the setting process, but be careful not to freeze it solid.
- Even Base: When pressing the biscuit mixture into the pan, ensure you compact it firmly and evenly. A consistent base guarantees that your cake holds together well and looks visually appealing.
- Ganache Consistency: The ganache should be smooth and easily pourable, but critically, it should not be too hot when it’s poured onto the chilled base. If it’s too warm, it might slightly melt the base. Conversely, if it’s too cool, it might become too thick to pour and spread smoothly. Aim for a slightly thickened, warm (not hot) consistency.
- Clean Slices: A sharp knife warmed under hot water and wiped dry between each slice is your ultimate tool for achieving professional-looking, clean-cut portions.
Creative Variations and Serving Suggestions:
While this cake is absolutely sublime on its own, there are endless opportunities to customize it and make it uniquely yours, adding exciting new dimensions of flavor and texture:
- Nutty Crunch: For an extra layer of flavor and crunch, try adding 1/2 cup of finely chopped toasted nuts, such as pecans, walnuts, or almonds, directly into your biscuit base mixture.
- Coffee Kick: Incorporate 1-2 teaspoons of instant espresso powder or very strong instant coffee granules into your ganache mixture along with the chocolate. Coffee has a magical way of enhancing chocolate flavor without making the cake taste overtly like coffee.
- Zesty Twist: A hint of fresh orange zest (approximately 1 teaspoon) mixed into the ganache can provide a bright, complementary citrusy note that beautifully cuts through the richness of the dark chocolate.
- Fruity Pairing: Serve individual slices of the cake with a side of fresh, tart berries like raspberries or strawberries, or a vibrant dollop of raspberry coulis. The acidity of the fruit provides a delightful contrast to the rich chocolate.
- Caramel Drizzle: For an extra layer of indulgence, a light drizzle of homemade or good quality store-bought caramel sauce over each slice just before serving can be absolutely heavenly.
- Sprinkle Fun: For a festive or celebratory touch, generously sprinkle the top of the set ganache with colorful sprinkles, delicate chocolate shavings, or a light dusting of high-quality cocoa powder.
- Sea Salt Finish: A tiny pinch of flaky sea salt sprinkled over the top of the ganache just as it begins to set can wonderfully enhance and intensify the chocolate’s deep flavor profile, adding a sophisticated touch.
Your Ultimate No-Bake Chocolate Crunch Cake Awaits!
There you have it – a comprehensive, easy-to-follow guide to creating a truly show-stopping No-Bake Chocolate Crunch Cake. This recipe stands as a testament to the fact that you don’t need to be a seasoned baker or own a fancy, high-tech oven to create truly spectacular and utterly delicious desserts. With its irresistible combination of a crispy, intensely chocolatey base and a smooth, luxurious ganache, this cake is destined to become a firm favorite for any occasion, whether it’s a grand celebration, a casual family dinner, or simply a comforting treat on a lazy weekend afternoon. Its effortless preparation makes it an accessible delight for everyone.
So, gather your ingredients, follow these straightforward steps with confidence, and get ready to experience the pure joy and satisfaction of a homemade dessert that’s as easy to make as it is profoundly delightful to eat. We sincerely hope that you and your loved ones enjoy this incredible chocolate crunch cake as much as we do. Happy dessert making!