
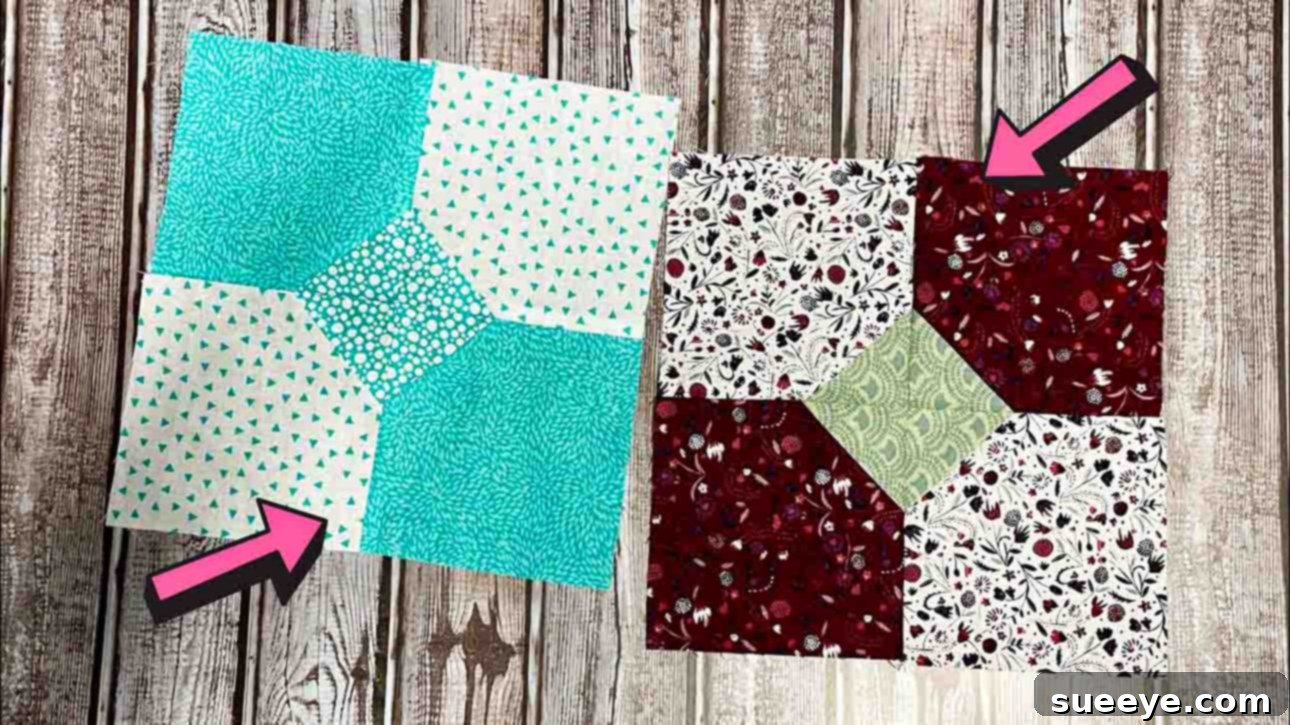
Mastering the Easy Bow Tie Quilt Block: A Beginner’s Guide to Fat Quarter Quilting
The timeless charm of a quilted item is undeniable, and among the myriad of quilt block patterns, the Bow Tie block stands out as a beloved classic. Its simple yet captivating design makes it an ideal project for quilters of all skill levels, especially those just starting their quilting journey. If you’re looking to create a beautiful baby quilt, a cozy lap quilt, or even add a touch of handmade elegance to home decor, learning to make the Bow Tie quilt block is an excellent place to begin.
This comprehensive guide will walk you through the process, transforming readily available fat quarters into a delightful Bow Tie block. We’ll leverage the straightforward techniques demonstrated by Cut and Create on YouTube, expanding on each step to ensure clarity and provide valuable tips for success. Get ready to embark on a rewarding creative adventure, turning fabric into a functional work of art!
Why Choose the Bow Tie Quilt Block?
The Bow Tie quilt block has been a favorite in the quilting community for generations, and for good reason. Its distinctive shape, reminiscent of a neatly tied bow, offers a playful yet sophisticated aesthetic. This block is incredibly versatile; depending on your fabric choices and how you arrange multiple blocks, you can achieve vastly different looks, from traditional and vintage to modern and whimsical. For beginners, its construction involves basic sewing techniques like straight seams and diagonal stitching, making it an excellent pattern to build confidence and refine your skills without feeling overwhelmed. Plus, it’s a fantastic way to utilize those gorgeous fat quarter bundles you’ve been collecting!
Essential Materials and Tools for Your Quilt Block
Before you dive into cutting and sewing, gather all your necessary materials and tools. Having everything organized will make the process smoother and more enjoyable. This project is specifically designed to work wonderfully with fat quarters, which are pre-cut fabric pieces typically 18×22 inches, offering a diverse selection of patterns and colors perfect for small projects or building a varied fabric stash.
Materials:
- Fat Quarters: For a single Bow Tie block as described in this tutorial, you will need two coordinating fat quarters. One fat quarter will serve as your primary fabric (Fabric A and B), and a contrasting or complementary fat quarter will be used for the accent pieces (Fabric C). Choosing fabrics with good contrast will help your “bow tie” design truly pop! If you plan to make multiple blocks for a larger quilt, you will need additional fat quarters, typically two bundles will provide enough variety and quantity.
- All-Purpose Sewing Thread: Select a high-quality thread that matches or blends with your fabrics. Polyester thread is strong and durable, suitable for most quilting projects.
- Quilting Pins or Fabric Clips: Essential for holding fabric pieces securely in place before and during sewing, ensuring accuracy.
Tools:
- Rotary Cutter: A sharp rotary cutter is indispensable for precise and efficient fabric cutting. Ensure your blade is sharp for clean edges.
- Quilting Ruler: A clear acrylic quilting ruler with precise measurements is crucial for accurate cutting. Look for one with clear markings for inches and often half-inch or quarter-inch increments.
- Self-Healing Cutting Mat: Protect your work surface and prolong the life of your rotary cutter blade with a good quality self-healing mat.
- Sewing Machine: Any basic sewing machine capable of a straight stitch will work perfectly. Ensure it’s clean and threaded correctly.
- Iron and Ironing Board: Pressing seams open or to one side is a vital step in quilting for flat, professional-looking blocks. A good steam iron is highly recommended.
- Fabric Marker or Pencil: A fabric-friendly marker or pencil (erasable or disappearing ink) is needed for drawing diagonal lines on your fabric squares.
Step-by-Step Directions: Crafting Your Bow Tie Quilt Block
Accuracy is key in quilting, especially with cutting and seam allowances. Take your time with each step to ensure your finished block is perfectly square and the design is crisp. For this tutorial, we will focus on creating a single Bow Tie block, approximately 9.5 inches unfinished, using specific measurements. These measurements are ideal for achieving the classic look.
Step 1: Precision Cutting and Initial Assembly
Let’s begin by preparing our fabric pieces. For clarity, we’ll refer to your chosen fat quarters as ‘Fat Quarter 1’ (for your main colors, Fabric A and B) and ‘Fat Quarter 2’ (for your contrasting accent, Fabric C).
- From Fat Quarter 1: Cut two 5-inch squares for what we’ll call “Fabric A” and two 5-inch squares for “Fabric B.” These will form the main segments of your bow tie.
- From Fat Quarter 2: Cut four 2.5-inch squares for “Fabric C.” These smaller squares will create the distinctive ‘knot’ or center of your bow tie.
Preparing Your Accent Pieces: Take your four 2.5-inch Fabric C squares. On the wrong side of each square, use your fabric marker or pencil and your ruler to draw a diagonal line from one corner to the opposite corner. This line will serve as your sewing guide.
Attaching the Corner Units: Now, take one of your 5-inch squares (either Fabric A or B). Position two of the 2.5-inch Fabric C squares on opposite corners of the 5-inch square. Align them precisely, with the drawn diagonal line facing inwards, towards the center of the larger square. Pin them securely. Sew directly along the diagonal line you just drew. Repeat this process for all four of your 5-inch squares (two Fabric A and two Fabric B), attaching two 2.5-inch Fabric C squares to opposite corners of each.
Trimming and Pressing: After sewing, carefully trim the excess fabric a quarter of an inch away from each stitch line. This removes bulk and creates a neat seam allowance. Now, iron these sewn corner units open. Pressing is crucial for flat blocks; gently press the seam allowance towards the darker fabric or open, whichever you prefer, ensuring your fabric lies smooth and flat. You will now have four larger squares, each with two contrasting corners sewn onto them.
Step 2: Assembling the Bow Tie Block
With your four units from Step 1 prepared, it’s time to bring your bow tie to life. Each of these units now has a main fabric square with two smaller accent triangles on opposing corners. The next step is to arrange these four units to form the complete Bow Tie block design.
Arranging Your Units: Lay out your four sewn units on your work surface. Arrange them into two rows, with two units in each row. The key is to orient them so that the smaller accent triangles create the “bow” and “knot” effect when the blocks are joined. Typically, you’ll want the accent triangles to point towards the center of the intended block, forming a square in the middle where they meet.
Sewing the Rows: Take the two units in your top row and place them right sides together, aligning the raw edges. Pin carefully, ensuring any seams match up as perfectly as possible to maintain accuracy. Stitch them together using a consistent quarter-inch seam allowance. Repeat this for the two units in the bottom row. Press the seams open or to one side, again, ensuring the fabric is perfectly flat.
Joining the Rows: Now you have two completed rows. Place these two rows right sides together, aligning the center seam where the four units will meet. This is a critical point for a tidy finish, so take extra care to nest your seams (if pressing to one side) or align them perfectly (if pressing open). Pin generously. Sew the two rows together with a quarter-inch seam allowance.
Final Pressing: After sewing the final seam, open up your block and give it a thorough press. This last press will set all your seams and ensure your finished Bow Tie block is crisp, flat, and ready for its next stage. Your beautiful Bow Tie block is now complete!
Tips for Quilting Success with Your Bow Tie Blocks
To ensure your quilting journey is smooth and your Bow Tie blocks are perfect every time, consider these valuable tips:
- Precision is Paramount: In quilting, even a slight inaccuracy in cutting or sewing can compound over multiple blocks. Always use your rotary cutter and ruler carefully, measuring twice and cutting once. Maintain a consistent quarter-inch seam allowance throughout your project.
- Pressing, Not Ironing: When we talk about pressing in quilting, it means lifting and placing the iron down, rather than sliding it back and forth. This prevents distorting your fabric pieces. Decide whether to press seams open or to one side (usually towards the darker fabric to prevent “shadowing” on lighter fabrics) and be consistent.
- Chain Piecing: If you’re making multiple Bow Tie blocks, consider chain piecing. This involves sewing several units together one after another without lifting the presser foot or cutting the thread between them. This saves time and thread.
- Fabric Selection Matters: Experiment with different fabric combinations. High contrast fabrics will make your bow tie design pop, while subtle differences can create a more blended, sophisticated look. Don’t be afraid to mix prints and solids!
- Square Up Your Blocks: After completing each Bow Tie block, it’s a good practice to “square it up” to your desired finished size (e.g., 9 inches or 9.5 inches). This involves trimming any excess fabric to ensure all your blocks are perfectly uniform, which makes assembling the full quilt much easier.
Beyond the Block: Creative Project Ideas
A single Bow Tie quilt block is a wonderful achievement, but its true magic lies in its potential for larger projects. Here are a few ideas to inspire you:
- Charming Baby Quilt: This is a classic choice for the Bow Tie block. A quilt made of 9-12 blocks would be a perfect size for a baby. Arrange them in a simple grid, or alternate them with plain squares for a varied look.
- Cozy Lap Quilt or Throw: For a larger project, consider a lap quilt or throw. You might need 20-30 blocks, depending on the desired size. Experiment with different settings, like setting the blocks on point (diagonally) for an added visual dynamic.
- Decorative Pillow Cover: One or two Bow Tie blocks can be transformed into a beautiful decorative pillow cover, adding a handmade touch to your living space.
- Table Runner or Placemats: A row of 3-5 Bow Tie blocks sewn together makes an eye-catching table runner. Individual blocks can also be used as unique placemats.
- Tote Bag or Pouch Accent: Incorporate a single Bow Tie block as a focal point on a handmade tote bag, pouch, or even a book cover for a personalized accessory.
Conclusion: Embrace Your Quilting Journey
You’ve successfully learned how to create the charming Bow Tie quilt block! This versatile and classic pattern is a fantastic addition to any quilter’s repertoire, offering endless possibilities for creativity and functional art. From baby quilts to decorative accents, the skills you’ve honed here will serve as a strong foundation for future quilting endeavors.
Remember that quilting is a journey of learning and discovery. Don’t be afraid to experiment with different fabrics, colors, and arrangements. Each stitch you make adds to your skill set and brings you closer to creating something truly unique and beautiful. We encourage you to watch the original Cut and Create tutorial on YouTube again for a visual reference and to help solidify your understanding. Happy quilting, and enjoy the satisfaction of seeing your fabric pieces come together into this delightful design!