
Super Easy Baked Pumpkin Donuts: The Ultimate Fall Comfort Food Recipe
As the leaves begin to turn vibrant shades of red and gold, and the crisp autumn air whispers promises of cozy evenings, there’s one flavor that consistently captures the essence of the season: pumpkin. If you’re searching for a delightful, hassle-free way to bring that warm, inviting taste into your home, look no further than these incredibly easy baked pumpkin donuts. Inspired by the brilliant simplicity of Preppy Kitchen’s method, this recipe delivers donuts that are not just delicious but also wonderfully soft, moist, and practically melt in your mouth. Forget the fuss of deep-frying; these baked beauties come together in minutes, making them the perfect treat for breakfast, a delightful snack, or a charming dessert for any fall gathering.
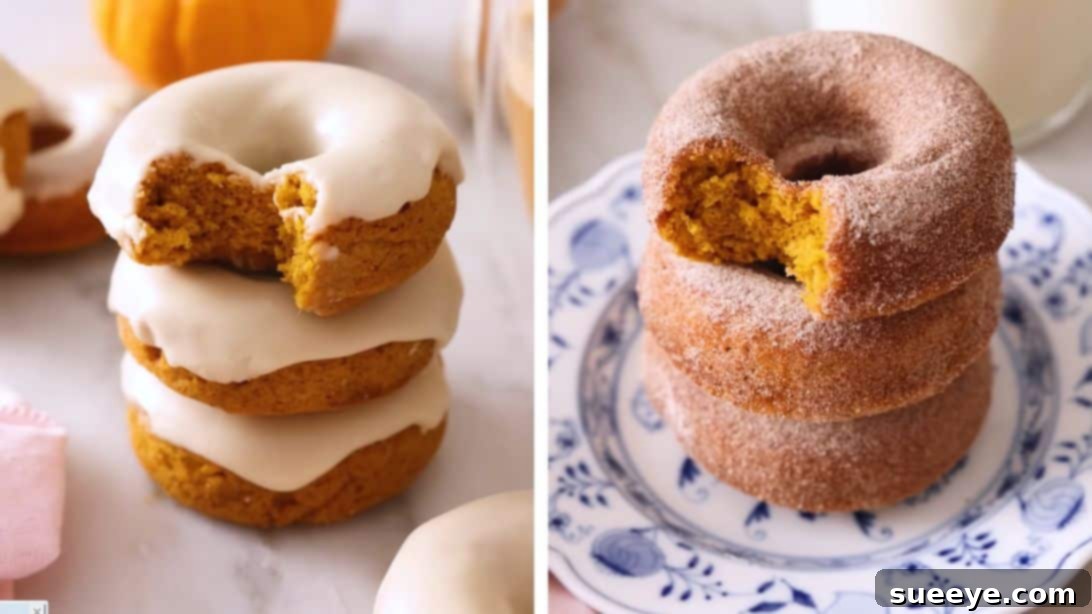
Whether you choose to adorn them with a luscious homemade maple glaze, adding a touch of sophisticated sweetness, or roll them in a comforting cinnamon sugar mixture for that classic, irresistible appeal, these pumpkin donuts are guaranteed to be a hit. They’re a celebration of autumnal flavors, effortlessly bringing warmth and joy to your kitchen. Get ready to bake your way to pure pumpkin bliss!
Why You’ll Fall in Love with This Baked Pumpkin Donut Recipe
- Effortlessly Easy: This recipe simplifies donut making, eliminating the need for yeast or deep-frying. Perfect for beginners and seasoned bakers alike.
- Incredible Flavor: Packed with real pumpkin puree and a generous blend of pumpkin pie spices, every bite is a taste of autumn.
- Perfect Texture: Baked to perfection, these donuts are wonderfully soft, moist, and delightfully fluffy – a truly melt-in-your-mouth experience.
- Quick to Make: From mixing bowl to oven, you’ll have freshly baked donuts ready in under 30 minutes, making them ideal for spontaneous cravings or last-minute guests.
- Versatile Toppings: Customize your donuts with a rich maple glaze or a classic cinnamon sugar coating, offering two equally delicious ways to enjoy them.
- Healthier Alternative: Baking instead of frying significantly reduces the fat content, allowing you to indulge a little more guilt-free.
Essential Ingredients for Your Homemade Baked Pumpkin Donuts
Crafting the perfect baked pumpkin donut starts with a selection of fresh, high-quality ingredients. Each component plays a crucial role in achieving that desirable moist texture and robust autumnal flavor. Here’s what you’ll need for the donuts themselves, followed by the delightful topping options.
For the Fluffy Pumpkin Donuts:
- 1 3/4 cups All-Purpose Flour: The foundational structure of our donuts. Sifting it ensures a light and airy crumb.
- 2 teaspoons Pumpkin Pie Spice: The heart of the flavor! This blend typically includes cinnamon, nutmeg, ginger, and cloves, delivering that quintessential fall aroma and taste.
- 1/2 teaspoon Baking Powder: A leavening agent that helps the donuts rise and achieve their fluffy texture.
- 1/4 teaspoon Baking Soda: Another leavener that reacts with acidic ingredients (like pumpkin puree) to create lift and tenderness.
- 1/4 teaspoon Salt: Enhances all the other flavors, balancing the sweetness and making the pumpkin and spice notes truly sing.
- 1 cup Pumpkin Puree: The star ingredient, providing moisture, natural sweetness, and that distinct pumpkin flavor. Ensure it’s 100% pure pumpkin, not pie filling.
- 1/2 cup Granulated Sugar: Contributes to the overall sweetness and helps create a tender crumb.
- 1/2 cup Firmly Packed Light Brown Sugar: Adds a deeper, molasses-rich sweetness and extra moisture, making the donuts incredibly tender.
- 1/4 cup Vegetable Oil: Keeps the donuts moist and tender without adding an overpowering flavor. Can also use canola or another neutral oil.
- 1 Large Egg: Acts as a binder, providing structure and richness to the batter.
- 2 teaspoons Vanilla Extract: A crucial flavor enhancer that complements the pumpkin and spices beautifully.
For the Irresistible Maple Glaze:
This simple yet elegant glaze adds a beautiful sheen and a delightful maple flavor that pairs perfectly with the pumpkin. It’s incredibly easy to whisk together while your donuts cool.
- 1 cup Powdered Sugar: The base of the glaze, creating a smooth and sweet coating.
- 2 tablespoons Maple Syrup: Provides the signature maple flavor and a touch of extra sweetness. Use pure maple syrup for the best results.
- 2 teaspoons Milk or Water: Used to thin the glaze to the perfect dipping consistency. You may need a little more or less depending on desired thickness.
For the Classic Cinnamon Sugar Coating:
A timeless topping that offers a comforting warmth and a delightful texture. This coating is best applied while the donuts are still warm, allowing the sugar to adhere beautifully.
- 1/2 cup Granulated Sugar: The primary component for the sweet, crunchy coating.
- 1 1/2 teaspoons Ground Cinnamon: Infuses the coating with that unmistakable warm spice.
- Melted Butter: Optional, but highly recommended! A light brush of melted butter helps the cinnamon sugar stick perfectly to the donuts.
Equipment You’ll Need for Baking Success
Having the right tools on hand will make your pumpkin donut baking experience smooth and enjoyable. Most of these are standard kitchen items, but a donut pan is key!
- Donut Pans (2 x 6-well): Essential for achieving the classic donut shape. Non-stick pans are highly recommended.
- Large Mixing Bowls (2): One for dry ingredients, one for wet.
- Whisk: For combining ingredients smoothly.
- Sifter or Fine-Mesh Sieve: For sifting dry ingredients, ensuring no lumps and a lighter texture.
- Rubber Spatula or Wooden Spoon: For folding the batter.
- Piping Bag or Large Ziploc Bag: Makes filling the donut wells much easier and less messy.
- Measuring Cups and Spoons: For accurate ingredient measurements.
- Wire Rack: For cooling the donuts and allowing glazes to set.
- Toothpicks: For checking doneness.
- Small Bowl (for glazes/cinnamon sugar): For dipping and coating.
- Pastry Brush (optional): If using melted butter for the cinnamon sugar coating.
Step-by-Step Instructions: Baking Your Perfect Pumpkin Donuts
Follow these detailed steps carefully, and you’ll be enjoying warm, homemade baked pumpkin donuts in no time. Precision and a little patience will yield the best results!
Step 1: Prepare Your Baking Environment
Begin by setting your oven to preheat to 350°F (175°C). This ensures a consistent temperature from the moment your donuts enter the oven, promoting even baking. While the oven heats, take out your donut pans. Lightly grease two 6-well donut pans with butter or a non-stick baking spray, then dust with a little flour. This crucial step prevents sticking and helps ensure your beautifully shaped donuts release effortlessly after baking. Proper pan preparation is the secret to perfectly intact donuts.
Step 2: Combine the Dry Ingredients
In a large mixing bowl, meticulously sift together all the dry ingredients: the all-purpose flour, pumpkin pie spice, baking powder, baking soda, and salt. Sifting is important as it removes any lumps, aerates the flour, and ensures that the leavening agents and spices are evenly distributed throughout the mixture. This will contribute to a lighter, more uniform texture in your finished donuts.
Step 3: Whisk Together the Wet Ingredients
In a separate large bowl, combine your wet ingredients. Add the pumpkin puree, both granulated sugar and firmly packed light brown sugar, vegetable oil, large egg, and vanilla extract. Using a whisk, vigorously beat these ingredients together until they are thoroughly combined and the mixture appears smooth and well-emulsified. The brown sugar will dissolve nicely, lending a rich, moist base to your donut batter.
Step 4: Gently Combine Wet and Dry Mixtures
Now, it’s time to bring the two mixtures together. Pour the wet ingredients into the bowl with the sifted dry ingredients. Using a rubber spatula or wooden spoon, gently fold the mixture until just combined. Be careful not to overmix! Overmixing can develop the gluten in the flour too much, leading to tough, dense donuts. A few small streaks of flour are acceptable at this stage. Once combined, transfer the batter into a piping bag (or a large Ziploc bag with one corner snipped off). Pipe the dough evenly into the prepared donut pan wells, filling each about 1/2 to 2/3 full. This amount ensures the donuts rise properly without overflowing their molds, creating that perfect shape.
Step 5: Bake and Cool to Perfection
Carefully place the donut pans into your preheated oven. Bake for approximately 12 to 15 minutes. Baking times can vary slightly depending on your oven, so keep an eye on them. To check for doneness, gently insert a toothpick into the center of a donut; if it comes out clean, your donuts are perfectly baked and ready. Avoid overbaking, as this can lead to dry donuts. Once baked, remove the pans from the oven and let the donuts cool in the pans for about 5 minutes. This brief cooling period allows them to firm up slightly before you attempt to remove them, preventing breakage. After 5 minutes, carefully transfer them to a wire rack to cool completely before glazing or coating, unless you’re applying cinnamon sugar which adheres best to warm donuts.
Step 6: Craft the Decadent Maple Glaze
While your donuts are cooling, prepare the luscious maple glaze. In a medium bowl, sift the powdered sugar. Sifting prevents lumps and ensures a silky-smooth glaze. Next, whisk in the maple syrup until fully incorporated. Finally, gradually add the milk or water, starting with 2 teaspoons, and whisk until you achieve a smooth, pourable consistency. If the glaze is too thick, add a few more drops of liquid; if too thin, stir in a little more powdered sugar. Once your donuts are still slightly warm but not hot, dip the tops into the glaze, allowing any excess to drip off. Place the glazed donuts back on the wire rack to allow the glaze to set beautifully.
Step 7: Coat with Classic Cinnamon Sugar
If you prefer the comforting simplicity of cinnamon sugar, prepare this coating. In a medium bowl, combine the granulated sugar and ground cinnamon, stirring until well mixed. For the best adhesion, it’s crucial that the donuts are warm when coated. If your donuts have cooled too much, you can lightly brush them with a small amount of melted butter first. Then, gently toss each warm donut in the cinnamon sugar mixture, turning to ensure an even and generous coating. The warmth helps the sugar and cinnamon stick, creating a delightful crunchy exterior that perfectly complements the soft interior.
Tips for Perfect Baked Pumpkin Donuts Every Time
Achieving bakery-quality baked donuts at home is easier than you think with these expert tips:
- Don’t Overmix the Batter: Overmixing develops gluten, which can lead to tough, chewy donuts. Mix just until the dry ingredients are incorporated into the wet.
- Use Room Temperature Ingredients: Eggs and pumpkin puree at room temperature emulsify better with other ingredients, creating a smoother, more uniform batter.
- Proper Pan Preparation is Key: Always grease and lightly flour your donut pans, even if they are non-stick, to prevent sticking and ensure easy release.
- Fill Pans Correctly: Don’t overfill the donut wells. Filling them 1/2 to 2/3 full allows for proper rising without overflow, maintaining the classic donut shape.
- Monitor Baking Time Closely: Ovens vary, so start checking your donuts at the 12-minute mark. Overbaking can make them dry.
- Cool Properly: Let donuts cool in the pan for a few minutes before transferring to a wire rack. This helps them firm up and prevents them from breaking.
- Adjust Glaze Consistency: For the maple glaze, adjust with more powdered sugar if too thin, or more milk/water if too thick, until you reach your desired dipping consistency.
- Cinnamon Sugar Adhesion: For the best cinnamon sugar coating, ensure your donuts are warm. A light brush of melted butter before tossing can also significantly help the sugar stick.
Delicious Variations and Customizations
While these baked pumpkin donuts are perfect as is, you can always get creative and customize them to your liking:
- Nutmeg Twist: Add a pinch of freshly grated nutmeg to your pumpkin donut batter for an extra layer of warmth and aroma.
- Chocolate Chip Surprise: Fold in 1/4 to 1/2 cup of mini chocolate chips into the batter for a delightful chocolatey touch.
- Cream Cheese Glaze: For a richer topping, whip up a simple cream cheese glaze instead of maple. Combine softened cream cheese, powdered sugar, milk, and vanilla.
- Streusel Topping: Before baking, sprinkle a crumbly streusel (flour, sugar, cold butter, cinnamon) over the donut batter for a delicious crunch.
- Spiced Sugar Dust: Instead of plain cinnamon sugar, create a spiced sugar blend with a mix of cinnamon, nutmeg, ginger, and a tiny pinch of cloves.
- Caramel Drizzle: After glazing with maple or a plain vanilla glaze, drizzle a store-bought or homemade caramel sauce over the donuts for an indulgent finish.
Storage Instructions for Freshness
To keep your delicious baked pumpkin donuts fresh and moist for as long as possible, proper storage is key:
- Room Temperature (Glazed/Un-glazed): Store un-glazed or cinnamon-sugar coated donuts in an airtight container at room temperature for up to 2-3 days. Glazed donuts can also be stored this way, though the glaze may become slightly sticky.
- Refrigeration (Glazed): If your glaze contains dairy or you prefer a firmer glaze, you can store glazed donuts in an airtight container in the refrigerator for up to 4-5 days. Allow them to come to room temperature before serving for the best texture.
- Freezing: Baked pumpkin donuts (especially un-glazed or cinnamon-sugar coated) freeze wonderfully! Once completely cooled, place them in a single layer on a baking sheet and freeze until solid. Then transfer them to a freezer-safe bag or container for up to 2-3 months. Thaw at room temperature or warm briefly in the microwave before enjoying.
Frequently Asked Questions About Baked Pumpkin Donuts
Can I use canned pumpkin pie filling instead of pumpkin puree?
No, it’s very important to use 100% pure pumpkin puree, not pumpkin pie filling. Pumpkin pie filling contains added spices and sugar, which would alter the flavor and sweetness balance of this recipe.
Do I need a special donut pan?
Yes, for these baked donuts, a donut pan (typically a 6-well metal pan) is essential to achieve the classic donut shape. They are widely available in kitchenware stores or online.
My donuts came out dry. What went wrong?
Dry donuts are usually a sign of overbaking. Ovens can vary, so start checking for doneness at the minimum recommended baking time. A toothpick inserted into the center should come out clean. Overmixing the batter can also contribute to a tougher, drier texture.
Can I make this recipe gluten-free?
While this recipe uses all-purpose flour, you can experiment with a 1:1 gluten-free baking flour blend. Ensure the blend contains xanthan gum, or add 1/2 teaspoon per cup of flour, to help with structure.
How far in advance can I make these?
These donuts are best enjoyed on the day they are baked for optimal freshness and texture. However, they can be made a day in advance and stored as per the storage instructions. If making cinnamon sugar donuts, coat them just before serving for the best crunch.
Embrace the Flavors of Fall with These Easy Baked Pumpkin Donuts
There’s something truly magical about the aroma of pumpkin and warm spices filling your home, especially during the autumn months. These super easy baked pumpkin donuts are more than just a recipe; they’re an invitation to create warmth, comfort, and delicious memories. With their soft, tender crumb, rich pumpkin flavor, and delightful toppings, they encapsulate everything we love about fall baking without any of the fuss. Whether you’re whipping up a batch for a weekend breakfast, a festive gathering, or simply to satisfy a sweet craving, this Preppy Kitchen-inspired recipe promises pure delight with every bite. So, gather your ingredients, preheat your oven, and prepare to fall in love with your new favorite fall dessert!