
The Ultimate Guide to Simple Homemade Lemon Curd: A Zesty Delight
There’s nothing quite like the vibrant, tangy, and sweet flavor of homemade lemon curd. Forget store-bought versions; this recipe, inspired by the fantastic Preppy Kitchen, will revolutionize your breakfast and dessert game. With its irresistible blend of citrus zing and creamy richness, it promises to brighten even the dullest day and bring a smile to your face. Whether you’re a seasoned baker or a kitchen novice, this straightforward guide will help you create a truly spectacular lemon curd that’s perfect on toast, pancakes, or even enjoyed straight from the spoon. Let’s dive into the world of this golden, luscious treat!
What Exactly is Lemon Curd?
Often mistaken for jam or custard, lemon curd holds its own unique place in the culinary world. At its heart, lemon curd is a creamy, intensely flavored spread made from lemons (juice and zest), sugar, egg yolks, and butter. Unlike a jam, which relies on fruit pectin for its gel-like consistency, curd thickens primarily due to the coagulation of egg yolks. It’s richer and smoother than a typical fruit preserve, offering a luxurious texture and a burst of fresh citrus taste that’s both invigorating and comforting. Historically, lemon curd became popular in England in the late 19th and early 20th centuries, traditionally served with bread or scones during afternoon tea.
The beauty of homemade lemon curd lies in its incredible freshness. The bright, zesty notes of real lemon shine through, perfectly balanced by the sweetness of sugar and the rich, velvety texture imparted by egg yolks and butter. This delicate balance creates a versatile condiment that can elevate simple dishes into gourmet experiences. Its shimmering golden hue is as appealing to the eye as its taste is to the palate, making it a favorite for special occasions and everyday indulgence alike.
Why Opt for Homemade Lemon Curd?
While store shelves offer various lemon curds, nothing compares to the taste and quality of a batch made in your own kitchen. Here’s why going homemade is always the best choice:
- Unmatched Freshness: You control the quality of every ingredient, from the lemons to the butter, ensuring the freshest possible flavor profile. The difference fresh lemon zest and juice make is truly remarkable.
- Superior Taste: The vibrant zest and juice of freshly squeezed lemons deliver an intense, authentic citrus punch that mass-produced versions simply cannot replicate. You’ll taste the sunshine in every spoonful!
- Velvety Texture: Homemade curd often boasts a silkier, smoother texture, free from the gelatiny or overly thick consistency sometimes found in commercial products. The precise cooking method helps achieve this luxurious mouthfeel.
- No Artificial Additives: Say goodbye to preservatives, artificial colors, and flavors. Your homemade curd is pure, wholesome deliciousness, made with ingredients you recognize and trust.
- Customizable Sweetness/Tartness: Adjust the sugar to lemon ratio to suit your personal preference, making it as sweet or as tart as you desire. This level of personalization is impossible with store-bought options.
- A Rewarding Experience: The process of transforming simple ingredients into a golden, shimmering curd is incredibly satisfying and surprisingly easy. Plus, your kitchen will be filled with the most delightful aroma!
Choosing to make your lemon curd from scratch is not just about taste; it’s about creating a wholesome, delicious product tailored to your preferences, free from unwanted additives, and offering an enjoyable culinary journey from start to finish.
Gather Your Simple Ingredients
One of the most appealing aspects of this incredible recipe is its minimal ingredient list. You only need a handful of staple items to create culinary magic. While some might consider this a “4-ingredient” recipe (often counting zest and juice as one “lemon” component, and eggs as one item), our list clarifies each item for precision. You’ll be amazed at the complexity of flavor derived from such simplicity!
- 1 cup of Granulated Sugar: This fine, white sugar provides the essential sweetness to balance the lemon’s vibrant tartness and contributes to the curd’s glossy appearance and smooth structure. It also aids in preventing the egg yolks from scrambling too quickly.
- 2 tablespoons of Lemon Zest: This is where the concentrated lemon oil and intense citrus aroma reside. The zest delivers a much deeper and more complex lemon flavor than juice alone. Always use fresh zest and ensure you only grate the yellow part, avoiding the bitter white pith.
- 6 Egg Yolks: The primary thickener for the curd, egg yolks give it its characteristic richness, creamy texture, and beautiful golden hue. They emulsify with the butter to create that signature luscious mouthfeel.
- 1/2 cup of Fresh Lemon Juice (minus 1 tablespoon): The source of tartness and refreshing lemon flavor. Freshly squeezed lemon juice is paramount for the best results; bottled juice often lacks the vibrant acidity and fresh taste needed. The slight reduction helps balance the liquid content perfectly.
- 1/2 cup of Unsalted Butter (cold, cut into cubes): Butter is added at the end to lend incredible richness, a silky mouthfeel, and help emulsify the curd, making it wonderfully smooth and glossy. Using unsalted butter allows you to control the overall salt content of your finished product, ensuring the lemon flavor remains dominant.
Quick Tip: For the best flavor, always opt for fresh, organic lemons if possible. The quality of your lemons will directly impact the vibrancy and depth of your curd. Choosing ripe, firm lemons with smooth, bright yellow skins is ideal.
Essential Equipment for Success
Before you begin your lemon curd adventure, gather these basic kitchen tools. Having everything at hand will ensure a smooth, stress-free, and successful cooking process:
- Medium-sized, Heavy-Bottomed Saucepot: Crucial for even heat distribution, which prevents scorching and helps the curd cook uniformly without hot spots.
- Wire Whisk: Essential for constantly stirring the curd, preventing lumps, and incorporating air for a lighter texture. A balloon whisk works best for this.
- Fine-Mesh Sieve (Strainer): Optional but highly recommended for achieving a supremely silky-smooth curd by removing any cooked egg bits or stray zest.
- Heat-Proof Bowls (2-3): One for separating egg whites, another for collecting the finished curd, and potentially one for mise en place.
- Rubber Spatula: Useful for scraping down the sides of the pot, ensuring all ingredients are incorporated, and minimizing waste.
- Citrus Zester or Microplane: To efficiently remove the flavorful lemon zest without including the bitter white pith underneath, which can add an undesirable bitter taste.
- Citrus Juicer: To extract the maximum amount of fresh lemon juice from your lemons. A hand juicer or reamer works perfectly.
- Measuring Cups and Spoons: For precise ingredient measurements, which are vital for baking and curd-making consistency.
- Airtight Container: For storing your delicious homemade lemon curd once it has cooled, maintaining its freshness and preventing it from absorbing refrigerator odors.
- Optional: Instant-Read Thermometer: While not strictly necessary, it can help ensure the curd reaches the ideal thickening temperature (170°F-180°F / 77°C-82°C) without overcooking.
Step-by-Step Instructions for Your Perfect Lemon Curd
Follow these detailed steps carefully, and you’ll be enjoying your homemade lemon curd in no time. Precision and patience are key to achieving that coveted silky texture and bright flavor. Remember, this is a delicate process, so take your time and enjoy the transformation of simple ingredients into a gourmet treat.
Step 1: Prepare Your Eggs
Begin by carefully separating the egg yolks from the whites. Crack each egg gently, perhaps over a separate small bowl first to avoid contaminating the main batch of yolks. Let the whites fall into one bowl, while transferring the yolks to your chosen heavy-bottomed saucepot. It’s crucial that no bits of shell or egg white contaminate the yolks, as even a small amount of white can affect the curd’s texture and cooking process, potentially leading to a less smooth result. Set the egg whites aside in a separate, airtight container; they are not needed for this recipe but can be brilliantly repurposed for delicious meringue buttercream, light angel food cake, or a healthy egg white omelet later.
Step 2: Zest and Juice Your Lemons
Next, it’s time to extract all that beautiful lemon flavor. Using a fine-holed grater or microplane, carefully zest your lemons. Aim for about 2 tablespoons of brightly colored zest. The key here is to only remove the yellow outer layer, meticulously avoiding the bitter white pith underneath, which can impart an unpleasant taste to your curd. Once zested, cut the lemons in half and juice them until you have exactly 1/2 cup of fresh lemon juice. For maximum juice extraction, you can briefly roll the lemons on a countertop before cutting, or microwave them for 10-15 seconds. Strain the juice through a small sieve to catch any seeds or pulp, ensuring your curd is perfectly smooth. Remember to reserve one tablespoon of the measured juice, as the recipe specifically calls for “1/2 cup of lemon juice minus 1 tablespoon” – this slight adjustment ensures optimal tartness and consistency.
Step 3: Combine and Whisk
With your separated egg yolks resting in the heavy-bottomed saucepot, lightly beat them with a wire whisk until they are just combined and uniform in color. This takes only a few seconds. Then, gradually add the granulated sugar to the yolks while continuing to whisk. The key here is gradual addition and constant whisking to help dissolve the sugar and prevent the yolks from clumping. Keep whisking until the mixture becomes lighter in color and slightly fluffy, almost pale yellow, indicating that the sugar has started to dissolve and is well incorporated. This usually takes a couple of minutes of steady whisking. Finally, slowly stir in the prepared lemon juice and the lemon zest. Ensure everything is thoroughly mixed before moving to the heat, creating a homogenous, slightly runny mixture.
Step 4: Cook Until Thickened
Place your saucepot over low heat. This step requires your full attention and constant stirring; do not step away from the stovetop. Using your wire whisk, stir the mixture continuously, making sure to scrape the bottom and sides of the pot to prevent the eggs from cooking unevenly or scrambling. The curd will gradually thicken as it heats, transforming from a thin liquid to a luscious cream. This process can take anywhere from 8 to 15 minutes, depending on your stovetop’s heat and the type of pot. Look for the mixture to thicken significantly, reaching a consistency where it coats the back of a wooden spoon or spatula (a culinary term known as ‘nappe’). When you run your finger across the coated spoon, the line should hold without the curd running back into it. It should also start to show small, gentle bubbles around the edges, but avoid a vigorous, rolling boil, which can overcook the eggs. If you have an instant-read thermometer, aim for a temperature between 170°F and 180°F (77°C and 82°C).
Step 5: Incorporate the Cold Butter
Immediately remove the pot from the heat once the curd has reached the desired thickness and consistency. Speed is important here to stop the cooking process. Add the cold, cubed unsalted butter directly into the hot curd. Stir vigorously with your whisk until all the butter has completely melted and is fully incorporated into the mixture. The cold butter not only adds an incredible richness and a beautiful sheen but also helps to rapidly cool down the curd, effectively stopping the egg yolks from cooking further. This step is crucial for achieving that wonderfully smooth, emulsified, and glossy finish that is characteristic of perfect lemon curd.
Step 6: Strain for Silky Smoothness (Optional but Recommended)
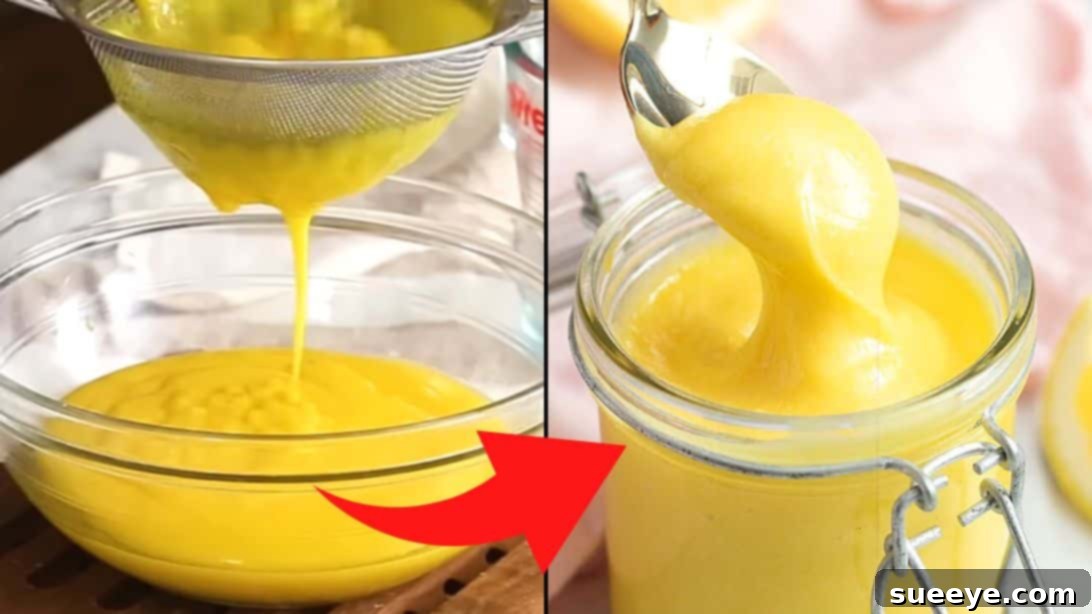
For an exceptionally silky-smooth lemon curd, this step is highly recommended and truly elevates the final product. Place a fine-mesh sieve over a clean, heat-proof bowl. Carefully pour the entire hot lemon curd mixture through the sieve, using a rubber spatula or the back of a spoon to gently push it through. This meticulous process will catch any tiny bits of cooked egg that may have formed, stray lemon zest pieces, or small butter solids that didn’t fully melt, resulting in a perfectly smooth, luxurious, and uniformly textured curd. While optional, it truly refines the texture to professional standards, ensuring every bite is pure bliss.
Step 7: Cool and Store
Once strained (or if you opted to skip the straining), transfer the warm lemon curd into a clean, dry, sealable container. Glass jars with tight-fitting lids are ideal. To prevent a “skin” from forming on top as it cools – which can happen as moisture evaporates from the surface – you can press a piece of plastic wrap directly onto the surface of the curd, ensuring it touches the entire top layer. Allow it to cool at room temperature for about 30 minutes, then transfer it to the refrigerator. The curd will continue to thicken significantly as it chills, reaching its optimal consistency. For the best flavor and texture, it’s best served thoroughly chilled, after at least 4 hours, or ideally overnight. The chilling process allows the flavors to meld and the texture to set perfectly.
Tips for Achieving Lemon Curd Perfection
Mastering lemon curd is straightforward, but a few expert tips can make all the difference, ensuring a flawless result every time:
- Always Use Fresh Ingredients: This cannot be stressed enough. The quality of your lemons, eggs, and butter significantly impacts the final taste and texture. Freshly squeezed lemon juice and vibrant zest are non-negotiable for that bright, authentic flavor.
- Low and Slow Heat: Never rush the cooking process. High heat can quickly scramble the eggs, leading to a lumpy, unpleasant curd. Keep the heat on low to medium-low and be patient; the thickening will happen gradually.
- Constant Whisking: This is your arm workout! Constant whisking prevents the eggs from setting at the bottom of the pot, ensures even cooking, and contributes to a smooth, lump-free consistency. Make sure your whisk reaches all parts of the pot.
- Don’t Overcook: As soon as the curd coats the back of a spoon (the ‘nappe’ test) and shows gentle bubbles around the edges, it’s done. Overcooking can lead to a stiff, rubbery, or grainy texture as the proteins in the egg yolks coagulate too much.
- Adjust Sweetness: Taste your curd after cooking (before chilling). If you prefer it sweeter, you can stir in a little more sugar (powdered sugar dissolves more easily) while it’s still warm. If, by chance, it’s too sweet for your liking, a tiny pinch of citric acid can sometimes brighten it up, but careful lemon juice measurement is key.
- The “Nappe” Test: This classic chef’s trick is your best indicator. Dip a clean spoon into the curd, lift it out, and draw a line across the back of the spoon with your finger. If the line holds and the curd doesn’t run back into the gap, it’s ready.
- Cover Immediately: As soon as the curd is in its storage container, press plastic wrap directly onto its surface to prevent a ‘skin’ from forming.
Endless Ways to Enjoy Your Homemade Lemon Curd
The versatility of homemade lemon curd is truly astounding. While it’s absolutely delightful on its own, here are numerous ways to incorporate this sunny spread into your culinary repertoire, transforming simple meals into extraordinary experiences:
- Classic Breakfast & Brunch: Spread generously on freshly baked crusty bread, warm croissants, fluffy scones, moist muffins, crisp bagels, or tender English muffins. It’s an instant upgrade to any morning pastry.
- Pancakes & Waffles: Drizzle over a towering stack of fluffy pancakes or crispy waffles instead of traditional syrup for a vibrant, zesty twist that wakes up the taste buds.
- Crepes: A perfect, light filling for delicate French crepes, perhaps adorned with some fresh berries (strawberries or blueberries are divine) or a generous dollop of whipped cream.
- Yogurt & Granola: Swirl a spoonful or two into plain Greek yogurt, top with some crunchy granola, and fresh fruit for a bright, satisfying, and healthy breakfast or snack.
- Dessert Fillings:
- Tarts & Pies: The quintessential filling for classic lemon meringue pies or charming individual lemon tarts. Its bright flavor is the star.
- Cakes & Cupcakes: Use as a delightful filling between cake layers, pipe it into the centers of cupcakes, or simply spread it as a tangy topping.
- Trifles: Layer with sponge cake, fresh berries, and light whipped cream for a stunning and refreshing dessert trifle.
- Meringues: Pair a spoonful of curd with crisp meringue shells or pavlovas for an elegant dessert that balances sweet and tart.
- Ice Cream & Sorbets: A spoonful swirled into vanilla bean ice cream or served alongside a refreshing berry sorbet adds a burst of unexpected flavor and texture.
- Thumbprint Cookies: Fill the indentations of buttery shortbread or sugar cookies with a dollop of lemon curd before or after baking for a beautiful, flavorful treat.
- Fruit Salad: Whisk a little lemon curd with a touch of olive oil and a splash of water for a light, zesty dressing that beautifully complements fresh fruit salads, especially those featuring berries or tropical fruits.
- Spoonful of Happiness: Don’t underestimate the simple pleasure of eating it straight from the spoon! It’s a quick pick-me-up anytime.
The possibilities are truly endless, limited only by your imagination and craving for citrusy delight!
Storing Your Golden Delight
Proper storage ensures your homemade lemon curd stays fresh and delicious for as long as possible, allowing you to savor its vibrant flavor over time:
- Refrigeration: Once your lemon curd has cooled completely, transfer it to a clean, airtight container. Glass jars with secure lids are excellent for this purpose. Stored properly in the refrigerator, homemade lemon curd will keep beautifully for up to 2-3 weeks. Always ensure the lid is sealed tightly to prevent any absorption of refrigerator odors, which can affect its delicate flavor.
- Freezing: For longer-term storage, lemon curd freezes exceptionally well, preserving its fresh taste for months. Spoon the chilled curd into freezer-safe containers, leaving about half an inch of headspace to allow for expansion. Alternatively, you can use heavy-duty freezer bags, squeezing out as much air as possible before sealing. It can be frozen for up to 3-4 months without significant loss of quality. When you’re ready to use it, thaw overnight in the refrigerator. After thawing, give it a good stir with a whisk to restore its perfectly smooth and creamy consistency, as it might separate slightly during the freezing process.
Always use clean utensils when serving to maintain the curd’s freshness and prevent any potential contamination, which can shorten its shelf life. Labeling your containers with the date of preparation can also help you keep track of its freshness.
Explore Delicious Variations
Once you’ve mastered the classic lemon curd, don’t hesitate to experiment and broaden your culinary horizons with different citrus fruits or subtle flavor enhancements. Each variation offers a unique twist on this beloved spread:
- Lime Curd: For a distinctly tart and incredibly aromatic spread, substitute lime juice and zest for lemon. Lime curd offers a sharper, more exotic tang that pairs wonderfully with coconut desserts or tropical fruits.
- Orange Curd: Use orange juice and zest for a sweeter, milder citrus curd. This variation is perfect for those who prefer less tang and enjoy a more mellow, sunny flavor. It’s fantastic with chocolate or in traditional English trifles.
- Grapefruit Curd: For a wonderfully sophisticated and slightly bitter note, try incorporating grapefruit juice and zest. This variation is particularly good for adult palates, offering a complex flavor that’s less overtly sweet.
- Mixed Citrus Curd: Unleash your creativity by combining different citrus fruits for a unique flavor profile. A lemon-lime blend offers a vibrant balance, while orange-grapefruit creates an interesting sweet-bitter dynamic.
- Vanilla Bean Curd: Elevate your curd with the luxurious aroma of vanilla. Infuse the curd with a split vanilla bean during the cooking process, removing it before straining, for an added layer of warm, sweet fragrance.
- Lavender Curd: For an elegant floral note, add a pinch of culinary lavender buds (about 1/2 teaspoon) to the mixture during the cooking process. Be sure to strain out the lavender buds before chilling to achieve a smooth texture and avoid an overpowering floral taste.
- Ginger Curd: Incorporate finely grated fresh ginger (about 1 teaspoon) with the lemon zest for a warming, spicy kick that complements the citrus beautifully.
These variations allow you to customize your curd to suit any taste preference or culinary application, proving that the versatility of this simple recipe is truly remarkable.
Frequently Asked Questions About Lemon Curd
- Why did my lemon curd curdle or become lumpy?
- This is a common issue and usually happens if the heat was too high or if the mixture wasn’t stirred constantly. The egg yolks can cook too quickly and essentially scramble, creating lumps. To prevent this, always cook over low heat and whisk continuously. If your curd does become slightly lumpy, don’t despair! Straining it through a fine-mesh sieve (as in Step 6) can often save a slightly curdled batch, giving you a smooth product.
- My lemon curd is too thin after chilling. How can I fix it?
- If your curd is too thin even after a full chilling period, it likely wasn’t cooked long enough to reach the proper thickening point. You can gently reheat it over very low heat on the stovetop, stirring constantly, until it thickens further and coats the back of a spoon. Be extremely careful not to overheat it this time. Alternatively, you can mix a small amount of cornstarch or arrowroot powder (1 teaspoon) with a tablespoon of cold water to create a slurry, then whisk this slurry into the warm curd and continue heating gently until it reaches the desired consistency. A key reason for thin curd is often not cooking it long enough to reach the proper temperature (170°F-180°F) or the ‘nappe’ consistency.
- Can I use whole eggs instead of just yolks?
- While some recipes for lighter custards might use whole eggs, traditional lemon curd recipes strongly emphasize using only egg yolks for their richness and superior thickening power. The whites contain more water and less fat, which would result in a curd with a different, often less luxurious, texture and a slightly paler color. For the classic, decadent lemon curd experience, sticking to yolks is recommended.
- How long does homemade lemon curd last?
- Stored properly in a clean, airtight container in the refrigerator, homemade lemon curd can last for 2 to 3 weeks. If you choose to freeze it in a freezer-safe container, it can extend its shelf life to 3 to 4 months. Always pay attention to the smell and appearance; if anything seems off, it’s best to discard it.
- Why is my lemon curd bitter?
- Bitterness in lemon curd usually comes from including the white pith of the lemon when zesting. The pith, located directly beneath the yellow zest, is very bitter. Always make sure to zest only the bright yellow outer layer, avoiding the white part as much as possible. Using fresh, good quality lemons also helps prevent bitterness.