
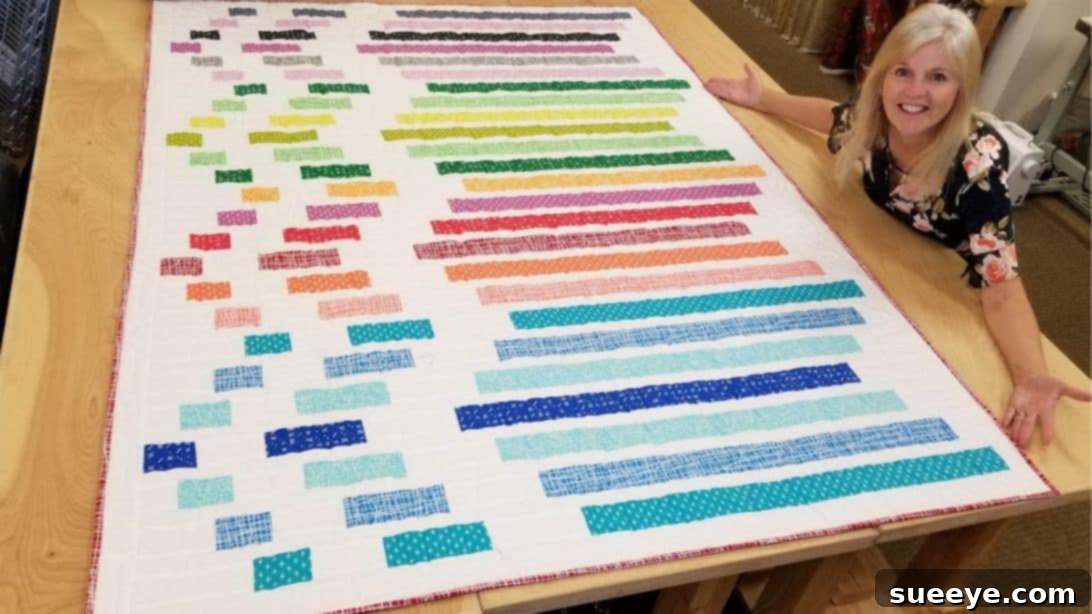
Quilting is a truly exciting and rewarding craft, offering endless possibilities for creativity and functional art. Among the myriad of quilt patterns available, the Dart Quilt by Jordan Fabrics stands out as an exceptional project, especially for those new to the quilting world or looking for a relaxing, straightforward make. This particular design captured my imagination early on in my quilting journey, and it remains one of the most satisfying projects I’ve ever tackled. Its simplicity belies a stunning visual impact, resulting in a neat, organized, and remarkably pretty finished product.
The beauty of the Dart Quilt lies in its clever use of fabric strips, often sourced from convenient jelly rolls, which eliminates much of the initial cutting and guesswork. This approach makes the piecing process incredibly efficient and enjoyable. Whether you’re aiming to create a cozy throw for your living room, a charming baby quilt, or a thoughtful handmade gift, this pattern delivers a striking geometric design that is both modern and timeless. If you’re eager to experience the joy of making this fantastic quilt, you’ve come to the right place. Below, you’ll find comprehensive instructions to guide you through each step, complemented by a reference to the excellent video tutorial by Jordan Fabrics for additional visual clarity. Let’s dive in and create something beautiful!
Materials for Your Dart Quilt Project:
Before embarking on your quilting adventure, gather all the necessary supplies. Having everything organized beforehand will ensure a smooth and enjoyable crafting experience. The beauty of this project is that it primarily uses a jelly roll, making fabric selection and preparation incredibly simple.
- 1 Jelly Roll: A jelly roll typically consists of 40 strips of fabric, each 2.5 inches wide and 42 inches long, pre-cut and coordinated. This is the heart of your quilt’s design.
- Background Fabric: This fabric will highlight your dart blocks and provide a cohesive backdrop. Choose a color that complements your jelly roll strips, typically a solid or a subtle tone-on-tone print.
- Binding Fabric: This fabric will create the finished edge of your quilt, giving it a polished and durable finish. It can match your background fabric, coordinate with your jelly roll, or provide a striking contrast.
- Marking Pen, Pencil, or Chalk: Essential for marking cutting lines, sewing lines, or any specific points on your fabric.
- Quilting Ruler: A clear acrylic ruler (at least 6×24 inches is very versatile) is crucial for accurate measuring and cutting.
- Scissors or Rotary Cutter and a Cutting Mat: A rotary cutter with a self-healing mat is highly recommended for speed and precision in cutting fabric strips. Sharp fabric scissors are also useful for smaller cuts.
- Sewing Machine: A reliable sewing machine with a quarter-inch foot (or an accurate seam allowance guide) is fundamental for piecing your quilt blocks.
- Dart Quilt Pattern: You can download the free pattern directly from Jordan Fabrics. This pattern provides specific cutting dimensions and assembly diagrams.
- Thread: High-quality 100% cotton thread that matches or blends with your fabrics.
- Batting: The middle layer of your quilt, providing warmth and dimension. Choose your preferred type (cotton, polyester, wool blend).
- Backing Fabric: The bottom layer of your quilt. This will be the largest piece of fabric you need.
Step-by-Step Guide to Crafting Your Dart Quilt:
Follow these detailed instructions to create your beautiful Dart Quilt. Precision in cutting and sewing is key to achieving a professional-looking finish, so take your time with each step.
Step 1: Fabric Preparation and Precise Cutting
The foundation of any successful quilt lies in accurate cutting. Begin by carefully reviewing the Jordan Fabrics Dart Quilt pattern to understand all the required fabric dimensions. While jelly rolls significantly reduce initial cutting, you will need to cut your background and binding fabrics, and potentially trim your jelly roll strips to specific lengths as indicated in the pattern. Using a rotary cutter and mat with a clear quilting ruler will ensure clean, straight edges and precise measurements. For the jelly roll strips, the pattern typically requires you to cut them into smaller segments to create the unique “dart” effect. Once all your pieces are cut according to the pattern’s specifications, gather and arrange them into individual strip sets as depicted in the diagram.
This initial organization is crucial for visualizing the design and ensuring you sew the correct pieces together. Take extra care during this step; accurately cut pieces will fit together perfectly, making the subsequent sewing process much smoother and more enjoyable. Remember, a slight error in cutting can compound through the entire quilt, so measure twice and cut once!
Step 2: Assembling the Strip Sets and Creating Rows
With your fabric pieces neatly organized, it’s time to bring them together. Take your prepared strip sets, typically consisting of several jelly roll segments arranged in a specific sequence to form the “dart” design. Using your sewing machine, sew these segments together along their long edges with a precise 1/4-inch seam allowance. This accurate seam allowance is fundamental to ensuring your blocks will come out the correct size and fit together seamlessly later on. After stitching each strip set, head to your ironing board. Pressing is a critical step in quilting; it helps to flatten seams, remove puckering, and ensures your pieces lie flat. For this project, the pattern suggests pressing the seams towards the darker fabric. This technique helps to hide the seam allowances and prevents “shadows” from showing through lighter fabrics.
Repeat this process for all your fabric sets. The Jordan Fabrics Dart Quilt often results in a total of 25 completed rows, each representing a segment of your quilt top. Once all rows are pieced and pressed, arrange them in the order shown in the pattern’s diagram. This step allows you to double-check your design and ensure the dart pattern emerges correctly. Visualizing the layout before final assembly is a great way to catch any potential missteps early.
Step 3: Integrating Background Rectangles (Fabric A)
To truly complete each row and enhance the striking visual effect of the dart design, you will now incorporate the background Fabric A rectangles. These rectangles typically frame the pieced dart sections and add length to your rows. Depending on the pattern’s specific instructions, you might add these Fabric A rectangles to the left end, the right end, or one on each end of your pieced strip sets. Carefully align the edges, ensuring your fabric pieces are right sides together, and stitch them into place using your consistent 1/4-inch seam allowance. After sewing, return to your ironing board and press the seams nice and flat. Again, pressing is crucial for neatness and accuracy. You can choose to press these seams open or towards the darker fabric, depending on your preference and how the quilt will be constructed, but consistency is key.
Step 4: Assembling the Quilt Top with Sashing Strips
Now that your individual rows are complete, it’s time to assemble the entire quilt top. This is where the magic of the “dart” pattern truly comes alive. The pattern instructs you to incorporate sashing strips between each pieced row. Sashing refers to fabric strips used to separate blocks or rows, providing a visual break and often helping to square up the quilt. Carefully place a sashing strip between each pieced row, aligning all raw edges and ensuring any intersecting seams are accurately matched. Pin extensively, especially at these intersection points, to prevent fabric shifting while sewing.
Sew these rows and sashing strips together, working systematically down the quilt. Maintaining your accurate 1/4-inch seam allowance throughout this process is absolutely vital for ensuring your finished quilt top is square and lies flat. As you complete each long seam, press it. Many quilters prefer to press sashing seams towards the sashing to minimize bulk. This meticulous approach in assembling the rows and sashing will result in a beautifully structured and cohesive quilt top, ready for the next stages.
Step 5: Adding the Borders
Borders are an essential element of many quilt designs, serving to frame the central design, square up the quilt top, and often add extra size. Once your main quilt top with sashing is complete, it’s time to attach the borders. The pattern will specify the dimensions for your border strips. Always measure your quilt top through the center both horizontally and vertically to get an average measurement, rather than just measuring the raw edges. Cut your border strips to these precise lengths and then attach them, typically the side borders first, followed by the top and bottom borders. Sew them on with a 1/4-inch seam allowance.
Once sewn, press the border seams nicely. Most quilters prefer to press border seams towards the border to reduce bulk in the main quilt body. This step adds a clean, finished edge to your quilt top, preparing it for the layers that will transform it into a complete, usable quilt.
Step 6: Basting the Quilt Sandwich
With the quilt top complete, the next critical step is to create the “quilt sandwich” and baste it. The quilt sandwich consists of three layers: your beautiful quilt top, a layer of batting in the middle, and the backing fabric on the bottom. Lay your backing fabric flat on a clean surface, wrong side up, smoothing out any wrinkles. Tape it down to secure it. Next, layer your batting smoothly on top of the backing. Finally, center your quilt top on top of the batting, right side up, ensuring it is perfectly flat and wrinkle-free.
Basting is the process of temporarily securing these three layers together so they don’t shift during quilting. There are several methods for basting: safety pins (pin basting), spray adhesive (spray basting), or long hand stitches (thread basting). Choose the method you prefer, ensuring your layers are well secured across the entire surface. Adequate basting prevents puckers and tucks in your finished quilt, so don’t rush this step.
Step 7: Quilting Your Dart Design
Quilting is the process of stitching through all three layers of the quilt sandwich – the top, batting, and backing – to hold them together permanently and add texture and durability. This is where your quilt truly takes on its final form and character. You can choose to machine quilt or hand quilt, depending on your skill level and desired aesthetic.
For machine quilting, options range from simple straight lines that follow the seams of your piecing (stitch-in-the-ditch) or parallel lines across the quilt, to more elaborate free-motion quilting designs. The Dart Quilt’s geometric nature lends itself well to straight-line quilting, which can be done easily with a walking foot on your sewing machine. Regardless of the method, ensure your stitches are even and consistent. This step not only adds visual interest but also locks all the layers together, giving your quilt its characteristic warmth and drape.
Step 8: The Final Touch: Binding
The final step in completing your Dart Quilt is adding the binding. Binding provides a clean, durable, and decorative edge that encases the raw edges of your quilt. Cut your binding fabric into strips (typically 2.5 inches wide, but check your pattern). Sew these strips together end-to-end to create one long continuous strip. Fold this strip in half lengthwise and press.
Attach the binding strip to the front of your quilt, aligning the raw edges of the binding with the raw edges of the quilt. Sew with a 1/4-inch seam, mitering the corners as you go. Once sewn to the front, fold the binding over to the back of the quilt, neatly encasing the raw edges. Secure the binding on the back, either by hand with an invisible whipstitch for a traditional finish or by machine for a quicker, more modern look. This last step gives your Dart Quilt a professional, finished appearance, ready to be loved and admired.
Why Choose the Dart Quilt: A Perfect Project for All Skill Levels
The Dart Quilt by Jordan Fabrics is more than just a pattern; it’s an experience that offers immense satisfaction, especially for beginners. Its design cleverly utilizes pre-cut jelly roll strips, significantly simplifying the cutting process—often the most daunting part for new quilters. This efficiency means you spend less time on preparation and more time on the enjoyable act of sewing. The geometric “dart” motif, while striking, is achieved through straightforward strip piecing, making it an excellent way to practice accurate seam allowances and pressing techniques, which are fundamental to all quilting.
Furthermore, the visual appeal of the Dart Quilt is undeniable. It creates a dynamic, modern design that looks far more complex than it actually is. This makes it an ideal choice for a project that yields impressive results without requiring advanced skills. Whether you’re making your very first quilt or simply seeking a relaxing, quick project, the Dart Quilt offers a rewarding journey from fabric strips to a beautiful, finished heirloom.
Tips for Quilting Success: Elevate Your Craft
Achieving a beautiful, well-made quilt comes down to a few key principles. Here are some essential tips to help you succeed with your Dart Quilt and future projects:
- Accurate Cutting is Paramount: The adage “measure twice, cut once” is golden in quilting. Even a slight inaccuracy in cutting can lead to points that don’t match and wavy seams. Invest in a good rotary cutter, a self-healing mat, and clear acrylic rulers.
- Consistent Seam Allowance: A perfect 1/4-inch seam allowance is the backbone of precise piecing. Use a 1/4-inch presser foot on your machine or mark a guide with painter’s tape to ensure consistency.
- Pressing, Not Ironing: When quilting, you “press” seams, which means lifting and placing the iron down, rather than sliding it back and forth. This prevents distorting your fabric pieces. Press seams towards the darker fabric or open, depending on the pattern’s recommendation or to reduce bulk.
- Chain Piecing: For efficiency, especially when sewing many identical units, use chain piecing. This involves feeding units through your machine one after another without lifting the presser foot or clipping threads between them.
- Trim Dog Ears: After pressing seams, often small triangular bits of fabric called “dog ears” will protrude. Trimming these before assembling blocks helps achieve cleaner intersections.
- Patience is a Virtue: Quilting is a journey, not a race. Take breaks, especially if you’re feeling frustrated. A relaxed quilter makes fewer mistakes.
- Watch Tutorials: Visual learners benefit greatly from video tutorials. The Jordan Fabrics tutorial for the Dart Quilt is an excellent resource to see the steps in action.
Fabric Selection: Making Your Dart Quilt Unique
One of the most exciting aspects of quilting is the opportunity to play with fabric. While the Dart Quilt pattern elegantly uses a jelly roll, your choice of colors and prints can dramatically alter the final look and feel of your quilt. Jelly rolls are fantastic because they provide a coordinated palette, taking the guesswork out of fabric matching. However, consider these points to make your Dart Quilt truly unique:
- Jelly Roll Variety: Explore different jelly roll collections. Some might be bright and playful, others subtle and elegant. The “dart” effect will be more pronounced with good contrast between adjacent strips.
- Background Fabric Impact: The background fabric plays a crucial role in highlighting your dart design. A solid white or cream offers a crisp, modern aesthetic, making the colors pop. A darker solid (like charcoal or navy) can create a dramatic, sophisticated backdrop. A subtle tone-on-tone print in your background can add texture without distracting from the main design.
- Binding as an Accent: Your binding doesn’t just finish the edge; it frames your artwork. Choose a binding fabric that ties into your jelly roll colors, matches your background for a seamless look, or provides a bold contrasting pop to draw attention to the edges.
- Personal Touch: Don’t be afraid to deviate slightly. If you have extra fabric scraps that coordinate, consider incorporating them, especially for the background or backing, to give your quilt an even more personalized touch.
Conclusion: Your Journey to a Beautiful Dart Quilt
Embarking on the creation of a Dart Quilt, especially with the guidance of the excellent Jordan Fabrics pattern, promises a truly rewarding crafting experience. From the initial excitement of choosing your jelly roll to the final satisfying stitch of the binding, each step brings you closer to a beautiful, functional piece of art. This pattern’s inherent simplicity, combined with its striking geometric appeal, makes it an ideal project for quilters of all levels. It’s a testament to how clever design can transform basic fabric strips into a visually captivating masterpiece.
I genuinely encourage you to give this project a try. The process is remarkably relaxing, and the sense of accomplishment upon completing such a neat and organized quilt is unparalleled. Imagine the possibilities of experimenting with different color palettes and fabric textures to create multiple versions, each with its own unique charm. Don’t hesitate to download the free pattern, gather your materials, and let your creativity flow. Happy quilting!
All images and the original pattern concept are credit to Jordan Fabrics via YouTube. Be sure to check out her other fantastic quilting content and follow for more inspiration!