
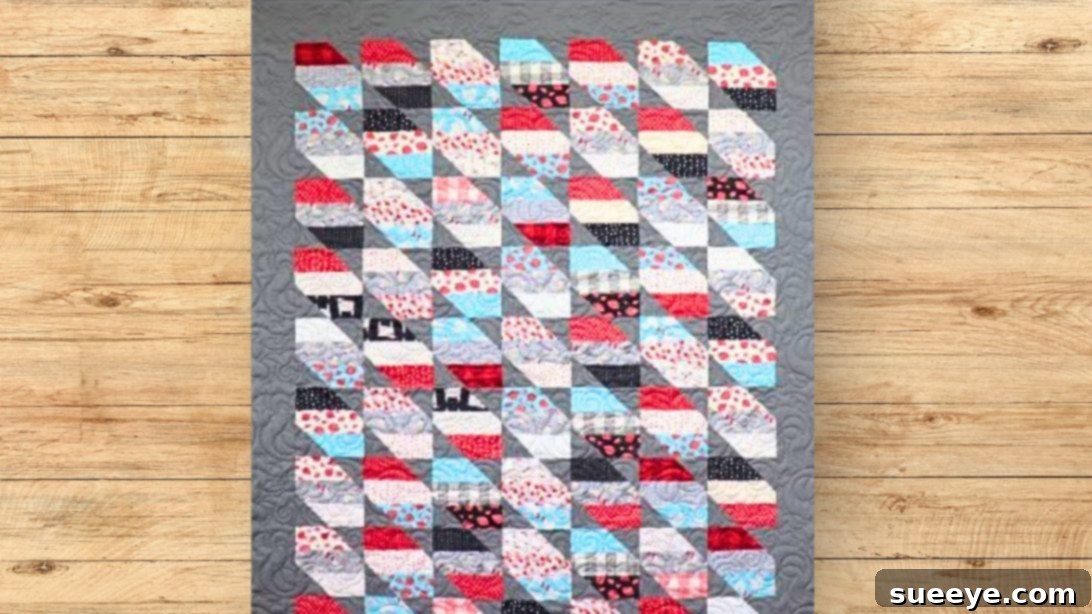
Welcome, fellow quilters and aspiring stitchers! If you’re searching for a rewarding quilting project that’s both enjoyable and incredibly simple to create, look no further than the remarkable 345 Quilt pattern. This design, championed by experts like Sew Yeah, stands out as one of the most accessible and satisfying quilt blocks you can master right from home. It’s perfectly tailored for beginners, comes together with impressive speed, and requires minimal specialized materials – just a collection of 2.5-inch fabric strips (often found in convenient jelly roll packs) and some coordinating background fabric.
The beauty of the 345 Quilt lies in its elegant simplicity and the rhythmic process of its creation. Whether you’re a seasoned quilter looking for a quick win or a complete novice taking your first steps into the wonderful world of fabric and stitches, this pattern offers a clear path to success. Imagine creating a stunning, personalized quilt top that looks intricate but was surprisingly straightforward to assemble. That’s the promise of the 345 Quilt.
Unveiling the Mystery: Why is it Called the 345 Quilt?
The name “345 Quilt” isn’t just a catchy title; it’s a clever descriptor of the block’s construction process, making it easy to remember and understand. Each finished quilt block is comprised of five distinct pieces. You begin by sewing together three fabric strips, forming the foundation of your block. Next, you add the fourth and fifth pieces – the background fabric squares used in the “snowball” technique – to beautifully complete the block’s unique design. This sequential addition of 3, then 4, then 5 pieces gives the quilt its memorable name and visually guides you through each stage of assembly.
This intuitive naming convention underscores the pattern’s beginner-friendly nature. It simplifies what might otherwise seem like a complex process into a clear, step-by-step progression. By understanding the “345” concept, you’re already halfway to mastering this delightful quilt.
RELATED: Explore More with the Basic X-Block Ruler Quilt With Jenny Doan
The Irresistible Appeal of the 345 Quilt: Why It’s Your Next Project
Beyond its clever name, the 345 Quilt offers a myriad of reasons why it should be your next quilting adventure. It’s more than just a pattern; it’s an experience that promises both rapid progress and lasting satisfaction.
- Perfect for Beginners: If you’ve been intimidated by quilting in the past, this pattern is your gateway. The steps are logical, repetitive, and forgiving, building confidence with every stitch.
- Lightning-Fast Assembly: Thanks to the efficiency of using pre-cut 2.5-inch strips and the simple block construction, you’ll see your quilt top grow at an astonishing pace. This makes it ideal for last-minute gifts or when you need a quick creative boost.
- Jelly Roll Friendly: Got a stack of beautiful jelly rolls sitting in your stash? This quilt is their perfect destiny! Jelly rolls offer a coordinated selection of fabrics, eliminating the stress of fabric matching and allowing you to dive straight into sewing.
- Stunning Visual Impact: Despite its simplicity, the finished 345 Quilt possesses a dynamic and engaging design. The “snowball” corners create a lovely interplay of color and geometry, making each block pop.
- Customizable Creativity: While the pattern is straightforward, there’s ample room for personal expression. Experiment with vibrant color contrasts, subtle monochromatic schemes, or themed prints to make your quilt truly unique.
The steps for creating this beautiful quilt are exceptionally easy to follow. You’ll begin by selecting three complementary strips from your jelly roll or collection of pre-cuts. These are sewn together to form a “3-unit” strip set, which is then cut into individual blocks. The final touch involves adding small background squares to two opposite corners of each block using the “snowball” method – essentially sewing squares diagonally onto the corners. Once this is done, a quick trim and press reveal the finished block. How delightfully simple is that? Remember, maintaining a consistent color theme for your middle strips across all blocks can help create a cohesive and harmonious overall design.
For more beginner-friendly quilt block ideas and tutorials to expand your quilting repertoire, don’t miss these fantastic resources:
- Easy Scrappy Quilt Tutorial for Beginners
- Simple ZigZag Quilt Tutorial
- The Easy Honey Do Quilt Tutorial
Essential Materials for Your 345 Quilt
Gathering your materials is the first exciting step towards bringing your 345 Quilt to life. This pattern is designed to be accessible, relying on common quilting supplies. Here’s what you’ll need:
- One 2.5″ Strip Roll (Jelly Roll): This typically contains 40 pre-cut fabric strips, each 2.5 inches wide and approximately 44 inches long. Using a jelly roll ensures a coordinated fabric palette and saves you valuable cutting time. If you don’t have a jelly roll, you can cut your own 2.5-inch strips from your fabric stash.
- 2 1/4 Yards of Background or Border Fabric: This fabric will be used for the corner squares that create the distinctive “snowball” effect, as well as for potential outer borders. Choose a color that contrasts nicely with your strip fabrics to make the design pop, or a subtle tone to provide a serene backdrop.
- 4 Yards of Backing Fabric: This will form the underside of your quilt. It’s crucial to select a fabric that is comfortable, durable, and large enough to extend beyond the edges of your quilt top (typically 4-6 inches on each side) to accommodate the quilting process.
- Coordinating Thread: A good quality polyester or cotton thread that blends with or complements your fabrics.
- Quilting Tools:
- Sewing machine (with a 1/4-inch piecing foot, if available)
- Rotary cutter with a sharp blade
- Cutting mat
- Acrylic ruler (at least 6.5″ x 24″ is ideal)
- Fabric scissors
- Iron and ironing board
- Pins or fabric clips
- Fabric marker or pencil (for drawing diagonal lines)
Having these items ready before you begin will ensure a smooth and enjoyable quilting experience.
Step-by-Step Guide: How to Craft Your Beautiful 345 Quilt
Now, let’s dive into the practical steps of creating your 345 Quilt. Remember, precision in cutting and consistent seam allowances are key to a professional-looking finish, but don’t let perfection be the enemy of progress – enjoy the journey!
Step 1: Constructing Your 3-Unit Fabric Strips
Begin by selecting three different 2.5-inch wide fabric strips. Lay them out side-by-side to visualize your color combination. Once satisfied, place two strips right sides together, aligning their long edges. Stitch them together using a precise 1/4-inch seam allowance. A consistent 1/4-inch seam is vital for your blocks to square up correctly later. After sewing, gently press the seam open or to one side (away from the darker fabric if possible, to prevent shadowing). Then, attach the third fabric strip to the assembled pair, again with a 1/4-inch seam allowance, pressing the second seam as before. You should now have a “3-unit” strip set. Repeat this process with the rest of your 2.5-inch strips, ensuring that the center strip in each 3-unit set maintains a similar color theme or contrast for a cohesive overall quilt design.
Pro Tip: Chain piecing (sewing multiple sets of strips one after another without cutting the thread in between) can significantly speed up this step.
Step 2: Precision Cutting Your Quilt Blocks
With your 3-unit strip sets complete, it’s time to cut them into individual quilt blocks. First, trim off the selvage edges from one end of each strip set to create a perfectly straight starting edge. Now, using your rotary cutter and acrylic ruler, carefully cut 6 1/2-inch blocks from your strip sets. Place your ruler at the trimmed edge, align it squarely with the strip set, and make your cut. Continue cutting 6 1/2-inch blocks until you’ve used up each strip set. For accuracy, it’s helpful to turn your mat or fabric after each cut rather than trying to measure from the opposite side. Aim for crisp, straight cuts – these will make assembly much easier.
You’ll need a total of 63 of these 6 1/2-inch blocks for a quilt top of roughly 63 inches by 70 inches, perfect for a throw or twin-sized quilt. Adjust the number of blocks as needed for your desired quilt dimensions.
Step 3: Preparing the Corner Snowball Squares
Next, you’ll prepare the small background fabric squares that will create the characteristic “snowball” corners on your blocks. From your chosen background fabric, cut 3 1/2-inch squares. For each 6 1/2-inch block, you will need two of these corner squares. Given our target of 63 blocks, you will need approximately 126 squares in total. It’s always a good idea to cut a few extra in case of mishaps.
Once your squares are cut, you need to mark a diagonal line on each one. This line will serve as your sewing guide. You can do this by folding each square in half diagonally and pressing it to create a crease, or by using a fabric marker or pencil and a ruler to draw a line from one corner to the opposite corner. This line is crucial for accurately creating your snowball corners.
Step 4: Implementing the Snowball Technique on Each Block
Now comes the fun part where your blocks truly start to take shape! Take one of your 6 1/2-inch striped blocks. Place one of your marked 3 1/2-inch background squares on the top-left corner of the block, right sides together. Ensure the diagonal line you marked runs from the outer corner (top-left) inwards towards the center of the block. Pin it in place to prevent shifting. Then, sew directly along the diagonal line you marked. Repeat this process with a second 3 1/2-inch background square on the bottom-right corner of the same block, again ensuring the diagonal line runs from the outer corner (bottom-right) inwards. Sew precisely on this line.
Once both corner squares are sewn, use your rotary cutter to trim away the excess fabric, leaving a 1/4-inch seam allowance outside your sewn line. Be careful not to cut into your stitching! Open the corner triangles that now form part of your block and press them flat. You can press the seams open or towards the darker fabric. Repeat this “snowballing” technique with all your remaining 6 1/2-inch blocks. Each block will now have two contrasting corners, giving it that distinctive 345 Quilt look.
Step 5: Assembling Your Quilt Top: Rows and Columns
Now that all your individual 345 blocks are complete, it’s time to bring them all together to form the quilt top! Lay out your blocks on a design wall, the floor, or a large table to determine your desired arrangement. For a visual interest, try to avoid placing identical blocks directly next to each other. Experiment with rotating blocks to create different patterns with the “snowball” corners.
For a standard throw quilt, arrange your blocks into 9 rows, with 7 blocks in each row. This will result in a quilt approximately 63 inches wide by 70 inches long (assuming finished block size of 6 inches).
Once you’re happy with your layout, sew the blocks together, one row at a time. Take the first two blocks of a row, place them right sides together, and stitch with a 1/4-inch seam allowance. Continue adding blocks to the row in the same manner until the entire row is complete. Press the seams within each row, alternating the direction of pressing for each consecutive row (e.g., press seams to the left for row 1, to the right for row 2, etc.). This technique, known as “nesting seams,” helps reduce bulk and ensures that your points line up beautifully when you join the rows.
After all 9 rows are sewn and pressed, it’s time to join them. Place the first two rows right sides together, carefully aligning all the seams (this is where nesting comes in handy!). Pin extensively, especially at the seam intersections. Stitch with a 1/4-inch seam allowance along the length of the row. Repeat this process until all 9 rows are joined, forming your complete 345 Quilt top. Give your finished quilt top a final press to ensure it lays perfectly flat.
Finishing Your Quilt: Beyond the Top
Creating the quilt top is a major accomplishment, but a quilt isn’t truly finished until it’s layered, quilted, and bound. Here’s a brief overview of the final stages:
Adding Borders (Optional)
If you wish to enlarge your quilt or frame your design, you can add borders. Measure the length and width of your quilt top in several places and take an average. Cut border strips accordingly, attach them to the sides first, press, then add the top and bottom borders. This will give your quilt a more substantial and finished look.
Quilting Your Layers
This is where your quilt becomes a true three-dimensional textile. You’ll create a “quilt sandwich” by layering your backing fabric (face down), batting (a soft filler layer), and your finished quilt top (face up). Secure these layers together with basting spray, safety pins, or long hand stitches. Then, you’ll stitch through all three layers – this is the actual “quilting” process. You can quilt by hand for a traditional look, use your home sewing machine for straight lines or free-motion designs, or send it to a professional long-arm quilter for intricate patterns.
Binding Your Quilt
The final step is to bind the edges of your quilt, which finishes the raw edges and adds a decorative frame. This involves cutting strips of fabric, joining them to create a continuous piece, and then sewing this strip around the perimeter of your quilt, folding it over to the back, and hand or machine stitching it down. The binding provides durability and a polished edge to your beautiful creation.
Caring for Your Handmade 345 Quilt
Once your quilt is complete, proper care will ensure it remains a cherished item for years to come. Most cotton quilts can be machine washed on a gentle cycle with cold water and a mild detergent. Avoid harsh chemicals or bleach. Tumble dry on low heat or, ideally, lay flat to dry to prevent stretching and preserve the quilting stitches. Store your quilt folded or rolled in a breathable cotton bag in a cool, dry place, away from direct sunlight.
Your Journey to a Beautiful 345 Quilt
Congratulations! You’ve just walked through the complete process of creating an Easy 345 Quilt. This journey, from selecting your first fabric strips to the final stitch of binding, is incredibly rewarding. The 345 Quilt is a testament to how simple techniques can yield stunning results, making it an ideal choice for anyone looking to dive into quilting or for experienced quilters seeking a fast and satisfying project.
We hope this detailed tutorial empowers you to start your own 345 Quilt. Remember that quilting is a journey of learning and creativity. Don’t be afraid to experiment with colors, fabrics, and even slight variations on the pattern. Share your creations, connect with other quilters, and most importantly, enjoy every moment of your crafting process. Happy quilting!