
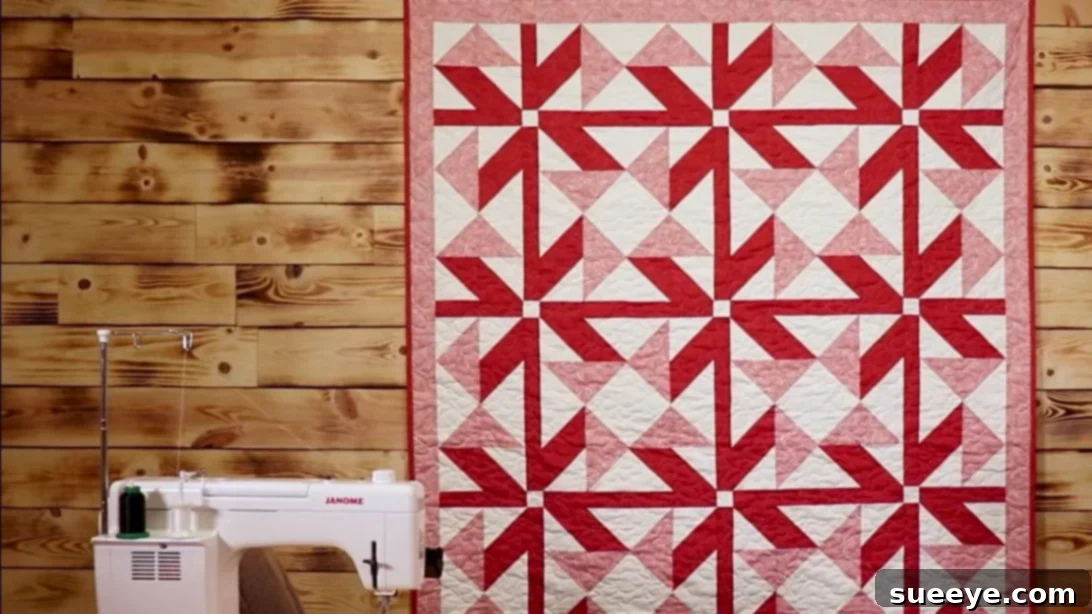
The world of quilting is constantly evolving, bringing forth an endless array of mesmerizing patterns that captivate the eye and inspire creativity. Among these, the **Easy Twisted Ribbon Quilt** stands out as a true gem, offering a delightful blend of visual complexity and surprising simplicity. From the moment I first laid eyes on this design, conceptualized with such perfection by Sew Yeah, I was instantly enamored. The way the “ribbons” appear to twist and intertwine creates an optical illusion that is both sophisticated and incredibly charming. The specific color palette chosen by Sew Yeah for their demonstration truly elevates this pattern, showcasing its full potential and making it an undeniable favorite. As ribbon-themed designs continue to gain immense popularity in the crafting community, this particular quilt pattern is poised to become a cherished project for countless enthusiasts.
RELATED: Master the Ribbon Star Quilt with Jenny Doan
The Allure of the Easy Twisted Ribbon Quilt: Your Ultimate Pattern Guide
The Twisted Ribbon Quilt is more than just a pattern; it’s an opportunity to create a dynamic, visually rich textile art piece that looks far more intricate than it actually is. This guide is designed to empower you, whether you’re a seasoned quilter or just beginning your journey, to successfully construct this beautiful design. We’ll delve into the secrets behind its captivating appearance, starting with meticulous fabric selection and moving through each construction phase with clear, actionable instructions. Prepare to transform simple fabric squares into a stunning quilt that will undoubtedly become a conversation starter.
Understanding the Twisted Ribbon Effect: Crucial Fabric Selection
The magic of the Twisted Ribbon Quilt lies primarily in the strategic interplay of three distinct fabric values: light, medium, and dark. This contrast is what gives the illusion of ribbons twisting over and under each other, creating depth and movement within the design. To achieve the specific, harmonious look often associated with this pattern, such as the one exquisitely demonstrated by Sew Yeah, I highly recommend opting for a monotone or closely related color scheme for your medium and dark fabrics. This approach allows the value differences to shine through without overwhelming the eye with too many disparate colors.
For instance, if you were to use two fabrics that are both very dark but in different colors (e.g., a dark navy and a dark forest green), the overall twisted effect might be diminished as the contrast between them would not be strong enough. The beauty of this pattern truly emerges when there’s a clear differentiation in lightness or darkness among your chosen fabrics. Your light fabric will act as the background or the “underneath” ribbon, while your medium and dark fabrics will create the primary twisted elements. Consider how shades of a single color (e.g., a pale blue, a medium blue, and a deep navy) or complementary colors with strong value differences can bring this design to life. Remember, the quality of your fabric is also paramount; opting for 100% quilting cotton will ensure your quilt is durable, drapes beautifully, and is a joy to work with.
While the pattern might appear challenging at first glance, its construction relies on fundamental quilting techniques that are easy to master. Don’t let its stunning appearance intimidate you. This project offers a wonderful opportunity to build your skills while creating a truly impressive piece. For those eager to explore more ribbon-inspired designs, consider these additional patterns: Easy Ribbon & Wreaths Quilt Tutorial, Ribbon Bow Quilt Block Tutorial, and Ribbon Weave Quilt Block Tutorial for Beginners. Each offers a unique take on the ribbon motif, expanding your creative horizons.
Gathering Your Supplies: Essential Materials for Your Twisted Ribbon Quilt
Before embarking on this delightful quilting adventure, it’s crucial to gather all your necessary materials. Precision in cutting and sewing begins with having the right tools and sufficient fabric. Here’s a comprehensive list of what you’ll need to create your Easy Twisted Ribbon Quilt:
Fabric Requirements:
- Fabric A (Light) – 1 7/8 yards: This fabric will form the lighter sections of your half-square triangles and your central sashing squares. Ensure it provides good contrast with your medium and dark fabrics.
- 24 pieces of 10″ squares
- 12 pieces of 2″ squares
- Fabric B (Medium) – 1 5/8 yards: This fabric will create one half of your twisted ribbon effect. Choose a shade that offers a clear distinction from both Fabric A and Fabric C.
- 12 pieces of 10″ squares
- 7 pieces of 3″ x WOF (Width of Fabric) for borders. These will frame your finished quilt top beautifully.
- Fabric C (Dark) – 1 5/8 yards and 1/2 yard for binding: This dark fabric is essential for the contrasting half of your twisted ribbon and the cross in the middle of each block, creating depth. The additional half-yard is specifically for the binding, which will give your quilt a neat and durable finish.
- 12 pieces of 10″ squares
- Remaining fabric into 2″ x WOF strips for the “cross” in the middle of each block. These strips will form the connecting sashing within your blocks.
- From the 1/2 yard binding fabric, cut into 7 pieces of 2 1/2″ strips for binding.
Essential Quilting Tools:
- Sewing Machine: A reliable machine with a 1/4″ presser foot is highly recommended for consistent seam allowances.
- Rotary Cutter, Mat, and Rulers: For precise and efficient cutting of fabric squares and strips. A 12.5″ square ruler and a longer ruler (e.g., 6″ x 24″) will be very helpful.
- Good Quality Thread: 100% cotton thread is ideal, matching or coordinating with your fabrics.
- Iron and Pressing Mat: Crucial for setting seams and ensuring flat, accurate blocks.
- Fabric Scissors: For any smaller cuts or trimming threads.
- Pins or Fabric Clips: To hold fabric pieces together securely before sewing.
- Seam Ripper: Every quilter’s essential “undo” tool.
- Design Wall or Large Flat Surface: Extremely useful for auditioning and arranging your blocks before final assembly.
Step-by-Step Guide: Crafting Your Easy Twisted Ribbon Quilt
Now that you have all your materials ready, let’s dive into the creation process. This pattern utilizes the ever-versatile half-square triangle (HST) technique, combined with strategic sashing, to achieve its dazzling twisted effect. Follow these steps carefully for the best results.
Step 1: Preparing Your Initial Half-Square Triangles (HSTs) for Fabric A & B
To begin forming your ribbon elements, you’ll first create a batch of HSTs. Take 2 pieces of your 10″ squares from Fabric A (Light) and Fabric B (Medium) respectively. Place them right sides together, ensuring all edges align perfectly. Using a fabric marker or pencil, draw a diagonal line from one corner to the opposite corner. Repeat this for the other diagonal, creating an “X” across your square. Next, sew a seam 1/4″ away on either side of both drawn lines. This technique allows you to create four HSTs from each pair of squares. Once sewn, cut directly on all the drawn lines, and then cut the square in half vertically and horizontally. This will yield 8 smaller units. Press these units open, always pressing the seam allowance towards the darker fabric (Fabric B in this case) to prevent “shadowing” of the lighter fabric. Finally, square up each HST to a precise 4 1/2″ square using your rotary cutter and square ruler. This meticulous squaring is vital for ensuring your blocks fit together perfectly. Repeat this process until you have enough A/B HSTs.
Step 2: Creating Remaining HSTs and Sashing Components
This step involves completing your HST collection and preparing the sashing elements that will connect your quilt blocks.
- First, make a total of 96 pieces of half-square triangles. For the initial set, use 12 pieces of 10″ Fabric A squares paired with 12 pieces of 10″ Fabric B squares. Follow the technique described in Step 1 (sewing 1/4″ on either side of the drawn diagonal, cutting, pressing, and squaring up to 4 1/2″).
- Next, create a second set of 96 half-square triangles by pairing 12 pieces of 10″ Fabric A squares with 12 pieces of 10″ Fabric C squares. Again, follow the same detailed process from Step 1, ensuring you press seams towards the darker Fabric C and square up to 4 1/2″.
- For the internal sashing that forms the “cross” within each block, cut 48 pieces of 2″ x 8 1/2″ strips from Fabric C. These strips will run between your assembled ribbon units.
- Finally, cut 12 pieces of 2″ squares from Fabric A. These small squares will act as cornerstones where your sashing strips intersect, adding a delicate touch to the block’s center.
Step 3: Assembling the Ribbon Units from HSTs
Now, let’s start forming the visual “ribbons.” Take your A/B half-square triangles and sew them together in pairs such that the colors connect to form a larger triangle. Imagine two HSTs, where the Fabric B sides meet to create a distinct triangle shape. Similarly, take your A/C half-square triangles and sew them together in pairs, connecting the Fabric C sides to form what visually resembles a rhombus or a diamond shape. The goal here is to create distinct two-toned units that will soon come together to form the twisted effect. Precision in your 1/4″ seam allowance is key here to ensure your points match up beautifully.
Step 4: Forming the Main Quilt Block Components
With your ribbon units prepared, it’s time to combine them. Carefully sew all the A/B pairs (the triangle units) to the A/C pairs (the rhombus units) to create a larger, more complex block component. This step is where the illusion truly begins to take shape. It is absolutely crucial to make sure that the A/B unit (the one with Fabric B) is consistently placed on top or in the designated position according to the pattern. This consistency ensures that the “twist” of the ribbon flows correctly across your entire quilt, avoiding any disjointed appearances. Take your time to align edges and press seams as you go, ensuring each component is flat and accurate.
Step 5: Assembling the Quilt Blocks with Sashing
This final assembly step brings all the elements together to form your complete Twisted Ribbon Quilt blocks. You’ve already created your main ribbon components; now we’ll integrate the sashing for structure and visual breaks.
- First, piece 2 of your ribbon units together with one of the 2″ x 8 1/2″ Fabric C strips in the center, acting as a connecting element. Refer to the provided photo or the original tutorial for visual guidance on how these units and strips are arranged. Repeat this process with the remaining ribbon units until you have all your horizontal unit pairs connected.
- Next, create the central sashing grid. Take the remaining 24 pieces of 2″ x 8 1/2″ Fabric C strips and the 12 pieces of 2″ Fabric A squares. Arrange these to form a grid, with the Fabric A squares acting as cornerstones where the Fabric C sashing strips intersect. This grid will form the striking “cross” in the center of your completed blocks.
- Finally, arrange all your assembled ribbon units and the sashing grid together to make each complete quilt block. The sashing strips will frame and separate your ribbon elements, enhancing the overall twisted effect and providing a crisp, clean finish. This is where a design wall or a large flat surface becomes invaluable; lay out your components, shifting them around until you are completely satisfied with the arrangement and the flow of the ribbon pattern. Once satisfied, carefully sew the rows together, paying close attention to nesting seams for perfect points. Repeat to create all the necessary blocks for your quilt.
Quilting Tips for a Flawless Twisted Ribbon Project
Creating a quilt is a journey that rewards patience and precision. To ensure your Easy Twisted Ribbon Quilt turns out beautifully, keep these expert tips in mind throughout your process:
- Accuracy is Paramount: The twisted ribbon effect relies heavily on precise cutting and consistent 1/4-inch seam allowances. Invest in a good quality rotary cutter, ruler, and mat, and measure twice, cut once. Use your 1/4″ presser foot as a guide.
- Pressing Matters: Pressing your seams correctly makes a significant difference. Generally, press seams towards the darker fabric to prevent the seam allowance from showing through lighter fabrics. For areas with many seams intersecting, consider “nesting” seams (pressing alternate seams in opposite directions) to reduce bulk and help points match perfectly. Always press, don’t iron (drag the iron); lift and place.
- Chain Piecing for Efficiency: When creating multiple identical units, like your HSTs, consider chain piecing. This involves feeding units through your sewing machine one after another without cutting the thread in between. It saves time and thread and helps maintain consistent stitching.
- Squaring Up is Non-Negotiable: After creating your HSTs and other pieced units, always take the time to square them up to the specified dimensions (e.g., 4 1/2″). This step is crucial for ensuring your blocks are perfectly sized and will fit together without puckers or waves.
- Audition Your Fabrics: Before making any cuts, lay out your chosen fabrics together to ensure the contrast and overall aesthetic are pleasing. This is especially important for the light, medium, and dark values in the Twisted Ribbon pattern.
- Use a Design Wall: As you assemble your blocks and eventually your quilt top, a design wall (even a flannel sheet taped to a wall) allows you to step back and view your layout. This helps catch any misplaced blocks or direction inconsistencies before they are sewn permanently.
- Good Quality Thread: Use a high-quality 100% cotton thread that complements your fabrics. It will be stronger and produce less lint, leading to a smoother sewing experience.
Customizing Your Twisted Ribbon Quilt: Creative Variations
One of the joys of quilting is the ability to personalize each project. While the original Twisted Ribbon Quilt pattern is stunning on its own, here are some ideas for how you can customize it to make it uniquely yours:
- Color Palette Exploration:
- Monochromatic Masterpiece: Experiment with various shades and tints of a single color (e.g., blues, greens, purples) for a sophisticated and serene look.
- Bold & Bright: Opt for high-contrast, vibrant colors for a playful and energetic quilt. Think primary colors or a rainbow spectrum.
- Seasonal Themes: Choose fabrics that reflect a particular season – warm oranges and browns for autumn, cool blues and whites for winter, pastels for spring, or bright florals for summer.
- Scrappy Delight: If you have a collection of fabric scraps, this pattern is an excellent way to use them! Just ensure you maintain the light, medium, and dark value distinctions across your chosen scraps.
- Fabric Print Play:
- Solids & Blenders: Using solid fabrics or very subtle blenders will highlight the geometric design and the twisted effect with maximum clarity.
- Small Prints & Textures: Incorporate small-scale prints, tone-on-tone fabrics, or fabrics with subtle textures to add visual interest without detracting from the ribbon pattern. Avoid large, busy prints that might obscure the design.
- Fussy Cutting: If you have a specific motif in a fabric that you want to showcase, consider fussy cutting some of your 2″ squares or even parts of your HSTs, though this will require more fabric.
- Quilt Size Adjustments:
- To make a smaller quilt (e.g., a baby quilt or wall hanging), simply make fewer blocks.
- For a larger quilt (e.g., twin, queen, king), calculate how many additional blocks you’ll need and adjust your fabric requirements accordingly. You can also increase the border width.
- Border Variations:
- Instead of a simple solid border, consider adding multiple borders in varying widths and colors.
- Experiment with pieced borders using smaller HSTs or strips to complement the main quilt design.
- Add a flange border for an extra pop of color between your quilt top and the main border.
- Quilting Motifs: Once your quilt top is assembled, think about how you will quilt it. Straight-line quilting can emphasize the geometric nature, while free-motion quilting can add softness and organic movement.
Bringing It All Together: Finishing Your Quilt
Once your quilt top is meticulously pieced together and looks absolutely perfect, the next exciting phase is to transform it into a complete, snuggly quilt. This involves three main steps: layering, quilting, and binding.
- Layering (Quilt Sandwich): You’ll create a “quilt sandwich” by layering your backing fabric (right side down), a layer of batting, and then your beautiful Twisted Ribbon quilt top (right side up). Ensure all layers are smooth and free of wrinkles. Baste these layers together using safety pins, basting spray, or long hand stitches, ensuring they remain securely in place during the quilting process.
- Quilting: This is where you add the stitches that hold all three layers together and add texture and durability. You can choose from various quilting methods:
- Straight-Line Quilting: Use your walking foot to stitch straight lines, emphasizing the geometric lines of your ribbon pattern or creating a grid.
- Free-Motion Quilting: For a more artistic touch, use a free-motion quilting foot to create swirling patterns, stippling, or other custom designs.
- Tying: For a simpler, traditional look, you can tie your quilt at regular intervals using embroidery floss or yarn.
The quilting design can dramatically enhance the visual appeal of your Twisted Ribbon pattern, so choose one that complements its unique twists and turns.
- Binding: The binding provides a durable and attractive finish to the edges of your quilt. You’ve already cut your 2 1/2″ strips from Fabric C for this purpose. Sew these strips together end-to-end to create one long continuous strip. Attach the binding to the front edge of your quilt, then fold it over to the back and hand-stitch or machine-stitch it down. This final touch not only secures the raw edges but also frames your masterpiece beautifully.
Final Thoughts: Embrace Your Twisted Ribbon Creation
The Easy Twisted Ribbon Quilt is a testament to how simple geometric shapes, when combined with thoughtful fabric choices and precise execution, can create something truly extraordinary. It’s a project that challenges and delights in equal measure, culminating in a finished piece that exudes intricate beauty. Whether you choose to follow the exact color scheme that first caught your eye or venture into your own unique palette, the result will be a stunning quilt that speaks volumes of your creativity and dedication.
We hope this comprehensive guide has demystified the process and inspired you to embark on your own Twisted Ribbon quilting journey. There’s immense satisfaction in seeing those ribbons appear to twist and turn across your fabric, a testament to your growing skills. Don’t hesitate to give this beautiful design a try for your next quilting project. Share your creations, experiment with new ideas, and most importantly, enjoy every stitch! Happy quilting!