
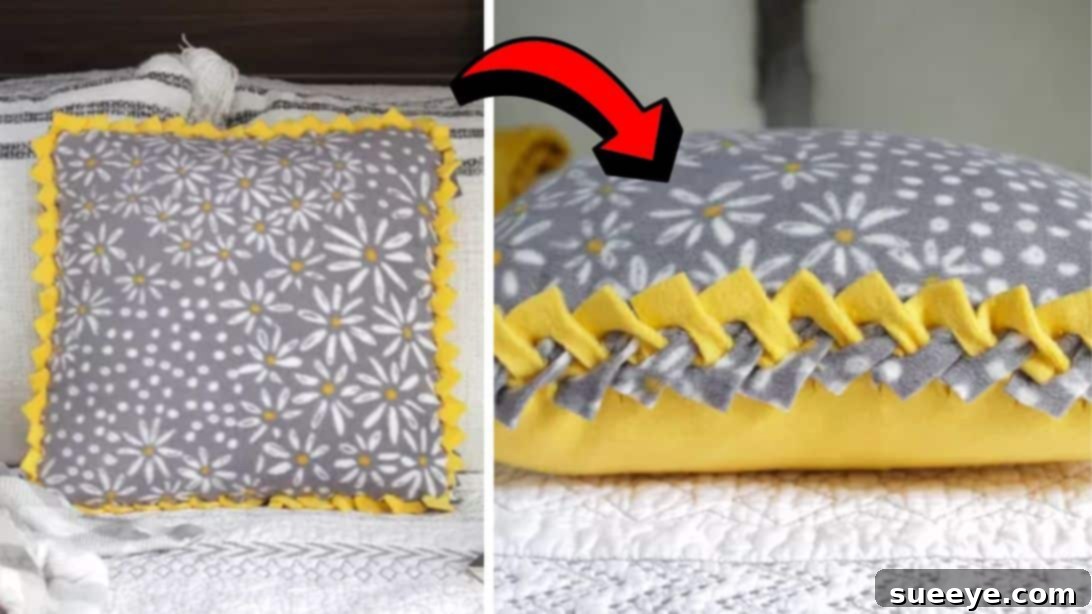
Embark on a delightful crafting journey with this incredibly simple yet utterly charming DIY braided pillowcase tutorial. Perfect for anyone seeking a quick, no-sew project that yields beautiful results, this innovative idea requires nothing more than a few cuts into soft fleece fabric and some basic braiding skills. Forget the sewing machine; you’ll be able to complete this project in just a matter of minutes, transforming ordinary fleece into a stylish and cozy home accessory. Whether you’re a seasoned crafter or a complete beginner, this step-by-step guide will walk you through creating a unique braided pillowcase that’s both functional and decorative.
RELATED: Easy No-Sew DIY Rug Using Scrap Fabrics
This brilliant no-sew concept is a game-changer for those who are unfamiliar with sewing techniques, lack the necessary equipment, or simply prefer a craft that doesn’t involve needles and thread. It’s an accessible project for all ages (with adult supervision for cutting) and a fantastic way to unleash your creativity. Beyond personal use, these handcrafted braided pillowcases make thoughtful and budget-friendly gifts for friends and family. The beauty of this DIY project lies in its customizability: you can choose any color combination of fleece to match your home decor or the recipient’s style, and even add embellishments to make it truly one-of-a-kind. Imagine a vibrant splash of color on your sofa or a cozy addition to a bedroom, all crafted by your own hands in under an hour.
Why Choose a No-Sew Braided Pillowcase?
The appeal of a no-sew project extends far beyond just saving time. For many, the barrier to entry for traditional crafting often involves specialized tools like a sewing machine, which can be expensive and intimidating. This braided fleece pillowcase tutorial bypasses all those hurdles, making crafting accessible to everyone. Fleece fabric is the secret hero here, as its non-fraying edges mean you don’t need to hem or finish the seams, simplifying the process immensely. This allows you to focus purely on the creative aspects of cutting and braiding, without the fuss of intricate stitching.
Moreover, the speed at which you can complete this project is truly remarkable. In a world where time is a precious commodity, a craft that delivers impressive results within minutes is invaluable. This makes it an ideal activity for a spontaneous creative burst, a last-minute gift idea, or a fun afternoon project with kids. The tactile experience of working with soft fleece and the satisfaction of seeing your project come together so quickly are incredibly rewarding. It’s also an excellent way to use up leftover fleece scraps from other projects, promoting sustainability and reducing waste.
Materials for Your No-Sew Braided Pillowcase:
Gathering your materials for this project is straightforward. The key components are readily available at most fabric or craft stores, making it easy to start your DIY adventure. The choice of fleece is crucial; its inherent properties make it perfect for no-sew projects, as it won’t unravel when cut. Select colors that complement each other or your existing decor. Remember, the quality of your tools, especially your scissors, can significantly impact the ease and neatness of your cuts.
- 2 pieces of fleece fabric, measuring approximately 18″x18″ each.
- 1 standard throw pillow insert, typically 16″x16″ (ensure it fits snugly inside the finished pillowcase).
- Sharp fabric scissors (for clean, precise cuts).
- A ruler or measuring tape (for accurate measurements).
When selecting your fleece, consider its weight and texture. Anti-pill fleece is an excellent choice as it resists pilling over time, ensuring your pillowcase remains looking fresh and new. While 18″x18″ squares are suggested, you can easily adjust these dimensions to accommodate different pillow insert sizes. Just ensure your fabric pieces are at least 2 inches larger on all sides than your pillow insert to allow for the braided edges. A good quality, sharp pair of fabric scissors will make cutting effortless and result in cleaner edges, which is essential for a polished finish. A ruler will be indispensable for marking and ensuring all your cuts are even, contributing to the overall symmetry of your braided design.
How to Make a No-Sew Braided Pillowcase: A Step-by-Step Guide
Creating this braided pillowcase is a testament to how simple techniques can produce stunning results. Follow these detailed steps to craft your own beautiful no-sew accessory. Precision in cutting is important for a neat finish, so take your time with each measurement and cut.
Step 1: Preparing Your Fleece Fabric
Begin by ensuring your two pieces of fleece are perfectly cut into 18-inch squares. Lay one piece of fleece flat on a clean, steady surface. Place the second piece directly on top, aligning all edges precisely. It’s often recommended to place them with their wrong sides facing each other, so the finished pillowcase has the desired outer surface facing outwards. Use your ruler to measure and mark a 2-inch square from each of the four corners of the stacked fleece. Carefully cut out these 2-inch squares through both layers of fabric. This crucial step creates the corners of your pillowcase and provides the starting point for your fringed strips.
Next, using your ruler and a fabric marker (or simply eyeballing if confident), mark strips along all four sides of the stacked fleece. These strips should be 1 inch wide and 2 inches deep, extending inwards from the outer edge towards the center, where the corner cutouts began. Cut through both layers of fleece along these marks, creating a series of 1×2-inch fringes around the perimeter of your fabric squares. The key here is consistency; try to make your strips as even as possible, as this will contribute to a more uniform and attractive braid. Take your time during this cutting phase; sharp scissors will make this process much smoother and prevent jagged edges.
Step 2: Creating Holes and Assembling the Layers
Once all your fringe strips are cut, you’ll need to create small openings for threading. Take each individual 1×2-inch strip, fold it in half lengthwise, and carefully snip a small hole or slit in the center of the fold. Repeat this process for every single strip on both pieces of fleece. These holes will act as the anchors through which you’ll thread the opposing strips, forming the signature braided look. Ensure the holes are large enough for the other strips to pass through easily but not so large that they compromise the integrity of the fleece.
Now, it’s time to assemble your pillowcase. Carefully lift and set aside the top layer of fleece. Place your 16×16-inch pillow insert directly onto the center of the bottom fleece layer. Make sure the pillow is centered and positioned evenly, leaving a border of fringe strips around all sides. Once the pillow is in place, gently lay the top layer of fleece back over the pillow, aligning its fringe strips directly with those of the bottom layer. The pillow should be snugly sandwiched between the two fleece squares, ready for the braiding process.
Step 3: The Braiding and Finishing Touch
With your pillow neatly positioned between the two fleece layers, it’s time to begin the braiding that will secure your pillowcase. Start on any one of the four sides. Take the top fringe strip closest to a corner, and carefully push it through the hole of the corresponding bottom fringe strip. Once it’s threaded through, take the bottom strip that you just threaded through and push it back through the hole of the top strip. This creates an interlocking loop. Gently pull to tighten, but don’t pull too hard as it might stretch the fleece or tear the hole.
Continue this simple yet effective threading pattern around the entire perimeter of the pillow. Work your way methodically, pushing the top strip through the bottom’s hole, then the bottom strip through the top’s hole. Maintain a consistent tension as you go, ensuring a neat and even braid all the way around. As you approach the end of a side, and finally the last few strips around the pillow, you’ll need to secure the final connection. When you reach the very last strip on one side, cut it in half lengthwise. This will create two thinner tails. Use these tails to tie a secure double knot with the adjacent strip, firmly fastening the braid and completing the enclosure of your pillowcase.
Unleash Your Creativity: Customizing Your Pillowcase
The beauty of a DIY project like this no-sew braided pillowcase is the endless possibilities for personalization. Once you’ve mastered the basic technique, you can truly make each pillowcase your own, or tailor it perfectly for a special gift.
Color Combinations and Patterns
Fleece comes in an astonishing array of colors, patterns, and even textures. Don’t limit yourself to solid colors! Consider using one patterned fleece and one solid, or two complementary solid colors for a striking contrast. For a child’s room, choose vibrant, playful prints. For a more sophisticated look, opt for subtle textures or a monochromatic scheme. You could even use three different colors by creating a “sandwich” of fleece layers and cutting through all three, though this would require a slightly different braiding technique to incorporate all colors effectively.
Adding Embellishments
To take your pillowcase to the next level, think about adding extra flair. Fabric markers can be used to draw designs or write messages on the solid fleece sections before braiding. Iron-on patches or appliqués can introduce fun characters or motifs. For a touch of sparkle, consider fabric glitter glue, or even sew (if you’re feeling adventurous) small pom-poms or tassels along the braided edge after the main construction. Just be mindful that any additions should be securely attached and durable enough to withstand normal use and washing.
Different Sizes and Shapes
While this tutorial focuses on an 18×18-inch square, the technique is incredibly adaptable. Want a rectangular throw pillow? Simply adjust your initial fleece square dimensions to rectangles, ensuring your pillow insert fits accordingly. You could even create smaller decorative pillows or larger floor cushions. The principle remains the same: ensure your two fabric pieces are larger than your insert, allowing ample material for the fringe and braiding.
Caring for Your Fleece Masterpiece
One of the best features of fleece is its ease of care, ensuring your beautiful braided pillowcase remains soft and vibrant for a long time. To keep your no-sew pillowcase looking its best, machine wash it in cold water on a gentle cycle. Use a mild detergent and avoid bleach, which can damage fleece fibers and fade colors. It’s often recommended to wash fleece items separately or with similar fabrics to prevent lint transfer. Tumble dry on a low heat setting or, for best results, air dry. High heat can sometimes cause fleece to melt or lose its softness. With proper care, your handmade braided pillowcase will continue to be a cozy and stylish addition to your home for years to come.
Beyond the Basics: More No-Sew Project Inspiration
Once you experience the joy and simplicity of this no-sew braided pillowcase, you might find yourself eager to explore other creative projects that don’t require a sewing machine. The world of no-sew crafts is vast and rewarding! From simple fleece blankets with tied fringes to decorative fabric storage bins, coasters, or even pet beds, the possibilities are endless. Many no-sew projects utilize similar techniques of cutting, tying, or using fabric adhesive, making them incredibly accessible for crafters of all skill levels. Don’t hesitate to check out other tutorials and gather inspiration to continue your no-sew crafting journey.
Your New Favorite DIY Project Awaits!
And there you have it – a simple, budget-friendly, and incredibly rewarding DIY project that bypasses the need for a sewing machine entirely. This no-sew braided pillowcase is more than just a functional item; it’s a testament to creativity, accessibility, and the joy of making something beautiful with your own hands. Whether you’re looking to spruce up your living space, create a heartfelt gift, or simply indulge in a relaxing craft, this tutorial offers an easy path to success. So grab your fleece, your scissors, and let your imagination take hold. The satisfaction of cuddling up with a pillowcase you crafted yourself is truly unmatched. Happy crafting!
*All image credit belongs to ehow via YouTube. Follow and subscribe to their channel for more inspiring DIY tutorials!