

Easy Fruit Kolaches: Your Simple Recipe for Delicious Homemade Pastries
Are you yearning for a delightful breakfast treat or a sweet snack that feels homemade but doesn’t demand hours in the kitchen? This incredible fruit kolaches recipe offers the perfect solution! Inspired by the ingenious methods showcased by Catherine’s Plates on YouTube, this approach masterfully blends the convenience of frozen dinner rolls with your favorite fruit fillings to produce an irresistible, tender pastry. Kolaches, with their rich heritage and comforting flavors, are a beloved classic, and this streamlined recipe makes them accessible to even the most beginner bakers. Say goodbye to the complexities of scratch-made dough; this guide prioritizes ease, fantastic flavor, and a rewarding result that will have everyone reaching for another kolache.
Originating from Central Europe, specifically the Czech Republic, kolaches are traditional pastries that have beautifully assimilated into American culinary culture, particularly gaining immense popularity in regions like Texas. Characterized by a slightly sweet yeast dough with a central depression, they are typically filled with a delightful variety of ingredients, ranging from fruit preserves, sweet cheese, and poppy seeds to savory options. While crafting kolaches from scratch can be a fulfilling but time-consuming endeavor, involving extensive kneading and multiple proofing stages, this innovative recipe thoughtfully utilizes store-bought frozen yeast rolls. This brilliant shortcut dramatically reduces preparation time, allowing you to achieve that authentic, cherished taste and texture without the usual fuss and wait.
Imagine the comforting aroma of freshly baked pastries filling your home on a lazy weekend morning, ready to be paired with a steaming cup of coffee or as a sweet complement to a leisurely brunch. These assorted fruit kolaches are not just perfect for breakfast; they also make a wonderful addition to any brunch spread, an ideal afternoon pick-me-up, or a satisfying dessert. By leveraging readily available ingredients such as frozen Rhodes Yeast Dinner Rolls and a selection of pie fillings, jellies, or jams, you gain the freedom to customize each batch. This versatility ensures there’s a flavor profile to please every palate, making it easy to cater to diverse tastes. Let’s embark on this culinary journey to bring these delectable, easy-to-make kolaches to your kitchen, promising maximum delight with minimal effort.
Essential Ingredients for Effortless Fruit Kolaches
The brilliance of this recipe lies in its simplicity and reliance on readily available ingredients, with one key component acting as a clever shortcut: frozen yeast dinner rolls. This smart choice allows you to achieve a homemade taste without the lengthy commitment typically associated with preparing yeast dough from scratch. Here’s a detailed look at everything you’ll need to create your batch of these utterly irresistible fruit kolaches:
- 1 pkg (approx. 36 count) Rhodes Yeast Dinner Rolls, Frozen: These rolls are the cornerstone of our easy kolache recipe. By using frozen dough, you completely bypass the time-consuming processes of preparing, kneading, and proofing dough from scratch, saving you significant effort and hours. Ensure the rolls are completely frozen when you begin the thawing process.
- 8 oz pkg Cream Cheese, Room Temperature: This ingredient is crucial for crafting the rich, tangy, and wonderfully creamy cheese filling that perfectly balances the sweetness of the fruit. Allowing the cream cheese to come to room temperature is vital for achieving a smooth, velvety, and lump-free mixture.
- 2 tbsp Powdered Sugar: Added to the cream cheese mixture, powdered sugar provides a delicate sweetness without being overpowering, contributing to the signature flavor of kolaches.
- 1 tsp Vanilla Extract: A splash of vanilla extract elevates the flavor profile of the cream cheese filling, infusing it with a warm, inviting aroma and a classic bakery taste.
- 1-2 tbsp Milk: Used to adjust the consistency of the cream cheese filling. Start with one tablespoon and add more as needed until the filling is smooth, pliable, and easy to spread or pipe, yet firm enough to hold its shape.
- Variations of Pie Filling: Unleash your creativity here! Popular choices include cherry, apple, peach, blueberry, or mixed berry pie fillings. These pre-made fillings offer a robust fruit flavor and a delightful texture, ensuring a consistent and delicious result.
- Variations of Jelly or Jam: Options like strawberry, raspberry, apricot, grape, or orange marmalade provide endless possibilities for flavor combinations. Jellies and jams often contribute a slightly different, sometimes brighter and more concentrated, fruit essence compared to pie fillings.
- Cooking Spray: An essential aid for preventing the plastic wrap from adhering to the rising dough. A light spray ensures a smooth, undisturbed rise, allowing your kolaches to achieve their perfect airy texture.
- 2 tbsp Butter, Melted (Optional, for brushing): Brushing the warm, baked kolaches with melted butter not only imparts a beautiful, glossy sheen but also enhances their flavor and helps to keep them wonderfully moist.
Step-by-Step Directions for Crafting Perfect Fruit Kolaches
Creating these delectable fruit kolaches is a surprisingly straightforward process, largely thanks to the strategic use of frozen yeast rolls. Follow these detailed, easy-to-understand steps to guarantee a successful and utterly delicious outcome:
Step 1: Thawing and Rising the Rolls
- Prepare your baking surface: Begin by lining a large baking sheet with parchment paper. This simple step prevents sticking, ensures even baking, and makes cleanup an absolute breeze.
- Arrange the frozen rolls: Carefully place the frozen Rhodes Yeast Dinner Rolls onto the prepared baking sheet. It is crucial to leave ample space between each roll, approximately 2 inches, as they will expand considerably during the rising process. Proper spacing prevents them from sticking together.
- Cover for proofing: Lightly spray a large piece of plastic wrap with cooking spray. Gently drape the plastic wrap, sprayed-side down, directly over the rolls. Ensure the plastic wrap is not pulled too taut, allowing plenty of room for the dough to expand as it rises.
- Allow to rise: Transfer the baking sheet to a warm, draft-free environment. Excellent choices include a slightly warmed oven (turned off, with just the oven light on for gentle warmth) or a spot near a sunny window. Let the rolls rise for approximately 3-4 hours, or until they have visibly doubled in size and appear puffy and soft. This proofing step is absolutely critical for achieving a light, airy, and tender kolache texture.
Step 2: Preparing the Cream Cheese Filling
- In a medium-sized mixing bowl, combine the softened cream cheese, powdered sugar, and vanilla extract.
- Using an electric mixer or a sturdy whisk, beat the mixture thoroughly until it becomes wonderfully smooth, creamy, and completely free of any lumps.
- Gradually incorporate 1 to 2 tablespoons of milk, mixing until you achieve the desired consistency. The filling should be thick enough to hold its form but soft enough to be easily spooned or piped into the kolaches.
Step 3: Creating the Filling Pockets
- Once the rolls have fully risen and are beautifully puffed, gently remove the plastic wrap.
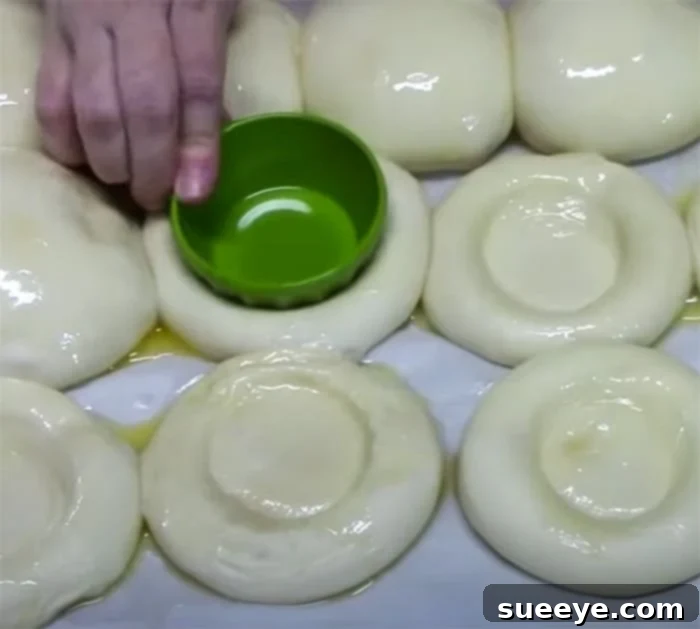
- Using the back of a spoon or your thumb, carefully create a shallow indentation right in the center of each risen roll. Exercise a gentle hand to avoid deflating the airy dough, as this depression will serve as the perfect nest for your delicious fillings.
Step 4: Filling the Kolaches
- Preheat your oven to 375°F (190°C). This ensures the oven is at the correct temperature for immediate baking.
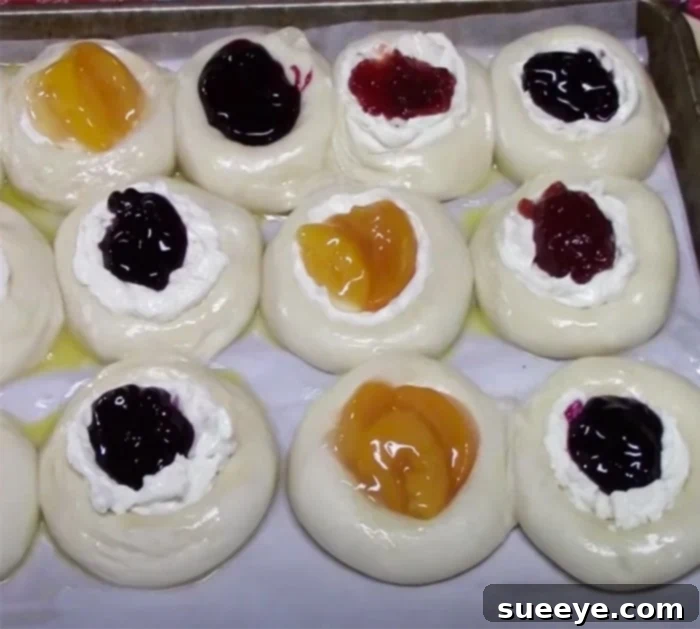
- Spoon a generous dollop of the freshly prepared cream cheese mixture into the center of each indentation. Spread it out slightly, but be sure to leave a small border of dough around the edges to contain the filling.
- On top of the luscious cream cheese layer, add a spoonful of your chosen pie filling, jelly, or jam. Feel free to mix and match different flavors on the same baking tray to create a delightful assortment for everyone to enjoy!
Step 5: Baking the Kolaches
- Carefully transfer the baking sheet, loaded with your prepared kolaches, to the preheated oven.
- Bake for approximately 20 minutes, or until the kolaches develop a beautiful golden-brown color on top and around the edges, and the fillings appear bubbly and set. It’s always a good idea to keep a close eye on them during the final minutes to prevent over-browning.
Step 6: Finishing Touches (Optional)
- Once baked to perfection, carefully remove the kolaches from the oven.
- If desired, gently brush the warm kolaches with melted butter. This simple step adds a wonderful richness, enhances their flavor, and imparts a lovely, professional-looking shine.
- Allow them to cool slightly on the baking sheet for a few minutes before carefully transferring them to a wire rack to cool completely. This helps the fillings to set properly.
Expert Tips for Perfect Easy Kolaches Every Time
Even with a simplified recipe, a few insider tips can transform your kolaches from simply good to absolutely extraordinary. Pay attention to these details for consistently delicious results:
- Optimal Proofing Environment: A warm and slightly humid environment is the secret to a successful rise. If your kitchen is on the cooler side, try warming your oven for just a minute, then turning it off and placing the rolls inside with the light on. Alternatively, placing a bowl of hot water in the oven alongside the rolls can create a steamy, ideal atmosphere for proofing.
- Avoid Overfilling: While the temptation to load up on delicious filling is strong, overfilling can lead to kolaches leaking during baking, resulting in a messy tray and potentially burnt filling. Aim for a generous but contained amount, allowing a small border of dough to remain around the edges.
- Handle with Care: After the rolls have risen, it’s crucial to handle them very gently. When creating the indentations and adding the fillings, avoid pressing too hard, as this can easily deflate the airy dough and lead to dense, rather than light and fluffy, kolaches.
- Experiment with Fillings: Don’t limit your creativity! While this recipe highlights fruit and cream cheese, traditional kolaches also come with delightful poppy seed fillings or even plain, sweet cheese. Feel free to mix and match or create a diverse assortment to satisfy various cravings.
- Monitor Baking Closely: Oven temperatures can vary, so the specified baking time should serve as a guideline. The best indicators of readiness are a beautiful golden-brown color on the dough and fillings that are visibly bubbly and set. Keep an eye on them during the final minutes to prevent over-browning.
- Cooling Patience: Allowing the kolaches to cool slightly before serving is important. This step permits the fillings to set properly, making them much easier to handle, serve, and fully enjoy without a molten mess.
Creative Flavor Variations and Serving Suggestions
One of the most enjoyable aspects of making kolaches is the opportunity to explore an endless array of flavor combinations. This recipe provides a fantastic, versatile base for your culinary creativity:
- Classic Cream Cheese Only: For a pure, rich experience, simply use the sweet cream cheese filling without adding any fruit. A light sprinkle of cinnamon sugar over the cream cheese before baking adds a comforting, traditional touch.
- Nutty Additions: Enhance texture and depth by stirring finely chopped toasted nuts, such as pecans or walnuts, directly into your fruit fillings or sprinkling them over the top before baking.
- Bright Citrus Zest: Introduce a refreshing twist by incorporating a small amount of finely grated lemon or orange zest into your cream cheese filling. This adds a vibrant, zesty note that beautifully complements the sweetness.
- Chocolate Decadence: For an indulgent treat, add a few mini chocolate chips to the cream cheese filling or sprinkle them over the fruit before baking.
These delightful pastries are incredibly versatile and can be enjoyed in a multitude of ways, making them perfect for any occasion:
- Breakfast or Brunch Centerpiece: Serve them warm alongside your morning coffee, a robust cup of tea, or a refreshing glass of milk for a truly satisfying and memorable start to your day.
- Elegant Dessert Option: Transform them into a sophisticated dessert by pairing them with a scoop of premium vanilla ice cream or a dollop of freshly whipped cream.
- Perfect Afternoon Snack: They make an ideal pick-me-up to accompany your afternoon tea or coffee break, providing just the right amount of sweetness.
- Party and Potluck Favorite: Kolaches are easy to transport and share, making them a fantastic contribution to any potluck, picnic, or gathering, always met with enthusiastic appreciation.
Storage and Make-Ahead Tips for Your Kolaches
To maximize the enjoyment of your homemade fruit kolaches and facilitate convenient preparation, consider these practical storage and make-ahead tips:
- Room Temperature Storage: Freshly baked kolaches, once completely cooled, can be stored in an airtight container at room temperature for up to 2 days. This helps maintain their soft texture.
- Refrigeration: For extended freshness, particularly for kolaches containing cream cheese filling, it is best to refrigerate them in an airtight container for up to 5 days. Gently warm them in the microwave or a preheated oven (around 250°F/120°C for 5-10 minutes) before serving for the best texture and flavor.
- Freezing Baked Kolaches: Once your kolaches have completely cooled, arrange them in a single layer on a baking sheet and freeze until they are solid. Then, transfer the frozen kolaches to a freezer-safe bag or an airtight container, where they can be stored for up to 2-3 months. To enjoy, thaw them overnight in the refrigerator and warm gently before serving.
- Make-Ahead Dough (Overnight Rise): For fresh-baked kolaches with minimal morning effort, you can arrange the frozen rolls on the baking sheet, cover them as directed, and let them thaw and rise slowly in the refrigerator overnight (this typically takes about 8-12 hours). In the morning, remove them from the refrigerator and allow them to come to room temperature for about 30-60 minutes before proceeding with the rest of the steps, from creating the indentations onwards. This method ensures warm, delicious kolaches are ready much faster on a busy morning.
Conclusion: Your Easy Path to Delicious Homemade Kolaches
In conclusion, this innovative fruit kolaches recipe offers a truly brilliant shortcut to creating a beloved, traditional pastry with remarkable ease. It skillfully demystifies the baking process, transforming what might typically be considered a complex and time-consuming task into an enjoyable, accessible culinary adventure for anyone, regardless of their baking experience. The strategic use of premade ingredients, particularly the frozen yeast rolls, makes these kolaches wonderfully similar to large, fluffy cheese danishes in their simple preparation and comforting appeal. While the intricate process of making traditional kolaches from scratch certainly has its merits, this recipe beautifully demonstrates that you absolutely do not need to dedicate hours in the kitchen to savor an authentic taste and satisfying texture.
Whether you’re an experienced baker seeking a quick yet impressive treat or a curious beginner eager to delve into the delightful world of pastries, these easy fruit kolaches are an impeccable choice. Each one is wonderfully dense yet tender, delightfully sweet, and incredibly versatile, offering endless possibilities with various filling options. So, gather your ingredients, follow these straightforward steps, and prepare to enchant your taste buds and loved ones with a batch of homemade kolaches that are as gratifying to create as they are to devour. Embrace the simple pleasure of baking and relish the utterly delicious rewards that await!