
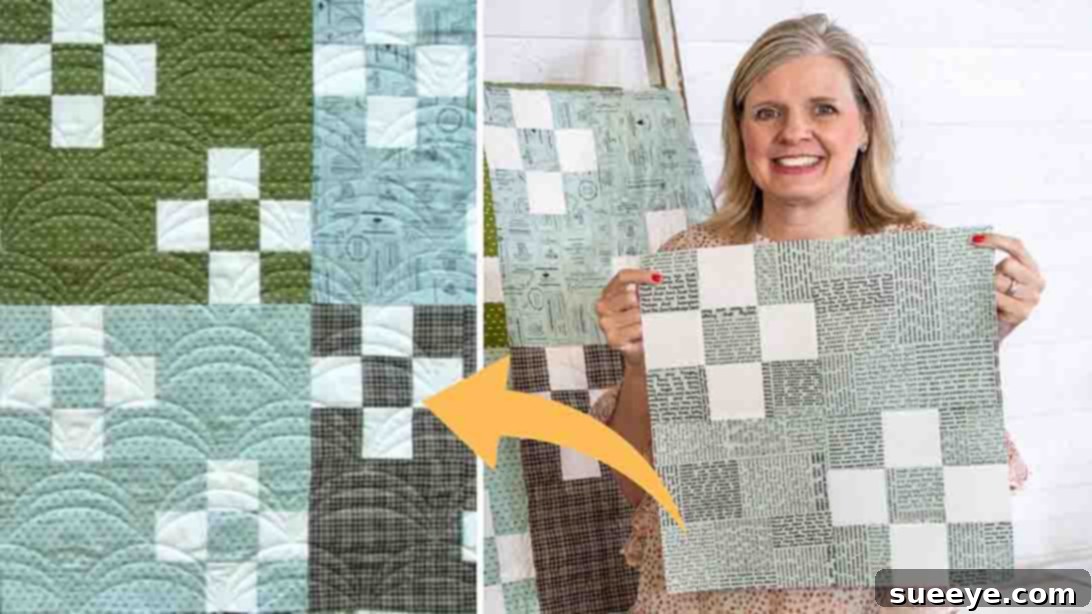
Embarking on a quilting journey is a truly rewarding experience, opening up a world of creativity and cozy comfort. For many, the first quilt pattern chosen sets the tone for future projects, becoming a cherished memory of learning a new skill. If you’re searching for that perfect introductory project, look no further than this incredibly straightforward Fat Quarter Four-Patch Quilt. This design, popularized by experts like Fat Quarter Shop on YouTube, is an enduring favorite among beginners, and for good reason. Its simplicity doesn’t compromise on visual appeal, allowing you to quickly master fundamental quilting techniques while creating a beautiful, functional piece. Join us as we explore the step-by-step process of crafting this delightful quilt, transforming vibrant fat quarters into a finished masterpiece you’ll be proud to call your own. Get ready to fall in love with quilting!
Why the Fat Quarter Four-Patch Quilt is an Ideal Starter Project
The Fat Quarter Four-Patch quilt stands out as a fantastic choice for anyone new to quilting, offering a gentle yet engaging introduction to the craft. Its appeal lies in several key aspects:
- Simplicity and Speed: The pattern relies on basic squares and straightforward piecing techniques, making it easy to understand and quick to assemble. You’ll see progress rapidly, which is incredibly encouraging for beginners.
- Perfect for Pre-Cuts: Utilizing fat quarters means less initial cutting and more time spent sewing. Fat quarters come in curated bundles, taking the guesswork out of fabric selection and ensuring a cohesive look.
- Skill-Building Foundation: While simple, this quilt teaches essential skills such as accurate cutting, consistent seam allowances, precise pressing, and block assembly – all crucial techniques that will serve as the bedrock for more complex projects down the line.
- Visually Stunning Results: Despite its ease, the Four-Patch design, especially when combined with a Nine-Patch block, creates a visually dynamic and intricate-looking quilt. It offers a wonderful opportunity to play with color and fabric placement.
- Versatility: Once you’ve mastered the basic block, you can easily adapt the pattern to create quilts of various sizes, or even incorporate these blocks into other projects. It’s a stepping stone to endless creative possibilities.
Materials: Gathering Your Supplies for a Lap-Sized Quilt
Before diving into cutting and sewing, let’s ensure you have all the necessary materials and tools. For this particular lap-sized quilt, the following quantities are recommended. Remember, choosing your fabrics is one of the most exciting parts of quilting, so pick colors and patterns that inspire you!
Fabric Requirements for a Lap Size Quilt Top:
- 21 Fat Quarters: These will form the main “Fabric A” and “Fabric B” elements of your quilt blocks. A fat quarter is a quarter-yard cut of fabric, approximately 18″ x 22″, offering a versatile piece for cutting squares and rectangles. Opt for a variety of prints and solids that complement each other.
- 1 1/3 Yards Accent Fabric: This fabric will be “Fabric C” in our instructions, providing contrast and cohesion within your nine-patch blocks. Choose a color that ties your fat quarters together, perhaps a solid or a subtle tone-on-tone print.
- 3/4 Yard Binding Fabric: This fabric will create the border that finishes the edges of your quilt. Select a durable fabric that coordinates with your quilt top.
- 4 3/4 Yards Backing Fabric: This will be the underside of your quilt. You can choose a single fabric or piece together several coordinating fabrics for a unique backing.
- Download the Free PDF Pattern Here: For a visual reference and detailed cutting diagrams, make sure to grab the official pattern from Fat Quarter Shop.
Essential Quilting Tools:
Beyond the fabrics, having the right tools on hand will make your quilting experience much smoother and more enjoyable. These are standard items for any quilter’s toolkit:
- Sewing Machine: A reliable machine capable of a straight stitch is paramount. Ensure it’s threaded with good quality cotton thread that matches or blends with your fabrics.
- Rotary Cutter, Mat, and Rulers: These are indispensable for accurate and efficient fabric cutting. A 24-inch ruler and a smaller square ruler (e.g., 6.5-inch or 8.5-inch) are highly recommended. Always use a sharp blade in your rotary cutter.
- Fabric Scissors: For any small snips or thread trimming. Keep them sharp and dedicated solely to fabric.
- Pins or Wonder Clips: Essential for holding fabric pieces together securely before sewing, ensuring alignment and preventing shifting.
- Iron and Ironing Board: Proper pressing is as crucial as sewing for accurate quilt blocks. A good steam iron is a quilter’s best friend.
- Matching Thread: High-quality 100% cotton thread is generally preferred for piecing quilts.
- Seam Ripper: Every quilter needs one! It’s for carefully undoing stitches when mistakes happen (and they will!).
Precision Cutting: The Foundation of a Beautiful Quilt
Accurate cutting is the cornerstone of successful quilting. Even slight inaccuracies can lead to distorted blocks and a wavy quilt top. Take your time with this step, ensuring all measurements are precise. Labeling your cut pieces can also save confusion later on.
Cutting Instructions for Your Fabrics:
For optimal results, ensure your fabrics are pressed before cutting to remove any wrinkles or creases. Use your rotary cutter, mat, and rulers for clean, straight cuts.
- From Your 21 Fat Quarters (Designated as Fabric A & B):
- From twenty of your fat quarters, carefully cut:
- 2 – 8″ squares per fat quarter (totaling 40 squares – Fabric A): These larger squares will be key components in your main quilt blocks.
- 10 – 3″ squares per fat quarter (totaling 200 squares – Fabric B): These smaller squares will be used to construct the inner nine-patch blocks.
- You will have one extra fat quarter that can be reserved for future projects, practice, or as a backing detail.
- From twenty of your fat quarters, carefully cut:
- From Your 1 1/3 Yards Accent Fabric (Designated as Fabric C):
- Cut 160 – 3″ squares (Fabric C): This accent fabric will alternate with Fabric B to create the characteristic nine-patch design.
- From Your 3/4 Yard Binding Fabric (Designated as Fabric D):
- Cut 8 – 2 1/2″ x Width of Fabric (WOF) strips (Fabric D): WOF typically refers to the selvage-to-selvage width of your fabric, usually around 40-44 inches. These strips will later be joined to create the continuous binding for your quilt.
Step-by-Step Quilting Journey: From Fabric to Finished Quilt
Now that your fabrics are prepped and precisely cut, it’s time for the exciting part: sewing! Throughout these steps, remember the importance of a consistent 1/4-inch seam allowance. This is the standard for quilting and is crucial for your blocks to come out the correct size. Also, pressing your seams correctly after each step helps blocks lie flat and fit together perfectly.
Step 1: Crafting the Nine-Patch Block – The Heart of the Design
The nine-patch block is a classic, made by sewing together nine squares in a 3×3 grid. For this quilt, you will be creating many of these foundational units.
- Begin by taking one 3″ Fabric B square and one 3″ Fabric C square. Place them right sides together and sew along one edge with a consistent 1/4-inch seam. Repeat this to create a Fabric B-C pair.
- Take another 3″ Fabric B square and sew it to a 3″ Fabric C square to create a C-B pair.
- Now, assemble your rows. For the first row, sew a Fabric B square, then a Fabric C square, then another Fabric B square. For the second row, sew a Fabric C square, then a Fabric B square, then another Fabric C square. For the third row, mirror the first: Fabric B, Fabric C, Fabric B.
- Pressing Rows: After sewing each row, press the seam allowances towards the darker fabric (or in opposing directions for adjacent rows to help seams “nest” later). This helps reduce bulk and creates flatter blocks. For instance, in row one, press seams to the right. In row two, press seams to the left. In row three, press seams to the right.
- Sewing Rows Together: With your rows pressed, align them carefully, matching up the seam intersections as precisely as possible. Pin in place. Sew the three rows together, again using a 1/4-inch seam allowance.
- Final Pressing: Once the nine-patch block is assembled, press the entire block. You can press the final seams open or to one side, whichever results in the flattest block. Trim your nine-patch to ensure it measures the correct size (refer to your PDF pattern for exact dimensions).
- Repeat: You will need to make a total of 40 of these nine-patch blocks. Chain piecing (sewing several units one after another without breaking thread) can significantly speed up this process.
Step 2: Assembling the Quilt Blocks – The Four-Patch Design
Now that you have your nine-patch blocks, it’s time to combine them with your larger Fabric A squares to create the main blocks of the quilt.
- Take two of your completed nine-patch blocks and two 8″ Fabric A squares.
- Lay them out in a 2×2 grid to form a four-patch design. For example, place a nine-patch in the top left, a Fabric A square in the top right, another Fabric A square in the bottom left, and a nine-patch in the bottom right. Or, alternate them in a diagonal pattern – the choice is yours and offers a chance to personalize your quilt!
- Sew into Rows: Sew the top two pieces together (e.g., nine-patch to Fabric A). Press the seam open or to one side. Then, sew the bottom two pieces together (e.g., Fabric A to nine-patch). Press this seam.
- Join the Rows: Align the two newly sewn rows, nesting seams carefully where they meet. Pin generously to ensure a perfect match. Sew the two rows together to complete one larger quilt block.
- Final Pressing: Press the finished block flat. Trim the block if necessary to achieve the precise final block size specified in the pattern.
- Repeat: You will need to create a total of 20 of these larger quilt blocks.
Step 3: Laying Out Your Quilt Top – Visualizing the Design
Once all 20 of your quilt blocks are complete, it’s time to arrange them into your desired quilt top layout. This is where your design comes to life!
- Find a large, flat surface – a clean floor or a design wall works perfectly.
- Lay out your 20 finished blocks according to the suggested pattern: four blocks across and five blocks down.
- Take a step back and observe your arrangement. Do you like the flow of colors and patterns? This is your chance to rotate blocks or swap their positions to achieve the most appealing visual effect. Pay attention to how the nine-patch elements interact with the solid squares.
- Once you are satisfied with the layout, take a photo with your phone. This serves as a helpful reference as you begin to sew your rows together, preventing accidental re-arrangements.
- Carefully stack the blocks in each row, keeping them in order from left to right, and label the rows (e.g., “Row 1,” “Row 2,” etc.) to maintain your design integrity.
Step 4: Sewing the Rows Together – Bringing It All to Life
With your blocks organized, it’s time to sew them into complete rows.
- Take the first two blocks from Row 1. Place them right sides together, carefully aligning their edges and matching any seam intersections. Pin securely.
- Sew them together with a 1/4-inch seam allowance.
- Continue adding the remaining blocks to Row 1, one by one, until the entire row is sewn.
- Pressing Rows: After completing each row, press the seam allowances. You can press them all in one direction (e.g., all seams in Row 1 pressed to the right, all seams in Row 2 pressed to the left, and so on). This alternating pressing technique will help the seams nest when you join the rows later.
- Repeat this process for all five rows until each row of four blocks is complete and pressed.
Step 5: Joining the Quilt Rows – Creating the Complete Top
The final step in constructing your quilt top is to join the five completed rows.
- Take Row 1 and Row 2. Place Row 1 right side down on top of Row 2, aligning the long edges.
- Crucially, match the vertical seam intersections between the blocks in each row. Because you pressed your seams in alternating directions, these seams should “nest” together, allowing for perfectly matched points. Pin generously at these intersections and along the entire length of the row.
- Sew Row 1 and Row 2 together using a 1/4-inch seam allowance.
- Pressing: After joining, press this long seam. You can press it open to distribute bulk, or press it to one side, usually towards the darker fabric if there’s a strong contrast.
- Continue joining the remaining rows in order (Row 3 to the joined Row 1 & 2, then Row 4, then Row 5) using the same technique of matching seams and careful pinning.
- Once all rows are joined, give your entire quilt top a final, thorough press from the front, ensuring all seams lie flat and the fabric is smooth. Your beautiful quilt top is now complete!
Finishing Your Quilt: Basting, Quilting, and Binding
With your quilt top proudly pieced, the next steps involve turning it into a complete, usable quilt. This process includes basting, quilting, and binding.
Basting Your Quilt Layers:
Basting is the process of temporarily securing the three layers of your quilt – the quilt top, the batting (the soft inner layer), and the backing fabric – so they don’t shift during quilting. There are several popular methods:
- Pin Basting: Lay your backing fabric face down, smooth it, then layer your batting on top, and finally your quilt top face up. Use curved safety pins (specifically designed for quilting) to pin through all three layers, placing pins every few inches across the entire quilt.
- Spray Basting: Use a temporary fabric adhesive spray to glue the layers together. This creates a very smooth surface without pins, but requires a well-ventilated area.
- Thread Basting: Hand-sewing long, loose stitches through all layers. This is often used for larger quilts or by those who prefer not to use pins or spray.
Whichever method you choose, ensure all layers are smooth and free of wrinkles or puckers before you begin quilting.
Quilting Your Project:
Quilting is the stitching that holds the three layers together, creating texture and adding durability. For a beginner-friendly project like the Fat Quarter Four-Patch, consider these simple techniques:
- Stitch-in-the-Ditch: This involves sewing exactly along the seam lines of your pieced blocks. It’s a subtle method that emphasizes the piecing design.
- Straight Line Quilting: Quilt straight lines across your quilt, either parallel to the seams or diagonally across the blocks. You can use masking tape or a walking foot guide for even spacing.
- Meandering: A free-motion quilting technique where you move the quilt under the needle to create a random, squiggly pattern. This requires practice but can be very forgiving for beginners.
Use a walking foot on your sewing machine if you have one, as it helps feed all three layers evenly, preventing puckering. Choose a thread color that blends with your fabrics or provides a subtle contrast for added visual interest.
Adding the Binding: The Perfect Frame:
Binding provides a neat and durable finish to the edges of your quilt, protecting them from wear and tear.
- Prepare Binding Strips: Take your 8 – 2 1/2″ x WOF binding strips (Fabric D). Join them end-to-end using a diagonal seam to create one continuous long strip. Press these seams open.
- Fold and Press: Fold this long strip in half lengthwise, wrong sides together, and press well. This creates your double-fold binding.
- Attach to Quilt: With right sides together, align the raw edge of your binding with the raw edge of your quilt top. Start in the middle of one side and leave a tail of about 6-8 inches. Sew the binding to the quilt with a 1/4-inch seam allowance, mitering the corners as you go.
- Join Ends: When you’re nearing your starting point, stop sewing and leave another 6-8 inch tail. Join the two binding tails together with a diagonal seam to create a continuous loop, then finish sewing it to the quilt.
- Finish Binding: Flip the folded binding over to the back of the quilt. You can either hand-stitch it in place for an invisible finish or machine-stitch it for a quicker, more durable result.
Caring for Your Handmade Quilt
Once your quilt is complete, proper care will ensure it lasts for years to come. Most handmade quilts, especially those made with cotton fabrics, can be washed in a machine.
- First Wash: For the first wash, especially if you used a variety of colors, consider using a color catcher sheet to prevent dye transfer. Wash on a gentle cycle with cold water.
- Detergent: Use a mild, pH-neutral detergent. Avoid harsh chemicals or bleach.
- Drying: Tumble dry on a low setting or, ideally, lay flat to dry. Machine drying can sometimes cause shrinkage or damage over time. If machine drying, remove while slightly damp and lay flat to finish.
- Storage: Store your quilt folded or rolled in a clean, dry place, away from direct sunlight. Avoid storing in plastic bags for extended periods, as fabric needs to breathe.
The Journey to Your First Quilt: A Rewarding Experience
Congratulations! You’ve successfully navigated the wonderful world of quilting to create your very own Fat Quarter Four-Patch Quilt. This project isn’t just about cutting and sewing fabric; it’s about developing precision, patience, and a deep sense of accomplishment. Each stitch you made contributes to a tangible piece of art, a cozy heirloom, or a heartfelt gift.
The Fat Quarter Four-Patch Quilt, with its accessible techniques and stunning results, is an excellent gateway to the broader quilting community. You’ve learned how to accurately cut, piece a classic nine-patch, assemble larger blocks, and construct a quilt top. These foundational skills are invaluable and will serve as a springboard for countless future projects. Remember that every quilter, no matter how experienced, started with a first project, and yours is a testament to your burgeoning creativity.
We encourage you to share your finished quilt with friends and family, and perhaps even online! The quilting community is incredibly supportive and inspiring. Don’t hesitate to explore more patterns and techniques, pushing the boundaries of your creativity. You can always find more inspiration and guidance, including additional quilting videos and patterns, by visiting resources like the Fat Quarter Shop YouTube channel and website, which provided the original inspiration for this fantastic pattern.
Embrace the joy of creation, and let your quilting journey continue to unfold, one beautiful stitch at a time. Happy quilting!