
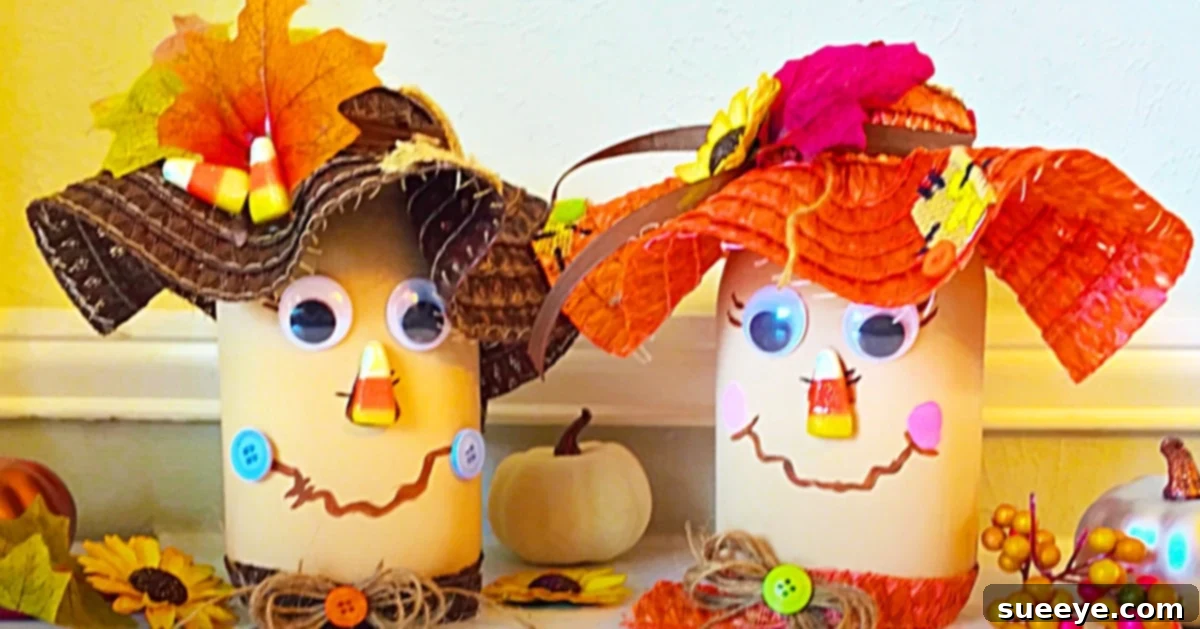
DIY Dollar Tree Scarecrow Mason Jars: Adorable & Affordable Fall Decor
As the vibrant greens of summer begin to yield to the rich tapestry of autumn hues, there’s a unique joy in preparing our homes for the cozy embrace of Fall. Imagine infusing your living space with delightful seasonal charm without stretching your budget. This dream becomes a reality with the incredibly simple yet utterly captivating Dollar Tree scarecrow mason jar craft! Inspired by an ingenious video tutorial from the creative minds at Rebecca, Stu & The Crew on YouTube, these adorable scarecrow jars are the perfect addition to any Fall setting, from your welcoming entryway to your cozy fireplace mantle, or even as a cheerful kitchen accent. They are more than just cute; they are a testament to how creativity and a few budget-friendly supplies can transform ordinary household items into extraordinary seasonal accents. Get ready to discover the magic of bringing these charming characters to life, adding a touch of rustic whimsy and handmade warmth to your autumn abode.
Embracing DIY Fall decor offers a profound sense of satisfaction, allowing you to personalize your surroundings and celebrate the season in a truly unique way. These scarecrow mason jars hold particular appeal because they utilize readily available and inexpensive items, many of which can be found at your local Dollar Tree. From the humble mason jar itself, serving as the canvas, to clever adaptations like placemats transforming into delightful hats, every component is employed with remarkable ingenuity. This project is perfectly suited for crafters of all skill levels, promising a fun, engaging, and deeply rewarding experience that culminates in beautiful, handmade decorations. So, let’s gather our simple materials and embark on this creative journey together, ensuring your home is perfectly prepared to welcome the beauty and warmth of the Fall season.
Why Dollar Tree is Your Go-To for Affordable Fall Crafts
Dollar Tree stands out as an absolute treasure trove for DIY enthusiasts, offering an extensive selection of items at an unbeatable price point. When it comes to Fall decor projects like these charming scarecrow mason jars, it provides an exceptional advantage. You can effortlessly find essential craft supplies, delightful seasonal embellishments, and even the core components such as mason jars and placemats, all typically for just a dollar (or a minimal cost, depending on your location and specific items). This remarkable affordability makes crafting accessible to everyone, empowering you to experiment with various designs, create multiple pieces, and even craft gifts without any financial strain. Moreover, the thrill of discovering just the right components for your creative vision adds an extra layer of excitement and enjoyment to the entire crafting process.
Materials You’ll Need for Your Charming Scarecrow Mason Jars:
Gathering your supplies is often the most exciting initial step in any DIY project. For these adorable scarecrow mason jars, you’ll be pleasantly surprised by how simple and incredibly inexpensive the required items are. The vast majority can be conveniently sourced from your local Dollar Tree, making this an exceptionally budget-friendly and accessible endeavor. Here’s a comprehensive and detailed list to ensure you have everything on hand before you begin your creative journey:
- Mason Jars (2 or more): These versatile glass jars form the fundamental structure of your scarecrows. Opt for standard-sized jars, which are widely available at Dollar Tree, grocery stores, or any craft supply outlet. The smooth surface provides an excellent canvas for painting.
- Straw-Style Round Placemats (2): These ingenious items will be cleverly transformed into the scarecrows’ charming, floppy hats. Look for natural straw or woven fabric placemats to achieve an authentic, rustic, and inviting Fall aesthetic.
- Scissors: A reliable pair of sharp scissors is absolutely essential for cleanly cutting various materials, including fabric, burlap, and ribbons. A good pair will ensure precise cuts and make your work significantly easier and more enjoyable.
- Craft Glue (Hot Glue Gun Recommended): A strong, reliable adhesive is crucial for securely attaching the various decorative elements. A hot glue gun is highly recommended due to its quick drying time and firm, immediate hold, making it ideal for securing embellishments efficiently.
- Paintbrushes: You’ll benefit from having a selection of paintbrush sizes. A wider brush is perfect for applying the base coat of paint to the jars, while a finer, more detailed brush will be indispensable for carefully painting the intricate scarecrow facial features.
- Craft Paints: Select a palette of colors that beautifully evokes the essence of Fall. Earthy tones such as cream, beige, light brown, or even a muted orange are excellent choices for the jar bodies. Black and white paints will be necessary for detailing the eyes and mouth, and a touch of red or pink will add a lovely flush for rosy cheeks.
- Burlap Fabric: A small strip or scrap of burlap fabric can be utilized for various rustic embellishments, such as creating textured “hair,” crafting decorative bows, or adding other charming, natural accents to your scarecrows.
- Assorted Buttons: Buttons are fantastic for adding a delightful touch of character and whimsy to your scarecrow’s “clothing” or hat. Choose various sizes, shapes, and colors that complement your chosen Fall theme.
- Scrap Fabric/Cloth: Small pieces of patterned or plain cloth can be creatively used for fashioning cute bandanas, adding decorative patches to the hat or body, or for other unique decorative elements.
- Candy Corn: This iconic Fall treat isn’t just for snacking! Its distinctive shape and color make it the perfect whimsical and instantly recognizable nose for your scarecrow, adding a touch of playful charm.
- Ribbon or Twine: Use natural twine, raffia, or a rustic ribbon for tying around the neck of the jar, creating decorative bows, or securely fastening the hat. Natural fibers beautifully complement the overall rustic theme.
- Optional Embellishments: Consider enhancing your scarecrows with small artificial leaves, miniature sunflowers, additional raffia, hay, or any other small decorative items that allow you to further personalize and enrich your creations.
Step-by-Step Guide: Crafting Your Adorable Scarecrow Mason Jars
Now that you have meticulously gathered all your materials, let’s dive into the most enjoyable part: bringing your charming scarecrows to life! This comprehensive tutorial simplifies each step, ensuring a fun and rewarding experience for everyone, regardless of crafting expertise. Remember, creativity is paramount in DIY projects, so please feel free to adapt these steps, experiment with different ideas, and infuse your own unique flair into each scarecrow you create.
Step 1: Preparing and Painting Your Mason Jars
The foundation of your scarecrow begins with a perfectly prepared and painted mason jar. This step sets the stage for all the intricate details to follow.
- Thoroughly Clean the Jars: Start by thoroughly washing your mason jars with warm soapy water. Carefully remove any existing labels, sticker residue, or dirt. Rinse them well and ensure they are completely dry, both inside and out, before proceeding. A clean, dry surface is essential for optimal paint adhesion and a smooth finish.
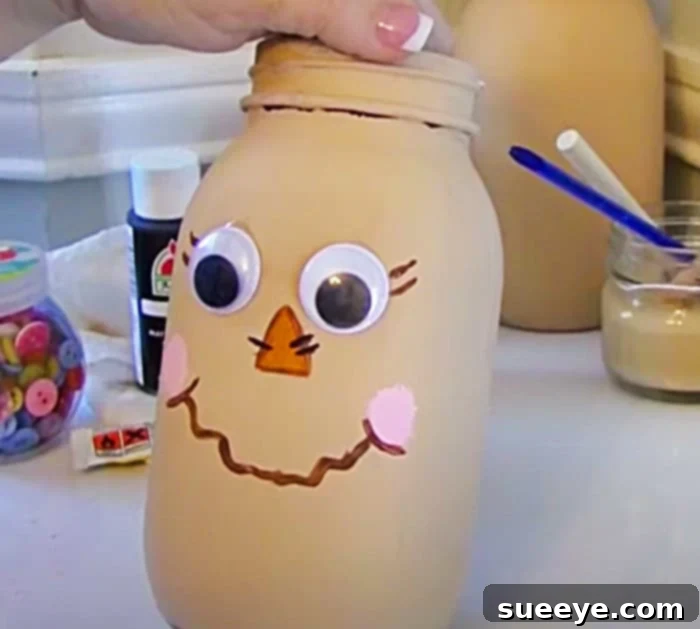
- Apply the Base Coat of Paint: Using a wider paintbrush, apply an even, thin base coat of your chosen craft paint (e.g., cream, beige, light brown, or a soft yellow) to the exterior of each mason jar. For best results and opaque coverage, you will likely need to apply two or three thin coats. It is crucial to allow each coat to dry completely to the touch before applying the subsequent one. This layering technique prevents streaking and provides a durable, smooth canvas for your scarecrow’s face.
- Cure the Paint (Optional but Recommended): For enhanced durability and resistance to gentle wiping, especially if you plan to use these year after year, consider curing the paint. Some craft paints can be baked at a low temperature (always check the specific instructions provided by your paint manufacturer), or you can simply allow them to air cure for several days in a well-ventilated area.
Step 2: Creating the Scarecrow Face
This is arguably the most exciting part, where your scarecrow truly begins to develop its own distinct personality and charm! Don’t be overly concerned with achieving absolute perfection; a slightly rustic or whimsical touch often enhances their appeal.
- Lightly Sketch Guidelines (Optional): If you feel more comfortable and confident, use a pencil to lightly sketch the basic outlines of the eyes, mouth, and placement for the cheeks directly onto the dried paint surface. This can serve as a helpful guide before you apply paint.
- Carefully Paint the Eyes: Dip a fine-tipped paintbrush into black craft paint. Carefully paint two simple, round, or slightly almond-shaped eyes. For an added touch of sparkle and life, once the black paint is completely dry, you can use a tiny dot of white paint to create small highlights within each eye.
- Add Sweet Rosy Cheeks: Using a small, soft brush or even a clean cotton swab, pick up just a tiny amount of red or pink craft paint. Gently dab and blend this paint onto the jar below the eyes to create adorable, rosy cheeks. Blend lightly to achieve a natural, soft flush.
- Paint the Characteristic Stitched Mouth: With black paint and your fine-tipped brush, paint a simple, classic stitched smile. This iconic scarecrow feature can be represented by a gentle curved line with several small, evenly spaced vertical dashes along it, mimicking the appearance of stitches.
- Secure the Candy Corn Nose: Once all the painted facial features are completely dry, apply a small dot of strong craft glue or hot glue just above the painted mouth. Carefully press a piece of candy corn onto the glue, ensuring the pointy end faces downwards, to create the scarecrow’s distinctive and whimsical nose.
Step 3: Crafting the Adorable Placemat Hat
The straw-style placemat undergoes a remarkable transformation in this step, becoming a charming, slightly floppy scarecrow hat that adds significant character and dimension to your project.
- Prepare the Placemat: Take one of your round, straw-style placemats. The goal is to fold and shape it into a cone-like hat structure.
- Form the Cone Shape: Carefully fold the placemat in half, then bring one side or corner over to meet another point, creating a loose cone or funnel shape. The wider, flat edge of the placemat will naturally form the brim of the hat, while the narrower, top portion will become the hat’s peak. Experiment with different folds and overlaps until you achieve a shape that you find appealing – a slightly slouchy or asymmetrical look often works wonderfully for scarecrows, lending them an endearing quality.
- Secure the Hat’s Form: Once you are satisfied with the desired cone shape, apply a line of hot glue along the overlapping edge of the placemat. Press and hold the edges firmly together until the glue sets completely, ensuring the hat maintains its shape.
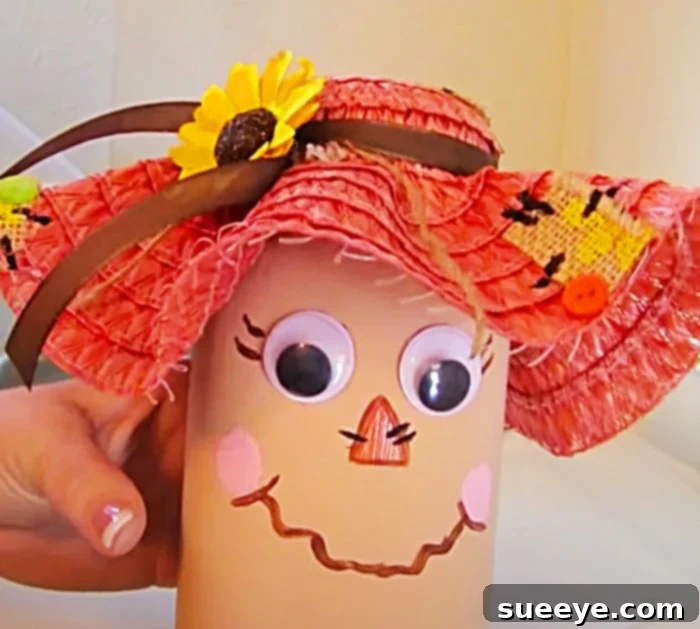
- Attach the Hat to the Jar: Carefully place the newly formed hat onto the top opening of the mason jar. You have the option to simply rest it loosely on top, allowing for easy removal, or you can use a few small dots of hot glue to secure it permanently to the rim of the jar. This ensures the hat remains in place and doesn’t shift, especially if the jars will be handled or displayed in a high-traffic area.
- Decorate the Hat with Flair: This step offers boundless opportunities to truly personalize your scarecrow and make each one unique.
- Ribbon or Twine Band: Wrap a piece of rustic ribbon, natural twine, or raffia around the base of the hat, just above the brim. Tie it into a simple knot, a charming bow, or allow the ends to dangle playfully.
- Buttons and Patches: For a whimsical, “patched-up” effect that enhances the scarecrow’s rustic charm, carefully glue small, assorted buttons or tiny scraps of contrasting fabric (cut to resemble patches) onto the surface of the hat.
- Artificial Leaves or Flowers: For an extra touch of autumnal beauty, tuck small artificial Fall leaves, miniature sunflowers, or other small silk flowers under the hat band. This adds natural texture and vibrant seasonal color.
Step 4: Adding Burlap Hair and Other Embellishments
To give your scarecrow a truly complete and finished look, adding “hair” and other thoughtful details can significantly enhance its overall appeal and character.
- Creating Burlap Hair: Cut several strips of burlap fabric, approximately 1 to 2 inches wide and varying in length to create a natural, layered look. You can gently fray the edges of these strips slightly to give them a more authentic, rustic, and straw-like appearance. Carefully glue these burlap strips strategically under the rim of the hat, allowing them to peek out around the scarecrow’s face. You can layer multiple strips to achieve desired volume and texture, mimicking the look of straw hair.
- Fashioning a Fabric Collar or Scarf: Select a small strip of attractive fabric, such as gingham, plaid, or another Fall-themed pattern. Tie this strip around the neck of the mason jar, just below the scarecrow’s face, to create a charming little bandana or scarf. If necessary, secure it with a tiny dab of glue to prevent it from coming undone.
- Adding Buttons to the “Body”: If you wish to extend the scarecrow’s visual presence beyond just the face, you can glue a couple of decorative buttons onto the lower portion of the mason jar’s body. This simple addition gives the delightful impression of a rustic shirt or overalls.
- Raffia Bows or Accents: Create small, delicate bows from raffia and glue them to the side of the hat, at the base of the jar, or as an accent on the fabric scarf. Raffia adds wonderful texture and reinforces the natural, rustic theme.
Tips and Tricks for Crafting Perfect Scarecrow Jars
To ensure your scarecrow mason jar project is as enjoyable and successful as possible, here are some helpful tips and clever tricks:
- Experiment with Unique Faces: Don’t feel obligated to make every scarecrow identical. Experiment with different eye shapes, mouth styles, and cheek placements to give each scarecrow a truly unique and expressive personality. Some can be cheerfully smiling, while others might have a slightly mischievous twinkle.
- Achieving a Weathered Paint Finish: For a beautifully authentic, weathered, or distressed rustic look, once your base paint is completely dry, you can gently dry-brush a slightly lighter shade of paint over the top. This technique subtly highlights textures and adds depth.
- Alternative Hat Ideas: While the placemat hat is wonderfully ingenious, you could also explore other options. A small piece of burlap can be shaped into a cone, or you might find miniature straw hats at craft stores that would also work perfectly.
- Ensure Secure Embellishments: Always use a strong, reliable craft glue for attaching various elements. For instant adhesion and a firm hold, a hot glue gun will be your most valuable tool in this project.
- Safety First with Hot Glue: If children are participating in this craft, ensure they are adequately supervised when using a hot glue gun, or have an adult handle the gluing steps to prevent accidental burns.
- Add a Weighted Base: If your scarecrow jars feel a bit top-heavy, especially after adding the hat and embellishments, you can place a small amount of sand, rice, or decorative pebbles at the bottom of the jar before you start painting to provide extra stability.
- Protect Your Workspace: Lay down newspaper, an old sheet, or a craft mat to protect your work surface from paint spills or glue drips.
Displaying Your Charming Scarecrow Creations
Once your adorable scarecrow mason jars are meticulously crafted and fully complete, the next exciting step is discovering the perfect spot to proudly showcase them! Their remarkable versatility means they can effortlessly brighten up almost any area of your home, bringing a delightful touch of Fall magic and rustic charm wherever they are placed. Here are some inspiring and creative ideas for displaying your unique handmade treasures:
- Mantlepiece Masterpiece: Arrange a delightful collection of your scarecrow jars alongside traditional Fall elements such as pumpkins, gourds, vibrant autumn foliage, and perhaps some flickering battery-operated candles on your fireplace mantle. This creates a classic, warm, and inviting Fall display.
- Enchanting Table Centerpiece: Position your scarecrows as the captivating focal point for your dining table, coffee table, or an entryway console. For an especially magical evening glow, you can carefully place small, battery-operated fairy lights inside the jars, illuminating their cheerful faces from within.
- Window Sill Delight: Place your charming scarecrows on a window sill to extend a warm welcome to guests and passersby. They look particularly lovely as they catch the soft afternoon sunlight, casting cozy shadows.
- Kitchen Counter Charm: Infuse a festive touch into your kitchen by displaying them on countertops, open shelving, or even repurpose a jar (without the scarecrow face inside, of course!) as a decorative holder for wooden spoons or other utensils.
- Welcoming Entryway Accent: Greet every visitor with a pair of cheerful scarecrow jars placed near your front door or in your entryway. They serve as a warm, inviting, and utterly seasonal sign that autumn has arrived.
- Cozy Bedroom Accent: Don’t limit your Fall decor to common living areas! A single, small scarecrow jar on a bedside table or dresser can add a wonderfully cozy, autumnal feel to a private bedroom space.
- Protected Outdoor Decor: If you are fortunate enough to have a covered porch, patio, or balcony, these jars can certainly add a whimsical touch to your outdoor seating area. Just be sure they are adequately protected from direct rain, heavy winds, or prolonged exposure to harsh weather conditions.
For an even more cohesive and captivating seasonal vignette, consider pairing your scarecrow jars with other delightful Fall finds from Dollar Tree, such as faux autumn leaves, small decorative pumpkins, bales of hay, or additional strands of fairy lights. The possibilities for creative arrangements are truly endless, and each display will beautifully showcase your personal creativity and your deep affection for the enchanting Fall season.
The Enduring Joy of DIY Fall Decor
There’s an unparalleled and uniquely satisfying feeling that comes from creating your own decorations. Beyond the significant cost savings, engaging in DIY projects like these scarecrow mason jars offers a multitude of invaluable benefits:
- Profound Personalization: You are the artist! You have the complete freedom to choose the colors, expressions, and embellishments, making each scarecrow truly unique and a genuine reflection of your personal taste and style. No two will be exactly alike, just like handmade art should be.
- A Fulfilling Sense of Accomplishment: Successfully completing a craft project, especially one that results in such charming and tangible decor, provides an immense and well-deserved sense of achievement and pride. You’ve created something beautiful with your own hands.
- Mindfulness and Relaxing Engagement: Crafting can often be a deeply meditative and calming process. It allows you to de-stress, clear your mind, and focus intently on a creative task, offering a welcome respite from the pressures and demands of daily life.
- Wonderful Family Fun: This particular project is absolutely fantastic for families to undertake together. Children can actively participate by helping with painting the jars, carefully choosing buttons, or attaching the candy corn (always with appropriate adult supervision, especially when using a hot glue gun). It’s a wonderful way to bond, foster creativity, and create cherished lasting memories together.
- Budget-Friendly Beauty: As we’ve highlighted throughout this guide, sourcing your materials from Dollar Tree means you can create incredibly high-impact and visually appealing decor without incurring a high price tag, proving that beautiful homes don’t require expensive decorations.
Conclusion: Your Charming Scarecrows Await!
As you can now clearly see, transforming simple, inexpensive items from Dollar Tree into these absolutely enchanting scarecrow mason jars is an incredibly rewarding, accessible, and enjoyable Fall craft project for anyone. With just a dash of paint, a bit of glue, and a sprinkle of your unique creativity, you possess the power to infuse a delightful touch of autumn whimsy and rustic charm directly into your home. The detailed, step-by-step instructions provided, lovingly inspired by the wonderful tutorial from Rebecca, Stu & The Crew, are designed to ensure a smooth, confident, and thoroughly enjoyable crafting experience from the moment you gather your supplies to the final embellishment.
These endearing little scarecrows are far more than just mere decorations; they are a heartfelt celebration of the season’s beauty, a tangible testament to the warmth of handmade charm, and a cheerful reminder that truly beautiful and inviting home decor doesn’t ever have to come with an exorbitant price tag. So, gather your chosen supplies, unleash your inner crafter, and prepare to adorn your home with these utterly adorable, wonderfully unique, and undeniably charming scarecrow mason jars. They are guaranteed to bring countless smiles, a feeling of cozy contentment, and a heartwarming autumnal spirit throughout the entire Fall season. Happy crafting!