
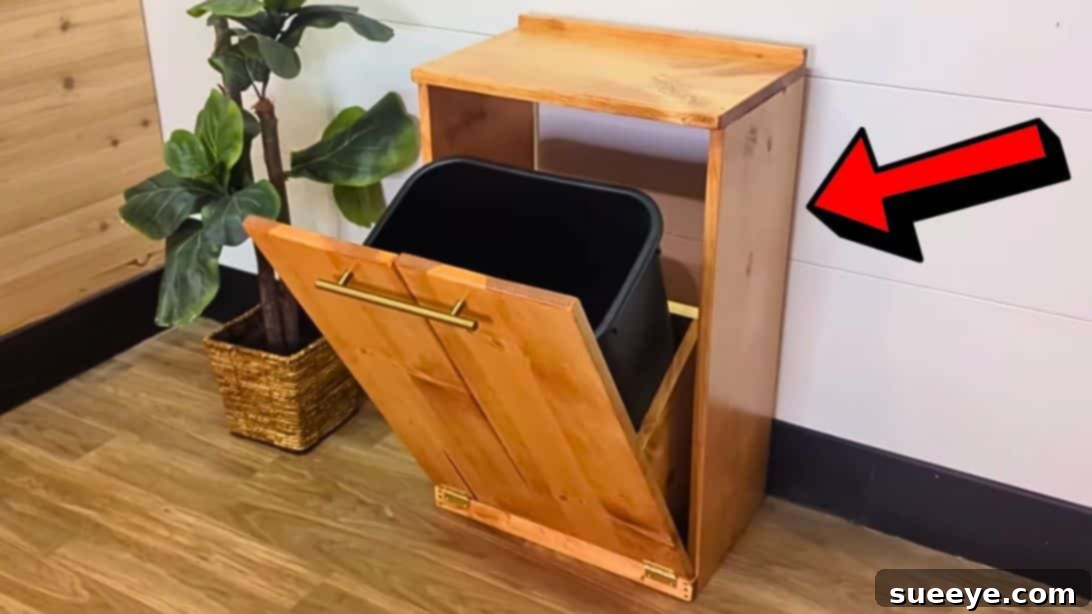
DIY Hidden Pull-Out Trash Can Cabinet: Build Your Own for Under $100
Are you tired of your unsightly trash can being the focal point of your kitchen? Do you dream of a cleaner, more organized living space, free from the visual clutter of a freestanding bin? We understand the struggle! A few days ago, we discovered an ingenious solution through a video tutorial by The Rehab Life. This project immediately caught our attention, and after giving it a try, we can confidently say it’s one of the most rewarding home improvement endeavors we’ve undertaken. This DIY hidden pull-out trash can cabinet not only conceals your bin effortlessly but also integrates seamlessly into your existing decor, looking just like any other stylish cabinet in your home.
Imagine a kitchen where your trash bin is no longer an eyesore, but rather a functional, integrated part of your cabinetry. This project delivers exactly that – a neat, visually pleasing, and incredibly practical upgrade. The best part? You can build this fantastic addition to your home for around $100 or even less, making it an exceptionally budget-friendly way to elevate your kitchen’s aesthetics and functionality. This comprehensive guide will walk you through every step, from gathering materials to the final finishing touches, ensuring you can create your very own custom trash bin cabinet with ease.
Why Build a Hidden Trash Can Cabinet? The Benefits Unveiled
Before diving into the construction, let’s explore why this DIY project is a game-changer for any home:
- Enhanced Aesthetics: Say goodbye to an exposed trash can. This cabinet design allows your bin to disappear behind a sleek, integrated facade, instantly upgrading your kitchen’s visual appeal and creating a more cohesive look.
- Improved Hygiene and Odor Control: Keeping your trash can enclosed within a cabinet helps contain odors more effectively, contributing to a fresher-smelling kitchen. It also keeps pests and pets away from the bin, promoting better hygiene.
- Space Optimization: By integrating the trash can into a cabinet, you free up valuable floor space, especially beneficial in smaller kitchens or areas where every square inch counts. It streamlines your workflow and keeps the space clutter-free.
- Customization to Match Your Style: Unlike off-the-shelf solutions, a DIY cabinet can be stained or painted to perfectly match your existing kitchen cabinets or complement your home’s unique decor. You choose the hardware, the finish, and the overall style.
- Durability and Longevity: Built from solid wood, your DIY cabinet will be far more durable and long-lasting than many flimsy plastic or metal bins. It’s an investment in your home’s functionality that will stand the test of time.
- Cost-Effective Solution: Compared to purchasing a pre-built pull-out trash system or custom cabinet inserts, building your own can save you a significant amount of money, often costing a fraction of the retail price.
- A Sense of Accomplishment: There’s immense satisfaction in creating something beautiful and functional with your own hands. This project is achievable for most DIYers and provides a rewarding experience.
Materials You’ll Need
Gathering all your materials before starting is key to a smooth and efficient build. Here’s what you’ll need to construct your stylish new trash bin cabinet:
- 1 board @ 1x12x8 ft (for the main cabinet base, top, and potentially the front door)
- 1 board @ 1x10x8 ft (for the main cabinet sides and the internal bin support structure)
- 1 board @ 1x2x6 ft (optional, for trim, face frame, or additional reinforcement, if desired)
- 1¼-inch trim head screws (ideal for a clean finish as their smaller heads are less noticeable and easier to conceal)
- Wood filler (to fill screw holes, gaps, and imperfections for a smooth surface)
- Sanding block or electric sander (essential for achieving a perfectly smooth finish before staining or painting)
- Wood stain (choose a color that complements your existing cabinetry or desired aesthetic)
- Polyurethane (a protective clear coat to seal the wood, providing durability and water resistance)
- 1 cabinet pull (select a style and finish that matches your kitchen hardware)
- 2 hinges @ 2 inches (butt hinges are commonly used for cabinet doors, ensuring smooth opening and closing)
- 6-inch small chain with ½-inch screws (this chain acts as a stopper for the front panel, preventing it from flopping open too far)
- 1 trash bin approximately 20 inches tall (measure your chosen bin carefully to ensure it fits perfectly within your cabinet design)
Essential Tools for the Job
Having the right tools will make this project much simpler and safer. Here’s a list of recommended tools:
- Measuring tape
- Pencil
- Miter saw or circular saw (for precise wood cuts)
- Drill/driver (with various drill bits and driver bits)
- Safety glasses and ear protection (always prioritize safety!)
- Wood clamps (to hold pieces securely during assembly)
- Spirit level or square (for ensuring straight and level construction)
- Caulking gun (if using wood glue in tubes, highly recommended for stronger joints)
- Paint brushes or rags (for applying stain and polyurethane)
Step-by-Step Directions: Building Your DIY Hidden Trash Bin Cabinet
Follow these detailed instructions carefully to construct your custom trash bin cabinet. Remember to measure twice and cut once for the best results, always prioritizing safety by wearing appropriate personal protective equipment.
Step 1: Cutting Wood and Assembling the Main Cabinet Frame
This initial phase focuses on preparing your wood and constructing the primary structural components of the cabinet, including the base, sides, and the inner support for the trash bin’s tilt mechanism.
- Prepare for Cutting: Don your safety glasses and ear protection. Lay out your wood boards on a stable workbench or saw horses.
- Cut Pieces for the Inner Trash Bin Support Frame:
- From your 1x10x8 ft board, cut two pieces to 1x10x10½ inches. These will serve as the side supports for the internal trash bin cradle.
- From the same 1x10x8 ft board, cut one piece to 1x10x14½ inches. This will form the back panel of the internal trash bin cradle.
- Assemble the Inner Support Frame: Take the two 1x10x10½ inch pieces and the 1x10x14½ inch back piece. Using a generous bead of wood glue along the edges for enhanced strength, align them to form a U-shape where the 14½-inch piece is the back, and the 10½-inch pieces are the sides. Pre-drill pilot holes to prevent wood splitting, then secure them together using 1¼-inch trim head screws. This U-shaped assembly will act as the cradle for your trash bin. Set this piece aside temporarily.
- Cut the Main Cabinet Base:
- From your 1x12x8 ft board, cut one piece to 1x12x14½ inches. This will serve as the robust bottom panel for your entire cabinet.
- Integrate the Inner Frame with the Cabinet Base: Position the previously assembled U-shaped inner support frame onto the 1x12x14½ inch base piece. Ensure the inner frame is centered or aligned as desired (e.g., flush with one edge, leaving an overhang on the other). The original guide suggests placing it “across the top” of the inner frame and then flipping it to be the bottom. For clarity, attach the U-shaped frame to what will become the top surface of this 1x12x14½ piece. Secure it firmly from the underside of the 1×12 into the U-frame using screws. Once secured, flip the entire assembly over so the 1x12x14½ piece is now correctly oriented as the bottom of your cabinet.
- Cut the Main Cabinet Side Walls:
- From your 1x10x8 ft board, cut two pieces to 1x10x27 inches. These will form the main vertical side walls of your cabinet.
- Attach Main Cabinet Side Walls: With the 1x12x14½ inch piece serving as the bottom, carefully position one of the 1x10x27 inch side walls. Ensure it’s square and flush with the edges of the base (or inset/overhanging as per your design). Using pilot holes and 1¼-inch trim head screws, secure the side wall to the bottom panel. Repeat this process for the other 1x10x27 inch piece on the opposite side. At this point, you should have a sturdy open-front cabinet structure with a functional inner support for the trash bin. Set this entire assembled piece aside.
Step 2: Finishing and Hardware Installation for a Polished Look
With the primary structure complete, this stage focuses on refining the cabinet’s appearance and installing all the necessary hardware to achieve its hidden, pull-out functionality. This is where attention to detail truly pays off.
- Prepare the Front Panel (Door): From your remaining 1x12x8 ft board (or 1x10x8 ft, depending on your dimensions), cut a piece to serve as the front panel, or “door,” of your cabinet. This piece should cover the front opening of your assembled cabinet when closed. Measure the exact width and height of the opening and cut your panel accordingly, allowing for a small reveal (gap) if desired for easier opening.
- Apply Wood Filler: Thoroughly inspect all screw holes, seams, gaps, and any other imperfections on all wooden surfaces of your cabinet and the front panel. Apply wood filler generously using a putty knife, ensuring it slightly overfills the area. This accounts for shrinkage as it dries. Allow the wood filler to dry completely according to the manufacturer’s instructions, typically a few hours.
- Sanding for Smoothness: Once the wood filler is fully dry, begin sanding all surfaces. Start with a medium-grit sandpaper (around 120-grit) to smooth out the filler and remove any larger blemishes or rough spots. Progress to a finer-grit sandpaper (220-grit or higher) for a silky-smooth finish, ensuring you always sand with the grain of the wood. This step is critical for a professional-looking stain or paint job. After sanding, meticulously wipe away all dust with a clean, damp cloth or a tack cloth.
- Staining or Painting:
- Staining: If you’ve chosen to stain, apply your desired wood stain evenly with a brush or a clean rag, following the wood grain. Allow the stain to penetrate for the recommended time (refer to product instructions), then wipe off any excess with a clean cloth. For a darker shade, apply additional coats, allowing ample drying time between each.
- Painting: If painting, it’s often beneficial to apply a wood primer first, especially if you’re painting over knotty wood or aiming for a drastic color change. Once the primer is dry, apply your chosen paint color in thin, even coats, allowing each coat to dry thoroughly before applying the next. Lightly sand with very fine-grit sandpaper (e.g., 320-grit) between paint coats for a smoother finish.
- Apply Polyurethane Protective Coats: After the stain or paint has completely dried and cured (this can take 24-48 hours depending on the product and humidity), apply several thin coats of polyurethane. This clear protective layer seals the wood, protecting it from moisture, scratches, and daily wear. Lightly sand with 220-grit or higher sandpaper between polyurethane coats (if recommended by the product) to ensure proper adhesion and a super smooth, durable finish. Wipe away dust thoroughly between coats.
- Attach the Cabinet Pull: On your finished front panel (door), carefully measure and mark the desired position for your cabinet pull. Accuracy here is key for a balanced look. Pre-drill holes for the pull, then attach it securely using the provided screws. Ensure it’s level and centered.
- Install the Hinges: Position the front panel within the main cabinet opening. Use shims or small blocks to maintain an even and consistent gap (reveal) around the edges of the door. Attach the two 2-inch hinges to one side of the front panel and the corresponding side of the main cabinet frame. Ensure the hinges are properly aligned and screwed in firmly, allowing the front panel to swing open smoothly and without binding. Test the door’s operation thoroughly.
- Attach the Chain: The 6-inch chain is a critical component for the “tilt-out” functionality. Attach one end of the chain to the inside top edge of the front panel (door) and the other end to the inside top edge of the main cabinet structure, using the ½-inch screws. Adjust the length of the chain so that when the front panel opens, it stops at an angle that allows the trash bin to be easily pulled out and emptied, preventing the panel from flopping completely forward or hitting the floor.
- Insert Your Trash Bin: Finally, place your chosen trash bin inside the newly built cabinet. Test the pull-out mechanism and ensure the bin slides in and out easily when the front panel is tilted open. Your new, hidden trash bin cabinet is now ready for use!
Customization Ideas to Make It Truly Yours
While the basic design is incredibly functional and attractive, one of the greatest advantages of a DIY project is the ability to customize it to your heart’s content. Here are a few ideas to inspire you to make your hidden trash bin cabinet uniquely yours:
- Color and Finish Variations: Beyond matching your existing cabinets, consider a bold accent color to add a pop to your kitchen, a distressed look for a rustic charm, or a sleek, modern high-gloss finish. You could even use chalk paint for a farmhouse aesthetic, or experiment with two-tone finishes.
- Add Mobility with Casters: Attach heavy-duty locking casters to the bottom of the cabinet. This makes it incredibly easy to move for cleaning around or under it, repositioning it for different tasks, or even rolling it closer to your cooking area when needed.
- Multi-Bin Recycling Station: If your chosen trash bin is narrow enough, or if you adapt the design slightly, you could create a double or even triple bin system. This allows for convenient and easy recycling separation (e.g., paper, plastic, compost) right in your kitchen.
- Integrated Cutting Board Top: Replace the standard wood top with a removable, food-grade cutting board. This instantly adds valuable extra workspace to your kitchen, especially useful in smaller spaces where counter space is at a premium.
- Unique Hardware Choices: Explore different styles of cabinet pulls and hinges – antique, modern, rustic, or industrial – to perfectly complement your overall kitchen theme and personal taste. The hardware can significantly impact the cabinet’s final look.
- Side Storage Solutions: Attach hooks to the side of the cabinet for hanging dish towels, oven mitts, aprons, or even small cleaning brushes. Magnetic strips could also be added to hold knives or other metal utensils.
- Decorative Details: Consider adding decorative molding or trim pieces to the front panel or sides to mimic the style of existing built-in cabinetry, making it blend in even more seamlessly.
Maintenance and Care for Your DIY Cabinet
To ensure your new hidden trash bin cabinet remains beautiful and functional for years to come, a little ongoing care and maintenance will go a long way:
- Regular Exterior Cleaning: Wipe down the exterior surfaces of the cabinet with a damp cloth and a mild, all-purpose cleaner as needed, especially after cooking or any spills. Avoid using harsh abrasive cleaners that could damage the finish or the protective polyurethane coating.
- Interior Cleanliness: Periodically clean the interior of the cabinet and the trash bin itself. Always lining the bin with a sturdy trash bag is essential to prevent spills, leaks, and odors from permeating the wood or causing damage. If any spills occur inside the cabinet, clean them immediately and allow the area to dry completely.
- Check Hardware Periodically: Every few months, take a moment to check that all screws on the hinges, the cabinet pull, and the chain are still tight and secure. Tighten them if necessary to maintain smooth operation and prevent any wobbling or sagging of the door.
- Protect the Finish: If, over time, you notice the polyurethane finish starting to wear down in high-traffic areas, you can lightly sand the affected area with very fine-grit sandpaper (e.g., 400-grit) and reapply a fresh coat of polyurethane. This will help extend the life of your cabinet and continue to protect the wood from moisture and wear.
Conclusion: A Smarter, More Beautiful Kitchen Awaits
Embarking on this DIY hidden pull-out trash can cabinet project is more than just building a piece of furniture; it’s about transforming your kitchen into a more organized, aesthetically pleasing, and functional space. Inspired by the excellent tutorial from The Rehab Life, this comprehensive guide has provided you with all the necessary steps, materials, and tips to create a custom solution for your trash woes, all while keeping your budget firmly in check.
From the precise cuts and initial assembly to the meticulous finishing touches and hardware installation, each step brings you closer to a kitchen that truly reflects your style and efficiency. No more eyesores, no more wasted floor space – just elegant, concealed functionality that enhances your home’s overall appeal. We wholeheartedly encourage you to take on this rewarding woodworking project and experience the immense satisfaction of enhancing your home with your own hands. Happy building, and enjoy your beautifully organized new kitchen!
*All image credit belongs to The Rehab Life via YouTube. Follow and subscribe to their channel for more inspiring DIY projects and home improvement ideas!