
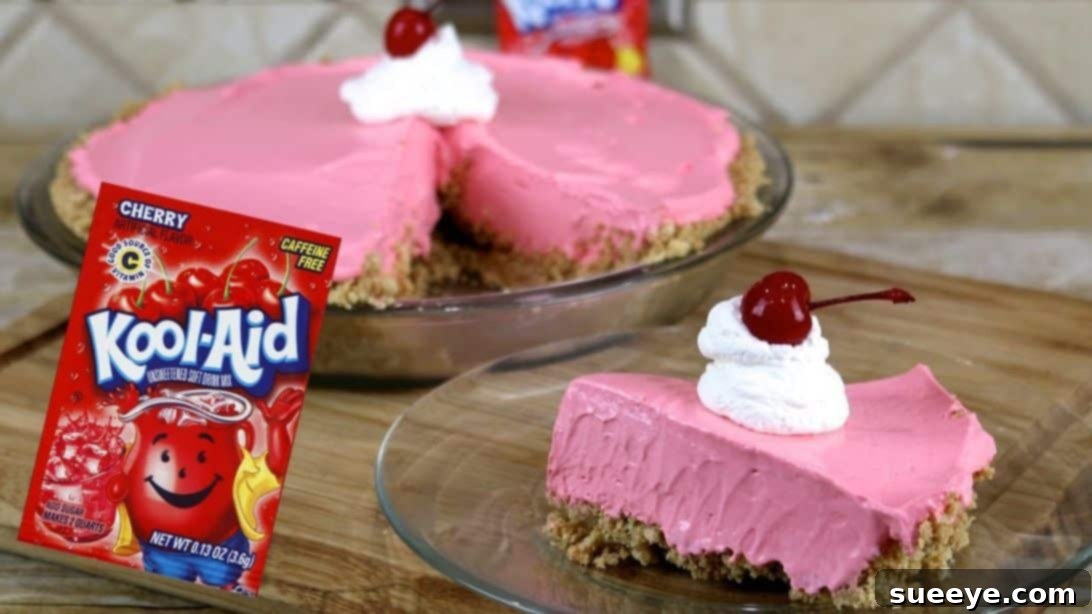
The Ultimate No-Bake Kool-Aid Pie: An Easy 5-Ingredient Recipe
Are you searching for a dessert that’s refreshingly simple, bursting with vibrant flavor, and requires absolutely no oven time? Look no further! This delightful No-Bake Kool-Aid Pie is a true culinary gem, perfect for warm weather gatherings, casual family dinners, or whenever you crave a sweet, tangy treat. Imagine a creamy, colorful filling nestled in a buttery, crunchy graham cracker crust – a slice of pure joy that comes together with just a handful of ingredients and minimal effort. If you’ve never experienced the nostalgic charm of a Kool-Aid pie, you’re in for a delightful surprise!
This fantastic recipe, inspired by the creative culinary talents of FunFoods on YouTube, simplifies dessert making into a joyous two-step process. It’s an ideal project for budding bakers and busy hosts alike, promising a spectacular outcome without the usual fuss. Get ready to impress your taste buds and your guests with this incredibly easy, flavorful, and visually appealing pie. Below, you’ll find the complete instructions, along with helpful tips and ideas to make your Kool-Aid pie an absolute masterpiece.
Why This No-Bake Kool-Aid Pie Is a Must-Try
Kool-Aid pie offers a unique blend of convenience, creativity, and classic flavor. Its no-bake nature makes it an energy-efficient option, especially appealing during hot summer months when turning on the oven is the last thing you want to do. The ability to customize the flavor simply by choosing a different Kool-Aid packet means endless possibilities, from classic cherry and grape to exotic tropical punch. It’s a dessert that not only tastes good but also brings a pop of color and fun to any table, making it a favorite for kids and adults alike. Plus, with its incredibly simple steps, you can whip this up even on your busiest days!
Essential Ingredients for Your Kool-Aid Pie
Gathering your ingredients for this pie is as straightforward as the recipe itself. Each component plays a vital role in creating the perfect balance of texture, sweetness, and tanginess. Here’s what you’ll need, along with a brief explanation of their purpose:
- 1 sleeve (8-9 pieces) of Graham Crackers: These form the foundation of our pie, providing a classic, buttery, and slightly sweet crust that complements the tangy filling perfectly. Their crumbly texture is ideal for creating a press-in crust.
- 6 tablespoons of Melted Butter: The butter acts as the crucial binding agent for the graham cracker crumbs, ensuring your crust holds its shape beautifully without crumbling when sliced. It also adds richness and depth of flavor.
- 1 (14 ounces) can of Sweetened Condensed Milk: This is the magic ingredient that provides the creamy base and rich sweetness for the filling. Its thick consistency helps the pie set firm, while its inherent sweetness balances the tartness of the Kool-Aid.
- 1 packet of Kool-Aid (Cherry flavor recommended): The star of the show! This powdered drink mix infuses the pie with its characteristic vibrant color and intense fruit flavor. While cherry is a fantastic choice, feel free to experiment with any flavor that sparks your interest.
- 8 ounces of Cool Whip (thawed): Folded gently into the filling, Cool Whip provides a light, airy, and fluffy texture, making the pie irresistibly smooth and decadent. It lightens the richness of the condensed milk, creating a heavenly mouthfeel.
- Whipped Cream, optional: For an extra touch of indulgence and visual appeal, a dollop of fresh whipped cream before serving is highly recommended. It adds another layer of creamy texture.
- Fresh Cherries or other fruit, optional: Garnish with fresh cherries or other complementary fruit for a professional finish and a burst of natural freshness.
Step-by-Step Instructions: Crafting Your Kool-Aid Pie
This recipe is divided into two main parts: preparing the crust and then mixing the filling. Both are incredibly simple, ensuring a stress-free baking (or rather, no-baking) experience.
Step 1: Preparing the Perfect Graham Cracker Crust
The foundation of any great pie is its crust, and for this no-bake wonder, a classic graham cracker crust is absolutely ideal. It’s simple to make and provides a wonderful texture contrast to the creamy filling.
- Crush the Graham Crackers: Begin by placing the graham cracker pieces into a sturdy Ziploc bag. Seal the bag, ensuring most of the air is removed. Now, using a rolling pin, a meat tenderizer, or even the bottom of a heavy glass, gently but firmly crush the crackers until they are transformed into fine crumbs. The goal is an even consistency, similar to coarse sand, with no large chunks remaining. This ensures a uniform crust that holds together well.
- Combine with Melted Butter: Transfer these finely crushed graham cracker crumbs into a large mixing bowl. Pour in the six tablespoons of melted butter. Using a fork or a spatula, thoroughly mix the crumbs and butter together. Continue mixing until every crumb is moistened and coated with butter. The mixture should resemble wet sand and hold together when pressed lightly in your hand. This thorough mixing is essential for a stable and delicious crust.
- Press into Pie Pan: Take a 9-inch pie pan (a standard glass or metal pie pan works perfectly). Transfer the graham cracker mixture into the pan. Using the bottom of a clean glass or your fingers, firmly press the mixture evenly across the bottom of the pan and up the sides. Ensure the crust is compact and uniform in thickness, especially at the edges, to prevent it from crumbling later.
- Chill the Crust: Once the crust is perfectly formed, place the pie pan into the refrigerator. Allow it to chill for at least one hour. This chilling period is crucial as it helps the butter solidify, setting the crust and making it firm and easy to slice later. While the crust chills, you can prepare your filling ingredients.
Step 2: Mixing the Vibrant Kool-Aid Pie Filling
Now for the heart of the pie – the wonderfully creamy and tangy Kool-Aid filling! This step is even quicker than the first, requiring just a few stirs to achieve a luscious consistency.
- Combine Sweetened Condensed Milk and Kool-Aid: In a separate large mixing bowl, pour in the entire can of sweetened condensed milk. Open your chosen packet of Kool-Aid (cherry for a classic taste, or any other flavor you desire) and sprinkle the powder directly over the condensed milk. Using a spatula or a whisk, mix these two ingredients together thoroughly. Continue stirring until the Kool-Aid powder is completely dissolved, and the mixture achieves a uniform, vibrant color without any streaks or lumps. The aroma will instantly transport you to childhood!
- Fold in the Cool Whip: Add the 8 ounces of thawed Cool Whip to the colorful condensed milk mixture. This step is about gentle incorporation rather than vigorous mixing. Use your spatula to gently fold the Cool Whip into the mixture until it is fully combined and the filling is light, airy, and homogenous in color and texture. Be careful not to overmix, as this can deflate the Cool Whip and make your filling less fluffy.
- Assemble and Chill: Retrieve your chilled graham cracker crust from the refrigerator. Carefully pour the vibrantly colored Kool-Aid filling on top of the crust. Use your spatula to spread the filling evenly across the entire surface of the pie, smoothing out the top for a polished look.
- Final Chill and Serve: Place the assembled pie back into the refrigerator. This final chilling period is crucial for the pie to set properly and achieve its firm, sliceable consistency. Leave it to chill for a minimum of 4 hours, or ideally, overnight. A longer chill ensures a perfectly set pie that holds its shape beautifully. Once firm, slice the pie into wedges.
- Garnish (Optional): For an extra special touch, top each slice with a generous swirl of whipped cream and a fresh cherry or other fruit of your choice. Serve immediately and enjoy the burst of flavor!
Tips for a Perfectly Delicious Kool-Aid Pie
- Crumb Consistency Matters: Ensure your graham cracker crumbs are fine and uniform. Large pieces can make the crust uneven and prone to crumbling.
- Firmly Press the Crust: Don’t be shy when pressing the crust into the pan. The firmer you press, the more stable your crust will be.
- Chill Time is Key: Rushing the chilling process will result in a soft, unset pie. Give both the crust and the finished pie ample time in the refrigerator to firm up properly.
- Gentle Folding: When incorporating the Cool Whip, use a gentle folding motion. This preserves the airiness of the Cool Whip, leading to a lighter, fluffier pie filling.
- Experiment with Flavors: While cherry is a classic, don’t hesitate to try other Kool-Aid flavors like grape, orange, strawberry, or even lemonade for a zesty twist. You can also combine flavors for a unique blend!
- Quality Ingredients: Using good quality sweetened condensed milk and fresh Cool Whip will significantly impact the final taste and texture of your pie.
Kool-Aid Pie Variations and Customizations
One of the best things about this pie is how incredibly adaptable it is. Here are some ideas to make it your own:
- Different Crusts: Instead of graham crackers, try vanilla wafers, chocolate cookies (like Oreos, with or without cream filling), or even shortbread cookies for a unique crust. Just crush them and mix with melted butter as directed.
- Fruity Additions: Fold in fresh berries (strawberries, raspberries, blueberries) or finely diced peaches into the filling for added texture and natural sweetness. Make sure to drain any excess liquid from the fruit.
- Tropical Twist: Use a tropical punch or pineapple-flavored Kool-Aid. You could even add a few drops of coconut extract to the filling for an exotic flair.
- Mini Pies: For individual servings, press the crust into muffin tins lined with cupcake liners, then fill and chill. These are perfect for parties or portion control.
- Zesty Kick: Add a tablespoon of fresh lemon or lime juice to the filling (in addition to the Kool-Aid) for an extra bright, tangy note.
- Chocolate Lover’s Dream: Drizzle chocolate syrup over the top before serving, or sprinkle with mini chocolate chips for a chocolatey contrast.
Storage and Serving Suggestions
Once your Kool-Aid pie is fully set, it’s ready to be the star of your dessert table! For the best taste and texture, serve the pie chilled directly from the refrigerator. Leftovers should be covered tightly with plastic wrap or stored in an airtight container and kept in the refrigerator for up to 3-4 days. While it technically can be frozen for longer storage (up to 2-3 weeks), the texture of the Cool Whip may change slightly upon thawing. If freezing, wrap slices individually or the whole pie very well before placing in the freezer.
This pie is perfect on its own, but a simple garnish can elevate it. Besides whipped cream and fresh fruit, consider a sprinkle of colorful sprinkles for a festive look, a drizzle of fruit syrup matching your Kool-Aid flavor, or even a dusting of powdered sugar. Enjoy this vibrant, easy, and utterly delightful dessert!
*These amazing images are all credited to FunFoods via YouTube. Check his other content and follow for more delicious recipes!