
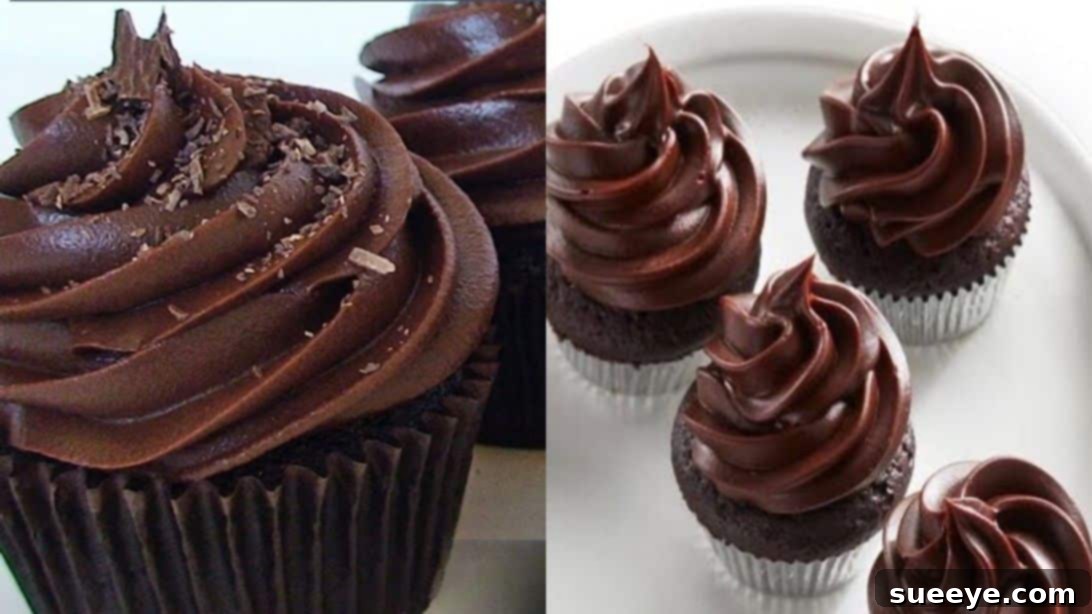
Are you searching for a dessert topping that’s both incredibly simple to make and irresistibly decadent? Look no further! This ultimate guide reveals the secret to crafting a luscious, velvety 2-ingredient chocolate frosting that will elevate your homemade cupcakes and cakes to professional levels. Forget complicated recipes with long lists of ingredients; this method, inspired by the brilliant insights of Cuisine Crush, is so straightforward, anyone can master it in their home kitchen. Prepare to be amazed by the rich taste and perfect consistency achievable with just two core components.
This isn’t just any frosting; it’s a wonderfully whipped chocolate ganache – a classic French confectionery staple simplified for everyday baking. The resulting texture is airy yet intensely chocolatey, a dream to pipe, and a delight to taste. Whether you’re a seasoned baker or just starting your culinary journey, this recipe guarantees a show-stopping finish for all your sweet creations.
RELATED: If you’re looking for even quicker options, check out this 1-Minute Chocolate Frosting Recipe!
The Magic Behind Two Ingredients: Understanding Chocolate Ganache
Before we dive into the steps, let’s appreciate the simplicity and versatility of chocolate ganache. At its heart, ganache is merely a mixture of chocolate and cream. The magic happens when these two ingredients emulsify, creating a stable, rich, and smooth base. When chilled and then whipped, it transforms into a light, airy frosting that holds its shape beautifully. This particular recipe focuses on achieving that perfect whipped texture, making it ideal for piping intricate designs or spreading generously.
The beauty of a 2-ingredient recipe lies in its purity. With fewer components, the quality of each ingredient shines through. This means selecting good quality chocolate and heavy whipping cream is paramount for achieving the best flavor and texture in your homemade chocolate frosting.
Choosing Your Ingredients Wisely for the Best Chocolate Frosting
The success of this easy whipped chocolate ganache frosting hinges on two simple, yet crucial, ingredients.
- Chocolate Chips (or chopped chocolate): We recommend using semi-sweet chocolate chips for a balanced sweetness that most people love. However, feel free to customize! If you prefer a less sweet, more intense chocolate flavor, opt for dark chocolate chips (60-70% cacao content works wonderfully). For a sweeter, creamier profile, milk chocolate chips can also be used, though you might need to adjust the chilling time slightly as milk chocolate has a different fat content. Ensure your chocolate is at room temperature to facilitate smoother melting and mixing. Quality matters here – a good chocolate will make a noticeable difference in the final taste of your frosting.
- Heavy Whipping Cream: This is the other star of our show. Look for heavy cream or heavy whipping cream with a fat content of at least 36%. The high-fat content is essential for creating the stable emulsion with the chocolate and for whipping up into that desirable light and fluffy consistency. Do not substitute with half-and-half, light cream, or milk, as these do not contain enough fat to achieve the correct texture.
Easy Whipped Chocolate Ganache Frosting Ingredients
- One cup of semi-sweet chocolate chips or finely chopped semi-sweet chocolate (ensure it’s at room temperature for best results)
- 1/2 cup of heavy whipping cream (with at least 36% fat content)
How to Make Chocolate Frosting: A Step-by-Step Guide to Perfection
Making this luxurious chocolate frosting is simpler than you might imagine. Follow these steps carefully, and you’ll have a beautifully pipeable ganache ready for any occasion.
Step 1: Gently Melt Your Chocolate
Begin by boiling a small amount of water in a pot. You will use the double boiler method to melt your chocolate. Place a heat-proof bowl (glass or metal) over the pot, ensuring the bottom of the bowl does not touch the simmering water. Add your 1 cup of room-temperature chocolate chips (or chopped chocolate) into the bowl. The gentle, indirect heat from the steam will slowly and evenly melt the chocolate, preventing it from seizing or burning. Stir continuously with a spatula until the chocolate is completely smooth and free of any lumps. Once fully melted, turn off the flame but keep the bowl over the warm water for a moment if needed, to maintain fluidity.
Using a double boiler is crucial here as it prevents overheating, which can cause the chocolate to become grainy or seize. Patience is key in this step for a silky-smooth base.
Step 2: Combine and Emulsify for a Silky Ganache
Carefully remove the bowl of melted chocolate from the pot. Immediately add the 1/2 cup of heavy whipping cream to the warm chocolate. Initially, stir with a spatula until the cream and chocolate start to combine. It might look a little separated at first, but don’t worry! Continue stirring gently until a smooth, uniform mixture begins to form. Then, switch to a whisk and continue mixing until the ganache is completely smooth, glossy, and beautifully emulsified. There should be no streaks of cream or unmixed chocolate visible. This thorough mixing ensures a stable and homogenous ganache.
Step 3: Chilling to Perfection
Once your ganache is smooth and fully combined, cover the bowl tightly with cling wrap. Make sure the cling wrap touches the surface of the ganache to prevent a skin from forming. Place the bowl in the refrigerator for at least one hour, or until it is firm to the touch but still pliable. This chilling period is vital; it allows the chocolate to re-solidify and the mixture to thicken, making it perfect for whipping into a light frosting. Resist the urge to rush this step – proper chilling is the foundation of a successful whipped ganache. If time permits, chilling for 2-3 hours can yield an even better whipping consistency.
Step 4: Whipping into a Fluffy Cloud
After the ganache has sufficiently chilled (it should resemble a thick, fudge-like consistency), remove it from the fridge and take off the cling wrap. Using an electric mixer (either a stand mixer with a whisk attachment or a hand mixer), beat the chocolate ganache on medium speed. Start slowly, then increase to medium. Continue beating for about 3 to 4 minutes, or until the mixture becomes smooth, light, and almost doubles in volume. It will transform from a dense ganache into a fluffy, pipeable frosting, similar in texture to whipped cream but with a rich chocolate flavor. Be careful not to over-beat, as this can cause the ganache to become grainy or separate. Stop once it reaches your desired light and airy consistency.
Step 5: Decorate with Confidence and Flair
Once whipped to perfection, transfer the light and airy frosting into a piping bag fitted with your favorite nozzle tip – a 1M open star tip is excellent for classic swirls on cupcakes. Pipe the frosting onto your cooled cupcakes or spread it generously onto your cake. If your kitchen is particularly warm, or if you find the ganache softening too quickly, pop your piping bag (or the bowl of frosting) back into the refrigerator for 10-15 minutes before piping. This brief re-chilling will firm it up just enough to give you beautifully defined peaks and clean edges, ensuring your desserts look as good as they taste.
This frosting is also fantastic as a cake filling, a drizzle for desserts, or even a dip for fresh fruit. Its versatility makes it a staple in any baker’s repertoire.
Tips for Chocolate Frosting Success
- Ingredient Temperature: Ensure both your chocolate and cream are at the right temperature (room temperature for chocolate, slightly warmed cream before adding) for optimal emulsification.
- Don’t Rush the Chill: The chilling phase is critical. An insufficiently chilled ganache will not whip properly and might result in a soupy frosting.
- Monitor Whipping: Keep a close eye on the ganache while whipping. It can go from perfect to over-whipped (and grainy) quickly. Stop as soon as it reaches your desired fluffy consistency.
- Quality Ingredients: As mentioned, good quality chocolate and heavy cream make a significant difference in flavor and texture.
-
Troubleshooting:
- Too Stiff: If your ganache is too firm to whip or pipe after chilling, let it sit at room temperature for 10-15 minutes, or gently warm it over a double boiler for a few seconds, stirring constantly, until it softens slightly.
- Too Runny: If it’s too soft after whipping, it likely wasn’t chilled enough. Refrigerate it for another 30 minutes to an hour, then re-whip.
Unleash Your Creativity: Frosting Variations
While this 2-ingredient chocolate frosting is divine on its own, don’t hesitate to experiment with flavor enhancements:
- Vanilla Extract: A teaspoon of good quality vanilla extract added during the whipping stage can brighten the chocolate flavor.
- Espresso Powder: A pinch of instant espresso powder (1/2 to 1 teaspoon) enhances the chocolate’s depth without making the frosting taste like coffee. Add it with the cream.
- Liqueurs: For an adult twist, a tablespoon of Kahlua, Grand Marnier, or even a raspberry liqueur can be folded in after whipping.
- Spices: A dash of cinnamon or a tiny pinch of cayenne pepper can add an unexpected and delicious warmth.
Beyond Cupcakes: Versatile Uses for Your Whipped Ganache
This luscious chocolate ganache isn’t just for cupcakes. Its rich flavor and adaptable texture make it perfect for a myriad of other desserts:
- Cake Filling and Frosting: Use it to fill and frost layer cakes for a truly decadent experience.
- Drip Cake: Before whipping, the ganache can be used as a elegant drip over cakes.
- Tart and Pie Topping: Spread it over fruit tarts or chocolate cream pies.
- Cookie Sandwiches: Pipe it between two cookies for a gourmet treat.
- Dip: Serve it alongside fresh strawberries, pretzels, or marshmallows for an irresistible snack.
Storage and Make-Ahead Tips
This whipped chocolate ganache frosting can be made ahead of time. Store the unwhipped ganache (after Step 3) in an airtight container in the refrigerator for up to 5 days. When you’re ready to use it, let it come to room temperature for about 30 minutes, then whip as directed in Step 4.
Once whipped, the frosting is best used immediately. However, you can store leftover whipped frosting in an airtight container in the fridge for 2-3 days. It may stiffen slightly; if so, let it sit at room temperature for 10-15 minutes and give it a quick whisk by hand or with the mixer on low speed to restore its smooth consistency before using.
2-Ingredient Chocolate Frosting: Your Ultimate Go-To Recipe
There you have it – the ultimate guide to creating a truly amazing 2-ingredient chocolate frosting. This recipe proves that you don’t need a pantry full of specialized ingredients to create something truly spectacular. With just chocolate and heavy cream, you can achieve a frosting that’s rich, creamy, light, and perfect for decorating any dessert.
So, gather your two simple ingredients and get ready to transform your baking with this foolproof and utterly delicious whipped chocolate ganache. Your taste buds, and your guests, will thank you! Give it a try, experiment with variations, and enjoy the pure joy of homemade chocolate perfection.