
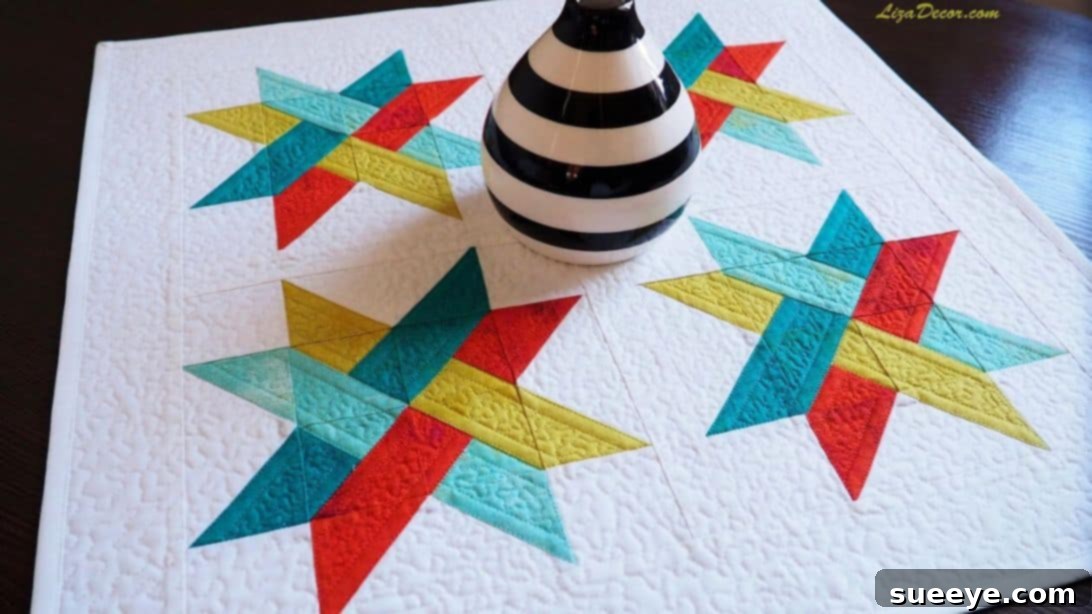
Craft a Beautiful Half Square and Flying Geese Patchwork Centerpiece Mat
Are you searching for your next inspiring sewing adventure? Look no further! This comprehensive tutorial will guide you through creating an exquisite patchwork centerpiece mat featuring classic Half Square Triangles (HSTs) and dynamic Flying Geese units. Inspired by the brilliant design from Liza Decor, this project might appear intricate at first glance, but you’ll be delighted to discover how straightforward and enjoyable it truly is. Perfect for adding a personalized touch to your dining table or any surface, this mat combines traditional quilting elements with a modern aesthetic.
Patchwork quilting is a timeless craft that allows you to combine various fabric pieces into a larger, cohesive design. The Half Square Triangle (HST) is one of the most fundamental building blocks in quilting, while Flying Geese units add movement and visual interest, mimicking flocks of birds in flight. Together, these elements create a captivating design that is both elegant and versatile. Whether you’re a seasoned quilter looking for a quick project or a beginner eager to learn new techniques, this centerpiece mat offers a rewarding creative experience. Let’s gather our materials and dive into the wonderful world of fabric artistry!
Gathering Your Quilting Supplies
Before embarking on any quilting project, ensuring you have all your materials neatly prepared is crucial for a smooth and enjoyable process. This project uses a vibrant selection of fabrics, carefully chosen to create a striking visual contrast and harmonious blend. Precision in cutting is key for patchwork, so take your time with this initial step. While we’ve suggested specific colors for a lively design, feel free to substitute them with your favorites to match your home decor or personal style.
Fabric Requirements for the Center Blocks:
The centerpiece mat is constructed from four main blocks, each featuring a unique color combination based on Half Square Triangles and corner additions. These pieces will form the heart of your design.
- First Square Block (Bottom Left):
- 1 piece of 3.75″ yellow square (Fabric A)
- 1 piece of 3.75″ blue square (Fabric B)
- 1 piece of 3.25″ light blue square (Fabric C)
- Second Square Block (Top Left):
- 1 piece of 3.75″ light blue square (Fabric D)
- 1 piece of 3.75″ blue square (Fabric E)
- 1 piece of 3.25″ red square (Fabric F)
- Third Square Block (Bottom Right):
- 1 piece of 3.75″ light blue square (Fabric G)
- 1 piece of 3.75″ red square (Fabric H)
- 1 piece of 3.25″ yellow square (Fabric I)
- Fourth Square Block (Top Right):
- 1 piece of 3.75″ yellow square (Fabric J)
- 1 piece of 3.75″ red square (Fabric K)
- 1 piece of 3.25″ blue square (Fabric L)
Fabric Requirements for the Flying Geese Units:
The Flying Geese units will frame your central blocks, adding a dynamic border element. We’ll be making units in four distinct color combinations.
- 4 pieces of 5.5″ white square (for the “sky” triangles)
- 4 pieces of 3″ squares for each color: yellow, blue, light blue, and red (these will form the “geese”)
Fabric for Corner Accents:
These smaller squares will fill in the corners of your mat, creating a neat and finished look around the main design elements.
- 16 pieces of 2.5″ squares (choose a coordinating solid or a subtle print)
Essential Quilting Tools:
In addition to your fabrics, you’ll need a few standard quilting tools to ensure accuracy and ease of construction:
- Sewing machine with a 1/4″ foot (highly recommended for consistent seam allowances)
- Rotary cutter, self-healing mat, and quilting ruler
- Fabric scissors
- Iron and ironing board
- Coordinating thread (polyester or cotton)
- Pins or fabric clips
- Fabric marker or pencil (for drawing lines on fabric)
- Seam ripper (just in case!)
Step-by-Step Quilting Instructions
Now that you have all your materials ready, let’s begin the exciting process of bringing your patchwork centerpiece mat to life. Accuracy in cutting and sewing is paramount in quilting, so take your time with each step. Remember to press your seams at each stage; this makes a huge difference in the final appearance and flatness of your mat.
Preparation for Quilting:
Before you begin cutting, it’s always a good practice to pre-wash your fabrics, especially if they are new, to prevent any potential color bleeding or shrinkage after the mat is finished. Press all your fabrics thoroughly to remove any wrinkles, ensuring they are perfectly flat for precise cutting.
Step 1: Mastering Half-Square Triangles (HSTs) for Your First Block
The foundation of our central blocks begins with creating Half-Square Triangles (HSTs). This method is efficient and yields two perfect HSTs from two squares. We’ll start with Fabrics A (yellow) and B (blue).
- Take one 3.75″ yellow square (A) and one 3.75″ blue square (B).
- Place these two squares right sides together, ensuring all edges are perfectly aligned.
- Using a fabric marker or pencil and a ruler, draw a diagonal line from one corner to the opposite corner across the top square. This line will serve as your cutting guide.
- Now, sew a seam 1/4″ away from this drawn line on both sides. Precision here is key to achieving accurate HSTs. Using a 1/4″ quilting foot on your sewing machine can greatly assist with this.
- Once sewn, cut directly along the drawn diagonal line. You will now have two triangular units.
- Carefully open up each unit and press the seam allowance. You can press the seam open for a flatter unit or press it to one side (typically towards the darker fabric) as per your preference. You now have two beautiful Half-Square Triangle units, each measuring 3.25″ unfinished.
Step 2: Adding Corner Squares to Create Unique Units
This step builds upon your newly created HSTs by adding a smaller corner square, a technique often referred to as “snowballing” or “trimming corners.” We will use the 3.25″ light blue squares (Fabric C) for this part.
- Take your two HST units from Step 1.
- Place one 3.25″ light blue square (C) on top of one of your HST units, aligning it with one corner. The corner of the smaller square should be flush with the corner of the HST. Ensure right sides are together.
- Draw a diagonal line across the smaller square from the outer corner towards the center of the HST. This line should traverse both the smaller square and a portion of the HST.
- Sew 1/4″ away from the drawn line on both sides, just as you did for the HSTs.
- Cut directly on the drawn line. This will yield two units.
- Open up the units and press the seams.
- Repeat this process for the other corner of the same HST unit and then for the second HST unit using the remaining two C squares.
- Once all four units are created, carefully trim each unit to a precise 2.5″ square. Accurate trimming at this stage is essential for all your blocks to fit together perfectly later on. A square-up ruler is very helpful here.
- You have now completed the first main block’s components.
Step 3: Completing the Central Blocks
To form the four distinct central blocks for your centerpiece mat, you will repeat the techniques learned in Steps 1 and 2. This iterative process allows you to efficiently create all the necessary components for a rich, varied design.
- Refer back to the “Fabric Requirements for the Center Blocks” section to identify the correct fabric pairs for each of the remaining three blocks (Second, Third, and Fourth Square Blocks).
- For each block, pair the two 3.75″ squares (e.g., D and E for the second block) to create two HST units following the instructions in Step 1.
- Then, use the corresponding 3.25″ square (e.g., F for the second block) to add corner triangles to your HSTs, as detailed in Step 2. Remember to trim all resulting units to 2.5″ squares.
- Once you’ve completed this for all four combinations, you will have a total of 16 smaller 2.5″ squares that form the core of your patchwork design. Organize them by their original block combination to keep track.
Step 4: Crafting the Dynamic Flying Geese Units
The Flying Geese units are a fantastic way to add direction and excitement to your quilt. This method efficiently creates four geese units at once.
- Begin with one 5.5″ white square and two 3″ yellow squares. These will create your first set of Flying Geese.
- Place one 3″ yellow square on one corner of the 5.5″ white square, right sides together, aligning the edges. Take another 3″ yellow square and place it on the opposite corner of the 5.5″ white square, again right sides together.
- Draw a diagonal line from the corner of the first yellow square to the opposing corner of the second yellow square across the white square. This line should pass through the white square.
- Sew 1/4″ away from this diagonal line on both sides.
- Cut directly along the drawn diagonal line. You will now have two larger units.
- Press the yellow triangles open. You will see they are now attached to the white fabric.
- Next, take a 3″ red square. Place one red square on each of the remaining white corners of the two units you just created. Ensure right sides are together and corners are aligned.
- Draw a straight diagonal line across each red square, from the outside corner to the inner corner (where the yellow fabric now meets the white).
- Sew 1/4″ away from these new diagonal lines on both sides.
- Cut directly on these lines.
- Press the red triangles open. You should now have four individual Flying Geese units, each with a central “goose” triangle and two “sky” triangles. These units typically measure 2.5″ x 4.5″ unfinished.
- Repeat this entire process for the remaining colors (blue, light blue, and red) using the 3″ squares for each color with the remaining 5.5″ white squares. By the end of this step, you will have a total of 16 Flying Geese units (four of each color combination).
Step 5: Assembling Your Patchwork Centerpiece Mat
This is where all your beautifully pieced units come together to form the final design. Careful arrangement and precise joining are key to a stunning finish.
- Refer to the provided layout image for guidance. Begin by arranging your four completed central square blocks (from Step 3), the 16 Flying Geese rectangles (from Step 4), and the 16 small 2.5″ corner squares (from your initial cutting) on a flat surface or design wall. This visual arrangement allows you to confirm your layout before sewing.
- The general layout involves a central block of four large squares, surrounded by Flying Geese units, and accented with the smaller 2.5″ squares in the corners and between the geese. Make sure the ‘geese’ are all flying in a consistent direction or create a deliberate pattern (e.g., pointing outwards).
- Once you are satisfied with your layout, begin sewing the units together in rows. Pin carefully to ensure that seams match up as precisely as possible.
- Sew the individual units within each row together, using a consistent 1/4″ seam allowance. Press seams after each row is sewn, alternating the direction of the seam allowances for adjacent rows. This technique, called “nesting seams,” helps reduce bulk and makes joining rows easier and flatter.
- After all rows are complete, sew the rows together to form larger blocks. Press these seams open or to one side.
- Finally, sew these larger blocks together to complete your centerpiece mat top. Take your time to align all edges and points. Press the final quilt top thoroughly.
Finishing Your Centerpiece Mat (Beyond the Top):
While the tutorial focuses on creating the patchwork top, a centerpiece mat typically requires backing, batting, and binding to be fully functional and durable. Here’s a brief overview of the final steps:
- Backing: Choose a single piece of fabric or piece together several fabrics to create a backing slightly larger than your quilt top (at least 2 inches larger on all sides).
- Batting: Select a batting type that suits your needs (cotton, polyester, blend). Cut it to the same size as your backing fabric.
- Quilting: Layer your backing (right side down), batting, and quilt top (right side up). Baste these layers together using pins, basting spray, or long stitches. Then, quilt through all three layers using your sewing machine or by hand. You can stitch in the ditch (along existing seams), create a free-motion design, or follow a simple grid pattern.
- Binding: Once quilted, trim the edges of your mat straight and even. Prepare binding strips (usually 2.5 inches wide, sewn together to form one long strip). Attach the binding to the front of the mat, wrap it around to the back, and hand-stitch or machine-stitch it in place for a clean, finished edge.
Your Beautiful Half Square and Flying Geese Patchwork Centerpiece Mat
Congratulations! You have successfully crafted a stunning Half Square and Flying Geese patchwork centerpiece mat. This project is a wonderful way to practice fundamental quilting techniques while creating a functional and beautiful piece of home decor.
The combination of classic Half Square Triangles and dynamic Flying Geese units results in a visually captivating design that will surely impress. Feel proud of your newly acquired skills and the beautiful mat you’ve brought to life. Don’t hesitate to experiment with different color palettes and fabric prints for your next project – the possibilities in patchwork quilting are truly endless!
We hope you enjoyed this detailed tutorial. Share your creations with the quilting community and continue exploring the joy of fabric artistry!