
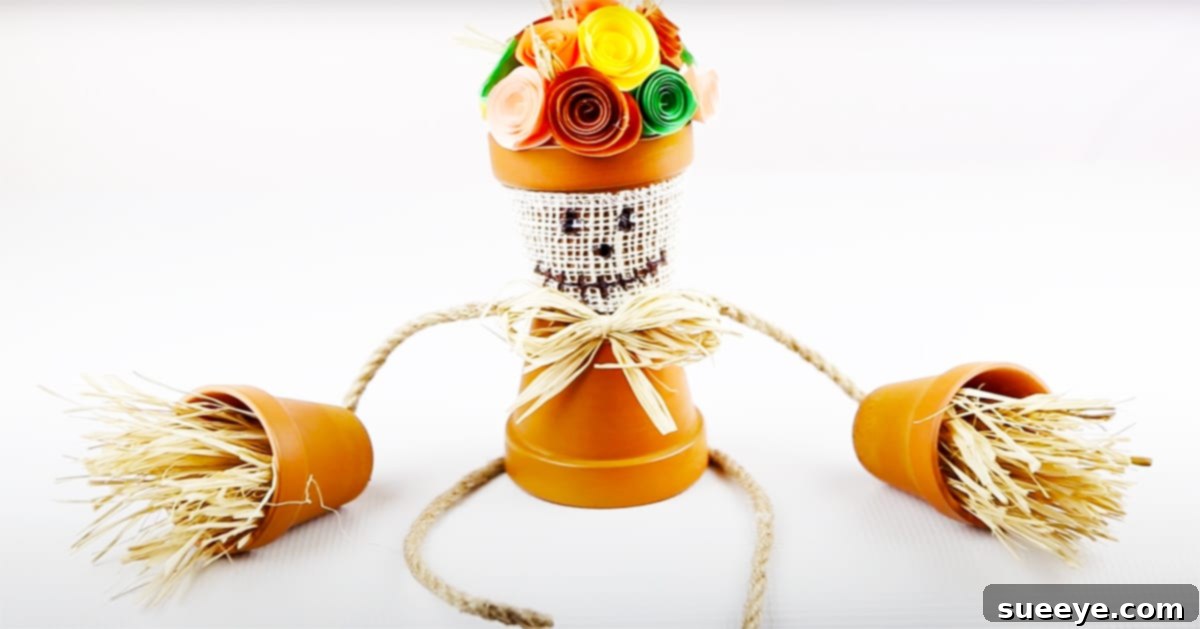
Charming DIY Scarecrow Flower Pots: Your Guide to Budget-Friendly Fall Decor
As the leaves begin to change and a crisp breeze fills the air, there’s a certain magic that autumn brings. It’s a season of cozy gatherings, warm beverages, and, of course, delightful decorations. Among the most iconic symbols of fall are scarecrows – those friendly guardians of the harvest, often seen in cornfields, now finding their way into our homes and gardens as charming decor. If you’re looking for an incredibly simple, budget-friendly, and utterly adorable way to infuse your space with fall spirit, you’ve come to the right place. We’re diving into the wonderful world of DIY with a delightful scarecrow flower pot project, inspired by the creative genius of Jenny W. Chan – Origami Tree on YouTube.
This project is a testament to how creativity doesn’t require a hefty budget. By utilizing common craft supplies, many of which can be found at dollar stores, you can craft a captivating piece of autumn decor that’s both festive and personal. Whether you’re a seasoned crafter or just starting, this DIY scarecrow flower pot offers a fulfilling experience that can be completed in under 15 minutes, making it perfect for a quick craft session alone or a fun activity with children. Imagine creating a whole family of these cute scarecrows, each with its own personality, gracing your mantelpiece, porch, or even serving as unique centerpieces for your Thanksgiving table.
Why Embrace the DIY Scarecrow Flower Pot for Fall?
There are countless reasons why this particular craft stands out as a must-try for the autumn season:
- Budget-Friendly Decor: In an era where seasonal decor can quickly become expensive, this project offers a refreshing alternative. Many of the materials are readily available at discount stores like Dollar Tree, ensuring you can deck out your home without breaking the bank.
- Easy and Quick: Don’t have hours to spare for crafting? No problem! This DIY is designed for efficiency, often taking less than 15 minutes per scarecrow. It’s perfect for busy individuals or spontaneous craft cravings.
- Family-Friendly Fun: The simplicity of the steps makes this an ideal craft to do with kids. It’s a fantastic way to encourage their creativity, develop fine motor skills, and spend quality time together, creating lasting memories alongside charming decor.
- Versatile Decoration: These small scarecrow flower pots are incredibly adaptable. They can adorn indoor spaces like windowsills, shelves, and tabletops, or bring a touch of whimsy to outdoor areas such as porches, patios, and garden beds.
- Personalized Touch: Unlike mass-produced decor, your handmade scarecrow will possess a unique charm. You have the freedom to choose colors, facial expressions, and embellishments, making each scarecrow a reflection of your personal style.
- Sustainable Crafting: Repurposing simple terracotta pots and using readily available materials aligns with a more conscious approach to decorating, focusing on creation rather than consumption.
Gather Your Essentials: Materials for Your Adorable Scarecrow
One of the best aspects of this DIY project is the accessibility of its materials. Most items can be sourced from your local Dollar Tree, craft store, or even around your home. Here’s a detailed list to help you prepare:
- Terracotta Flower Pots: These are the foundation of your scarecrow. You’ll need at least two per scarecrow – one for the body and one for the head. Smaller pots work best for a cute, tabletop size.
- Raffia Straws: Essential for giving your scarecrow its signature “straw” hair and adding a rustic touch. Bundles of raffia are usually found in craft or floral sections.
- Construction Paper: This will be used to create the cheerful paper flowers that adorn your scarecrow. A variety of colors will allow for vibrant and interesting blooms.
- Hot Glue Gun and Glue Sticks: Your primary tool for assembly. A hot glue gun ensures quick and secure adhesion of all components. Always use caution and supervise children when using.
- Pencil: For drawing circles for your paper flowers and sketching facial features.
- Scissors: For cutting paper and raffia.
- Styrofoam Ball: This forms the core of your scarecrow’s head, providing shape and a sturdy base for the facial wrap. Choose a size that complements your terracotta pots.
- Self-Adherent Wrap Tape (or Fabric Scraps/Burlap): This is used to create the scarecrow’s face. The self-adherent wrap tape is easy to apply smoothly, but you could also use thin fabric scraps, burlap, or even felt for a different texture.
- Black Sharpie (or Permanent Markers): For drawing the eyes, nose, and mouth onto your scarecrow’s face, bringing its personality to life.
- Rope (or Twine/Yarn): To fashion the scarecrow’s arms and legs, adding to its charming, rustic appeal.
- Spray Paint (Optional, but Recommended): To give your terracotta pots a uniform and vibrant base color before assembly. Earthy tones, bright yellows, or even a classic white can work beautifully.
- Optional Embellishments: Consider small buttons, tiny fabric patches, miniature straw hats, or even small silk leaves to further personalize your scarecrow.
Step-by-Step Guide: Crafting Your Adorable Scarecrow
Inspired by Jenny W. Chan’s brilliant tutorial, here’s a detailed breakdown of how to bring your scarecrow flower pot to life. Remember, creativity is key, so feel free to adapt these steps to your own style!
Step 1: Preparing Your Terracotta Pots
Begin by setting the foundation for your scarecrow. Take your terracotta flower pots and, in a well-ventilated area, spray paint them with your chosen base color. Allow them to dry completely according to the spray paint manufacturer’s instructions. This step is crucial for achieving a vibrant and polished look, as terracotta can be quite absorbent. Consider using a primer if you want very bright colors to stand out more. Once dry, you may want to apply a second coat for even coverage.
Step 2: Crafting Your Paper Flowers
Next, let’s add a touch of color and cheer with handmade paper flowers. On construction paper of various colors, use a pencil to draw a simple circle. The size of the circle will determine the size of your flower. Inside this circle, draw a spiral pattern that extends from the edge towards the center. Carefully cut along this spiral line. Once cut, begin rolling the paper strip from the outer edge inwards, creating a beautiful layered flower. Secure the end with a dab of hot glue. Make several of these in different sizes and colors to give your scarecrow a lovely floral accent. For a visual guide on this technique, be sure to watch Jenny W. Chan – Origami Tree’s tutorial on YouTube.
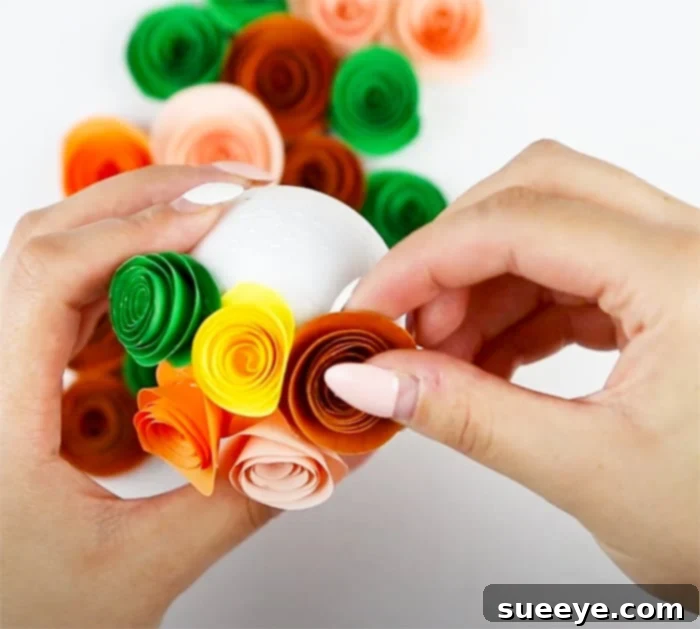
Step 3: Creating the Scarecrow’s Head and Face
Now, let’s give your scarecrow its adorable personality. Take one of your painted flower pots (this will be the head) and the Styrofoam ball. Hot glue the Styrofoam ball into the opening of the pot to secure it firmly. This will provide a stable base for the face. Next, carefully wrap the self-adherent wrap tape around the top portion of the flower pot and over the Styrofoam ball, creating a smooth, light-colored surface for the face. Ensure it adheres well and covers the entire area where the face will be drawn. Once the “face” is formed, use your black Sharpie to draw expressive eyes, a charming nose, and a friendly mouth. You can make them simple dots and lines, or more elaborate designs – let your imagination run wild!
Step 4: Assembling the Body and Limbs
With the head complete, it’s time to assemble the rest of your scarecrow. Take your second painted terracotta pot (this will be the body) and hot glue the “head” pot on top of it, ensuring it’s centered and secure. Next, cut two equal lengths of rope for the arms and two slightly longer lengths for the legs. Using your hot glue gun, carefully attach the ropes to the sides of the “body” pot for the arms and to the bottom edge for the legs. You can bend and position the ropes slightly to give your scarecrow a dynamic pose.
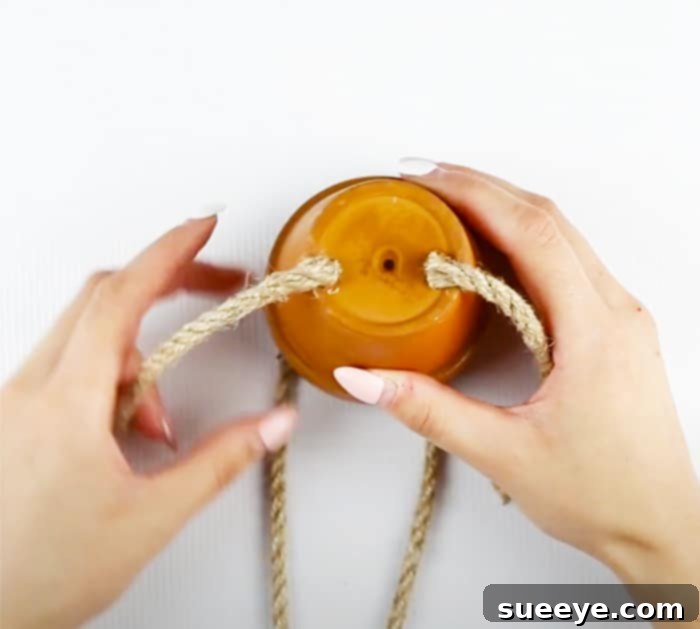
Step 5: Adding Raffia Hair and Finishing Touches
No scarecrow is complete without its signature straw elements! Take small bundles of raffia and hot glue them around the brim of the head pot, letting them peek out from underneath, mimicking hay hair. You can also glue a few pieces to the ends of the rope arms and legs to create little “hands” and “feet.” Finally, hot glue your beautiful paper flowers onto the scarecrow – perhaps one on its head like a hat, or a few clustered on its body. This is also the time to add any other embellishments like small buttons for eyes (over the Sharpie), tiny fabric patches, or a miniature straw hat for an extra touch of charm.
Creative Customization and Personalization Ideas
While the basic tutorial provides a fantastic foundation, the real fun lies in personalizing your scarecrow. Here are some ideas to make each creation truly unique:
- Varying Facial Expressions: Experiment with different eye shapes (oval, squinted, wide-eyed), eyebrow angles, and mouth styles (smiling, surprised, winking) to give each scarecrow a distinct personality.
- Paint Patterns and Colors: Instead of a solid color, try painting stripes, polka dots, or even tiny autumnal designs on the terracotta pots. Use different color palettes – classic oranges and browns, or perhaps more whimsical pastels.
- Fabric Embellishments: Cut small squares of plaid fabric, denim, or burlap to create “patches” for your scarecrow’s “clothing.” You could even tie small bow ties or scarves from fabric scraps around its neck.
- Natural Elements: Incorporate small dried leaves, acorns, or tiny twigs for a more organic, rustic look. These can be hot glued directly onto the pots or mixed with the raffia.
- Accessories Galore: Miniature straw hats, tiny plastic pumpkins, small pinecones, or even tiny gardening tools can be hot glued to your scarecrow to give it character and a story.
- Theme Variations: While perfect for general fall decor, you could adapt them for specific holidays. For Halloween, give them spooky faces or attach tiny spiders. For Thanksgiving, add mini cornucopias or ears of corn.
- Glitter and Sparkle: For a whimsical touch, add a light dusting of glitter to the paper flowers or paint details.
Displaying Your Charming Scarecrows
Once your adorable scarecrow flower pots are complete, it’s time to showcase them! Their compact size and versatile nature mean they can brighten up almost any spot in your home or garden.
- Indoor Decor:
- Mantelpiece or Shelf: Arrange a collection of scarecrows in varying heights for a dynamic display.
- Windowsills: Let them peek out from behind curtains, greeting passersby.
- Entryway Table: Create a welcoming autumn vignette with your scarecrows, a small pumpkin, and some fall foliage.
- Dining Table Centerpiece: Group a few together with candles or gourds for a charming and festive dining experience.
- Kid’s Room: A friendly scarecrow can be a delightful addition to a child’s bedroom during the fall season.
- Outdoor Accents:
- Porch or Patio: Place them on steps, tables, or alongside larger potted plants to add a whimsical touch.
- Garden Beds: Tuck them among your autumn flowers or vegetable patches for a playful touch (ensure they are protected from heavy rain if made with paper elements).
- Window Boxes: They make a charming addition to outdoor window boxes, bringing cheer to your home’s exterior.
- Thoughtful Gifts: These handmade scarecrows make wonderful, heartfelt gifts for friends, family, or neighbors. They are perfect for housewarmings, hostess gifts, or just a sweet gesture of autumn appreciation.
The Joy of Fall Crafting
This DIY scarecrow flower pot project, inspired by the creativity of Jenny W. Chan, is more than just a craft; it’s an invitation to embrace the spirit of autumn through mindful creation. It’s about saving money, reducing waste, and most importantly, making cherished memories whether you’re crafting solo or with loved ones. The straightforward nature of the tutorial, combined with the incredibly inexpensive materials, makes it accessible to everyone, regardless of crafting experience.
So, as the days grow shorter and the air turns crisp, gather your supplies, put on some cozy music, and let your creativity flow. In just a short time, you’ll have transformed simple terracotta pots and paper into adorable scarecrow companions that bring warmth and charm to your home. Dive into the full tutorial on Jenny W. Chan’s Origami Tree YouTube channel for all the visual guidance you need. Happy crafting, and may your autumn be filled with handmade joy!