
Crafting Brilliance: Your Guide to a Dollar Tree Race Track Lantern DIY
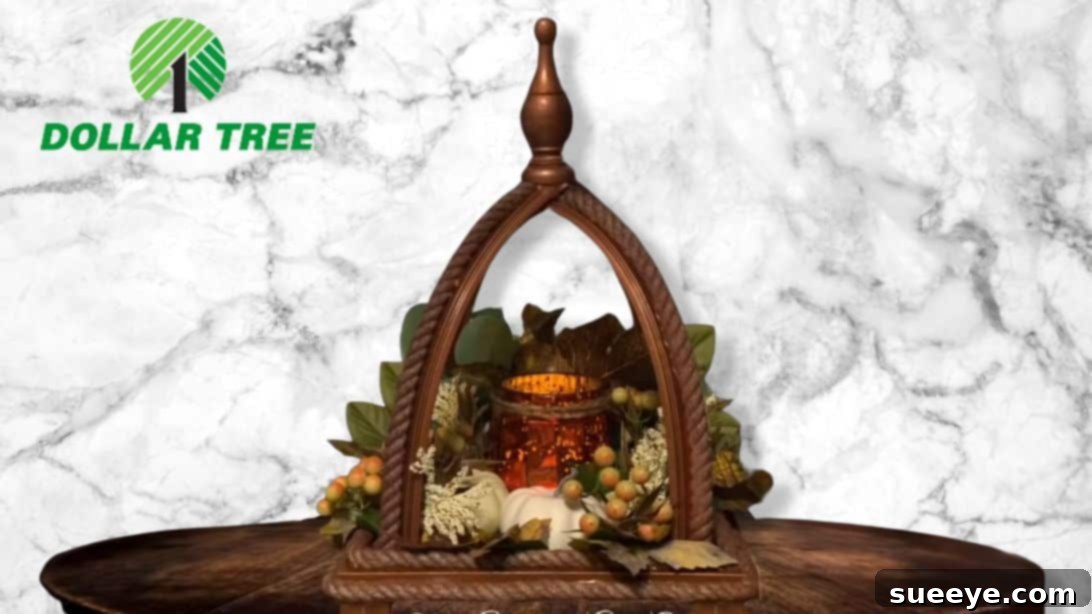
Who would ever guess that the elegant, rustic lantern gracing your home decor began its life as a simple Dollar Tree race track toy? Prepare to be amazed by this incredibly clever and creative project, brilliantly conceptualized by This Southern Girl Can. The finished piece radiates the charm and sophistication of an item purchased from a high-end decor boutique, proving that a dash of imagination and a few budget-friendly materials can truly go a long way.
This DIY Dollar Tree race track lantern is more than just a craft; it’s a statement piece that will captivate your guests and spark conversations. Imagine the delight when you reveal its humble origins! Perfect as a cozy fall centerpiece for your living room table, a charming accent for your entryway, or even a unique gift, this project offers an exceptional way to add a personalized touch to your home without breaking the bank. Dive into this comprehensive guide, or watch the original video, to unlock the secrets to creating your own stunning, upcycled lantern.
Why Choose This Dollar Tree DIY Lantern Project?
In a world increasingly focused on sustainability and mindful consumption, repurposing everyday items into beautiful home decor is not only satisfying but also eco-friendly. This Dollar Tree race track lantern project embodies the spirit of creative upcycling, transforming inexpensive toys into a sophisticated lighting accent. Here’s why this DIY is a must-try:
- Budget-Friendly Decor: Achieve a high-end look for a fraction of the cost. Almost all materials can be sourced from Dollar Tree, making this an incredibly economical craft.
- Unleash Creativity: It’s an opportunity to flex your creative muscles, proving that with a little ingenuity, ordinary items can be transformed into extraordinary works of art.
- Unique Statement Piece: Stand out from mass-produced decor. Your lantern will be a one-of-a-kind item, reflecting your personal style and craftsmanship.
- Rewarding Experience: There’s immense satisfaction in creating something beautiful with your own hands, especially when the final product is so impressive.
- Versatile Design: While perfect for fall, this lantern’s design can be easily adapted for various seasons and decorative themes, simply by changing the embellishments.
Gather Your Crafting Arsenal: Essential Materials
One of the most appealing aspects of this project is its reliance on readily available, inexpensive materials. Before you begin, ensure you have the following items at hand. A quick trip to your local Dollar Tree should cover most of your needs, keeping your project truly budget-friendly.
- 1 Dollar Tree Box Sign: This will serve as the sturdy base of your lantern. Look for one that’s a suitable size for your desired lantern dimensions. Its flat surface is perfect for building upon.
- Dollar Tree Hotwheels Race Track: The star of our show! You’ll need enough track pieces to form the structural frame. The flexible plastic is surprisingly robust once secured.
- Wooden Craft Cubes: Approximately 12 pieces. These small wooden blocks will form the feet or stand for your lantern, giving it elevation and stability.
- Hot Glue and Hot Glue Gun: Essential for quick initial bonds. Keep plenty of glue sticks on hand, as you’ll be using this extensively for assembly and embellishments.
- E6000 Adhesive: This industrial-strength adhesive is crucial for reinforcing the structural joints, ensuring a long-lasting and durable lantern. It provides a permanent bond that hot glue alone cannot.
- Copper-Colored Spray Paint: Or any color of your choice! This paint will unify the disparate materials and give your lantern its polished, high-end appearance. Consider metallic finishes for an extra touch of sophistication.
- Wooden Cap: A decorative element that will sit atop the lantern, adding a finished look.
- Dollar Tree Nautical Rope (Cotton): This rope adds fantastic texture and visual interest, mimicking the look of traditional lanterns. Choose a cotton rope for easy adhesion and painting.
- Candle Holder: A small holder for your LED candle. This ensures the candle sits securely within the lantern’s base.
- Fall Faux Berries Sprigs and Leaves: For decorating your lantern, especially if you’re aiming for a cozy autumn theme. Look for realistic-looking foliage at Dollar Tree or craft stores.
- Small Pumpkin Decor: A few miniature pumpkins or gourds will complete the fall aesthetic, adding charming accents to the base.
- LED Candle Light: For safety and convenience, an LED candle is highly recommended over an open flame. It provides a warm, flickering glow without any fire hazards.
Step-by-Step Guide: Building Your Race Track Lantern
Now that you’ve gathered all your materials, let’s embark on the creative journey of transforming these simple items into a magnificent Dollar Tree race track lantern. Follow these detailed steps for a smooth and enjoyable crafting experience.
Step 1: Laying the Foundation – Crafting the Sturdy Base
The stability of your lantern begins with a well-constructed base. This step focuses on creating the elevated stand that will support the entire structure.
- Take your Dollar Tree box sign and turn it upside down so the flat base is facing up.
- Select 12 wooden craft cubes. These will form the four support legs for your lantern.
- For each corner of the box sign, stack three wooden cubes on top of each other.
- Securely glue these three cubes together using hot glue first for an immediate hold. Once positioned, reinforce each stack of cubes to the corner of the box sign with a generous application of E6000 adhesive. This two-part gluing process ensures maximum stability.
- Carefully center the cube stacks at each corner, making sure they are aligned and even.
- Allow these glued connections to dry completely. E6000 requires a longer curing time (up to 24-72 hours for full strength), so be patient. A stable base is critical for the lantern’s overall integrity.
Step 2: The Architectural Twist – Shaping the Race Track Frame
This is where the magic of the race track truly comes alive, forming the distinctive crisscross framework of your lantern.
- Take your Dollar Tree Hotwheels race track pieces. Depending on the length of your tracks and the desired height of your lantern, you may need to connect several pieces to achieve the necessary length for each arch.
- Gently bend two long sections of the race track into an arch.
- Position these arched race track pieces on opposite corners of your wooden box sign base, creating a crisscross or “X” shape over the center. The ends of each arch should meet and be glued firmly to the base.
- Use hot glue to initially secure the track pieces to the base and to each other where they crisscross at the top. This provides an immediate hold while you fine-tune the shape.
- Once you are satisfied with the positioning and shape of the arches, reinforce all connection points with E6000 adhesive. Apply it carefully to ensure a strong, lasting bond between the race track and the wooden base, as well as where the tracks intersect.
- Allow the E6000 to cure fully. This structural integrity is vital for the lantern to hold its shape.
Step 3: Adding Texture and Color – Rope Detailing and Spray Paint
This step brings character and a unified aesthetic to your lantern, transforming its appearance from disparate components into a cohesive piece.
- Begin by gluing the cotton nautical rope onto the center of the race track arches. You can wrap it spirally around the crisscross intersection, or glue straight sections to cover the plastic, depending on the look you desire. Use hot glue for this task, ensuring it adheres firmly.
- Next, meticulously glue some more rope around the sides and top edges of your wooden box sign base. This adds a beautiful, rustic texture and helps to hide any visible glue or raw edges, giving the base a finished, decorative appearance.
- Once all the rope detailing is in place and the glue has dried, it’s time to unify the entire lantern with color.
- Take your lantern to a well-ventilated area, preferably outdoors.
- Apply an even coat of copper-colored spray paint (or your chosen color) to the entire lantern, ensuring full coverage of the wooden base, the race tracks, the rope, and the wooden cap (which you should glue to the top center of the crisscrossed tracks before painting).
- Apply several thin coats rather than one thick coat to prevent drips and ensure a smooth, professional finish.
- Allow the spray paint to dry completely between coats and before proceeding to the next step. This can take several hours depending on humidity.
Step 4: Bringing it to Life – Festive Fall Embellishments
With the structure and color complete, it’s time to add the decorative elements that will truly make your lantern shine, especially for a fall theme.
- If your fall faux berries sprigs and leaves come in a bouquet, gently cut individual sprigs and leaves from the main stem. This gives you more control over their placement.
- Place your candle holder securely in the center of the lantern’s base. You can use a dab of hot glue to keep it from shifting.
- Begin arranging the leaves on the base around the candle holder. Start with larger leaves to create a foundation, then layer smaller ones. Attach them with hot glue, ensuring they are positioned aesthetically and cover any visible parts of the base.
- Next, artfully arrange your small pumpkin decor. A common technique is to place three pumpkins to the front, creating a focal point. Use hot glue to secure them in place.
- Finally, add the berries sprigs to the sides, weaving them among the leaves and pumpkins. These add pops of color and texture.
- Once all the embellishments are securely glued, place your LED candlelight onto the holder.
- Step back and admire your handiwork – your Dollar Tree Race Track Lantern is now complete and ready to illuminate your space!
Personalize Your Lantern: Endless Customization Ideas
The beauty of DIY projects lies in the ability to personalize them. While this guide provides a fantastic fall-themed lantern, don’t hesitate to let your creativity flow and adapt the design to suit your taste and specific decor needs.
- Seasonal Themes:
- Winter Wonderland: Use white or silver spray paint, decorate with faux snow, pinecones, tiny frosted branches, and miniature ornaments.
- Spring Fresh: Opt for pastel-colored paint, and adorn with faux cherry blossoms, delicate green leaves, or small bird figurines.
- Summer Bright: Choose vibrant colors like turquoise or coral, and embellish with seashells, nautical ropes (white/blue), or tiny faux lemons.
- Color Palette: Experiment with different spray paint colors. Matte black for a modern minimalist look, distressed white for farmhouse chic, or bold primary colors for a playful touch. You can also distress the paint after it dries for an aged, vintage feel.
- Embellishments: Instead of fall foliage, consider:
- Ribbons and Bows: Tie bows around the base or the top cap.
- Charms and Pendants: Glue small decorative charms, beads, or even miniature keys to the rope or frame.
- Fabric Accents: Wrap small pieces of burlap, lace, or decorative fabric around parts of the base or frame.
- Glitter and Sparkle: For a festive touch, add a light dusting of glitter after the paint dries.
- Lighting Options: Beyond LED candles, explore small battery-operated fairy lights woven through the frame for a softer glow, or a small LED puck light at the base for upward illumination.
Displaying Your Masterpiece: Where to Shine
Once your Dollar Tree race track lantern is complete, you’ll want to showcase it! Here are some ideas for placement and styling:
- Living Room Centerpiece: As originally suggested, it makes a stunning focal point on a coffee table or dining table, especially when surrounded by complementary decor.
- Entryway Accent: Greet your guests with its warm glow on a console table or shoe rack.
- Mantel Decor: Elevate your fireplace mantel with one or two lanterns, perhaps flanked by other fall or seasonal elements.
- Bedroom Ambiance: Add a cozy, soft light to a nightstand or dresser for a relaxing atmosphere.
- Covered Patio/Porch: If protected from the elements, it can add a charming glow to your outdoor living space.
- Bookshelf Styling: Integrate it into your bookshelf decor for an unexpected touch of warmth and texture.
Tips for Success and Troubleshooting
To ensure your DIY project goes smoothly and yields the best results, keep these pointers in mind:
- Ventilation is Key: Always work in a well-ventilated area when using spray paint and E6000 adhesive.
- Patience with Drying Times: Don’t rush the drying process, especially for E6000 and spray paint. Full curing ensures durability and a professional finish.
- Thin Glue Coats: When using hot glue, apply thin, even lines to avoid unsightly clumps. For E6000, a moderate amount is effective; too much can ooze.
- Protect Your Workspace: Lay down newspaper, cardboard, or a drop cloth to protect your surfaces from glue and paint.
- Safety First: Wear gloves when working with adhesives and a mask when spray painting.
- Pre-Plan Embellishments: Before gluing down your leaves, berries, and pumpkins, arrange them loosely to find the most appealing composition. Take a picture, then glue!
Conclusion: Ignite Your Creativity with This Dollar Tree DIY
This Dollar Tree race track lantern DIY project is a testament to the power of creative vision and the joy of crafting. From humble plastic toys to an elegant piece of home decor, this transformation is not only incredibly satisfying but also an intelligent way to beautify your home on a budget. Whether you’re aiming for a rustic fall vibe or a personalized statement piece, this lantern is versatile enough to fit many styles.
We encourage you to embark on this rewarding DIY journey. Gather your materials, follow these steps, and don’t be afraid to infuse your own unique style into the project. The result will be a stunning lantern that not only lights up your space but also serves as a proud reminder of your crafting prowess. Share your creations and inspire others – happy crafting!