
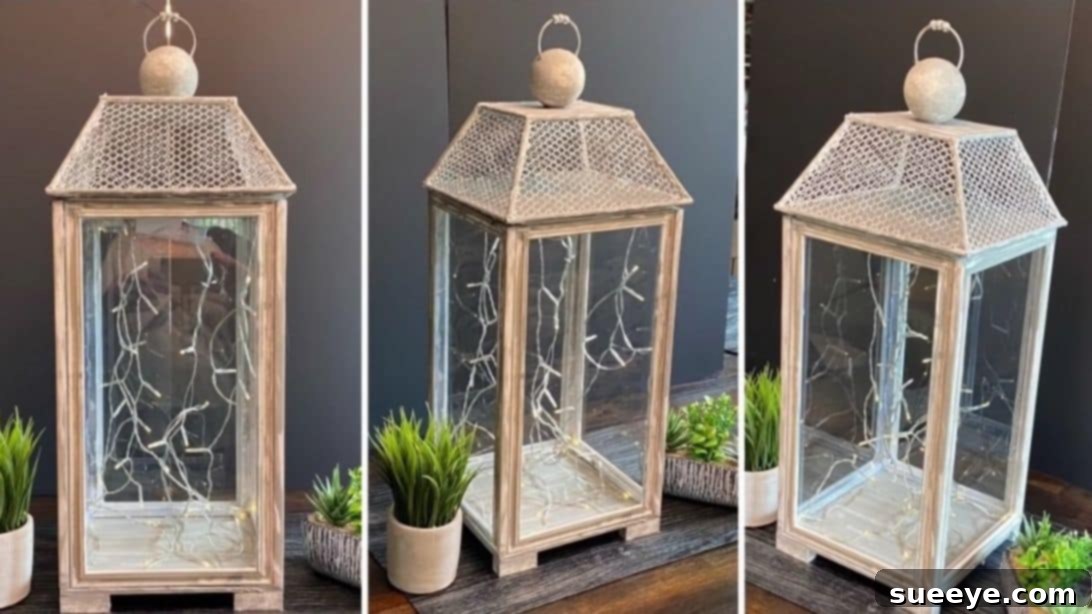
There’s a unique charm that lanterns bring to any space, instantly transforming an ordinary room into a cozy haven with a rustic or farmhouse vibe. For years, I’ve admired their beauty, envisioning them adorning my shelves, mantels, or even outdoor patios. However, the price tag often associated with quality lanterns can be quite steep, making them a luxury rather than an accessible home decor item. This common hurdle led me on a quest to find an easy, affordable, and rewarding DIY project. My search happily concluded when I discovered an ingenious craft tutorial by sana sea ? Rim ? Rahaf on YouTube. This remarkable guide not only showed me how to craft beautiful lanterns on a shoestring budget but also encouraged the use of repurposed materials alongside inexpensive dollar store finds. The result? Several exquisite lanterns that feel like a steal, proving that stunning home decor doesn’t require a hefty investment. I was so thrilled with my creations that I’m now eager to explore more DIY projects like this in the future, bringing personalized style into my home one craft at a time.
Why DIY Lanterns? The Perfect Blend of Style and Savings
Crafting your own lanterns offers a multitude of benefits beyond just cost savings. It’s an incredibly satisfying creative outlet that allows you to personalize your home decor to perfectly match your aesthetic preferences. Instead of settling for mass-produced items, you can create unique pieces that tell a story. This particular DIY lantern project is a standout for several reasons. Firstly, it champions the concept of repurposing, transforming readily available and often discarded items, like old picture frames, into something new and beautiful. This approach is not only eco-friendly but also incredibly budget-conscious. Secondly, the project leverages the affordability of dollar store items, making high-impact decor accessible to everyone. The distressed finish technique adds an authentic, aged look, ideal for rustic, farmhouse, or shabby chic interiors. Imagine the pride of displaying a handcrafted piece that brings warmth and character to your living space, all while knowing you created it yourself for a fraction of the cost of store-bought alternatives.
Gathering Your Materials: A Smart Approach to Budget-Friendly Crafting
One of the most appealing aspects of this DIY lantern project is its reliance on simple, often inexpensive materials. Many items can be found around your home, at a dollar store, or a local craft supply shop. Opting for white and grey paint hues lends itself perfectly to a classic distressed, weathered look, but feel free to experiment with colors that complement your existing decor. Remember, part of the joy of DIY is making it uniquely yours! Before you begin, gather all your supplies to ensure a smooth crafting process.
Essential Materials for Your Rustic Lantern:
- 4 pieces of 12×6 inches Picture Frames: Look for these at dollar stores, thrift stores, or repurpose old frames you no longer use. The glass is crucial for the lantern’s enclosure.
- Garden Mesh: A small roll of garden mesh, sometimes called hardware cloth or chicken wire with smaller openings. This adds an authentic rustic touch to the lantern’s top.
- Wooden Sticks: Craft sticks, dowel rods, or even thin pieces of scrap wood can work. These will form the structural elements of the lantern’s decorative top.
- Foamboard, white: Easily found at craft or dollar stores. This will create the base and the top elements of your lantern.
- 4 pieces of 1 to 1.5 x ½ inches (½ inch thick) Wood Pieces: These will serve as the feet for your lantern, giving it elevation and stability. Small wooden blocks or thick craft sticks can be cut to size.
- White Spray Paint: Provides a quick, even base coat for your picture frames.
- White Chalk Paint (or any white paint): Used for distressing and coating various elements. Chalk paint is ideal for its matte finish and ease of distressing.
- Grey Chalk Paint (or any grey paint): Crucial for achieving the weathered, aged effect. Any craft acrylic paint can be used as an alternative.
- Sponge: For applying chalk paint in a dabbing motion to create streaks and texture.
- Brush: For general painting and detailed work.
- Pliers: Useful for bending or trimming the garden mesh, if needed.
- Scissors: For cutting foam board, garden mesh, and other materials.
- Hot Glue Gun and Glue Sticks: Your primary adhesive for quick and strong bonds throughout the project.
- Styrofoam Ball: A small one, about 1.5 to 2 inches in diameter, for the decorative finial on top.
- Metal Binder Ring: A small binder ring (the type used for keyrings or holding paper) to create a hanging loop on the Styrofoam ball.
- Fairy Lights or LED Candle: The essential element to illuminate your lantern and create that warm, inviting glow. Battery-operated options are best for safety and portability.
Crafting Your Rustic Charm: Step-by-Step Guide
Follow these detailed instructions to bring your beautiful DIY lantern to life. Precision and patience are key, especially when working with hot glue and achieving the distressed finish.
Step 1: Preparing the Lantern’s Glass Case and Base
Begin by carefully disassembling your four 12×6 inch picture frames. Gently remove the backing, matting, and glass, setting aside the glass panels in a safe place. Keep only the bare wooden or plastic frames. Take these frames and apply an even coat of white spray paint. This will serve as your primary base color. Once the spray paint is completely dry, which usually takes about 15-20 minutes, it’s time to create the distressed effect. Dip a sponge lightly into your grey chalk paint and, using a dabbing or light dragging motion, roughly apply the grey paint over the white frames. The goal is to create subtle streaks and an aged, weathered look, allowing some of the white base to show through. Don’t aim for perfection; inconsistencies will enhance the rustic charm. Once all frames are painted and dry, carefully reattach the glass panels to each frame using hot glue along the inner edges where the glass rests. Ensure they are securely fastened. Next, cut a 6×6 inch square from your white foam board. Apply grey chalk paint to one side of this foam board square using the same sponge distressing technique. This piece will serve as the bottom of your lantern. Once dry, attach this painted foam board at the bottom of one of the glass cases (which is actually just one of your frames with glass reattached), with the painted side facing upwards, using hot glue to create a sturdy base. Repeat this process for the other three glass cases.
Step 2: Building the Decorative Top Structure for the Lantern
Now, let’s create the ornate top section of your lantern. Cut another 6×6 inch square from your foam board, and a smaller 3×3 inch square. Cover both of these foam board pieces with grey chalk paint using your sponge, replicating the distressed look. Set them aside to dry. Next, prepare your wooden sticks. You’ll need to cut them into specific lengths: four pieces 6 inches long, four pieces 3 inches long, and four pieces approximately 2 to 2.5 inches long. Precision here will ensure a well-aligned top structure. Using hot glue, assemble the four 6-inch sticks into a perfect square. Do the same with the four 3-inch sticks to form a smaller square. These will be the top and bottom platforms for your mesh canopy. Take the larger 6-inch wooden square you just assembled. At each corner, attach one of the 2 to 2.5-inch long sticks using hot glue, positioning them in a slightly slanted upward angle. These slanted sticks will connect the larger base square to the smaller top square, forming a pyramid-like structure. Finally, carefully place and secure the smaller 3-inch wooden square on top of these slanted sticks, ensuring it is centered and level. This forms the skeletal structure for your mesh lantern head.
Step 3: Integrating the Garden Mesh Elements and Distressing
Now, let’s add the rustic texture to your lantern’s top section. Take the assembled wooden stick frame from Step 2. Carefully measure the shape and size of each triangular space between the slanted wooden sticks. Mark and trace these dimensions onto your garden mesh. Using sturdy scissors or pliers, cut out four pieces of garden mesh corresponding to these measurements. Attach each piece of mesh to its respective side of the wooden stick structure using hot glue. Be generous with the glue to ensure a secure attachment. If there’s any excess mesh overhanging, carefully trim it with pliers or scissors for a neat finish. Once all mesh panels are attached, apply a base coat of white chalk paint to the entire mesh structure. Allow it to dry thoroughly. Then, repeat the distressing technique by lightly dabbing grey chalk paint with a sponge over the white, creating that desirable aged and textured look. Finally, retrieve the two painted foam board pieces from Step 2. Attach the larger 6×6 inch painted foam board at the bottom of the mesh lantern head structure (aligning with the 6-inch wooden square), and the smaller 3×3 inch painted foam board at the very top (aligning with the 3-inch wooden square). Use hot glue to secure them firmly. Set this complete lantern head aside.
Step 4: The Finishing Touches and Final Assembly
We’re almost there! Take your four small wooden pieces (1 to 1.5 x ½ inches) that will serve as the lantern’s feet. Paint them completely white or use a distressed white and grey finish to match the rest of your lantern. Once they are dry, attach them securely with hot glue to the bottom corners of your glass case base, ensuring the lantern sits level. Next, prepare the decorative finial for the top. Carefully insert the metal binder ring into the top of your Styrofoam ball. You can add a drop of hot glue around the base of the ring where it meets the ball to ensure it’s firmly secured and to hide any gaps. If you wish, you can also thread small beads onto the ring before securing it, adding an extra decorative touch. Once the ring is secure, cover the entire Styrofoam ball with grey chalk paint, allowing it to dry completely. Finally, attach this painted Styrofoam ball, ring side up, to the very top of your mesh lantern head using hot glue. Your lantern is now ready for illumination! Carefully insert your fairy lights or LED candle inside the glass case. Make sure the battery pack is accessible if needed. Finally, carefully place the assembled mesh lantern head on top of the glass case, aligning it neatly. You can apply a few dots of hot glue to secure the head to the base for added stability, or leave it unglued if you prefer to easily remove it to change the lights or clean the interior. Step back and admire your beautiful, handcrafted rustic lantern!
Tips for Success and Customization
To ensure your DIY lantern project goes smoothly and to make it truly your own, consider these helpful tips:
- Hot Glue Savvy: Use hot glue sparingly but effectively. A small bead is often enough. For stronger bonds, press pieces together firmly for a few seconds. Watch out for hot glue strings and remove them carefully once dried for a clean finish.
- Achieving the Distressed Look: The key to a good distressed finish is layering. Let your base coat dry completely before applying the top, contrasting color with a light hand. Use a dry brush technique or a sponge for varied textures. Sanding gently with fine-grit sandpaper after the paint dries can also enhance the worn look.
- Alternative Materials: Don’t have wooden sticks? Cardboard strips cut into precise measurements can work for the top structure, though they might not be as durable. For the lantern feet, cork stoppers or small wooden beads can be interesting alternatives.
- Personalized Paint Schemes: While white and grey lend themselves to a classic rustic aesthetic, feel free to choose colors that match your home. Consider sage green and cream for a shabby chic look, or deep blues and metallics for a more modern touch.
- Lighting Options: Fairy lights are popular for their delicate glow, but flameless LED candles offer a more traditional flicker. Solar-powered fairy lights could even make your lantern suitable for outdoor use during the day, charging up to light up your evenings.
- Embellishments: Add small decorative elements such as mini faux wreaths around the base of the Styrofoam ball, tiny bows made from twine, or even miniature artificial birds or flowers to the mesh section for seasonal variations.
Displaying Your Handcrafted Masterpiece
Once your beautiful DIY lantern is complete, the fun continues with finding the perfect spot to display it. These versatile pieces can enhance almost any area of your home. Place them on a mantelpiece for a warm focal point, on open shelves to add texture and height, or as a charming centerpiece on your dining table or coffee table. They look equally stunning in an entryway console, welcoming guests with a soft glow. During warmer months, consider bringing them outside to illuminate a covered patio or porch for evening gatherings, just be sure to protect them from direct elements if they are not specifically made for outdoor use. For holiday seasons, you can easily switch out the internal decor—think miniature ornaments for Christmas, small pumpkins for autumn, or vibrant faux flowers for spring. Your handcrafted lanterns are not just light sources; they are decorative accents that reflect your personal style and creativity.
*These amazing images are all credited to sana sea ? Rim ? Rahaf via YouTube. Check her other content and follow for more inspiring DIY projects!