
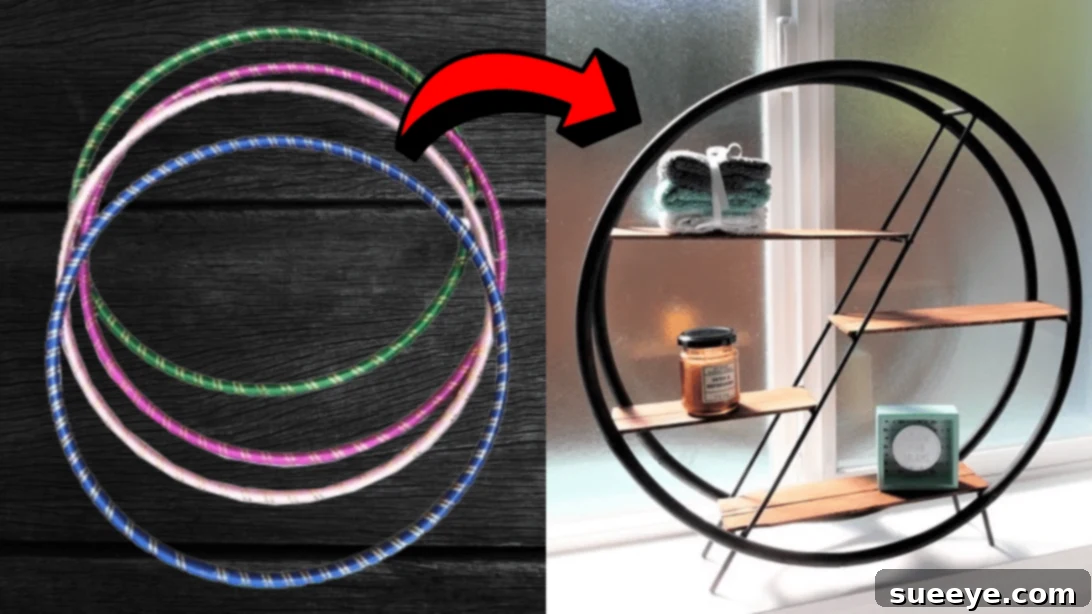
DIY Hula Hoop Shelf: Transform Dollar Store Finds into High-End Decor
Are you searching for unique, stylish, and incredibly affordable home decor solutions? Look no further! This ingenious DIY Hula Hoop Shelf project allows you to craft a sophisticated, high-end looking piece of furniture using surprisingly simple and inexpensive materials, most notably, hula hoops from your local Dollar Store. Imagine creating a functional art piece that not only serves as a beautiful display for your cherished items, mini indoor plants, or decorative accents but also becomes a conversation starter. The best part? It’s far less expensive than anything you’d find in a store, and its customizability means it can perfectly match your personal style and existing home aesthetic.
This project is not just about saving money; it’s about unlocking your creative potential and adding a personal touch to your living space. With a little bit of time and effort, you can transform ordinary hula hoops into a stunning and practical shelving unit. You can choose any paint color to complement your home’s palette, making each shelf truly unique to your taste. This guide will walk you through every step, ensuring a smooth and enjoyable crafting experience, inspired by the fantastic tutorial from Laurie R Creations on YouTube.
RELATED: Easy DIY Hula Hoop Chandelier Tutorial
Why You’ll Love This DIY Hula Hoop Shelf
This project stands out for several compelling reasons, making it a favorite among DIY enthusiasts:
- Budget-Friendly Elegance: Achieve a high-end look without the hefty price tag. Utilizing Dollar Store hula hoops drastically cuts down on material costs, proving that stylish decor doesn’t have to break the bank.
- Unleash Your Creativity: From selecting your desired paint colors to choosing a wood stain that complements your home, this project offers endless opportunities for personalization. Make it bold, subtle, rustic, or modern – the choice is yours!
- Surprisingly Simple: Despite its sophisticated appearance, the construction process is straightforward and enjoyable. It’s an accessible project for crafters of various skill levels, offering a rewarding experience.
- Versatile Functionality: This shelf isn’t just pretty; it’s incredibly practical. Use it to display small decorative items, organize your spices in the kitchen, hold bathroom essentials, or showcase your beloved collection of mini indoor plants and succulents. Its compact design makes it suitable for various spaces, from entryways to bedrooms.
- Sustainable Crafting: Repurposing hula hoops gives new life to an inexpensive item, aligning with eco-conscious crafting practices.
- Instant Home Upgrade: Add a unique focal point to any room that guests will surely admire, often surprised to learn its humble origins.
Materials for Your DIY Hula Hoop Shelf:
Gathering your materials is the first exciting step towards creating your bespoke shelf. Most items are readily available at craft stores, hardware stores, or even discount retailers.
- 2 Hula Hoops, approximately 20.5 inches in diameter (standard Dollar Tree size)
- 1 Package of Wooden Dowels, 6 inches in length (for vertical supports)
- 1 Package of Wooden Skewers, 32 inches in length (for structural crossbars)
- 7-8 Wood Paint Stir Sticks, 5-gallon size (these will become your shelf boards)
- Black Acrylic Paint (or your preferred color for the hoops and supports)
- Walnut Color Wood Stain (or a stain that matches your desired aesthetic for the shelves)
- Brad Nails, 1¼ x 16 inches (for secure assembly)
- Saw (a hand saw or miter saw for cutting wood dowels, skewers, and paint sticks)
- E6000 Adhesive (a strong, permanent glue for crucial connections)
- Hot Glue Gun and Glue Sticks (for quick bonds and initial positioning)
- Hammer (for brad nails)
- Paintbrush (for applying paint and stain)
- Sandpaper (medium to fine grit, for smoothing rough edges)
How to Make Your DIY Hula Hoop Shelf: A Step-by-Step Guide
Follow these detailed instructions to bring your elegant hula hoop shelf to life. Patience with drying times is key to a durable and beautiful finish!
Step 1: Preparing Your Hula Hoops and Marking Shelf Placement
Begin by preparing your hula hoops. Most Dollar Store hula hoops come with decorative wrapping and small, noise-making pebbles inside. Carefully remove the plastic wrapping from both hoops. Locate the connected ends of each hoop – typically there’s a small seam or a staple. Gently pull the hoop open at these connected points and empty out all the pebbles. This step is crucial for a stable and quiet shelf. Once empty, reconnect the ends securely. Now, it’s time to paint your hoops. Apply a coat of black acrylic paint (or your chosen color) to both hoops, ensuring even coverage. Allow them to dry completely – this might take a few hours or require a second coat for full opacity. Once dry, take one of the long skewers and place it diagonally across one hula hoop. This will help you visualize and mark the desired locations for your shelves. Using a pencil, mark precisely where you want each shelf to land along the hoop’s inner edge. Aim for even spacing for a balanced look, or customize for varying shelf heights.
Step 2: Constructing the Shelf Framework
With your first hoop marked, transfer these markings precisely onto the second hula hoop, ensuring perfect alignment. This guarantees your shelves will be level. Next, cut two long skewers to size, ensuring they fit across the hoops at your marked diagonal positions. Paint these skewers black (or to match your hoops) and allow them to dry. Now, using a combination of E6000 adhesive for a strong, permanent bond and a dab of hot glue for immediate hold, attach these two long skewers into place on both hoops at your marked positions. E6000 requires significant curing time, so let the hoops and skewers sit undisturbed overnight to ensure the glue completely dries and forms a strong bond. While waiting, cut smaller pieces from your remaining skewers or dowels to serve as vertical spacers between the two hoops. These spacers will provide the necessary depth and stability for your shelf. Paint these spacer pieces, then use brad nails to securely attach them into place between the two hoops, aligning them with your initial marks. Finally, paint the 6-inch wooden dowels (these will act as the front and back supports for your shelves). Attach these painted dowels where your markings are, nailing them firmly to both hula hoops. Ensure they are plumb and evenly spaced.
Step 3: Crafting and Attaching the Shelf Boards
At this stage, you have the basic structure of your shelf taking shape. Now it’s time to add the actual shelf boards. Start by adding a small amount of hot glue around the ends of the dowels that are already attached to the hoops; this reinforces their connection. Next, measure and cut your remaining dowels or skewer pieces to fit snugly in between the two long diagonal skewers you attached earlier. These shorter pieces will serve as additional supports for your shelves. It is crucial to ensure these new pieces are perfectly level with the outside dowels before permanently hot gluing them into place. Precision here will result in level shelves. Once these internal supports are secure, lay your paint stir sticks (which will become your shelf boards) across the supports to measure their exact length. Cut the paint sticks to size using your saw. After cutting, thoroughly sand the rough edges of each paint stick with sandpaper. This not only makes them smooth to the touch but also prepares them for a professional-looking finish.
Step 4: Finishing Touches, Staining, and Final Assembly
With all your wooden components cut and sanded, it’s time for the aesthetic transformation. Apply a second coat of paint to the entire project – the hula hoops, dowels, and any other painted support pieces. This second coat ensures full coverage, a richer color, and a more durable finish. Allow it to dry completely. Next, apply your chosen walnut color wood stain to all the paint stir stick boards. Make sure to cover all surfaces: top, bottom, and edges. Apply the stain evenly and wipe off any excess according to the product instructions for a consistent, professional look. Once the stain is dry (check manufacturer’s recommendations for drying times), carefully hot glue each stained board into place. Secure them firmly to the top of the wooden dowels and internal supports, ensuring they are flush and level. Repeat this process for each shelf. Finally, prepare the “legs” of your shelf. The video tutorial from Laurie R Creations provides excellent visual guidance for this step, showing how to cut and attach additional dowels or stir sticks to the bottom of the structure to create a stable base, allowing your shelf to stand freely. Watch the video closely for the specific technique to ensure your shelf is balanced and robust.
And there you have it! A stunning, high-end looking shelf crafted from simple Dollar Tree hula hoops. This project is a testament to how creativity and a few basic materials can transform your home decor. Enjoy your beautiful, custom-made shelving unit!
*All these images are credited to Laurie R Creations via YouTube. Her channel is a treasure trove of creative and budget-friendly DIY ideas. We highly recommend giving her channel a visit and subscribing for more inspiring projects and tutorials! Your support helps creators continue sharing their amazing craft.
Conclusion: Your Affordable High-End Hula Hoop Shelf Awaits!
This Easy Dollar Tree DIY Hula Hoop Shelf Tutorial demonstrates that exceptional home decor doesn’t require a lavish budget or complex skills. By repurposing common items like hula hoops, you can create a truly unique and functional piece that reflects your personal style. Whether you choose a minimalist black finish, a vibrant pop of color, or a rustic stained look, this project offers boundless possibilities for customization. It’s a wonderful way to add storage, display cherished objects, or simply enhance the aesthetic appeal of any room in your home. Dive into the world of DIY, enjoy the process, and take pride in creating something beautiful and practical with your own hands. Happy crafting!