
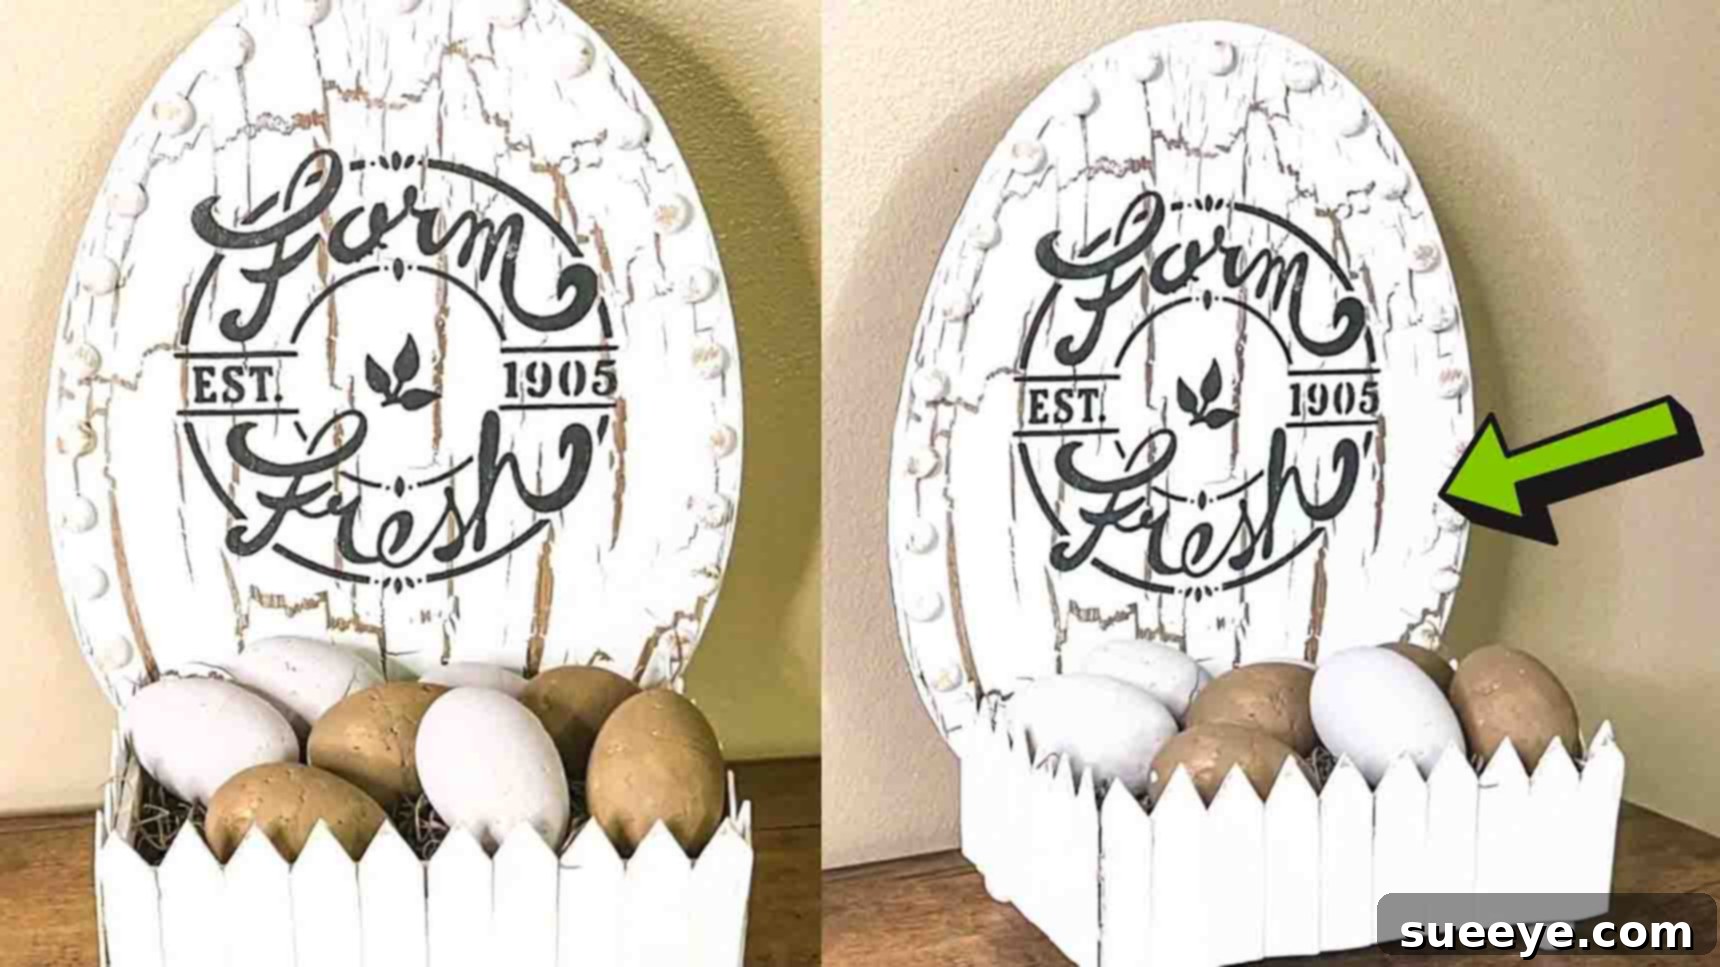
DIY Farm Fresh Egg Display: Craft Your Own Charming Farmhouse Decor
Transform your home into a cozy farmhouse haven with this utterly adorable DIY Farm Fresh Egg Display! Perfect for adding a touch of rustic charm, this project is not only a delightful craft but also incredibly timely as Easter approaches. Imagine these beautiful, handcrafted eggs gracing your mantelpiece, kitchen island, or dining table, bringing warmth and a personalized touch to your space. Inspired by the creative minds at We Craft Around on Youtube, this comprehensive tutorial provides a straightforward, step-by-step guide to creating your very own eye-catching display. Whether you’re a seasoned crafter looking for your next project or a beginner seeking a fun and rewarding weekend activity, gather your materials and let’s dive into making something truly special. This budget-friendly craft, often achievable with items from stores like Dollar Tree, promises a rewarding experience and a stunning, custom-made result that will surely impress.
The enduring allure of farmhouse decor lies in its simplicity, warmth, and connection to nature. This “Farm Fresh Egg Display” perfectly encapsulates that spirit, offering a versatile piece that looks fantastic from early spring through to autumn. It’s more than just a seasonal Easter decoration; it’s a timeless accent that speaks of homemade goodness, rustic elegance, and a love for handcrafted items. The beauty of a DIY project is the ability to customize it to your personal style, and this egg display offers ample opportunity for personalization. By following our detailed instructions, you’ll learn how to combine everyday craft supplies with clever techniques to achieve a professional-looking, custom display that radiates charm. Get ready to impress your guests and add a unique, handcrafted element to your home decor collection that truly stands out.
Materials You’ll Need for Your Farm Fresh Egg Display Project
Before embarking on this delightful crafting journey, ensure you have all the necessary supplies on hand. A significant advantage of this project is that many of these items are readily available at craft stores, discount retailers like Dollar Tree, or even general stores, making it an incredibly accessible and budget-friendly endeavor. Gathering everything beforehand will help your crafting process flow smoothly and efficiently, allowing you to focus on the creative aspects without interruptions.
- Egg Shape Cutout: This will serve as the prominent backdrop for your “Farm Fresh” sign. A sturdy wooden or MDF cutout is ideal, providing a solid, durable base that holds paint and embellishments beautifully. Look for one that’s approximately 10-12 inches tall for a noticeable yet elegant display.
- “Farm Fresh” Stencil: A good quality stencil is absolutely crucial for achieving crisp, professional-looking lettering. Choose a stencil with a classic, rustic farmhouse font to enhance the overall aesthetic. Alternatively, if you’re skilled, you could hand-paint the lettering.
- Small Wooden Tray: This tray will form the functional base of your display, neatly holding the Spanish moss and foam eggs. Select a size that complements your egg cutout, ensuring it’s deep enough to hold the moss comfortably and wide enough to support the eggs.
- Spanish Moss: This natural filler adds an authentic, nest-like texture to your display. Its earthy tones and soft feel create a perfect, rustic bed for your painted eggs.
- 12 Craft Sticks: Standard popsicle sticks work perfectly for this project. These humble sticks will be ingeniously transformed into charming miniature picket fence details, adding a whimsical touch to your tray.
- Four Wooden Beads: Opt for small, round wooden beads (around 1/2 to 3/4 inch in diameter) that will serve as decorative feet for your tray. These elevate the display slightly, adding an elegant finish and a touch of refinement.
- Half-Round Beads: These small, flat-backed beads (often referred to as cabochons) will be used to create a decorative border around your egg cutout. They add fantastic texture and visual interest, framing the main element beautifully.
- Eight Foam Eggs: Lightweight, smooth, and incredibly easy to paint, these foam eggs will be the “fresh eggs” nestled within your display. Choose a size that fits well within your tray once it’s filled with moss – typically about 2-3 inches tall.
- Home Decor Wax (Clear or Antiquing): This versatile product is key to achieving that coveted distressed, aged finish on your wooden elements. It imparts a beautiful farmhouse patina and also helps to seal and protect your paintwork, enhancing its durability.
- White Glue (PVA Glue): A general-purpose craft glue that provides an excellent base for paint adhesion. It helps create a smooth surface and can be used for various light-duty gluing tasks throughout the project.
- Chalk Paint (Plaster, Hazelnut, and Sandstone): Chalk paint is a crafter’s favorite for its superior coverage, matte finish, and ability to create a vintage, distressed look with ease.
- Plaster: A beautiful off-white or light cream shade, perfect for the main egg cutout and various detailing, offering a clean, rustic base.
- Hazelnut: A warm, rich, earthy brown that will give some of your foam eggs a natural, authentic color.
- Sandstone: A soft, muted tan or light beige, complementing the hazelnut beautifully for the other foam eggs, creating a lovely contrast.
- Black Acrylic Paint: For stenciling the “Farm Fresh” lettering, ensuring it stands out boldly and legibly against the lighter background of the egg cutout.
- Hot Glue Gun and Hot Glue Sticks: An indispensable tool for quick, secure bonds during assembly, especially for attaching the craft sticks and smaller beads, where speed is an advantage.
- Gorilla Glue (or other strong adhesive): A robust, permanent adhesive is essential for securing the wooden tray to the egg cutout, ensuring your entire display is sturdy, stable, and long-lasting.
- Additional Tools: Paintbrushes (various sizes for different tasks), baby wipes (for blending wax), a craft knife or sturdy scissors (for precise cutting of craft sticks), painter’s tape (invaluable for stenciling and holding beads), and skewers (for easy handling while painting foam eggs).
Step-by-Step Directions to Craft Your Farm Fresh Egg Display
Follow these detailed instructions carefully to bring your charming farmhouse egg display to life. Remember, taking your time with each step ensures a beautiful, professional finish and a truly rewarding crafting experience. Don’t rush, and enjoy the process of creating something unique with your own hands.
Step 1: Preparing and Painting the Egg Cutout and Foam Eggs
Begin by giving your main egg-shaped cutout a rustic and aged foundation. Take your home decor wax – whether it’s a clear wax for subtle sheen or an antiquing wax for more pronounced aging – and brush a thin, even layer across the entire surface of the egg cutout. Immediately after applying the wax, use a soft baby wipe to gently blend it in and remove any excess. This technique is crucial for creating that sought-after subtle distressed effect, allowing the natural wood grain to subtly peek through and adding immediate character. Allow this initial wax layer to dry completely according to the product instructions; this usually takes only a few minutes, but proper drying ensures subsequent layers adhere correctly.
Once the wax is thoroughly dry, brush a generous, even coat of white glue (PVA glue) over the entire waxed surface. This acts as a preparatory primer, significantly enhancing the adhesion of your chalk paint and creating a durable, smooth base for the next step. While the white glue is still wet, proceed to apply your plaster chalk paint. Paint evenly, striving for full and consistent coverage across the egg cutout. The slightly wet glue will help the chalk paint adhere beautifully, resulting in a smooth, matte finish that is characteristic of farmhouse decor. Once painted, set the egg cutout aside in a dust-free area and let it dry completely. Patience here is absolutely key to preventing smudges, ensuring a flawless base for your upcoming stencil work.
Next, it’s time to paint your foam eggs, which will become the “fresh eggs” in your display. For maximum ease of handling and to keep your fingers paint-free, insert a skewer into the bottom of each foam egg. This provides a convenient handle, allowing you to rotate and paint them without touching the wet surface. Begin by painting four of the foam eggs with the hazelnut chalk paint, applying thin, even coats to ensure thorough coverage. For the remaining four foam eggs, use the sandstone chalk paint, creating a lovely natural variation in color. Depending on the chalk paint’s opacity and the finish you desire, you may need to apply a second coat to achieve a rich, opaque color. Allow all the painted foam eggs to dry thoroughly on their skewers, ideally by sticking the skewers into a block of floral foam or a piece of cardboard, ensuring they don’t touch each other or any surfaces while drying.
Step 2: Constructing and Painting the Picket Fence Tray Base
Now, let’s create the charming picket fence detail that will adorn your display tray. Take your twelve craft sticks and carefully cut them in half, yielding twenty-four smaller pieces. To achieve the classic picket fence look, take each half-stick and cut a small diagonal angle on one end. This creates the pointed top characteristic of traditional fence posts. Precision in these cuts will result in a more uniform and appealing fence line, so take your time. You will need ten of these picket fence pieces for the front of the tray and seven pieces for each side, totaling twenty-four pieces. Using a hot glue gun, carefully attach these picket fence pieces to the outer perimeter of your wooden tray. Ensure they are evenly spaced and stand upright to create a neat, decorative border that evokes a rustic farmyard feel.
To give your entire display a subtle lift and a more finished, elegant look, glue four wooden beads to the four corners on the bottom of the tray. These beads will serve as small, decorative feet, elevating the tray slightly from the surface it rests on. Use hot glue for these as well, ensuring they are firmly attached and evenly spaced for optimal stability. This small detail adds a touch of sophistication and makes the display feel more substantial.
Next, prepare your half-round beads for painting. A clever and efficient trick is to place them sticky-side-down onto a strip of painter’s tape. This innovative method holds them securely in place, preventing them from rolling around and allowing you to paint them all at once without any fuss. Apply two even coats of the plaster chalk paint to all the half-round beads, ensuring complete coverage. While these beads are drying, also take the opportunity to paint the entire wooden tray (including the newly attached picket fence and the wooden feet on the bottom) with two coats of the same plaster chalk paint. This ensures a beautifully cohesive color scheme and a clean, unified base for your entire display. Remember to let all painted components dry completely between coats and before proceeding to the next steps to avoid smudges or uneven finishes.
Step 3: Assembling, Stenciling, and Finishing Your Display
Once all your individually painted pieces are completely dry, it’s time for the exciting assembly phase! Carefully glue the half-round beads around the outer edge of your plaster-painted egg cutout. Position them neatly and evenly, creating a beautiful decorative frame that enhances the egg shape. It’s important to remember to omit gluing beads along the very bottom edge of the egg cutout, as this particular section will be cleverly covered and obscured by the tray when the two pieces are joined later. Use your hot glue gun for this step to ensure quick and secure adhesion of the beads.
After the half-round beads are securely in place and their glue has set, take a small amount of your home decor wax and lightly dab it onto the newly glued beads and gently over the painted tray. This crucial step further unifies the distressed, aged look across all components of your display, creating a beautifully cohesive farmhouse aesthetic. The wax provides a subtle patina and adds depth to the plaster paint, giving the entire piece a lovely, authentic vintage feel.
Now, prepare for the focal point of your display: the “Farm Fresh” sign. Take your stencil and carefully position it onto the center of the egg cutout, ensuring it is perfectly straight and centered for optimal visual impact. Use painter’s tape to firmly secure the stencil in place, preventing any unwanted shifting while you work. Using a stencil brush or a small sponge, lightly dab black acrylic paint over the stencil. The key here is to dab, not brush or wipe, to prevent any paint from bleeding under the stencil, which can ruin crisp lines. Apply thin layers for a sharp, clean transfer of the lettering. Once you’ve achieved good, opaque coverage, carefully peel off the stencil while the paint is still slightly damp. This technique often results in the cleanest lines. Let the paint dry completely before proceeding.
With the stenciling perfectly done, it’s time to permanently join the main egg cutout with its picket fence tray base. Apply a strong adhesive like Gorilla Glue to the very bottom edge of the egg cutout where it will meet the tray. Carefully position the tray onto the egg, taking extra care to ensure it’s perfectly centered and straight. Apply gentle, even pressure and allow the glue to cure fully according to the product instructions – this typically requires some time, so be patient and avoid moving the piece. This strong bond ensures your finished display will be incredibly sturdy and last for many years to come.
To complete your beautiful display, fill the wooden tray with Spanish moss. Arrange the moss artfully to create a soft, natural bed, mimicking the look and feel of a cozy bird’s nest. Finally, with creative flair, artfully place your painted foam eggs amongst the moss. Mix the hazelnut and sandstone eggs strategically for a varied, textured, and visually appealing arrangement. Step back and admire your handmade creation – a truly unique and charming piece of farmhouse decor!
Dollar Tree DIY Farm Fresh Egg Display Tutorial: Your Rustic Masterpiece Awaits!
This Dollar Tree DIY Farm Fresh Egg Display is more than just a craft; it’s an opportunity to infuse your home with personality, warmth, and undeniable rustic charm. The beauty of this project lies in its simplicity, the affordability of its materials, and the stunning, professional-looking results it yields. Whether you’re decorating for Easter, preparing for a festive spring gathering, or simply want to add a timeless farmhouse touch to your kitchen, dining area, or entryway, this display is an absolutely perfect choice that embodies homemade elegance.
We highly encourage you to experiment with different color palettes for your foam eggs or even try various stencil designs if you want to personalize it further. Imagine pastel-colored eggs for a softer, more whimsical spring look, or perhaps a different heartfelt phrase stenciled onto the egg cutout. You could even add small decorative elements like miniature burlap bows, tiny artificial flowers nestled in the moss, or even a few real feathers for an extra touch of authenticity and whimsy. This project also makes a thoughtful and truly unique handmade gift for friends and family, perfect for Easter, housewarmings, or any special occasion where a touch of personalized rustic charm would be appreciated.
Thank you for following along with this comprehensive tutorial. We genuinely hope you enjoyed the creative process and are absolutely delighted with your finished Farm Fresh Egg Display. Remember, the joy of DIY is not just in the final product, but in the journey of creation. Don’t forget to share your beautiful creations with us and inspire others! Happy crafting, and enjoy your beautiful new piece of farmhouse decor!