
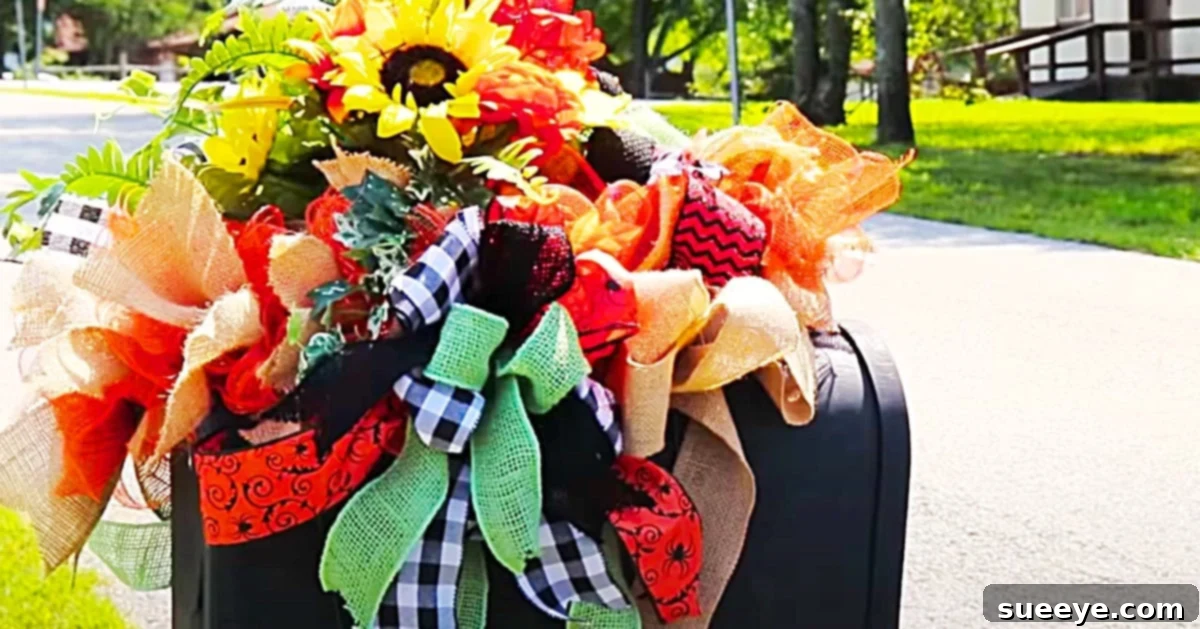
Transform Your Mailbox for Fall: The Ultimate Dollar Tree Autumn Makeover Guide
As the vibrant greens of summer begin to yield to the warm hues of gold, crimson, and rust, there’s an undeniable buzz in the air. Autumn is just around the corner, bringing with it crisp mornings, cozy evenings, and a plethora of opportunities for creative expression. For many, fall crafts and seasonal decorating are cherished traditions, signaling the shift to cooler, more introspective months. If you’re eager to infuse your home and surroundings with the spirit of the season, look no further than an often-overlooked canvas right at your curb: your mailbox.
Your mailbox is more than just a functional receptacle for letters; it’s a prominent feature of your home’s exterior, offering a fantastic opportunity to enhance curb appeal and welcome the autumn season with open arms. Imagine the delight of your mail carrier, neighbors, and guests as they approach a mailbox adorned with a magnificent display of fall colors and textures. While searching for unique fall decor ideas, I stumbled upon a truly inspiring concept: a Dollar Tree Fall Mailbox Makeover, masterfully demonstrated in a video tutorial by Olivia’s Romantic Home on YouTube. The rich, earthy tones and vibrant autumnal arrangements instantly transported me to a cooler, more refreshing state of mind, sparking an immediate desire to recreate this stunning display.
This comprehensive guide will walk you through transforming your ordinary, perhaps even drab, mailbox into an extraordinary autumn masterpiece. We’ll delve into the simplicity and affordability of using Dollar Tree finds, ensuring that a breathtaking seasonal display is accessible to everyone. From gathering your materials to crafting a show-stopping arrangement, get ready to unleash your creativity and make your mailbox the envy of the neighborhood. This project is all about embracing abundance and opulence, turning a simple structure into a flamboyant celebration of fall.
Essential Materials for Your Autumn Mailbox Makeover
One of the most appealing aspects of this project is its budget-friendliness, largely thanks to the accessibility of materials from stores like Dollar Tree. Don’t let the low cost fool you; with a keen eye and a touch of creativity, these simple items can be transformed into a high-end looking display. Here’s what you’ll need to gather:
- Burlap Strips: Burlap provides a rustic, natural base that perfectly complements autumn aesthetics. Look for rolls or pre-cut strips. Its neutral tone allows other fall colors to pop, and its texture adds depth to the arrangement.
- Assorted Ribbons: Ribbons are key for adding volume, color, and festive flair. Opt for a variety of fall-inspired colors such such as deep reds, golden yellows, rustic oranges, and warm browns. Gingham patterns (especially black and white) can add a charming farmhouse touch, while natural-toned ribbons offer a sophisticated accent. Consider different widths and textures for a dynamic look.
- Cardboard: This will serve as a sturdy, yet pliable base for your arrangement, allowing you to create a foundation that can be easily attached to the mailbox. Repurposed cardboard boxes work perfectly, making this element virtually free.
- Craft Wire: Flexible craft wire is essential for securing components, attaching the arrangement to the mailbox, and shaping elements. Floral wire or thin gauge craft wire will work best.
- Wire Cutters: A pair of standard wire cutters will be necessary to snip your craft wire cleanly and efficiently.
- Floral Tape: This self-adhesive tape is ideal for bundling stems, covering wire, and creating a more seamless, professional finish for your faux floral elements. It’s often green or brown, blending discreetly with natural elements.
- Ribbon Maker (Optional but Recommended): A bow maker tool can significantly simplify the process of creating professional-looking, voluminous bows. If you don’t have one, beautiful bows can still be tied by hand with a little practice.
- Faux Flowers: Choose a diverse selection of artificial flowers in rich autumn tones. Look for varieties like chrysanthemums, sunflowers, dahlias, and various fall berry sprays. Dollar Tree often has an excellent selection of seasonal florals.
- Autumn Leaves and Decorations: Artificial autumn leaves are a must for creating a lush, full backdrop. Additionally, incorporate small decorative elements such as mini pumpkins, gourds, squash, pinecones, acorns, or decorative picks to add character and interest. These seasonal accents truly bring the fall theme to life.
- Hot Glue Gun and Glue Sticks: An indispensable tool for securing various elements quickly and firmly.
- Scissors: For cutting ribbons, burlap, and other materials.
Detailed Directions: Crafting Your Autumn Mailbox Masterpiece
This project, while appearing elaborate, is surprisingly straightforward and can be completed in a single afternoon. The goal is to create an “over-the-top” design, so don’t be shy about layering and filling your display with an abundance of beautiful fall elements. For visual learners, Olivia’s Romantic Home’s Dollar Tree Fall Bouquet video tutorial on YouTube offers excellent guidance, but here’s a step-by-step breakdown to get you started:
Step 1: Preparing Your Mailbox and Base Structure
- Clean the Mailbox: Before you begin, give your mailbox a good wipe down to ensure it’s clean and free of dirt or cobwebs. This provides a clean canvas for your decor.
- Create a Cardboard Foundation: Cut a piece of cardboard that will rest securely on top of your mailbox, extending slightly down the sides or front as desired for your arrangement’s base. This piece will provide a sturdy, flat surface to attach your decorations, preventing them from sliding off or drooping. You might want to notch it to fit snugly around the mailbox flag or other features.
- Secure the Cardboard: Using craft wire, securely attach the cardboard base to the top of your mailbox. Thread the wire through the cardboard and around the mailbox, twisting it tightly underneath to ensure it doesn’t move. You can also use strong adhesive strips or magnets for additional stability, especially if you want to make it easily removable.
Step 2: Building Volume with Burlap and Foliage
- Drape Burlap: Begin by draping burlap strips over and around your cardboard base. The burlap acts as a foundational layer, adding rustic charm and helping to obscure the cardboard structure. Secure the burlap with hot glue or floral wire, ensuring it creates a natural, flowing effect. Don’t aim for perfection; a slightly messy, organic look is part of burlap’s appeal.
- Add Your First Layer of Faux Leaves: Start inserting your artificial autumn leaves, spreading them out to cover the cardboard and burlap base. Use a hot glue gun to secure them firmly. The goal here is to create a full, lush backdrop that will make your flowers and other embellishments stand out. Bend the stems of the leaves as needed to create a natural, cascading shape.
Step 3: Arranging Your Faux Flowers and Decorative Accents
- Incorporate Faux Flowers: Begin placing your faux flowers, starting with larger blooms to create focal points. Distribute them evenly throughout the arrangement, varying their height and angle for a dynamic look. Use floral tape to bundle smaller flowers together or to extend stems if necessary. Secure each flower with hot glue to the burlap and cardboard base.
- Add Berry Sprays and Smaller Fillers: Weave in berry sprays, smaller floral picks, and other delicate fillers to add texture and depth. These elements help to fill any gaps and create a more cohesive, abundant look. Don’t forget to add some elements that extend slightly beyond the main body of the arrangement to create a sense of movement and natural growth.
- Integrate Autumn Decorations: Now is the time to place your mini pumpkins, gourds, pinecones, and other decorative accents. Hot glue them securely onto the arrangement. Cluster some items together for visual impact and scatter others for whimsy. Remember, this project is meant to be “over the top,” so embrace a sense of generous abundance!
Step 4: Crafting and Attaching Ribbons and Bows
- Create Voluminous Bows: Using your ribbon maker (or by hand), create several multi-loop bows using a combination of your chosen fall-colored ribbons. Layer different textures and widths of ribbon within each bow for maximum visual interest. For instance, combine a wide burlap ribbon with a narrower gingham and a solid satin ribbon.
- Attach Ribbons: Once your bows are made, strategically place them throughout your arrangement. Hot glue them securely to the base, ensuring they are prominently displayed. Allow some ribbon tails to cascade down the sides of the mailbox for an elegant touch. Don’t be afraid to add extra ribbon loops or trails throughout the arrangement to fill space and add a festive flourish.
Step 5: Final Touches and Durability Considerations
- Step Back and Evaluate: Once you think you’re done, step back and look at your mailbox from different angles. Are there any bare spots? Does it look balanced? Add more leaves, flowers, or ribbons as needed until you achieve the desired fullness and grandeur. Remember, this is a statement piece!
- Secure Everything: Double-check that all components are firmly attached. Since this is an outdoor decoration, it will be exposed to wind, rain, and potentially curious hands. Use plenty of hot glue and wire where necessary to ensure longevity.
- Consider Weatherproofing (Optional): For extra durability, especially if you live in an area with harsh weather, you can lightly spray the entire arrangement with a clear acrylic sealer designed for outdoor use. This can help protect the colors and materials from fading and moisture.
Why Choose a DIY Fall Mailbox Makeover?
Beyond the sheer joy of crafting, there are numerous benefits to embarking on this DIY project:
- Budget-Friendly Beauty: Leveraging Dollar Tree finds makes this an incredibly affordable way to achieve high-impact seasonal decor without breaking the bank.
- Personalized Expression: Unlike store-bought decorations, your DIY mailbox will be a unique reflection of your style and creativity.
- Enhanced Curb Appeal: A beautifully decorated mailbox instantly elevates the look of your home, making it more inviting and festive.
- Spreading Seasonal Cheer: Your vibrant display will not only bring a smile to your face but also to everyone who passes by, including your diligent mail carrier.
- Engaging Activity: It’s a wonderful way to spend an afternoon, either solo or with family, embracing the spirit of the season.
Maintenance Tips for Your Autumn Mailbox
To keep your festive mailbox looking its best throughout the fall season, a little care goes a long way:
- Regular Checks: Periodically inspect your arrangement, especially after strong winds or rain, to ensure all elements are still securely attached. Re-glue or re-wire anything that has come loose.
- Gentle Cleaning: If dust or dirt accumulates, gently brush it off with a soft cloth or a feather duster. Avoid harsh cleaners, which could damage the faux materials.
- Seasonal Storage: At the end of the fall season, carefully remove the entire arrangement or its main components. Store them in a dry, protected container to prevent crushing and preserve them for next year’s autumn display.
The transformation of your mailbox into an autumnal showpiece is more than just a decorating project; it’s an act of joy and an expression of seasonal celebration. As the final touches are added, you’ll feel a palpable shift into the festive mood of fall. My own mailbox makeover brought an instant wave of excitement, with neighbors honking their appreciation as they drove by! So, gather your materials, embrace your inner decorator, and create a welcoming autumn statement right at your curb. Happy crafting, and enjoy the beautiful fall season!