
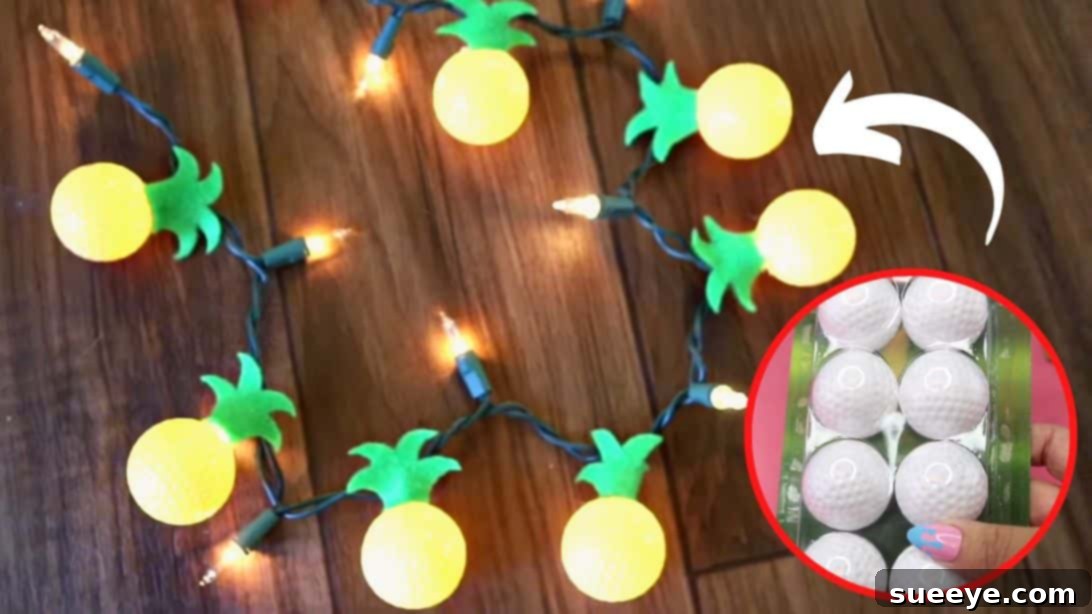
Transforming your living spaces, both indoors and out, doesn’t have to break the bank. With a dash of creativity and a minimal investment, you can give ordinary items a stunning new purpose. Imagine your backyard glowing with unique, custom-made lights that exude a tropical charm – all crafted from simple, affordable materials. This guide will show you how to repurpose old string lights and Dollar Tree golf balls into eye-catching pineapple string lights, adding a festive and welcoming ambiance to any area. This budget-friendly DIY project, inspired by the clever tutorial from Jay Munee DIY on YouTube, is perfect for anyone looking to personalize their decor without the hefty price tag.
Dollar Tree DIY Pineapple String Lights: A Budget-Friendly Backyard Makeover
Are you tired of plain, uninspired outdoor lighting? Do you dream of a vibrant, inviting atmosphere for your patio, deck, or garden parties? Look no further! This step-by-step tutorial will empower you to create your own enchanting pineapple string lights using incredibly inexpensive materials, primarily from your local Dollar Tree store. Instead of investing in pricey pre-made decorative lighting, you can achieve a truly unique aesthetic that reflects your personal style. Not only is this project incredibly satisfying, but it also allows you to upcycle existing string lights, giving them a fabulous second life. Prepare to amaze your guests with these charming, custom-made illuminations that promise to be a conversation starter.
Why DIY Pineapple String Lights Are a Must-Have for Your Home
The appeal of DIY projects lies in their ability to combine cost-effectiveness with personalization. Crafting your own pineapple string lights offers numerous benefits. Firstly, the financial savings are substantial. Rather than spending a significant amount on a new set of decorative lights, you can utilize materials found at a dollar store, keeping your total expenditure to just a few dollars. This makes it an ideal project for those on a tight budget or anyone who enjoys smart, thrifty decorating. Secondly, these lights bring a unique tropical flair that store-bought options often lack. Pineapples are symbols of hospitality, warmth, and friendship, making them a perfect motif for welcoming guests and creating a cozy outdoor retreat. Imagine the cheerful glow of these charming pineapples as they illuminate your evening gatherings, casting a warm, inviting light on your space. Furthermore, the satisfaction of creating something beautiful and functional with your own hands is immeasurable. It’s a fun, engaging craft that yields delightful results.
Materials You’ll Need for Your Tropical Light Project
Gathering your materials is the first exciting step in any DIY adventure. For this project, we prioritize affordability and ease of access. Most of these items can be found at your local dollar store, making this a truly budget-friendly craft. Here’s a comprehensive list of what you’ll need, along with a few tips:
- Dollar Tree Golf Balls: These are the stars of our project! Their size and spherical shape are perfect for mimicking the body of a pineapple. Look for multi-packs to ensure you have enough for your string lights.
- Green Felt: This will be used to create the iconic spiky crown of the pineapple. Felt is easy to cut, holds its shape well, and comes in various shades of green, allowing for subtle variations.
- Plastic Straws (or similar slender stick): These are incredibly useful for holding the golf balls during the painting process, ensuring an even coat and mess-free handling. Any sturdy, thin stick or skewer will also work.
- String Lights or LED Lights: An old set of string lights that are still functional is ideal for upcycling. LED lights are highly recommended as they produce less heat, which is a safer option when encased in plastic, and they are also more energy-efficient. Ensure the bulbs are a suitable size to fit into the golf balls.
- X-Acto Knife (or sharp craft knife): Essential for precisely piercing the golf balls. Safety is paramount when using this tool, so always cut away from yourself on a protected surface.
- Hot Glue Gun and Glue Sticks: Your trusty adhesive for securing the felt crowns to the golf balls. A hot glue gun provides a quick and strong bond.
- Green Marking Pen or Washable Pen: Useful for tracing your pineapple crown design onto the felt before cutting. A washable pen is great if you want to ensure no marks remain visible.
- Yellow Spray Paint: The key to transforming plain white golf balls into vibrant pineapple bodies. Choose a bright, cheerful yellow for an authentic tropical look. Ensure it’s suitable for plastic.
- Scissors: For cutting the felt into the desired crown shapes.
Step-by-Step Guide: Crafting Your Pineapple Lights
Now that you have all your materials, let’s dive into the creative process. Follow these detailed steps to bring your pineapple string lights to life.
Step 1: Preparing Your Golf Balls for Transformation
This initial step involves carefully modifying the golf balls and applying their vibrant yellow base color. Precision and safety are key here.
Begin by taking a single golf ball. With your X-Acto knife, carefully pierce the top of the golf ball, creating an “x” shape. The size of this “x” cut is crucial – it needs to be large enough to allow the bulb of your string light to comfortably fit inside, but not so large that the golf ball becomes loose or unstable. Test the fit with a spare light bulb if you’re unsure. Repeat this piercing process for all the golf balls you intend to use. Remember to work slowly and on a stable, protected surface to avoid accidents.
Next, prepare your golf balls for painting. This is where the plastic straws come in handy. Insert one golf ball onto each end of a plastic straw. This simple trick provides a stable handle, allowing you to hold and rotate the golf balls effortlessly without touching the wet paint. Lay out a drop cloth or old newspapers in a well-ventilated area for spray painting. Holding the straw by its center, begin spray painting the golf balls with your chosen yellow color. Apply several light, even coats rather than one thick coat to prevent drips and ensure a smooth, professional finish. Rotate the golf balls as you paint to cover all sides evenly.
Once painted, carefully place the straws with the golf balls attached across the tops of two cups or a small box. This elevation allows the golf balls to dry completely without smudging. Ensure they are left in a well-ventilated area, preferably outdoors or in a garage, until they are thoroughly dry to the touch. This drying process can take several hours, so be patient!
Step 2: Crafting the Pineapple Crowns and Assembling Your Lights
While your golf balls are drying, you can begin working on the distinctive green pineapple crowns. This step brings the design to life and involves careful assembly.
Grab your piece of green felt. Using your green marking pen, draw a basic pineapple crown shape. Think of a series of elongated, slightly curved leaves emerging from a central point. You can vary the size and number of “leaves” for each crown to add character. Once you’re happy with your design, use your scissors to carefully cut it out. Repeat this process, cutting enough crowns for each of your painted golf balls. Before finalizing all your cuts, it’s a good idea to measure a cut crown against a string light bulb socket to ensure it’s proportional and will effectively cover the base of the golf ball once assembled.
Once your painted golf balls are completely dry and your felt crowns are ready, it’s time for assembly. Take your string lights and begin inserting the prepared golf balls onto each bulb. Gently push the bulb through the “x” opening you created earlier until the golf ball sits snugly around the base of the bulb socket. Continue this process for all your golf balls. If you wish, you can alternate pineapple-decorated bulbs with plain bulbs for a varied look, or simply deck out every bulb for maximum pineapple power.
With the golf balls in place, it’s time to add the crowns. Turn on your hot glue gun and allow it to heat up. Dab a small amount of hot glue onto the top edge of a golf ball, specifically around the base where the felt crown will sit. Carefully press one of your felt pineapple crowns onto the hot glue, ensuring it is centered and securely attached. Hold it in place for a few seconds until the glue sets. Repeat this for every pineapple-decorated golf ball on your string lights. Once all the crowns are attached and the glue has dried, your new pineapple string lights are complete and ready to illuminate your space! Find the perfect spot for them and enjoy your handmade tropical decor.
Creative Placement Ideas for Your New Pineapple Lights
Now that your charming pineapple string lights are complete, the fun continues with deciding where to display them! Their tropical vibe makes them incredibly versatile for various settings, both indoors and outdoors. For outdoor use, string them along your patio railing, intertwine them through a gazebo or pergola, or drape them across a fence to create a magical canopy. They look fantastic hanging from tree branches, instantly transforming your backyard into a resort-like oasis. For special occasions, they can adorn an outdoor dining area, adding a festive and warm glow to evening meals and celebrations. Indoors, consider hanging them in a sunroom, a child’s bedroom for a playful theme, or even in a kitchen for a quirky, cheerful accent. They are also perfect for summer parties, luau-themed gatherings, or simply to bring a touch of sunshine into your home year-round. Wherever you choose to place them, these DIY pineapple lights are sure to evoke smiles and admiration.
Customization and Personalization Tips
While the classic yellow pineapple look is delightful, don’s hesitate to put your own spin on this project! Creativity knows no bounds. Consider experimenting with different colors of spray paint for the golf balls – perhaps a pastel yellow, a metallic gold, or even a whimsical pink for a unique twist. You could also add glitter to the golf balls after painting for an extra sparkle, especially if they’ll be used for evening events. For the felt crowns, try different shades of green, or even use a patterned felt for a more eclectic look. You could cut the leaves in varied styles, making them shorter, longer, wider, or more jagged to create different types of pineapple tops. Another idea is to incorporate small beads or rhinestones onto the felt crowns for added embellishment. The beauty of DIY is the ability to customize every detail to match your specific decor theme or personal preferences. Let your imagination guide you!
Safety and Maintenance for Your DIY Lighting
When working with any DIY project involving electricity and craft tools, safety should always be a top priority. Always exercise caution when using an X-Acto knife or hot glue gun. Ensure good ventilation when spray painting, and allow sufficient drying time. For the string lights themselves, it is highly recommended to use LED bulbs. LED lights generate very little heat compared to traditional incandescent bulbs, significantly reducing any potential fire hazard when encased in plastic golf balls. They are also more durable and energy-efficient. If you are using older incandescent string lights, ensure they are in good working condition and check them regularly for any signs of wear. For outdoor use, ensure your string lights are rated for exterior use and are protected from the elements. To maintain your pineapple lights, simply wipe them clean with a damp cloth as needed. Store them carefully during off-seasons to prevent damage to the felt crowns or paint.
Embrace Your Inner Crafter: The Joy of DIY
Creating these Dollar Tree DIY pineapple string lights is more than just a craft project; it’s an opportunity to infuse your home with personality and warmth. This simple, affordable, and incredibly fun endeavor demonstrates that beautiful decor doesn’t require a lavish budget. By repurposing common items and adding your unique touch, you can create something truly special and memorable. We extend a huge thank you to Jay Munee DIY via YouTube for her inspiring video tutorial and for the images used here. If you enjoyed this project, we encourage you to visit her channel and explore her other creative DIY ideas – you’re sure to find more projects to spark your imagination and subscribe for future inspiration!