
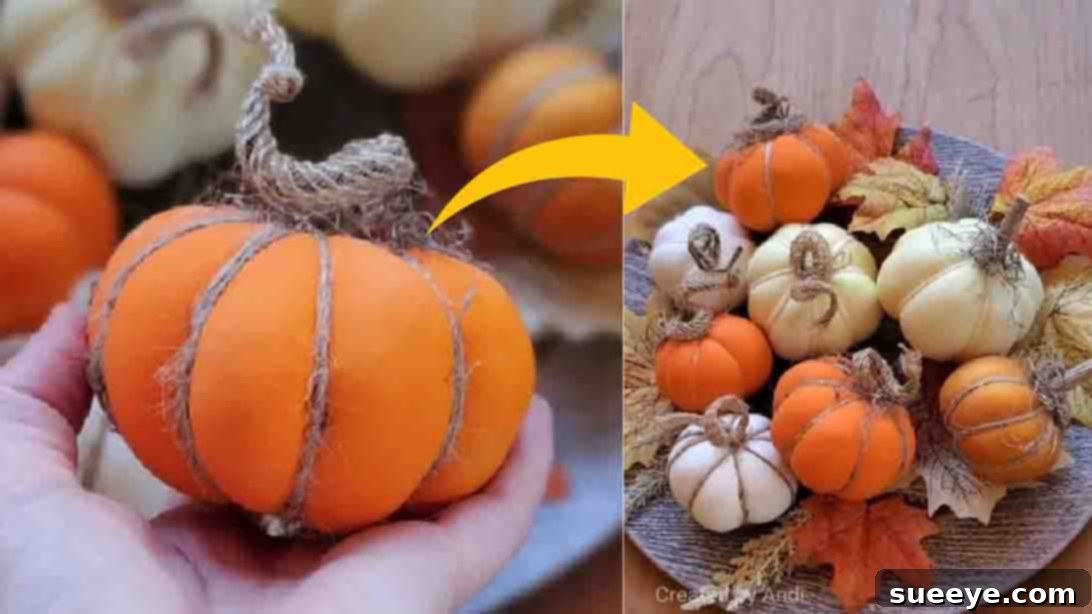
As the crisp air of autumn ushers in the beautiful Fall season, our homes naturally yearn for cozy and inviting decorations. If your TikTok feed is anything like ours, you’ve likely been inundated with creative DIY decor ideas that capture the spirit of the season. Among the most charming and surprisingly simple projects trending right now are these adorable DIY Balloon Pumpkins, an ingenious craft shared by the talented @createdbyandi. What makes this project truly special is its incredible ease of execution and budget-friendly nature – you can source virtually all the necessary materials from your local Dollar Tree!
Imagine transforming ordinary balloons into delightful, textured pumpkins that add a touch of rustic charm to any corner of your home. Whether gracing your mantelpiece, enhancing a festive tablescape, or simply bringing a warm autumn glow to your entryway, these balloon pumpkins are sure to impress. This isn’t just a craft; it’s an opportunity for a fun, creative weekend activity with friends or family, resulting in beautiful decor you’ll be proud to display throughout Fall, Halloween, and even Thanksgiving. Dive into this guide and discover how to craft these stunning, inexpensive Fall pumpkin decorations today!
For a visual walkthrough, be sure to watch the inspiring video tutorial below, but first, let’s gather our supplies and get ready to create some magic!
Essential Materials for Your DIY Dollar Tree Balloon Pumpkins
One of the biggest appeals of this charming craft is how accessible and affordable the supplies are. Most, if not all, can be found at a Dollar Tree store, making it a fantastic project for crafters on a budget. Before you embark on your pumpkin-making adventure, gather the following items:
- Balloons: Opt for standard latex balloons in orange, white, cream, or even a soft green to mimic various pumpkin varieties. The size of your balloon will determine the final size of your pumpkin, so grab a few different sizes for variety.
- Stuffed Toy Stuffing (Polyester Fiberfill): This is crucial for giving your pumpkins their soft, plump shape. A single bag from the Dollar Tree usually suffices for several pumpkins, depending on their size.
- Scissors: A good pair of sharp scissors will be needed for cutting balloons, twine, and mesh tubing.
- Jute Twine: This natural fiber twine is essential for creating the distinctive pumpkin segments and adds a lovely rustic texture. Choose a medium thickness for best results.
- Mesh Tube (Decorative Poly Mesh Tubing): Often found in the floral or craft section, this flexible, colorful tubing will form the curly “vines” of your pumpkin. Green or brown shades work best for a natural look.
- Floral Wire: A thin, flexible wire is needed to help shape and secure the mesh tube vines. Green floral wire blends in well.
- Hot Glue Gun and Glue Sticks: An indispensable tool for securing various elements quickly and firmly. Make sure you have plenty of glue sticks on hand!
- Small Wood Sticks: These will serve as the natural-looking stems for your pumpkins. You can collect small twigs from your yard, or find craft sticks at the Dollar Tree.
- Optional: Acrylic Paint and Brushes: If you want to customize your wood sticks or add subtle shading to your pumpkins, a little craft paint can go a long way.
- Optional: Fall Leaves or Berries: For extra embellishment, consider small artificial fall leaves or berry sprigs to attach to the base of your pumpkin stem.
Having all your materials ready before you begin will ensure a smooth and enjoyable crafting experience. Now, let’s move on to the exciting part – creating your beautiful balloon pumpkins!
Step-by-Step Guide to Crafting Your Adorable Balloon Pumpkins
Follow these detailed instructions, inspired by the clever technique shown by @createdbyandi, to create your own collection of beautiful balloon pumpkins. Remember, crafting is all about creativity, so feel free to personalize these steps as you go!
Step 1: Prepare and Stuff Your Balloons
- Prepare the Balloon: Take a balloon of your desired pumpkin size. Using your scissors, carefully cut off about half of the neck portion of the balloon. This opening will make it easier to stuff the balloon and will also create a cleaner finish at the top, where the stem will be attached.
- Stuff the Balloon: Begin gently filling the balloon with the polyester fiberfill (stuffed toy stuffing). Continue adding stuffing until you achieve a firm, plump, and spherical shape that resembles a pumpkin. Don’t overstuff it to the point of risking a burst, but ensure it’s full enough to hold its form. The more stuffing, the firmer your pumpkin will be.
- Shape and Secure: Once you’re satisfied with the size and firmness of your “pumpkin,” gather the cut edges of the balloon opening and carefully tie them off with a piece of string or an extra bit of balloon neck to secure the stuffing inside. You can also use a small amount of hot glue to reinforce this closure, ensuring no stuffing escapes.
Step 2: Create the Signature Pumpkin Segments with Jute Twine
- Measure the Twine: Cut a generous length of jute twine. It’s better to have too much than too little. You’ll need enough to wrap around the entire circumference of your balloon-shaped stuffing several times to create distinct segments.
- Begin Wrapping: Place the beginning of the twine at the top center of your stuffed balloon, where your stem will eventually go. Hold it in place with a small dab of hot glue if needed. Carefully begin wrapping the twine vertically around the pumpkin, pulling it snug to create an indentation. Guide the twine down one side, under the bottom, and up the other side to meet at the top again.
- Form the Segments: Repeat this wrapping process, evenly spacing your twine wraps around the balloon to create the classic pumpkin segments. Aim for 6-8 segments for a traditional pumpkin look. Pull the twine firmly each time to ensure the indentations are well-defined.
- Secure the Twine: Once you’ve created all your segments and are happy with the shape, bring the end of the twine back to the top center. Cut off any excess twine, leaving enough to tie a secure knot with the starting end (or another piece of twine). You can reinforce these knots with a tiny drop of hot glue to ensure they won’t unravel.
Step 3: Craft and Attach the Curly Vines (Mesh Tube)
- Cut the Mesh Tube: Cut a piece of mesh tube to your desired vine length. A length of 6-10 inches usually works well, depending on how long you want your curl to be.
- Insert Floral Wire: Carefully thread a piece of floral wire through the center of the mesh tube. The wire will allow you to shape and hold the curl. Extend the wire slightly beyond both ends of the mesh tube.
- Secure and Twirl: Twist the ends of the floral wire around the mesh tube ends to secure it. Then, gently begin twirling the mesh tube around your finger or a thin dowel to create a whimsical, curly vine shape.
- Attach to Pumpkin: Apply a dab of hot glue to the top center of your balloon pumpkin, right where all the jute twine meets. Carefully press the base of your newly formed mesh tube vine onto the glue, holding it in place until it sets. You can add one or two curls, depending on your preference.
Step 4: Add the Natural Wood Stem and Finishing Touches
- Prepare the Wood Stick: Select a small wood stick or twig that is proportionate to your pumpkin’s size. If desired, you can paint it brown or green for an enhanced natural look, or leave it as is.
- Attach the Stem: Apply a generous amount of hot glue to the bottom end of your wood stick. Press it firmly into the top center of the pumpkin, nestling it among the secured twine and mesh tube vine. Hold it until the glue cools and hardens, ensuring a strong bond.
- Embellish with Jute Twine: For an extra touch of rustic charm, take a few small pieces of untwirled jute twine (or simply pull apart a strand of regular twine to make it frizzier). Arrange these around the base of the wood stick and secure them with tiny dots of hot glue. This adds texture and helps blend the stem into the pumpkin.
- Optional Fall Foliage: If you have small artificial fall leaves or berry sprigs, this is the perfect time to hot glue them around the base of the stem for a more elaborate, festive look.
Repeat these steps to create an entire patch of beautiful balloon pumpkins in various sizes and colors. These **easy DIY fall decorations** are perfect for grouping together as a centerpiece or scattering throughout your home for a cohesive autumn theme.
Watch the Full Video Tutorial: Easy Balloon Pumpkins by @createdbyandi
Sometimes, seeing is believing! For a complete visual guide and to watch these charming balloon pumpkins come to life, check out the original TikTok video that inspired this tutorial:
@createdbyandi Easy Balloon Pumpkins 🎃 #createdbyandi #easy #fall #autumn #balloon #autumndecor #halloween #halloweendecor #pumpkin #tutorial #diy #reels #reelstiktok #dollartree #dollartreecrafts #diycrafts #diydecor #created #centerpiece #decor #homedecor #tabledecor #falldecor #ideas #handmade #pumpkinseason #craft #tiktok #tiktokreels #ősz #crafts
♬ Les feuilles mortes (Gypsy Guitar – Jazz Swing Manouche) – Lino Buttice Calogero & Respirando
Why You’ll Love These DIY Balloon Pumpkins
There are countless reasons why these **charming balloon pumpkins** have become a viral sensation and a favorite among DIY enthusiasts. Beyond their undeniable cuteness, they offer a wealth of benefits that make them the perfect **Fall craft project**:
- Incredibly Budget-Friendly: As a **Dollar Tree craft**, the cost of materials is exceptionally low, allowing you to create a whole patch of pumpkins without breaking the bank. This makes them ideal for decorating large spaces or for hosting a crafting party.
- Remarkably Easy to Make: The steps are straightforward and require no specialized crafting skills. This project is perfect for beginners, children (with adult supervision for hot glue), or anyone looking for a quick and satisfying craft.
- Customizable and Versatile: Experiment with different balloon colors (orange, white, sage green), various twine textures, and diverse sizes. You can paint the wood sticks, add glitter, attach small faux leaves, or even wrap them with fairy lights for a magical evening glow.
- Long-Lasting Fall Decor: Unlike real pumpkins, these delightful creations won’t rot or attract pests. They’ll remain fresh and vibrant throughout the entire autumn season, from early September all the way through Thanksgiving.
- Perfect for Any Setting: Whether you’re decorating a cozy living room, a festive dining table, a welcoming entryway, or even a classroom, these pumpkins blend seamlessly into any Fall decor theme. They make excellent **Halloween decorations** and **Thanksgiving centerpieces**.
Creative Ways to Display Your Handmade Fall Pumpkins
Once you’ve crafted your collection of charming balloon pumpkins, the fun doesn’t stop there! Here are some inspiring ideas to display your **homemade Fall decor** and elevate your seasonal ambiance:
- Enchanting Table Centerpiece: Group several pumpkins of varying sizes in the center of your dining table. Add some faux fall leaves, pinecones, and perhaps a string of battery-operated fairy lights for a truly captivating display.
- Welcoming Entryway Accent: Arrange them on a console table by your front door to greet guests with a festive touch. Pair them with a “Welcome Fall” sign or a basket of dried gourds.
- Cozy Mantel Decor: Line your fireplace mantel with these pumpkins, interspersed with candles, autumn garlands, or family photos, creating a warm and inviting focal point.
- Charming Shelf Fillers: Tuck smaller balloon pumpkins onto bookshelves or open shelving units to add pops of seasonal color and texture throughout your home.
- Window Sill Delights: Place a few pumpkins on your window sills to enjoy their cheerful presence both indoors and out.
- Kids’ Room Decor: These soft, lightweight pumpkins are safe and fun for decorating children’s rooms, adding a whimsical touch to their space.
- Party Decorations: Use them as part of your Fall festival, Halloween party, or Thanksgiving dinner decor. They can even be charming party favors!
Your Perfect Fall DIY Project Awaits!
We absolutely adore these **DIY balloon pumpkins**! They truly represent the epitome of charming, affordable, and accessible Fall decor. The ease of crafting combined with their adorable aesthetic makes them one of the cutest **DIY Fall decorations** we’ve encountered in a long time.
Inspired by the creativity of @createdbyandi, this project is a wonderful way to infuse your home with the warmth and spirit of autumn. So, why wait? Gather your Dollar Tree treasures, invite some friends over, and embark on this delightful crafting journey. You’ll be amazed at how quickly you can create a beautiful, custom collection of pumpkins that will bring joy to your home throughout the season.
We encourage you to try making a batch of these today and see for yourself just how satisfying and rewarding crafting your own Fall decor can be. Share your creations with us – we can’t wait to see your unique balloon pumpkin patches!