
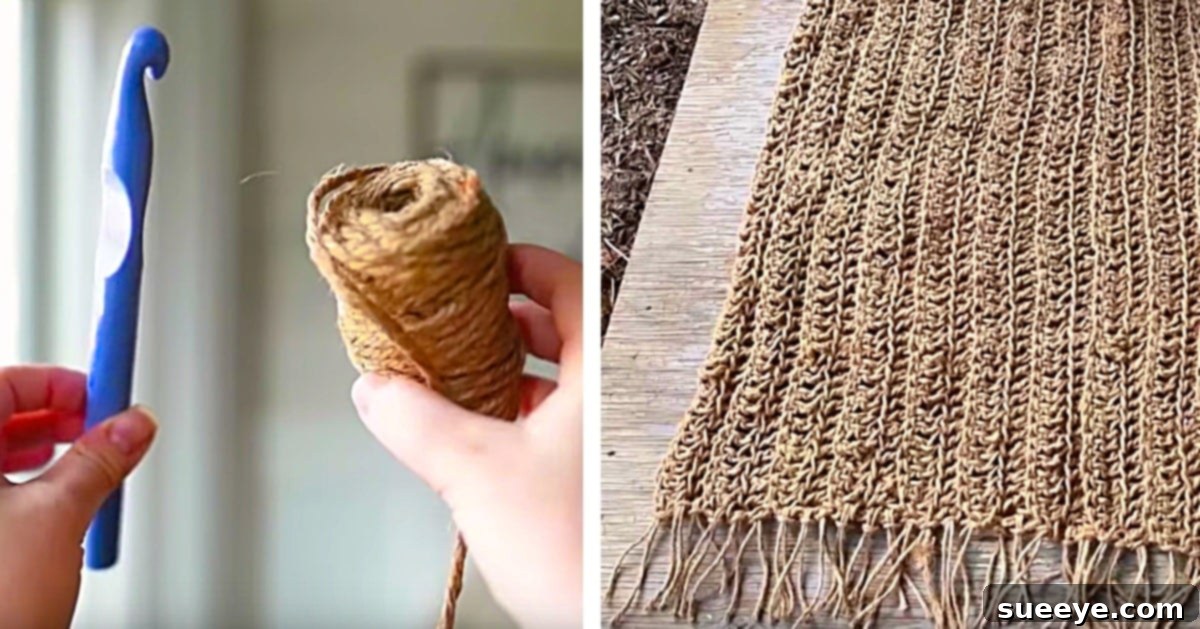
Moving into a new home is always an exciting adventure, filled with possibilities for personalization and comfort. For me, the charm of hardwood floors throughout my new space immediately brought a fresh challenge: acquiring numerous rugs to soften the acoustics, add warmth, and define each room’s aesthetic. My heart has always had a special place for jute rugs; their natural texture, earthy tones, and incredible durability make them a timeless choice for any interior. Over the years, I’ve purchased many, admiring their organic beauty. However, a desire to create one with my own hands had long lingered, feeling like a monumental task reserved for skilled artisans or mass production.
Imagine my delight when I stumbled upon a simple tutorial that completely demystified the process! It was a revelation, proving that an item I perceived as complex and only available from a store could indeed be crafted right in my own home, with just a few basic tools and a touch of creativity. Driven by the vision of a natural-colored, cozy rug for my kitchen, I headed to the most budget-friendly haven of all: the Dollar Store. There, I discovered inexpensive jute twine, a seemingly humble material that held incredible potential. Its affordability was so compelling that I ended up buying every spool they had, perhaps a touch more than strictly necessary for my first project. A feeling told me this wouldn’t be my last jute rug, and I was eager to have extra supplies on hand for the next inspired creation. With my newfound conviction and a bag full of twine, I eagerly began gathering my materials for this exciting DIY journey.
Craft Your Own Stunning Jute Rug: A Step-by-Step Guide with Dollar Store Twine
Are you ready to transform humble jute twine into a beautiful, functional, and eco-friendly rug for your home? This comprehensive tutorial will guide you through every stitch, helping you create a custom-sized jute rug that perfectly complements your space, all while keeping your budget intact. Get ready to add a touch of natural elegance to your decor!
Why DIY Jute Rugs? The Benefits of Crafting Your Own
Beyond the immense satisfaction of creating something with your own hands, there are numerous advantages to making your own jute rug. Firstly, the cost savings are significant. Store-bought jute rugs, especially larger ones, can be quite expensive. By using Dollar Store twine, you dramatically reduce the material cost, making beautiful home decor accessible to everyone. Secondly, customization is key. You’re not limited to standard sizes or colors. You can tailor the rug’s dimensions precisely to fit your specific area, whether it’s a small entryway, a kitchen runner, or a larger living room accent. You can even experiment with different patterns or add unique embellishments.
Furthermore, jute is an incredibly sustainable and natural fiber. It’s biodegradable, renewable, and brings an organic, earthy texture to any room. This DIY project allows you to embrace sustainable living while adding a stylish, natural element to your home. Finally, the therapeutic aspect of crocheting should not be underestimated. The repetitive motion can be incredibly relaxing, offering a wonderful way to unwind and de-stress after a long day. So, not only do you end up with a gorgeous rug, but you also enjoy the process of creating it.
Materials You’ll Need: Sourcing Your Supplies
The beauty of this project lies in its simplicity and accessibility. You don’t need a vast array of specialized tools, just a couple of key items that are readily available. Here’s what you’ll need to get started on your natural jute rug:
- A Size 16 Crochet Hook: This specific size is crucial for working with jute twine. Jute is a thick, stiff fiber compared to traditional yarn, and a larger hook like a Size 16 (which corresponds to approximately 11.5mm to 12.75mm, or an N/P hook in US sizing) allows you to comfortably grab the twine and create loose enough stitches. Using a smaller hook would make the work incredibly difficult, leading to cramped hands and an overly dense, stiff rug. The larger hook ensures a more flexible and manageable fabric.
- 5 Spools Of Jute Twine: This is a rough estimate, but a good starting point for a moderate-sized rug, such as a kitchen runner. Dollar Store jute twine is often thinner than what you might find at a craft store, meaning you’ll need more spools to achieve the desired thickness and size. The beauty of Dollar Store finds is that they are so inexpensive, buying extra is hardly a budget breaker. It’s always better to have a little more than not enough, especially since dye lots aren’t usually a concern with natural jute.
- Optional (but Recommended) Tools:
- Scissors: For cutting the twine.
- Measuring Tape: Essential for checking your rug’s dimensions as you go and ensuring it fits your space.
- Yarn Needle (or large-eye needle): Helpful for weaving in any loose ends for a neat finish.
Step-by-Step Directions: Crocheting Your Jute Rug
Let’s dive into the core of the project! Follow these detailed instructions to crochet your very own rustic and charming jute rug. Remember, patience and consistent tension are your best friends when working with jute.
First, Start Your Chain: Establishing the Length of Your Rug
The foundation of your rug is the starting chain. This determines the overall length of your finished piece. While the tutorial mentions 61 starting loops, this is merely an example; you should adjust this number based on the specific dimensions you desire for your space. To begin:
- Create a Slip Knot: Make a slip knot on your crochet hook. If you’re new to crochet, numerous online resources can show you how to do this simple first step.
- Chain Stitch: Yarn over your hook, then pull the yarn through the loop on your hook. This completes one chain stitch. Repeat this process, creating a series of consistent chain stitches.
- Measure and Adjust: As you chain, periodically lay your chain flat and measure it. Remember that your rug might slightly shrink or stretch as you add more rows, so aim for a length that is just a bit longer than your desired final dimension. The key is to make your chain stitches neither too tight (which will make your rug stiff and difficult to work with) nor too loose (which might make it floppy). Consistent tension here will ensure a straight and even rug. For a standard kitchen runner, a chain of 60-80 stitches might be appropriate, but always measure your intended space.
Once you’ve reached the desired length for your rug’s foundation, you’re ready to move on to the next step, turning this chain into a solid piece of fabric.
Then, Double Crochet Back: Building Your First Row
With your foundation chain complete, it’s time to work back across it using the double crochet stitch. This stitch provides a good balance of density and flexibility for a rug, creating a sturdy yet comfortable fabric. Here’s how to execute the double crochet:
- Turning Chain: To start your first row of double crochet, you’ll need to create a turning chain. This usually involves chaining two or three stitches (depending on your preference and the look you want). For jute, a chain of two is often sufficient as it’s a bulkier material. Skip the first 2-3 chains from your hook (these count as your first double crochet stitch).
- First Double Crochet: Yarn over your hook. Insert your hook into the next chain stitch (the third or fourth chain from the hook, depending on your turning chain). Yarn over again and pull a loop through the chain stitch (you should now have three loops on your hook). Yarn over and pull through the first two loops on your hook (two loops remain). Yarn over again and pull through the remaining two loops on your hook (one loop remains). You’ve completed your first double crochet!
- Continue Across the Chain: Repeat the double crochet stitch in each subsequent chain across your foundation row. Ensure you work into every chain stitch to maintain an even edge. Working with jute can be a bit challenging initially due to its stiffness, so take breaks if your hands start to cramp.
- Check Your Work: At the end of the first row, count your stitches to ensure you have the correct number. Your product at this point will begin to resemble the photo below, showcasing the initial texture and width of your rug. This first row sets the stage for the rest of your project, so make sure it’s as even as possible.
Then, Continue Double Crochet Pattern: Achieving Your Desired Width
Once you’ve completed your first row, the process becomes a rhythmic repetition. You will continue to build upon your work, row after row, using the double crochet pattern until your rug reaches the desired width for your designated space. This is where your rug truly begins to take shape.
- Turning at the End of Each Row: At the end of each row, you’ll need to create another turning chain (chain 2 or 3, consistent with your previous turning chain). Then, turn your work so you can begin crocheting back across the previous row.
- Working into Stitches: When crocheting into subsequent rows, insert your hook under both loops of the stitch from the previous row (the ‘V’ shape at the top of the stitch). This creates a neat and sturdy fabric.
- Maintaining Even Edges: One common challenge with rugs is maintaining straight edges. To do this, always make sure you are placing your first stitch in the very first stitch of the row and your last stitch in the top of the turning chain from the previous row. Counting your stitches at the end of every few rows can also help prevent your rug from becoming wider or narrower inadvertently.
- Joining New Twine: When you run out of a spool of twine, don’t worry! Simply tie the end of the old spool to the beginning of a new spool with a secure knot. You can hide this knot by crocheting over it or by weaving in the ends later with a yarn needle. Try to join twine at the end of a row or at least in a less conspicuous spot.
- Measure as You Go: Periodically lay your rug out and measure its width. This prevents you from overshooting your target dimensions. The jute will add significant texture and body with each row.
Continue this pattern until your rug is the perfect width. The robust nature of jute twine, combined with the double crochet stitch, will result in a durable and beautiful mat that’s perfect for high-traffic areas like kitchens, hallways, or entryways.
Then, Add Tassels or Jute Fringe: The Perfect Finishing Touch
Once your rug has reached its desired length and width, it’s time to add the charming finishing touches that truly elevate its handmade appeal. Adding tassels or a jute fringe at each end is a fantastic way to enhance its rustic aesthetic and provide a professional, completed look. Here’s how to do it simply:
- Prepare Your Jute Strands: Decide on the length you want your tassels or fringe to be. Double that length and cut multiple strands of jute twine. For example, if you want a 4-inch fringe, cut pieces that are 8 inches long. The number of strands you use per tassel will determine its fullness.
- Attaching the Fringe/Tassels:
- Method 1 (Lark’s Head Knot): Take 2-3 cut strands of jute and fold them in half. Insert your crochet hook into the edge of your rug (either into the very last row of stitches or along the foundation chain edge). Grab the folded loop of your jute strands with your hook and pull it partially through the rug. Then, take the loose ends of the jute strands and feed them through the loop you just pulled through. Pull tightly to secure the knot.
- Method 2 (Simple Tie): If you prefer a more informal look, you can simply tie individual or small groups of jute strands directly around the edge stitches of your rug with a simple double knot. This creates a slightly different, perhaps more organic, fringe.
- Spacing: Attach your tassels or fringe evenly across both short ends of your rug. You can add them to every other stitch, every third stitch, or whatever spacing you prefer to achieve your desired density.
- Trimming and Shaping: Once all your fringe or tassels are attached, you can use scissors to trim them to an even length. You can also gently comb them out with your fingers to separate the strands and create a fuller look.
This simple addition transforms your crocheted piece into a truly complete and decorative jute rug, ready to adorn your home. The soft, frayed ends of the jute add an inviting texture and a final touch of artisanal charm.
Tips for Success and Customization
Making a jute rug is a rewarding experience, and a few extra tips can make your journey even smoother:
- Consistent Tension is Key: As mentioned, maintaining even tension throughout your crocheting process is vital. This ensures a uniform fabric, straight edges, and a rug that lays flat without curling or bulging. Practice a few rows until you find a comfortable and consistent rhythm.
- Dealing with Stiff Jute: Jute twine can be quite stiff and coarse, which can be tough on your hands. If you find your hands getting sore, consider wearing gloves (garden gloves can work well) or taking frequent breaks. Some crafters even lightly mist their jute with water before starting to make it more pliable, though be careful not to oversaturate.
- Estimating Twine: While 5 spools is a good starting point, the exact amount of twine needed will depend on the thickness of your Dollar Store twine, your hook size, and the desired dimensions and density of your rug. If you’re planning a large rug, it’s always safer to buy more than you think you’ll need.
- Cleaning Your Jute Rug: Jute rugs are relatively low maintenance. For everyday cleaning, vacuum regularly to remove dirt and dust. For spills, blot immediately with a clean, damp cloth. Avoid saturating the rug, as excessive moisture can damage jute fibers. Spot clean with mild soap and water if necessary, then allow to air dry completely.
- Customization Ideas: Don’t limit yourself to a simple rectangular rug!
- Stripes: Incorporate different colored jute twine (if available, or experiment with dyeing natural twine) to create stripes or patterns.
- Shapes: With a bit more advanced crochet knowledge, you could attempt circular or oval rugs.
- Edging: Instead of tassels, you could add a simple single crochet or slip stitch border around the entire rug for a clean finish.
Troubleshooting Common Jute Rug Issues
Even experienced crafters can encounter hiccups. Here are solutions to common problems when making a jute rug:
- Rug is Curling: If your rug is curling at the edges, it usually indicates that your tension is too tight or your hook size is too small. Try to consciously relax your stitches. If it’s already too far along, you can try dampening the rug and laying it flat with heavy books on the edges to block it into shape once complete.
- Uneven Edges: This is often caused by either missing the first or last stitch of a row, or by inconsistently creating your turning chains. Make sure you always work into the top of the turning chain of the previous row and always start your first stitch in the very first stitch. Counting stitches at the end of each row can be a lifesaver.
- Running Out of Twine: If you find yourself running low on twine mid-project and cannot get more of the same, consider incorporating a contrasting color for a striped effect or adding a unique border to use up what you have. Always try to weave in new twine seamlessly to avoid bulky knots.
I absolutely adore this DIY Jute Rug project. It was not only incredibly relaxing to create, providing a wonderful creative outlet, but the end result was also stunning. The natural texture and handmade charm brought a unique warmth to my kitchen, and the satisfaction of knowing I crafted it myself from affordable materials is truly priceless. I encourage everyone to give this project a try; you might just surprise yourself with what you can achieve!
Frequently Asked Questions About DIY Jute Rugs
Here are some common questions prospective jute rug makers might have:
How long does it take to make a DIY jute rug?
The time required will vary significantly depending on the size of your rug, your crocheting speed, and your experience level. A small kitchen runner might take anywhere from 8-15 hours of focused work, spread out over several days or weeks. Larger rugs will naturally take considerably longer.
Can I use different types of twine or yarn?
Yes, absolutely! While jute twine offers a unique rustic appeal and durability, you can certainly adapt this pattern for other materials. Cotton rope or thick t-shirt yarn would create a softer, more pliable rug. Just be sure to adjust your crochet hook size accordingly to match the thickness of your chosen material.
How do I clean my handmade jute rug?
Jute rugs are best cleaned with regular vacuuming to remove loose dirt and debris. For spills, blot immediately with a clean, dry cloth to absorb as much liquid as possible. Avoid rubbing. If necessary, lightly dampen a cloth with plain water or a very mild detergent solution and gently dab the stain. Always allow the rug to air dry completely and avoid saturating the fibers.
Is a crocheted jute rug durable enough for high-traffic areas?
Yes, jute is a naturally strong and durable fiber, making it an excellent choice for rugs in high-traffic areas like kitchens, entryways, or hallways. When crocheted with a dense stitch like double crochet, the resulting fabric is robust and holds up well to daily wear and tear.
Can a beginner crochet enthusiast make this rug?
While the project involves basic crochet stitches (chain and double crochet), working with jute can be a bit challenging due to its stiffness compared to soft yarn. However, with patience and perseverance, a determined beginner can absolutely tackle this project. It’s an excellent way to practice fundamental stitches and gain confidence with a rewarding outcome.
How many spools of Dollar Store twine do I need for a larger rug?
For a rug larger than a kitchen runner (e.g., a 3×5 ft area rug), you will likely need significantly more than 5 spools, possibly 10-15 spools or more, depending on the twine’s thickness and your stitch density. It’s always best to buy extra from the same batch if possible.