
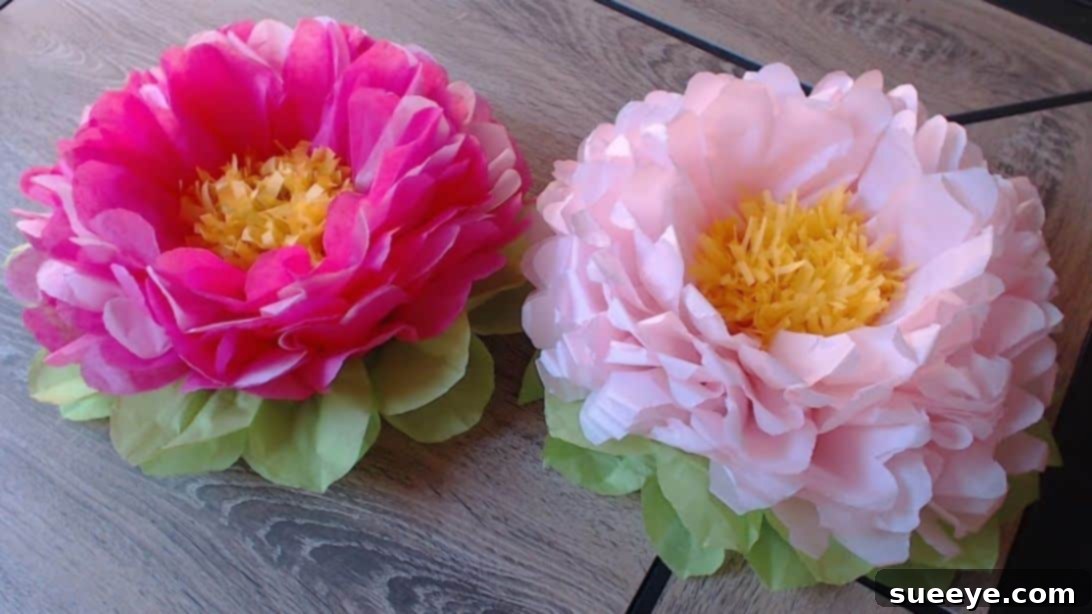
DIY Tissue Paper Flowers: A Complete Step-by-Step Guide for Stunning Decorations
Planning a memorable celebration or simply wishing to infuse your living space with personalized charm? Our comprehensive guide to crafting breathtaking tissue paper flowers is exactly what you need! These delightful blooms are not only surprisingly simple to create but also offer an elegant, cost-effective solution for any decorating need. Whether you’re preparing for a vibrant birthday bash, an elegant wedding reception, or just seeking to brighten a corner of your home, these customizable flowers provide an artistic touch that store-bought decor often lacks. Dive into the world of DIY crafting and transform humble tissue paper into spectacular floral masterpieces that reflect your unique style.
This fantastic tutorial, inspired by the creative insights from ArtsnCrafts4u on YouTube, empowers you to craft impressive, large-scale flowers that instantly uplift any environment. I’ve personally created countless arrays of these charming flowers, adorning my home with their vibrant colors and infectious joy, and I can attest to both their ease of creation and stunning visual impact. By following our detailed instructions and expert tips, you’ll be astonished by the professional-looking results you can achieve. So, gather your materials, embrace your inner crafter, and let’s embark on a journey to bring your blossoming vision to life!
Why Choose DIY Tissue Paper Flowers for Your Decor?
The appeal of crafting your own tissue paper flowers extends far beyond mere aesthetics. There are compelling reasons why this DIY project is a favorite among crafters and decorators alike. Firstly, they are incredibly economical. Tissue paper is a remarkably inexpensive material, making these handmade flowers a brilliant alternative to fresh floral arrangements, especially when decorating large venues or requiring a high volume of blooms where costs can quickly escalate. Secondly, their versatility is unmatched. You possess complete creative control over every design element – from selecting the perfect color palette to customizing the size and intricate shape of each petal. This allows you to perfectly align your flowers with any party theme, existing home decor, or seasonal celebration. Furthermore, unlike natural flowers, tissue paper creations offer enduring beauty; they will never wilt, fade, or require watering, providing lasting charm.
Beyond their practical advantages, the process of making tissue paper flowers is a deeply rewarding and wonderfully relaxing activity. It’s a craft that welcomes all skill levels, from complete beginners seeking a fun introduction to DIY to seasoned crafters looking for a satisfying project. It can serve as a peaceful solo endeavor or transform into an enjoyable group activity for friends and family, fostering connection and creativity. The moment you begin to gently unfold and fluff each layer, watching your flat paper stack metamorphose into a vibrant, three-dimensional flower, is incredibly satisfying. Embrace the joy of handmade decoration and unlock the endless creative potential that tissue paper flowers offer to your crafting repertoire.
Essential Materials You’ll Need:
To ensure a smooth, enjoyable, and successful crafting experience, it’s best to organize all your materials before you begin. One of the greatest advantages of this project is its reliance on readily available and inexpensive supplies. Here is a precise list of what you will need to create beautiful multi-colored flowers, complete with helpful advice for selecting the best items:
- Tissue Paper:
- For the Flower Center: 2 pieces, each approximately 6.5″ by 20″, in a bright, cheerful yellow. This forms the vibrant core of your bloom.
- For the Main Petals: 7 pieces, each approximately 13″ by 20″. We highly recommend using a combination of shades for depth – for instance, 5 sheets of a rich dark pink and 2 sheets of a soft light pink. This layering creates a more natural and visually appealing petal effect.
- For the Leaves/Base: 2 pieces, each approximately 13″ by 20″, in a lush green. These provide a natural foundation and frame for your flower.
Crafting Tip: When selecting tissue paper, opt for a good quality brand that feels durable yet remains pliable enough to fold and shape easily without tearing. A slightly heavier-weight tissue paper can often be more forgiving for beginners. Remember, the beauty of this craft lies in personalization, so feel free to explore different color combinations to match your specific theme or aesthetic vision!
- Floral Wire or Strong Thread: This is a crucial element for securely binding all the delicate tissue paper layers together. Floral wire, typically around 24-26 gauge, is ideal as it offers both strength and flexibility, making it easy to twist and secure. If you prefer using thread, ensure it’s a robust variety like embroidery floss, thin twine, or a sturdy craft thread to prevent breakage during the fluffing process.
- Sharp Scissors: The quality of your cuts directly impacts the final appearance of your flower. A pair of sharp, clean-cutting scissors is essential for achieving precise edges and preventing frustrating tears, especially when cutting through multiple layers of delicate tissue paper simultaneously.
- Paper Clip: A simple paper clip is an invaluable tool for maintaining perfect alignment of your stacked tissue paper sheets during the initial crucial folding stages. It acts as a temporary clamp, preventing layers from shifting.
Please note that these quantities are specified for crafting one large, single flower. If your decorative plans include creating multiple blooms, simply adjust and multiply the material amounts accordingly. Additionally, establishing a clean, flat, and spacious workspace will significantly enhance your crafting efficiency and overall enjoyment.
Step-by-Step Guide: Crafting Your Magnificent Tissue Paper Flowers
Embark on your creative journey by meticulously following these detailed instructions. Each step is designed to guide you toward creating a beautiful, handmade flower. Patience and precision at every stage are key to achieving the most stunning and professional-looking results.
Step 1: Preparing and Precisely Stacking Your Tissue Paper Layers
The initial arrangement of your tissue paper layers forms the critical foundation of your flower, dictating its multi-toned appearance and structural integrity. Begin by laying your two green tissue paper sheets perfectly flat and aligned on your clean workspace; these will serve as the base, mimicking natural foliage. Next, carefully place two dark pink sheets directly on top of the green layers, ensuring all edges are flush. Follow this with one lighter pink sheet, then two more dark pink sheets, another lighter pink sheet, and finally, one dark pink sheet. The arrangement creates a natural gradient. To complete the stack, position your two vibrant yellow sheets precisely in the center of the entire pile. Confirm that all the short edges of every sheet are in perfect alignment. To temporarily secure this carefully arranged stack and prevent any shifting during the subsequent folding process, use a paper clip to firmly hold all layers together on one short side. This temporary clip is essential for maintaining perfect alignment.
Step 2: Mastering the Art of the Accordion Fold
With all your tissue paper layers neatly clipped and aligned, the next crucial step is to create the accordion folds that will ultimately give your flower its wonderful volume and texture. Holding all the stacked sheets firmly with one hand, take the bottom edge of the paper and fold it upwards by approximately one inch. Apply firm, even pressure along this fold to create a crisp, sharp crease. Now, carefully flip the entire paper stack over to the other side and repeat the exact same 1-inch upward fold. Continue this systematic process, flipping the stack after each fold, until you have pleated the entire length of your tissue paper. The objective here is to achieve a series of consistent, evenly spaced accordion pleats. Once the entire length has been folded, gently trim off any excess paper from the ends to ensure a perfectly uniform size for your folded stack. Conclude this step by pressing down very firmly along the entire length of the folded accordion to reinforce all the creases; this will significantly aid in the precision of later steps and contribute to a beautifully defined flower.
Step 3: Separating and Re-folding Layers for Enhanced Precision
After successfully completing the primary accordion fold, it becomes necessary to temporarily separate the different color sections. This step is crucial for preparing each segment for individual, precise shaping. Carefully and gently open out the main accordion folds. Then, meticulously separate the green paper sheets from the combined pink and yellow sheets. Next, separate the pink sheets from the yellow sheets. At this point, you should have three distinct, flat piles: one green, one pink, and one yellow. Once separated, meticulously refold each individual color group back into its own accordion style. This might seem like a small, repetitive action, but it is vital. Re-folding each color group separately allows for much more precise and clean cuts in the next stage, ensuring that each part of your flower – be it a vibrant petal or a lush green leaf – receives its perfect shape without accidentally affecting adjacent layers. Take your time to make these re-folds as neat, compact, and consistent as possible.
Step 4: Shaping the Petals and Leaves with Artistic Cuts
This is the exciting stage where your flower truly begins to take on its unique and beautiful form! Each distinct color section requires a specific type of cut to create its intended shape. Begin with the yellow paper, which will form the delicate, fringed center of your bloom. Fold the yellow accordion stack in half lengthwise, and press down to create a sharp crease. Along the open edge (the side opposite the fold), carefully make small, closely spaced slits, cutting about halfway into the paper. These tiny cuts will create a soft, feathery fringe effect. Next, move to the pink papers, which form the main petals. Fold the pink accordion stack in half and establish a clear central crease. Unfold it, and then, on one end, make a smooth, rounded “U” shape cut, removing the corners to sculpt a beautiful, natural-looking petal edge. Fold the pink stack in half again and repeat the exact same “U” shape cut on the other end, ensuring perfect symmetry. Finally, address the green paper, destined to become the leaves. Fold the green accordion stack in half and make a gentle, sweeping half-arc cut along the open edge. This specific cut will yield the natural, graceful curve of a leaf. Remember, precise and confident cuts at this stage will significantly impact the overall aesthetic and realism of your finished flower.
Step 5: Meticulously Re-assembling Your Flower Layers
Now that all your individual tissue paper sections are expertly cut and shaped, it’s time to carefully bring them back together, forming the complete structure of your flower. Begin by gently unfolding all the papers from their accordion style, carefully flattening each color group out on your workspace. Start by placing the two green sheets flat on the bottom, ensuring their edges are perfectly aligned. These green layers will form the foundational leaves and provide structural support for your bloom. Next, carefully layer all the pink sheets on top of the green, taking extra care to ensure their edges are precisely aligned with the green layers underneath. This creates the voluminous body of the flower. Finally, position the two yellow sheets, with their delicate fringed edges, directly in the very center of the pink layers. Double-check that all edges across all colors are flush and that the yellow paper sits perfectly centered within your stacked masterpiece. This meticulous alignment is absolutely critical for achieving a symmetrical, well-balanced, and aesthetically pleasing flower once it is fluffed.
Step 6: Securing the Center and Fluffing Your Beautiful Bloom
This is arguably the most exciting and transformative step – securing your flower and bringing it vibrantly to life! Take your chosen floral wire or strong thread and carefully wrap it tightly around the exact center of your neatly stacked papers. It is absolutely crucial to twist the wire or tie the thread very firmly on the green (bottom) side of the stack. This strategic placement ensures all layers are securely bound together while keeping the tie discreetly hidden beneath the natural-looking leaves. Once your flower is firmly secured, you can begin the magical process of fluffing. Gently pull each individual layer of tissue paper upwards and towards the center, separating them one layer at a time. Always start with the very top layers (the yellow, fringed center) and work your way progressively down through the various shades of pink. Exercise immense patience and a gentle touch throughout this process, as tissue paper is delicate and can tear if handled too roughly. Continue to carefully separate, lift, and shape each layer until all are fully detached and transformed into a full, voluminous, and gorgeously textured bloom. The more care and attention you devote to fluffing, the more realistic, impressive, and stunning your handmade tissue paper flower will appear.
Expert Tips for Success and Creative Variations
To ensure your tissue paper flowers consistently achieve perfection and to inspire new avenues for creative expression, consider incorporating these additional tips and exploring various design possibilities:
- Exercise Gentleness: Remember that tissue paper is inherently delicate. Handle it with extreme care and a soft touch, particularly during the critical fluffing stage, to prevent any accidental tearing or damage to your delicate petals.
- Experiment with Color Palettes: Do not feel confined to the pink and yellow combination! Unleash your creativity by experimenting with a myriad of color schemes. Imagine serene blues and whites for a frosty winter theme, rich reds and oranges for a warm autumnal display, or soft pastels for an elegant baby shower or spring event. You can also create stunning gradient effects by layering different shades of the same color.
- Vary Sizes and Petal Shapes: Adjust the initial dimensions of your tissue paper sheets to create a diverse range of flowers, from dramatic, large statement pieces to charming, smaller accent blooms. Explore different cutting techniques for the petal edges – sharp pointed tips, gently scalloped edges, or deeper U-cuts can each yield unique and captivating flower varieties.
- Discover Multiple Decorative Uses: These versatile flowers can transform any space! Attach them to walls to create a breathtaking photo backdrop, string them together to form festive garlands, arrange them as captivating table centerpieces, or use them as elegant embellishments for gift packages. They also make wonderful additions to wreaths, floral arrangements, or even as unique party favors.
- Creating Stems for Display: If you wish to display your beautiful flowers in a vase or freestanding, you can easily create a sturdy stem. Simply attach a longer piece of floral wire or a thin wooden dowel rod to the base of the flower using floral tape, ensuring it’s securely fastened.
- Efficient Storage Solutions: To preserve the beauty of your tissue paper flowers when not in use, gently flatten them back down and store them carefully in a box or container. When you’re ready to display them again, a quick and gentle re-fluffing will bring them back to their original voluminous splendor.
Conclusion: Embrace the Beauty and Joy of Handmade Decor
Congratulations! You have now successfully mastered the enchanting art of creating beautiful, voluminous tissue paper flowers. This delightful and accessible craft offers a simple yet profoundly impactful way to infuse personalized charm, vibrant color, and artistic flair into any occasion or living space. From serving as lively and festive party decorations to acting as serene and elegant home accents, your meticulously handmade blooms are guaranteed to impress and captivate all who see them. We wholeheartedly encourage you to continue unleashing your boundless creativity, experimenting freely with an array of different colors, sizes, and petal designs, truly making each flower a unique reflection of your personal style. Share your stunning creations with your cherished friends and family, and allow yourself to bask in the immense satisfaction that comes from crafting something truly beautiful and unique from scratch. Happy crafting, and may your world be perpetually filled with an abundance of vibrant, paper blossoms!