
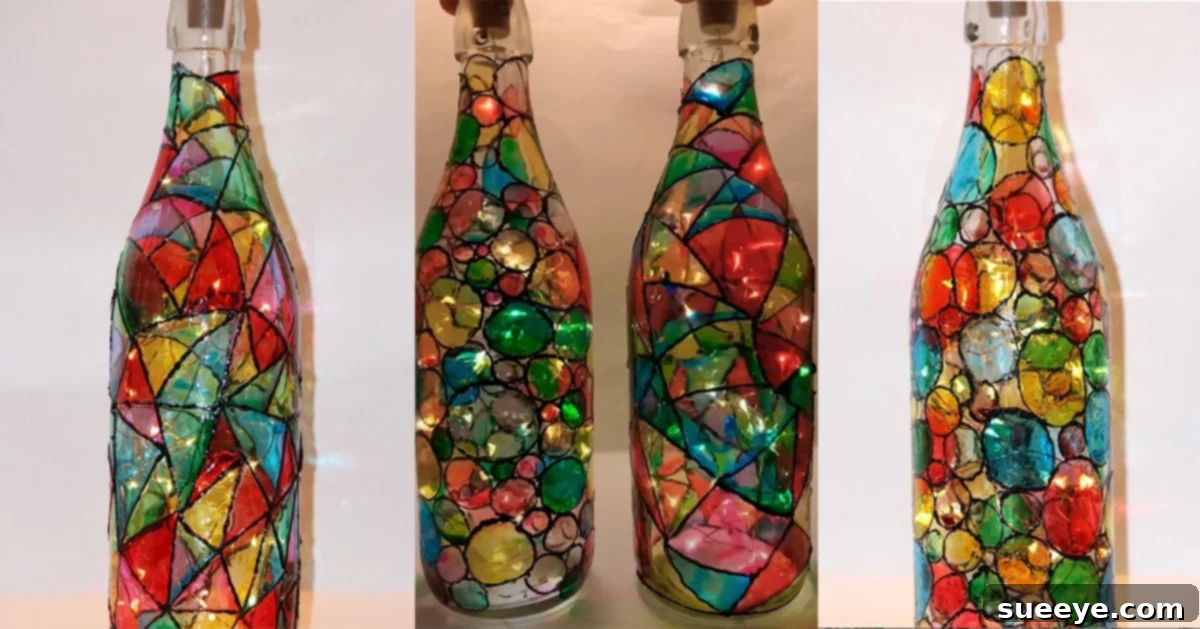
DIY Stained Glass Bottle Lights: Transform Recycled Glass into Stunning Decor
Are you looking for a creative, eco-friendly, and budget-conscious way to add a touch of magic to your living space or create truly unique gifts? Look no further than the enchanting world of DIY stained glass bottle lights! This fascinating project allows you to transform ordinary glass bottles and jars into captivating pieces of illuminated art. With just a few basic supplies and a splash of imagination, you can craft beautiful stained glass creations that glow with a warm, inviting light.
Inspired by the brilliant tutorial from Dory Diary on YouTube, this craft is surprisingly simple, requiring minimal materials yet yielding incredibly impressive results. The beauty of these stained bottles lies in the interplay of vibrant colors and light; when illuminated, the LED lights bounce off the painted surfaces, creating a mesmerizing kaleidoscope of hues that can instantly elevate the ambiance of any room. Whether you’re aiming for sophisticated wine bottle art or charming mason jar decor, this project offers endless possibilities for personalization and artistic expression.
Not only is this a wonderfully inexpensive endeavor, making it accessible for crafters of all skill levels, but it also serves as a fantastic opportunity to repurpose items that might otherwise end up in a landfill. Imagine turning an old wine bottle into a statement piece for your dining table or transforming a collection of mason jars into a whimsical centerpiece. The process of staining glass is straightforward, making it an ideal activity to share with family members, including children. It’s a fantastic way to encourage creativity and enjoy quality time together, producing beautiful, tangible results. Each bottle becomes a unique canvas, allowing you to experiment with different shapes, sizes, and color palettes, reminiscent of the vibrant scales of “The Rainbow Fish.”
Why Create Stained Glass Bottle Lights? The Benefits of This Illuminating Craft
Engaging in DIY projects offers numerous rewards, and crafting stained glass bottle lights is no exception. Beyond the sheer joy of creation, there are several compelling reasons to embrace this particular art form:
- Eco-Friendly Upcycling: In an era of increasing environmental consciousness, reusing glass bottles and jars is a fantastic way to practice sustainable living. You’re giving new life to items that would otherwise be discarded, reducing waste and contributing to a healthier planet.
- Unique Home Decor: Tired of mass-produced decorations? Stained glass bottle lights offer a bespoke solution. Each piece is handmade, reflecting your personal style and adding an exclusive touch that store-bought items simply can’t replicate.
- Budget-Friendly Creativity: The primary materials – old bottles – are often free, and the paints and LED lights are relatively inexpensive. This makes it an incredibly cost-effective way to enhance your home decor or create thoughtful, personalized gifts without breaking the bank.
- Therapeutic & Relaxing: The process of painting and creating can be incredibly calming and meditative. Focusing on colors, patterns, and the tactile sensation of painting allows for a mindful escape from daily stresses, fostering a sense of accomplishment and peace.
- Versatile Gifting Option: Looking for a heartfelt gift? A handmade stained glass bottle light is perfect for birthdays, anniversaries, housewarmings, or holidays. It shows thought, effort, and personalized care, making it a truly cherished present.
- Family-Friendly Activity: The simplicity of this craft makes it suitable for all ages. It’s a wonderful opportunity for children to develop fine motor skills and express their creativity in a fun and safe environment, with adult supervision for painting.
- Ambiance & Mood Setting: The soft, diffused glow emanating from a stained glass bottle can instantly transform the mood of a room. Whether you need a cozy reading nook, a romantic dinner setting, or a festive party atmosphere, these lights provide perfect ambient illumination.
Essential Supplies for Your Stained Glass Masterpiece
The beauty of this project lies in its simplicity. You don’t need a vast array of specialized tools or expensive materials. Here’s what you’ll need to gather:
- Stain Glass Paint: These specialized paints are designed to adhere to glass and dry with a translucent, stained-glass-like finish. They come in a wide spectrum of vibrant colors. Consider water-based options for easier cleanup and non-toxic properties, especially if crafting with children. Look for brands known for their clarity and color vibrancy.
- Glass Paint Outliner (or Liquid Leading): This is crucial for creating the defined “lead lines” that separate the colors, mimicking traditional stained glass. It helps contain the paint within specific areas, preventing colors from bleeding into one another. Outliners typically come in tubes with fine nozzles, allowing for precise application. Common colors include black, gold, silver, or clear.
- LED Bottle Cork Lights: These ingenious lights are designed to fit snugly into the opening of most bottles and jars, with a string of tiny LEDs that descend into the vessel. They are battery-operated, safe, and available in various colors (warm white, cool white, multicolored) to match your aesthetic. They provide the magical glow that brings your stained glass art to life.
Optional but Recommended Supplies:
- Rubbing Alcohol or Glass Cleaner: For thoroughly cleaning your bottles before painting, ensuring optimal paint adhesion.
- Cotton Pads or Paper Towels: For cleaning and wiping off any accidental smudges while the paint is still wet.
- Protective Work Surface: Newspaper, cardboard, or a plastic sheet to protect your table from paint spills.
- Small Brushes: While often the stain glass paint can be applied directly from the bottle or dabbed, small brushes can be useful for intricate details or blending.
- Disposable Palette: A paper plate or plastic lid can serve as a palette if you wish to mix colors or apply paint with a brush.
Step-by-Step Directions to Create Your Stained Glass Bottle Lights
Ready to turn those plain bottles into sparkling beacons of light? Follow these easy steps to craft your own illuminated stained glass art.
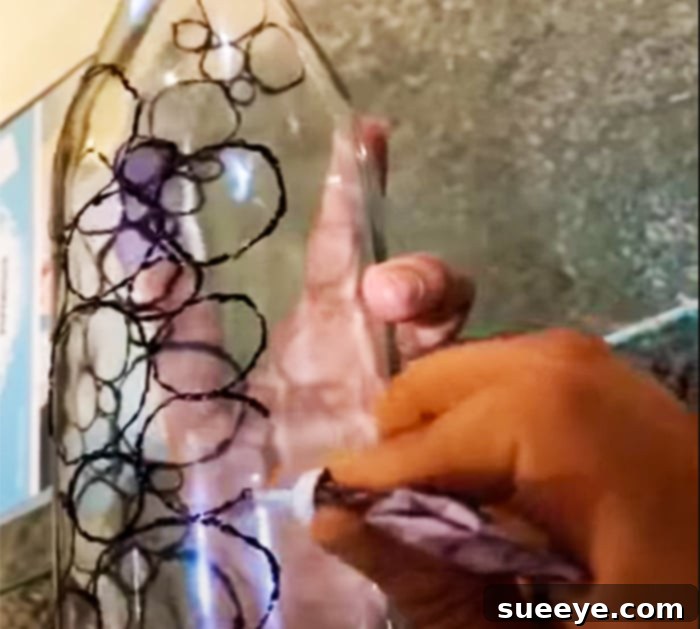
Step 1: Prepare Your Bottles for Artistic Transformation
Cleanliness is paramount for a professional finish. Begin by thoroughly washing your chosen bottles or jars with soap and warm water to remove any dirt or residue. If your bottles have labels, soak them in warm, soapy water for an extended period, then gently scrape off any adhesive. Once clean, use rubbing alcohol or glass cleaner to wipe down the entire surface. This step removes any oils or fingerprints, ensuring the paint adheres properly. Allow the bottles to dry completely, inside and out, before proceeding. A clean, dry surface is key to preventing paint bubbles and peeling.
Step 2: Master the Art of Outlining
This is where your design takes shape! Using the glass paint outliner, carefully draw your desired shapes and patterns directly onto the bottle. You can opt for geometric designs like diamonds, squares, or circles, create organic, flowing lines, or even draw more intricate elements like flowers or abstract swirls. The key is to ensure that your lines are continuous and form completely closed shapes. This will prevent your colored paints from bleeding into one another. Apply the outliner with steady, even pressure, maintaining a consistent line thickness for the best results. Don’t rush this step! If you’re unsure about design ideas or need visual guidance on different techniques, refer to the Dory Diary tutorial for inspiration and practical tips. Once you’ve completed your outlines, allow them to dry completely according to the manufacturer’s instructions, typically for several hours or overnight. This ensures they create a proper barrier for the colored paints.
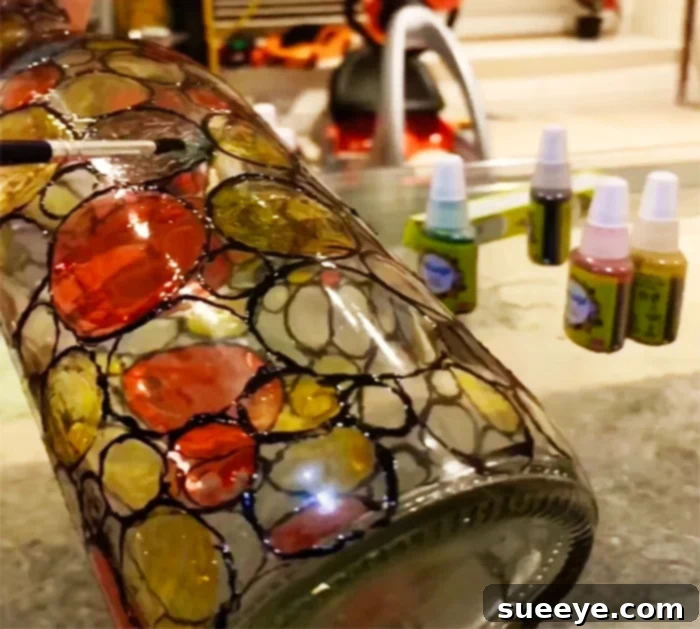
Step 3: Infuse Your Bottle with Vibrant Colors
Now comes the most exciting part – adding color! Select your stain glass paints and begin to fill in the areas defined by your outliner. Instead of painting the entire bottle one solid color, alternate and use a variety of different stain glass paint colors. This technique not only makes your bottle visually captivating but also creates depth and dimension, mimicking the true essence of stained glass. You can apply the paint by gently squeezing the bottle, using a small brush, or a toothpick to spread it evenly within the outlined sections. Don’t overload the paint; it’s better to apply thin, even coats to achieve a smooth, translucent finish. You might need multiple coats for some colors to reach your desired vibrancy, allowing each coat to dry partially before adding the next. Experiment with complementary or contrasting colors to create stunning effects. Once all the colored sections are filled and you are happy with the intensity, allow the paint to air dry completely. This curing process can take anywhere from 24 to 72 hours, depending on the paint type and humidity. Ensure the bottle is placed in a dust-free area during this time.
Step 4: The Grand Illumination – Adding Your LED Lights
Once your stained glass paint is fully dry and cured, it’s time to bring your creation to life! Carefully insert the LED bottle cork lights into the opening of your bottle. The cork component is designed to fit snugly, keeping the lights secure. Allow the string of LED lights to cascade gently inside the bottle. Most cork lights have a small switch; turn it on to witness your beautiful stained glass art glow. Adjust the position of the lights if needed to achieve the most appealing illumination. The internal light will highlight the different colors and patterns you’ve created, casting a beautiful, soft radiance. Your unique, handmade stained glass bottle light is now complete and ready to adorn your space or be presented as a heartfelt gift!
Creative Variations and Advanced Tips for Your Stained Glass Art
While the basic steps are simple, there’s ample room to explore and personalize your stained glass bottle lights even further:
- Themed Creations: Design bottles for specific seasons or holidays. Think warm reds and greens for Christmas, spooky silhouettes for Halloween, or pastel shades for spring. Nautical themes, bohemian patterns, or minimalist geometric designs can also be stunning.
- Different Glassware: Don’t limit yourself to just wine bottles or mason jars. Experiment with unique shaped liquor bottles, old vases, glass cruets, or even discarded glass panels for a different artistic canvas. Each shape offers a new challenge and aesthetic.
- Adding Texture: Before applying outliner, you can use specialized glass etching creams or textured paints to add subtle tactile elements to your bottle. Be cautious and follow product instructions precisely for these materials.
- Glitter and Embellishments: While the paint is still slightly wet, you can carefully sprinkle fine glitter into certain sections for an extra sparkle. Small gems or beads can also be glued onto the exterior of the bottle after the paint has dried for added dimension, ensuring they don’t interfere with the light inside.
- Outdoor Use: If you plan to use your stained glass bottle lights outdoors, consider applying a clear, weather-resistant sealant over the dried paint. This will protect your artwork from the elements, ensuring its longevity. Always test sealants on a small, inconspicuous area first.
- Gift Packaging: When gifting, consider presenting your illuminated bottle in a beautiful box, perhaps tied with a ribbon and a small tag explaining that it’s a handmade, upcycled creation.
- Troubleshooting: If you encounter bubbles in your paint, try gently bursting them with a toothpick before the paint dries. For smudges, quickly wipe with a cotton swab dipped in rubbing alcohol while the paint is still wet. If dry, sometimes carefully scratching off the mistake with a craft knife (and repainting) is an option.
Maintaining Your Stained Glass Bottle Art
To ensure your beautiful stained glass bottle lights continue to shine brightly, a little care goes a long way. For cleaning the exterior, gently wipe with a soft, damp cloth. Avoid harsh chemicals or abrasive scrubbers, as these can damage the paint. If you need to replace the LED cork lights, simply remove the old ones and insert new ones. Store your bottle art in a place where it won’t be exposed to extreme temperatures or direct, prolonged sunlight, which could potentially fade some paint types over time.
Conclusion: Ignite Your Imagination with Stained Glass Bottle Lights
In conclusion, creating your own DIY stained glass bottle lights is an incredibly rewarding project that combines artistic expression with practical home decor. It’s a testament to how simple supplies and a dash of creativity can transform ordinary objects into extraordinary pieces of art. The process is not only straightforward and enjoyable, but the end result is a truly unique, illuminated decorative item that brings warmth, color, and personality to any space. Whether you’re making them for yourself, as a thoughtful gift, or as a fun family activity, these stained glass lights are sure to impress. So, gather your supplies, let your imagination flow, and embark on the journey of creating your very own glowing masterpiece. Light up your world, one beautifully painted bottle at a time!