
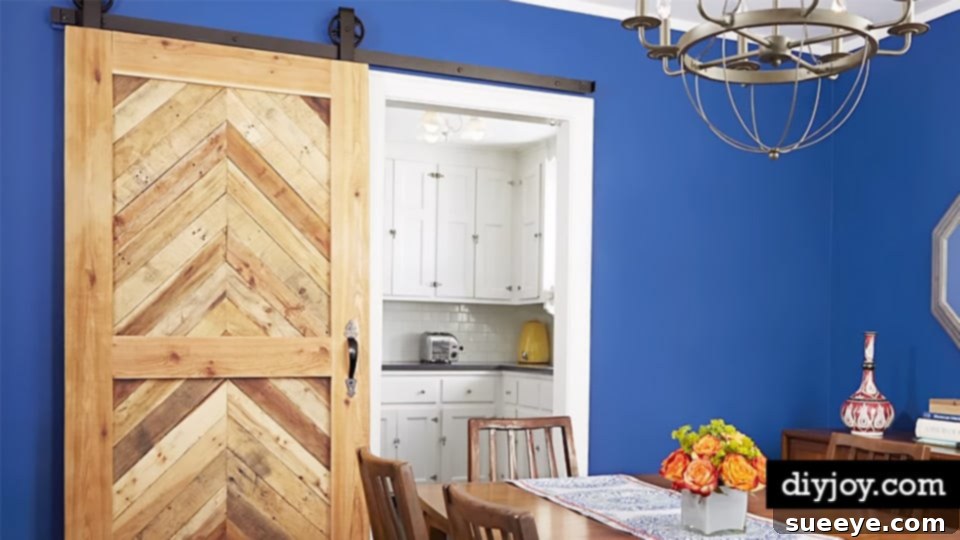
DIY Barn Doors for Tight Spaces: Achieving Farmhouse Charm on a Budget
The rustic elegance and unique sliding mechanism of barn doors have captivated countless homeowners, including myself. There’s an undeniable appeal to their robust construction and the distinctive character they bring to any interior. Naturally, I envisioned them as the perfect addition to our guest room, seeking to infuse a touch of that beloved farmhouse charm. However, a common obstacle quickly arose: the guest room’s severely limited wall space. Traditional barn door installations demand ample clearance for the door to slide open, a luxury our compact room simply couldn’t accommodate. This spatial constraint often deters many from pursuing this stunning home improvement. Yet, I’m thrilled to share that, with the right guidance and a willingness to embrace DIY, installing barn doors in tight spaces is not only feasible but incredibly rewarding. Our journey, much like many successful home projects, began with a deep dive into the vast resources of YouTube, where we discovered a game-changing tutorial that provided the exact roadmap for our space-efficient barn door installation.
Why Barn Doors? A Blend of Style, Function, and Space-Saving Innovation
Barn doors are more than just a passing design trend; they represent a harmonious blend of aesthetic appeal, practical functionality, and clever space utilization. For our home, the decision to install them was driven by both a strong desire for a specific look and the urgent need to resolve a long-standing functional issue.
The Enduring Appeal of Farmhouse Chic and Beyond
The farmhouse aesthetic has firmly established itself as a beloved interior design style, and barn doors are a quintessential element of this timeless look. Their sturdy construction, often highlighting natural wood grains or classic painted finishes, instantly imparts a sense of warmth, history, and rural authenticity. However, the versatility of barn doors extends far beyond a single style. With thoughtful variations in design, materials, and hardware, they can seamlessly integrate into industrial, modern, contemporary, or even bohemian decors. They serve as a striking architectural feature, effortlessly transforming a standard doorway into a captivating focal point that enhances the room’s overall character. The extensive customization options – from the type of wood and the chosen finish to the style of hardware – allow you to tailor the door perfectly to your existing interior, ensuring it feels like an integral part of your home’s design narrative.
A Smart Solution for Maximizing Limited Space
One of the most compelling reasons to opt for barn doors, especially in our specific scenario, is their ingenious space-saving design. In stark contrast to conventional hinged doors that necessitate a significant swing radius, barn doors operate by sliding horizontally along a track mounted above the doorway. This innovative mechanism liberates valuable floor and wall space that would otherwise be consumed by door clearance. In compact rooms, narrow hallways, or areas where furniture placement is a challenge, this space-saving advantage is truly invaluable. For our guest room, which occasionally serves as a workspace, reclaiming that floor space made a profound difference, enabling more flexible furniture arrangements and fostering a greater sense of openness. It’s a brilliant design choice that marries form and function beautifully, demonstrating that you can achieve both style and practicality without compromise.
Bidding Farewell to Troublesome Doors: Our Quest for Functional Privacy
Beyond their aesthetic charm and space-saving attributes, our primary motivation for this project stemmed from a deeply frustrating functional problem. For years, the en-suite bathroom in our guest room was plagued by a notoriously dysfunctional sliding door. It was infamous for sticking, derailing from its track, and becoming virtually impossible to open or close smoothly. This wasn’t merely an inconvenience; it led to a significant lack of privacy and was a constant source of irritation for us and our guests. We yearned for a reliable, aesthetically pleasing, and effortlessly functional solution to properly close off the bathroom. The vision of a smoothly operating barn door, not only looking fantastic but also finally delivering the privacy and ease of use we desperately needed, was an incredibly powerful incentive. This project was more than just a home improvement; it was about enhancing the daily living experience and comfort within our home.
Our DIY Barn Door Journey: From Inspiration to Successful Installation
Embarking on any do-it-yourself project can initially feel overwhelming, particularly when it involves a critical functional element like a door. However, our firsthand experience conclusively demonstrated that with the right guidance and a commitment to learning, even individuals without extensive woodworking backgrounds can achieve impressive, professional-looking results.
The YouTube Revelation: Unlocking the Secrets of Space-Saving Installation
Our DIY adventure truly gained momentum with the discovery of an exceptional YouTube tutorial. When confronted with the specific challenge of installing barn doors in a very confined area, our initial thoughts drifted towards the possibility of it being too intricate for the average DIY enthusiast. Nevertheless, a focused online search revealed a wealth of insightful guides, and one particular video stood out from the rest. It meticulously illustrated how to adapt standard barn door installation techniques for tight spaces, offering ingenious solutions for track placement and ensuring smooth door movement without obstruction. The tutorial was remarkably clear, segmenting each step into easily digestible actions, complete with vivid visual demonstrations that simplified the entire process. This specific video provided the much-needed surge of confidence to tackle the project head-on, underscoring the fact that practical, elegant solutions are often just a click away. We wholeheartedly recommend seeking out detailed, step-by-step video guides tailored to your unique situation if you’re considering a similar project. (For inspiration, consider searching YouTube for “barn door installation tight space” or “DIY space-saving barn door.”)
Gathering Your Arsenal: Essential Tools and Materials for Success
Prior to commencing any construction or installation, meticulous preparation is paramount. This involves not only thoroughly understanding each step of the process but also ensuring you have every necessary tool and material readily available. A comprehensively stocked toolkit and a complete shopping list will effectively prevent frustrating interruptions and multiple, time-consuming trips to the hardware store.
Key Tools You’ll Likely Need for This Project:
- Tape Measure: Absolutely critical for precise measurements of your doorway opening, wall space, and door components.
- Level: Indispensable for guaranteeing that your barn door track is perfectly horizontal and that your finished door hangs plumb and operates smoothly.
- Miter Saw or Circular Saw: Essential for making accurate, clean cuts if you plan to construct your own door panels or modify existing ones to fit your space.
- Drill/Driver: A versatile tool for pre-drilling pilot holes and securely fastening screws during assembly and installation.
- Stud Finder: Crucial for accurately locating wall studs, which are vital for securely mounting the heavy barn door track.
- Pencil: For clearly marking all measurements, cut lines, and drill points.
- Safety Glasses and Gloves: Non-negotiable safety gear to protect your eyes and hands when operating power tools and handling materials.
Materials Required for Your DIY Barn Door Project:
- Wood Panels or Door Blanks: Depending on your chosen design, you might use solid wood planks, high-quality plywood, or pre-made door blanks.
- Barn Door Hardware Kit: This comprehensive kit typically includes the sliding track, rollers (hangers), track stoppers, a floor guide, and all necessary mounting hardware. Ensure the kit is rated for the anticipated weight of your finished door.
- Door Handles/Pulls: Select a style that harmonizes with your barn door design and overall room decor, providing both functionality and aesthetic appeal.
- Wood Glue and Appropriate Screws: For securely assembling your door panels if you are building the door from scratch.
- Paint or Stain: To apply your desired finish, protect the wood, and integrate the door with your interior color scheme.
- Sandpaper (various grits): Essential for smoothing wood surfaces and preparing them for a flawless finish.
- Wood Filler (Optional): Useful for addressing any minor imperfections, knots, or small gaps in the wood for a more polished look.
Ensuring you have all these items ready before you begin will significantly streamline the entire process, allowing you to concentrate on the craftsmanship rather than scrambling for supplies.
The Step-by-Step Installation Process: A General Road Map
While the precise sequence of steps may vary slightly based on your chosen tutorial and specific door design, the overarching flow of a DIY barn door installation remains consistent. Our successful weekend project adhered closely to this logical progression, making the entire endeavor feel organized and achievable.
- Measure and Plan Meticulously: Begin by precisely measuring your doorway opening and the available wall space on either side. Carefully plan the dimensions of your door, ensuring it generously overlaps the opening to guarantee adequate privacy when closed.
- Construct or Prepare Your Door: If you’re building the door from raw materials, cut and assemble your wood panels according to your design. If you’re using a pre-made door, confirm it’s correctly sized and prepare its surface for finishing (sanding, cleaning).
- Finish the Door: Apply your chosen paint or stain to the door according to the product instructions. This step is almost always easier to complete before the door is hung.
- Install the Barn Door Track: This is a critical foundational step. Utilize your stud finder to accurately locate wall studs above the doorway. Securely mount the barn door track to these studs, using a level repeatedly to ensure it is perfectly horizontal.
- Attach Rollers to the Door: Mount the roller hangers to the top edge of your finished door, strictly following the specific instructions provided with your barn door hardware kit.
- Hang the Door onto the Track: With assistance, carefully lift the door and position the rollers onto the installed track, ensuring they engage smoothly and securely.
- Install Floor Guide and Track Stoppers: Secure the floor guide to the floor directly beneath the door, which prevents the bottom of the door from swinging outwards. Then, install the track stoppers at both ends of the track to control the door’s range of motion.
- Add Door Handles/Pulls: Finally, attach your chosen door handles or pulls. This completes both the functionality and the aesthetic appeal of your new barn door.
Adhering to a clear, sequential set of instructions, like those found in a high-quality video tutorial, is essential for minimizing errors and ensuring a smooth, successful installation.
Overcoming Challenges and Savoring the DIY Experience
No DIY project is entirely without its moments of contemplation or minor adjustments. For us, achieving precise measurements and ensuring the barn door track was perfectly level were key areas that demanded extra attention and care. Working collaboratively, my husband and I found that dividing tasks and diligently double-checking each other’s work not only enhanced efficiency but also made the entire process surprisingly enjoyable. There’s an immense, unparalleled satisfaction in witnessing raw materials transform into a beautiful, functional piece within your own home. This particular project, notably, proved to be entirely manageable for us—neither of us are seasoned woodworking experts nor do we possess any specialized construction skills. It truly stands as a testament to the transformative power of a well-explained tutorial and a genuine willingness to learn. Completing the entire installation in just one weekend, from start to finish, felt like a significant accomplishment and profoundly deepened our appreciation for the possibilities that DIY endeavors offer.
Design & Customization: Crafting Barn Doors That Truly Reflect Your Style
One of the most thrilling aspects of undertaking a DIY barn door project is the expansive scope for personalization. This endeavor isn’t solely about adding functionality; it’s about meticulously crafting a distinctive piece that flawlessly reflects your individual style and beautifully complements your home’s existing decor.
Choosing the Perfect Style and Finish for Your Space
The chosen style of your barn door profoundly influences the overall aesthetic of your room. You can opt for a classic Z-brace or K-brace design to evoke a timeless, traditional farmhouse ambiance, or select a sleeker, more minimalist panel design for a clean, contemporary feel. Material selection also plays a pivotal role. Solid wood offers unparalleled warmth, authenticity, and a premium feel, while engineered wood or MDF can be a more budget-friendly alternative, providing a smooth, consistent surface ideal for painting. Carefully consider the existing wood tones and the color palette prevalent in your room. A distressed finish can inject vintage character and rustic charm, whereas a crisp white or light gray paint can instantly brighten a space and cultivate a fresh, minimalist look. Don’t hesitate to experiment with different wood stains to harmonize with existing furniture or flooring, or boldly choose a vibrant color to transform the door into a true statement piece. The creative possibilities are virtually limitless, empowering you to craft a door that is uniquely and distinctly yours.
Hardware Matters: Where Functionality Meets Fashion
The barn door hardware kit is much more than a collection of functional components; it is a critical design element that significantly impacts the door’s final appearance. The style, finish, and even the bulk of your track, hangers, and handles can dramatically influence the door’s overall aesthetic. Matte black hardware, for instance, remains an enduring favorite, offering a bold, industrial, and distinctly modern farmhouse appeal that creates a striking contrast with lighter-colored doors. Stainless steel or brushed nickel hardware can impart a more contemporary, sleek, or even minimalist look, while antique bronze or oil-rubbed bronze finishes can beautifully enhance a rustic or traditional design. Pay close attention to subtle details: the unique shape of the hangers, the visibility of mounting bolts, and the ergonomic style of the door pull. These seemingly small choices collectively contribute to the comprehensive character of your barn door. Beyond aesthetics, always ensure that the chosen hardware is robust and appropriately rated for the weight of your door, guaranteeing smooth, reliable, and safe operation for many years to come.
Is DIY Barn Door Installation the Right Choice for You?
The prospect of embarking on a significant DIY project can often feel daunting, but the installation of barn doors is surprisingly accessible for the majority of homeowners. If you’re contemplating whether this is a project you can realistically undertake, consider the following key aspects:
Skills Required: More Enthusiast Than Expert
The reassuring news is that you absolutely do not need to be a seasoned carpenter or a professional contractor to successfully install barn doors. Basic woodworking skills, such as precise measuring, accurate cutting (if you’re building the door panels), drilling pilot holes, and proficiently using a level, are generally more than sufficient. The fundamental keys to success are patience, meticulous attention to detail, and a commitment to following instructions carefully. Much of the perceived complexity lies in ensuring precise measurements and achieving a perfectly level installation of the track, which any careful DIYer can accomplish with the assistance of a good tutorial. If you can follow a step-by-step guide and are comfortable using standard power tools safely, you are very likely well-equipped for this rewarding project.
Time Commitment: A Highly Rewarding Weekend Project
One of the most attractive attributes of this project for many homeowners, including ourselves, is its remarkably manageable time commitment. While larger, more intricate custom door builds might naturally require more extensive time, a standard barn door installation can often be completed efficiently within a single weekend. This estimated timeframe typically encompasses all stages: purchasing necessary materials, assembling or preparing the door, applying the chosen finish (painting or staining), and the actual installation of the track and hanging the door. By dedicating a focused Saturday and Sunday to the task, you can realistically find yourself celebrating the successful completion of your beautiful, functional new barn doors by Sunday evening. This makes it an ideal home improvement project for those seeking a significant upgrade without the inconvenience of weeks of disruption.
Budget-Friendly Approach: High Impact, Low Cost
Opting for a DIY barn door installation can lead to substantial financial savings when compared to hiring professional contractors or purchasing expensive custom-made doors. The primary costs involved will typically be for the raw wood (if you choose to build your door from scratch), the barn door hardware kit itself, and your chosen finishing materials (paint or stain). By carefully sourcing materials, often taking advantage of sales or reclaimed wood, and investing your own labor, you can achieve that highly coveted farmhouse look on a budget. This makes DIY barn doors an incredibly appealing option for anyone looking to maximize their home improvement budget while still achieving a high-end, stylish, and customized result that adds significant value and charm to their home.
Our Verdict: A Weekend Project with Profound, Lasting Impact
Reflecting upon our newly installed barn doors, the sense of accomplishment and satisfaction is truly immense. Not only do they flawlessly embody the farmhouse aesthetic we initially desired, but they have also profoundly transformed the functionality and flow of our guest room. The perpetually sticky, frustratingly unusable sliding door is now a distant, unpleasant memory, replaced by a smooth, effortlessly gliding barn door that provides perfect privacy and significantly enhances the room’s overall appeal and user experience. It stands as a powerful testament to the efficacy of the DIY approach – with a clear, step-by-step guide, a collection of basic tools, and a dedicated weekend of effort, even projects that initially seem complex can be successfully tackled by enthusiastic homeowners who are not professional experts.
Embrace the DIY Spirit: Transform Your Home Today!
If you find yourself contemplating the addition of charming barn doors to your home, particularly in a space where traditional doors or even standard barn door setups appear impossible due to spatial constraints, I wholeheartedly encourage you to explore and embrace the DIY route. Do not allow the initial thought of installing your own barn doors to intimidate you. Our personal experience, transitioning from complete novices to proud barn door owners in just one fulfilling weekend, conclusively demonstrates that it is an achievable, incredibly rewarding, and genuinely enjoyable project. Dive into those detailed, step-by-step tutorial videos, gather your essential materials, and prepare to be genuinely amazed at what you can accomplish with your own hands. You will not only gain beautiful, highly functional doors but also the immense personal satisfaction of having created something wonderful and impactful for your home. Get ready to wholeheartedly embrace the enduring charm, enhanced functionality, and undeniable practicality that DIY barn doors can bring to your living space!