
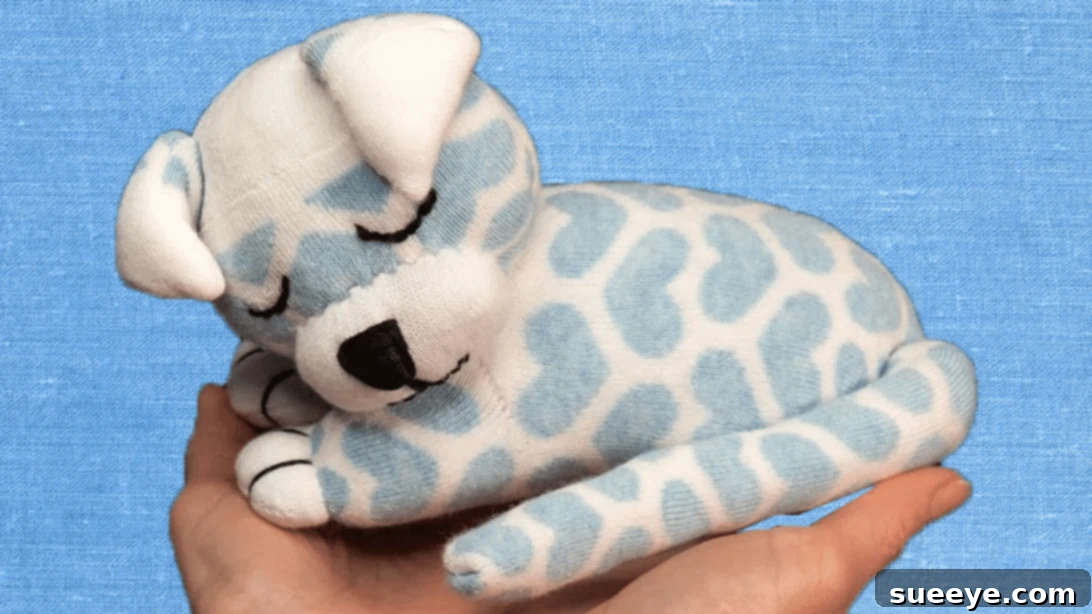
Unlock your creativity and craft skills by transforming everyday items into cherished treasures! Forget expensive store-bought toys; imagine creating a heartwarming, personalized companion right from the comfort of your home. With a little imagination and some readily available materials, you can bring an adorable puppy plush to life using nothing more than a pair of old socks. This project is not only incredibly cost-effective but also a fantastic way to upcycle textiles, reducing waste and giving new purpose to items destined for the donation bin or trash.
Embark on a delightful crafting journey that promises both fun and a charming result. Whether you’re a seasoned crafter or just starting out, this DIY sock puppy project is designed to be accessible and enjoyable for everyone. The beauty of handmade toys lies in their unique character and the personal touch you imbue with every stitch. Plus, they make incredibly thoughtful gifts for friends, family, or even for yourself!
DIY Puppy Sock Plush: Craft Your Own Adorable Companion from Old Socks
Creating your very own stuffed animal is a rewarding experience, and this DIY puppy sock plush stands out as an exceptionally charming and straightforward project. Instead of spending a fortune on generic toys, you can repurpose materials you likely already have around the house, like that lonely sock searching for its match. This guide will walk you through each step, ensuring you can successfully create a soft, huggable puppy. For a visual reference, you can follow along with the clear instructions provided by Miarti – Creative ideas on YouTube, whose tutorial makes the process incredibly easy to understand and execute.
Why Choose a DIY Sock Plush?
Beyond the sheer joy of creating something with your own hands, there are numerous compelling reasons to opt for a DIY sock plush. Firstly, it’s an incredibly budget-friendly endeavor. By utilizing old socks, you eliminate the need to purchase new, often expensive, crafting materials. Secondly, it’s an eco-conscious choice. Upcycling old textiles directly contributes to reducing waste and promoting sustainability. Every sock transformed into a toy is one less item added to landfills. Thirdly, handmade toys carry a unique charm and sentimental value that mass-produced items simply cannot replicate. Each stitch, each detail you add, makes your puppy truly one-of-a-kind. Lastly, it’s a fantastic creative outlet that can be enjoyed by crafters of all ages and skill levels, fostering patience, fine motor skills, and artistic expression. It’s also an excellent project for parents and children to do together, creating lasting memories alongside a tangible keepsake.
Materials for Your DIY Puppy Sock Plush:
Before diving into the crafting process, ensure you have all your materials ready. Gathering everything beforehand will make the project smoother and more enjoyable. You might be surprised to find most of these items are already stashed in your craft drawer or linen closet!
- A pair of printed socks: These will form the main body of your puppy. Look for socks with fun patterns, stripes, or polka dots to give your puppy character. Make sure they are clean and free from holes. The larger the sock, the larger your puppy will be.
- Plain sock: This sock will be used for smaller details like the ears, snout, or tail, providing a nice contrast to the printed body. A plain white, black, or brown sock works well.
- Scissors: A sharp pair of fabric scissors will make cutting easier and more precise.
- Needle and thread: You’ll need a hand-sewing needle and a strong thread that matches your sock colors or is a neutral shade like white or black. Embroidery floss can also be used for facial features.
- Stuffing: This is crucial for giving your puppy its soft, plump shape. You can use traditional Poly-fil fiberfill, which is lightweight and fluffy. Alternatively, you can upcycle old fabric scraps, cotton balls, or even other old socks cut into small pieces as stuffing.
- Poly-fil fiberfill: While mentioned above, this is the most common and recommended stuffing material for plush toys due to its softness, resilience, and hypoallergenic properties.
- Optional additions: Small buttons or beads for eyes (ensure they are securely attached if for young children, or embroider eyes instead), embroidery floss in various colors for facial features, ribbon for a collar, or felt for patches.
Essential Tools for Your Sock Plush Project:
While the materials list covers the main components, having a few basic sewing tools on hand will significantly enhance your crafting experience and the quality of your finished plush. These simple tools are usually inexpensive and can be found at any craft or dollar store.
- Sewing Pins: Useful for holding fabric pieces together before stitching, ensuring accuracy and preventing shifting.
- Fabric Marker or Chalk: Handy for marking cutting lines or embroidery guidelines directly on your socks.
- Thimble: Protects your finger when pushing the needle through thicker fabric layers, especially when stuffing.
- Seam Ripper: While we aim for perfection, mistakes happen! A seam ripper is invaluable for carefully undoing stitches without damaging the fabric.
- Small Pliers or Tweezers: Can be helpful for pulling the needle through tough spots or adjusting small pieces of stuffing.
How to Sew Your Puppy Sock Plush: A Step-by-Step Guide
Now that you have all your materials and tools ready, let’s get started on bringing your adorable sock puppy to life. This guide breaks down the process into easy-to-follow steps, ensuring a smooth and enjoyable crafting experience. Remember, precision is key for a well-formed plush, but don’t be afraid to add your own creative flair!
Pre-Sewing Preparation:
Before making any cuts, lay out your socks and visualize how the different parts will come together. Ensure your workspace is clean and well-lit. If your socks are particularly new or stiff, a quick wash can soften them, making them easier to work with. This preparation phase is crucial for a smooth crafting process.
Step 1: Forming the Body Base
Take one of your printed socks. This will be the main body of your puppy. First, locate the heel of the sock. Carefully cut the sock horizontally about 1 inch (approximately 2.5 cm) above the heel. This cut will define the upper part of the puppy’s body. Next, cut off the cuff of the sock entirely. The cuff is the elasticized opening; removing it creates a neater edge for subsequent steps. Now, take the heel part you just cut off. You will need to cut this part vertically, starting from the center of the heel opening, going down towards the toe, for about ½ to 1 inch (1.25 to 2.5 cm). This vertical cut creates the separation for the puppy’s legs or a more defined body shape. Turn the entire piece inside out. This is important because you will be sewing on the wrong side of the fabric to hide your stitches. From your plain sock, cut two small, narrow strips of fabric. These strips will be used to reinforce and shape the areas you just cut. Sew these small strips onto the straight, cut edges of the sock part that you cut vertically. Use a simple running stitch or a backstitch for durability, ensuring your stitches are neat and secure. This step begins to give structure to your puppy’s body.
Step 2: Shaping and Stuffing the Body
With the sock piece still inside out, focus on the top of each “leg” or body segment you’ve started forming. Gently shape the top of each segment into a soft, rounded curve. Using your fabric marker, you can draw these curves for precision before cutting. Carefully cut along these curves. Now, stitch these curved edges closed. A small, neat whipstitch or ladder stitch works well here, as these will be strong seams that hold the stuffing. Once stitched, turn the entire piece right side out. You should now have a basic, hollow sock shape that resembles the beginning of a plush toy body. It’s time to stuff! Begin filling the entire sock with your chosen stuffing material, whether it’s Poly-fil fiberfill or fabric scraps. Make sure to stuff firmly and evenly, pushing the stuffing into all corners to avoid any lumpy areas. A chopstick or the eraser end of a pencil can be helpful for reaching tight spots. Once adequately stuffed, sew the main opening closed using an invisible stitch, like a ladder stitch, to create a smooth finish. Don’t forget the toe part of the sock; fill this area as well to give your puppy’s head or tail a good shape, then sew it closed securely. This ensures a uniform and cuddly body for your puppy.
Step 3: Creating the Snout and Facial Features
Now for the most expressive part of your puppy: its face! Take a piece from your plain sock and cut it into an oval shape. This will become the puppy’s snout. The size of the oval should be proportionate to the size of your puppy’s head. Stitch around the very edge of this oval shape using a running stitch, but do not pull the thread tight yet. This technique is often called a gathering stitch. Gently stuff the oval piece with a small amount of fiberfill as you slowly pull the thread to gather the edges. This will create a small, slightly puffed oval shape. Once you’re happy with its fullness and shape, stitch this gathered oval piece securely to the head of your puppy. Position it centrally to form the snout. Now comes the creative part: embroidering the facial details. Using your needle and embroidery floss (black or brown works well), embroider the eyes, mouth, and nose. For the eyes, simple French knots or a few straight stitches can create cute, expressive eyes. For the nose, a small inverted triangle shape filled with satin stitch looks adorable. A simple curved line or a “Y” shape can form the mouth. Refer to the video tutorial by Miarti – Creative ideas for visual guidance on these details. Take your time with the embroidery; these small details will give your puppy its unique personality. If making this for very young children, consider embroidering the eyes rather than using buttons or beads for safety.
Step 4: Attaching Ears, Paws, and Tail
Your puppy is almost complete! Let’s add the finishing touches that bring it to life. From your plain sock, cut out two ear shapes. You can make them long and floppy, short and pointy, or rounded – whatever style you prefer for your puppy. You might want to stitch two layers of sock together for each ear to give them more body. Once shaped, sew these prepared ears securely to the sides of the puppy’s head. Ensure they are evenly spaced and firmly attached. Next, it’s time for the paws. Using embroidery floss, embroider small paw details onto the bottom of the puppy’s feet. Simple “Y” shapes or a few straight lines can effectively represent toes. This adds a charming, realistic touch. Now, connect the head and body of your puppy. While they are already part of the same sock, you may want to add a few strong stitches at the neck area to define the head and ensure it’s securely positioned, especially if you stuffed the head and body separately. Finally, prepare the tail. You can cut a simple tail shape from either the printed or plain sock, stuff it lightly if desired, and then sew it securely to the end of the puppy’s body. A gently curved tail often looks most natural. Double-check all your stitches to ensure everything is firmly attached and no raw edges are showing. Your adorable puppy sock plush is now complete!
Personalizing Your Plush Puppy:
The beauty of DIY projects is the freedom to make each creation uniquely yours. Don’t stop at the basic design! Here are some ideas to personalize your sock puppy:
- Different Sock Patterns: Experiment with striped socks for a tiger-like puppy, polka dots for a playful look, or even solid colors for a more classic feel.
- Accessories: Add a tiny ribbon bow around its neck, sew on a small felt patch, or even create a miniature collar from a strip of fabric.
- Embroidery Variations: Try different eye styles (sleepy eyes, wide-awake eyes), add eyebrows for more expression, or embroider small hearts or stars on its body.
- Body Shape: With a little experimentation, you can modify the cutting process to create different body shapes, perhaps a longer dachshund-like body or a rounder pug-like body.
- Mix and Match: Use one pattern for the body and a different, contrasting pattern for the ears and tail for a truly unique look.
Caring for Your Handmade Friend:
Once your adorable puppy is complete, you’ll want to ensure it stays in great condition. Handmade items, especially those used by children, might need a little care:
- Spot Cleaning: For minor spills or dirt, use a damp cloth with mild soap to gently spot clean the affected area.
- Hand Washing: If a deeper clean is needed, hand wash your puppy in cool water with a gentle detergent. Avoid harsh scrubbing, and rinse thoroughly.
- Drying: Gently squeeze out excess water (do not wring), then reshape the puppy and air dry it completely. Placing it near a fan or in a well-ventilated area can speed up drying.
- Repairs: Keep a needle and thread handy for any loose stitches or small tears that might occur with frequent cuddles.
Making a puppy sock plush is more than just a craft; it’s an opportunity to create a cherished friend, practice your sewing skills, and engage in sustainable living. The simple process, combined with the endless possibilities for customization, makes this project a delightful endeavor for anyone looking for a creative outlet. So grab those old socks, unleash your inner crafter, and enjoy the satisfaction of making something truly special with your own two hands. We encourage you to share your unique creations!
*All image credit belongs to Miarti – Creative ideas via YouTube. Follow and subscribe to her channel for more inspiring DIY projects and creative ideas!