

Mini Rails Quilted Table Runner: Craft Your Perfect Home Accent with a Free Pattern
Embark on a delightful quilting journey with the incredibly talented Donna Jordan. Each of her projects sparks immense creative joy, and her designs consistently deliver stunning results that inspire countless quilters. We are particularly thrilled to explore her unbelievably cute Mini Rails Quilted Table Runner, a project made accessible through a fantastic video tutorial by Jordan Fabrics on YouTube. What makes Donna Jordan’s creations even more appealing is her generous provision of a free pattern download, a signature offering with many of her exquisite designs. This charming Mini Rails Table Runner is not just a project; it’s an opportunity to create a beautiful, personalized accent that will perfectly complement any seasonal display, whether it’s the warm hues of fall in your dining room or a vibrant spring arrangement. Dive into the world of accessible quilting and discover the joy of crafting something truly special with Donna Jordan’s expert guidance.
Donna Jordan has become a revered name in the global quilting community, celebrated for her ability to transform complex-looking designs into achievable, enjoyable projects for quilters of all skill levels. Her instructional approach is characterized by clarity, practical tips, and a focus on techniques that yield professional-looking results without unnecessary fuss. The Mini Rails design is a testament to this philosophy, offering a modern aesthetic rooted in classic quilting principles. By diligently following her step-by-step video tutorial and utilizing the provided free pattern, even those new to quilting can confidently create a finished piece that looks like it came straight from a high-end boutique. This project not only enhances your home decor but also significantly builds your confidence and skills as a passionate crafter.
The allure of the Mini Rails Quilted Table Runner lies in its striking visual appeal and surprising simplicity. The “rails” design, a dynamic variation of the traditional rail fence quilt block, creates an impressive pattern with minimal effort, making it an ideal choice for showcasing a curated selection of fabrics. Whether you opt for a perfectly coordinated fabric bundle, such as a jelly roll, or meticulously select individual prints from your stash, the outcome is always a piece full of character, texture, and undeniable charm. Imagine this beautifully handmade runner gracing your dining table, adorning a coffee table, or elegantly draped over a console, instantly elevating the ambiance of any room. It’s more than just a table runner; it’s a conversation starter, a focal point, and a tangible reflection of your creative spirit and dedication to handmade excellence. This versatile piece also makes a thoughtful and cherished gift for loved ones, adding a personal touch to any occasion.
Essential Materials for Your Mini Rails Quilted Table Runner Project
Gathering the right tools and materials is the first crucial step towards a successful and enjoyable quilting project. Donna Jordan’s designs are renowned for being straightforward and accessible, and this Mini Rails Table Runner is no exception. While the free pattern will provide precise measurements and specific fabric requirements, here’s a detailed breakdown of the essential items you’ll need to confidently begin your creative journey, ensuring a smooth and rewarding crafting experience.
- Free Pattern Download: This is your indispensable blueprint for the entire project. Accessible directly from the Jordan Fabrics website, this comprehensive downloadable pattern eliminates any guesswork by providing exact cutting dimensions, block assembly diagrams, and detailed step-by-step instructions specifically tailored for the Mini Rails design. Ensure you print it out accurately, verifying the scale, and take the time to read through the entire document thoroughly before making your first cut. This preparation will give you a clear overview of the project and help you visualize each stage.
- Fabric (according to instructions): The very heart and soul of your table runner! The pattern will explicitly specify the exact yardage or pre-cut requirements. For the Mini Rails design, fabric strips are foundational. Consider using a ‘jelly roll’ (pre-cut 2.5-inch fabric strips) for ultimate convenience and a beautifully coordinated look, or meticulously select your own assortment of quilting cottons to create a unique aesthetic. High-quality 100% quilting cotton is highly recommended for its ease of use, superior durability, and vibrant, long-lasting colors.
- A Sewing Machine: A reliable and well-maintained sewing machine is absolutely indispensable for quilting. While advanced features can certainly be beneficial, a basic machine capable of producing a consistent straight stitch and maintaining even tension is all you truly need to complete this project. Ensure your machine is in good working order, thoroughly cleaned, and fitted with a fresh needle specifically designed for quilting (e.g., a sharp or microtex needle).
- A Quilter’s Ruler: Precision is paramount in quilting, directly impacting the accuracy and professional appearance of your finished piece. A clear acrylic quilter’s ruler, typically 6×24 inches or similar, featuring clear and easy-to-read markings, will be essential for making accurate fabric cuts. Look for rulers that clearly indicate 1/4-inch increments, which are standard for quilt piecing.
- Thread: Select a good quality 100% cotton or cotton-blend thread that either perfectly matches or subtly blends with your chosen fabric palette. A neutral color such as white, cream, or light grey often works exceptionally well for piecing the blocks, minimizing its visibility, while a coordinating color can be used for the final quilting stitches to add an extra design element.
- A Pair of Scissors: A sharp pair of fabric-only scissors is vital for trimming stray threads, precisely clipping corners, and general fabric manipulation. It is crucial to dedicate these scissors exclusively to fabric to maintain their razor sharpness; avoid using them on paper, cardboard, or any other materials.
- A Rotary Cutter: This innovative tool, when used in conjunction with your quilter’s ruler and cutting mat, allows for incredibly quick, precise, and straight cuts of multiple fabric layers simultaneously. A 45mm or 60mm rotary cutter is standard and highly efficient for quilting projects. Remember to always use a fresh, sharp blade for the cleanest cuts and practice safe handling.
- A Cutting Mat: To protect your work surface from the rotary cutter’s blade and to extend the life of your blade, a self-healing cutting mat is absolutely essential. Cutting mats come in various sizes; a large one (e.g., 24×36 inches) is highly recommended for quilting projects, providing ample space for cutting long strips and larger blocks.
- Iron and Ironing Board: While sometimes overlooked in initial material lists, an iron is an absolutely crucial tool for pressing seams throughout the quilting process. Proper pressing ensures flat blocks, accurate piecing, and overall a much more professional and polished final finish. A dry iron with a steam option is ideal.
- Quilting Pins or Fabric Clips: These are incredibly helpful for holding fabric pieces together before sewing, ensuring precise alignment, especially when matching seams and points. Good quality, sharp pins or wonder clips can prevent fabric shifting and greatly improve accuracy.
- Seam Ripper: Let’s be realistic, every quilter, regardless of experience level, needs a good seam ripper! It’s an invaluable tool for gently correcting any accidental mis-sewn stitches, allowing for flawless execution.
Step-by-Step Directions to Create Your Mini Rails Quilted Table Runner
Crafting this wonderful Mini Rails Quilted Table Runner is an immensely rewarding experience, made even more enjoyable thanks to Donna Jordan’s exceptionally clear and encouraging instructions, expertly presented in the Jordan Fabrics YouTube video tutorial. This project is thoughtfully broken down into easily manageable steps, making it perfectly suited for both eager novice quilters and seasoned enthusiasts alike. Let’s meticulously walk through each stage of the process, ensuring you gain confidence with every stitch and cut.
Step 1: Download and Prepare Your Free Pattern
Your creative journey officially begins by securing the free pattern download directly from the Jordan Fabrics website. This pattern serves as your indispensable blueprint, meticulously containing all the necessary measurements, detailed cutting instructions, and clear assembly diagrams. Print it out with utmost care, ensuring it prints to the correct scale as indicated on the pattern itself. Before making your first cut, dedicate ample time to read through the entire pattern. This crucial preparatory step will provide you with a comprehensive overview of the entire project, allowing you to clearly visualize each stage and anticipate the subsequent steps. It’s also highly advisable to organize your workspace efficiently, ensuring you have ample, well-lit room for both precise fabric cutting and comfortable sewing.
Step 2: Precise Fabric Cutting
Once you’ve thoroughly familiarized yourself with the pattern’s requirements, it’s time to prepare your chosen fabrics. Utilizing your trusty rotary cutter, quilter’s ruler, and cutting mat, proceed to accurately cut your fabric strips according to the precise dimensions specified in Donna Jordan’s pattern. Precision at this stage is absolutely paramount; consistent strip widths will directly ensure that your blocks come together perfectly later on, preventing skewed shapes or uneven seams. If you’re using a convenient jelly roll, you might simply need to cut these pre-cut strips into specific lengths. If you’re working with yardage, you will first cut wider strips, then carefully sub-cut them as needed for your blocks. Always diligently double-check your measurements before making any irreversible cuts.
Step 3: Assemble Fabric Strips into Panels
With your fabric strips meticulously cut, the exciting next step involves piecing them together to form the foundational units of your table runner. Following the pattern’s specific guidance, you will sew the fabric strips side-by-side to create longer, multi-colored panels. It is critical to maintain a consistent 1/4-inch seam allowance throughout this entire process, as this is the standard in quilting and is absolutely crucial for achieving accurate block sizes and a harmonious overall design. After sewing each seam, meticulously press it carefully with your iron. Donna Jordan often provides specific recommendations on pressing seams – whether to press them open for minimal bulk or to one side for added stability – depending on the desired flatness and structural integrity of the block. Proper pressing ensures your sewn panels lie perfectly flat and are ideally prepared for the subsequent stages of assembly.
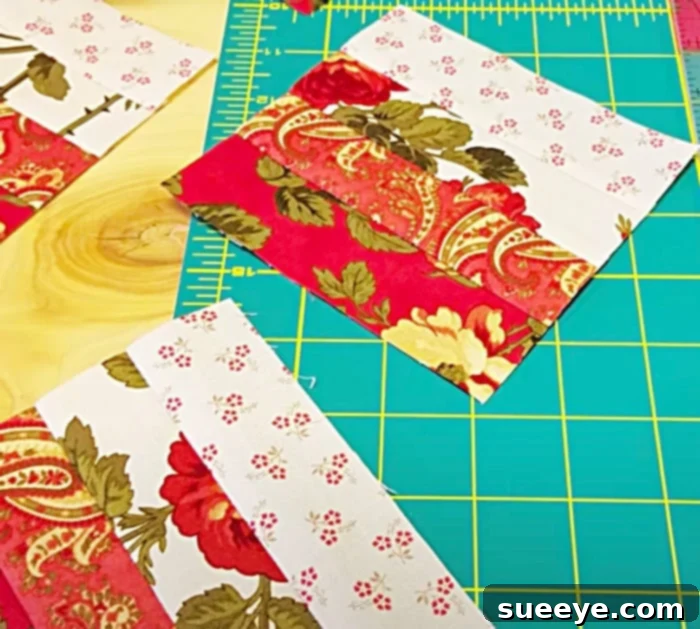
Step 4: Sub-cutting Panels into Individual Blocks
Now that you have your beautifully pieced fabric panels, it’s time to transform them into the individual units that will form your captivating Mini Rails design. You will once again utilize your rotary cutter and quilter’s ruler to precisely cut these sewn-together strip sections into squares or rectangles, as explicitly indicated by the pattern. It is often at this pivotal stage that the characteristic “mini rails” pattern truly starts to emerge within each individual block, revealing the unique visual rhythm of the design. Again, maintaining rigorous accuracy in your cuts is paramount to ensure all your blocks are uniform in size. This uniformity greatly simplifies the final assembly process and ultimately results in a much crisper, more professional-looking finish. Take your time, carefully align your ruler with the pressed seams, and make clean, decisive cuts.
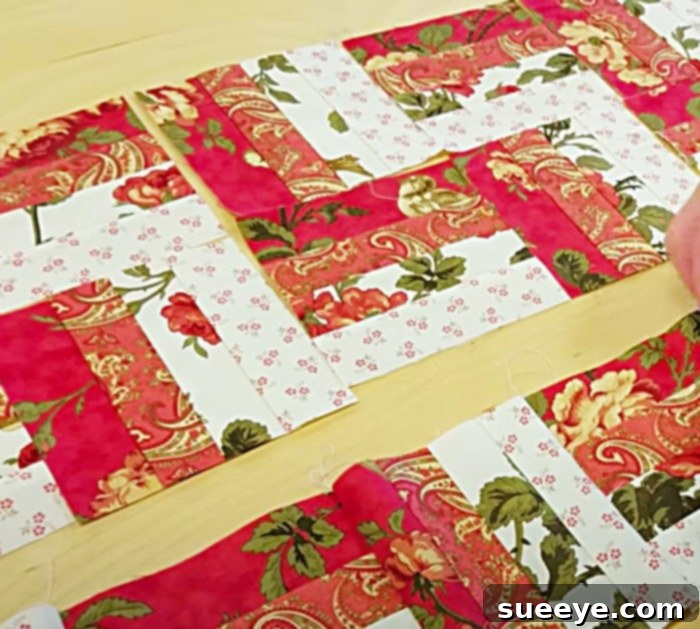
Step 5: Assembling the Table Runner Top
With all your individual Mini Rails blocks meticulously prepared, the exciting and highly anticipated part of seeing your design come to life truly begins. Following Donna Jordan’s expert instructions, you will meticulously arrange these blocks in an “alternate pattern.” This specific arrangement is what ingeniously gives the Mini Rails table runner its dynamic and visually appealing staggered, or rail fence, effect. It is often immensely helpful to lay out your blocks on a design wall, a large cutting mat, or even a clean floor to finalize your arrangement and ensure you are happy with the visual flow before you begin any sewing. Once you are completely satisfied with the layout, proceed to sew your blocks together into rows, diligently pressing seams after joining each row. Subsequently, join these completed rows to form the entire table runner top. Paying close attention to “nesting” seams (alternating the direction of pressed seams between adjacent blocks) will greatly help ensure your points match up perfectly, creating an exceptionally polished and professional overall appearance.
Step 6: Layering and Quilting
Once your meticulously pieced table runner top is complete, the penultimate step is to create the “quilt sandwich.” This involves carefully layering your table runner top, followed by a piece of batting (the insulating and stabilizing layer), and finally a complementary backing fabric. Secure these three layers together firmly, typically by pin basting (using safety pins), spray basting (with a temporary fabric adhesive), or thread basting, to absolutely prevent any shifting or puckering during the quilting process. Then, proceed to quilt your layers using your sewing machine. For a table runner, simple yet elegant straight-line quilting, discreet stitch-in-the-ditch (quilting precisely along existing seams), or a gentle meandering free-motion design can all look truly fantastic and add beautiful texture. A walking foot attachment for your sewing machine can be immensely helpful for achieving consistently even stitches and preventing fabric distortion when quilting multiple layers.
Step 7: The Finishing Touch – Binding
The final and most satisfying step to complete your magnificent Mini Rails Quilted Table Runner is the addition of the binding. This crucial element not only provides your runner with a neat, clean, and professional finished edge but also significantly enhances its durability and longevity. Create binding strips from a coordinating fabric (often cut on the bias for flexibility around corners or straight grain for crisp edges), carefully attach them to the edges of your quilted runner, and then either hand-stitch or machine-stitch the binding to the back for a truly impeccable and polished finish. Take immense pride in this final step, as it genuinely brings your handmade creation to its magnificent fruition. Consider adding a small, personalized label to the back, documenting the date of completion and your name, thereby transforming it into a cherished, heirloom-quality piece that can be enjoyed for generations.
This Mini Rails Quilted Table Runner project is undeniably charming, incredibly versatile, and immensely satisfying to complete. The “mini rails” design lends itself beautifully to various home decor styles and seamlessly adapts to different seasonal themes. Personally, I envision it as the perfect, vibrant centerpiece for my Fall dining room display, surrounded by an array of autumn-themed accents that will make the rich colors of the chosen fabrics truly pop and resonate with the season’s warmth. But its remarkable versatility means it would look equally stunning adorned with winter, spring, or summer decorations, or even serve as a captivating everyday statement piece that adds character to your home. The profound satisfaction of crafting something both beautiful and highly functional with your own hands, guided by a quilting master like Donna Jordan and her wonderfully accessible free patterns, is an unparalleled joy. Don’t hesitate to add this exquisite piece to your home decor collection or craft it as a thoughtful gift. Download the free pattern from Jordan Fabrics today and enthusiastically start creating your own heirloom-quality Mini Rails Quilted Table Runner!