
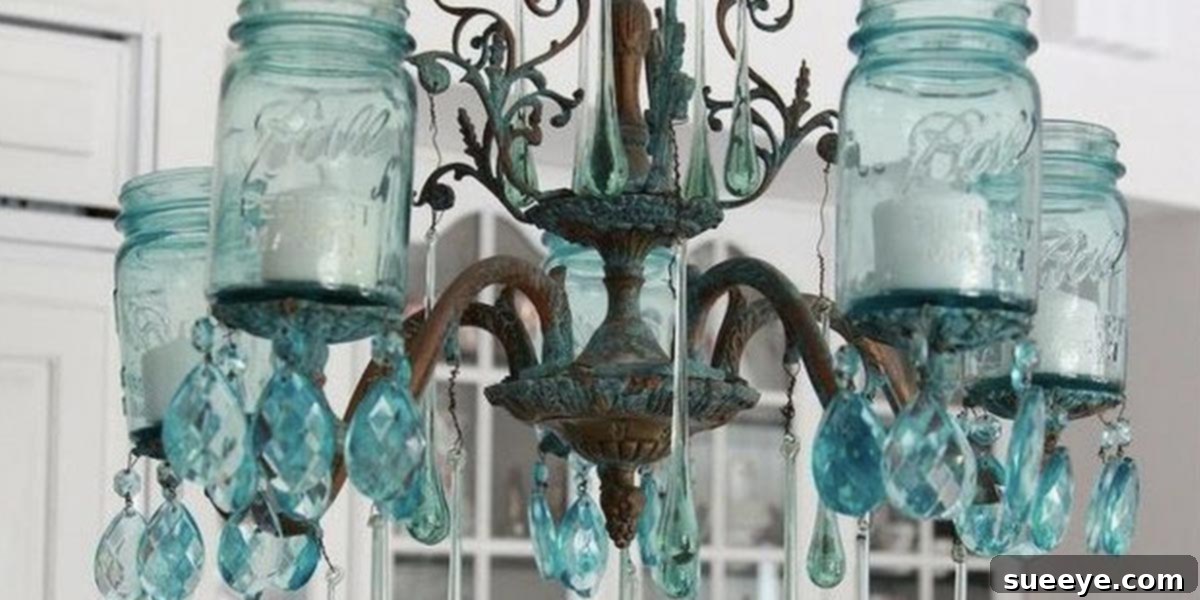
Create Your Own Rustic Chic Mason Jar Chandelier: A Comprehensive DIY Guide
In the realm of home decor, few styles capture the heart quite like farmhouse charm. Its blend of rustic comfort, timeless elegance, and inviting warmth creates an atmosphere that feels both lived-in and meticulously curated. At the forefront of this beloved aesthetic is the quintessential Mason jar, an item synonymous with vintage appeal and DIY versatility. Imagine elevating your home’s lighting with a stunning Mason jar chandelier – a design marvel that effortlessly blends chic sophistication with a delightful touch of country living. This project isn’t just about illuminating a space; it’s about infusing it with character, crafting a focal point that tells a story, and embracing the endless possibilities of personalized design.
Whether your style leans towards a rugged rustic vibe, a refined country chic, or a whimsical vintage romance, a custom Mason jar chandelier can be tailored to perfectly match your vision. The beauty lies in its adaptability: from selecting the ideal base fixture to choosing your preferred lighting source and adding unique embellishments, every step offers an opportunity for creative expression. This guide will walk you through the journey of transforming ordinary components into an extraordinary lighting fixture, proving that breathtaking decor doesn’t always come with a hefty price tag.
Embracing the Farmhouse Charm: Why a Mason Jar Chandelier?
The allure of the farmhouse style is undeniable, resonating with a desire for simplicity, authenticity, and connection to tradition. A Mason jar chandelier perfectly embodies these values, offering a versatile lighting solution that transcends mere functionality. It’s more than just a light source; it’s a statement piece that immediately draws the eye and sparks conversation. The transparent or tinted glass of the jars, combined with the soft glow of light, creates an inviting ambiance, transforming any room into a cozy sanctuary.
This style of lighting complements a wide array of interior designs, not just strictly farmhouse. It can introduce a touch of industrial edge when paired with metal finishes, add bohemian flair with macrame accents, or serve as a charming centerpiece in a shabby chic setting. The inherent simplicity of the Mason jar allows it to be a blank canvas for your creativity, making it an ideal choice for anyone looking to add a truly unique and handcrafted element to their home. Furthermore, the act of creating something beautiful with your own hands brings immense satisfaction, turning a functional item into a cherished personal accomplishment.
The Spark of Inspiration: From Thrift Store Finds to Stunning Decor
The Tale of a $6.99 Treasure
The journey to creating an astonishing Mason jar chandelier often begins with an unexpected find, proving that inspiration can strike in the most unassuming places. Take Michelle Beighly’s story, for instance. She discovered a plain chandelier fixture at a thrift store for an incredible $6.99. This modest investment laid the foundation for a truly remarkable transformation. Her experience highlights a fundamental principle of DIY and upcycling: potential is often hidden in plain sight, waiting for a creative eye to unlock it. A forgotten fixture, destined for the discard pile, can be reimagined and reborn as a stunning piece of modern or vintage decor, tailored precisely to your taste.
This concept of repurposing is not only eco-friendly but also incredibly budget-conscious. Instead of spending hundreds on a new, mass-produced chandelier, you can craft a unique, custom piece for a fraction of the cost. The beauty of starting with an existing fixture, whether it’s an old one you already own or a thrift store gem, is that it provides a solid structural base, simplifying the electrical components and hanging mechanism. This approach encourages resourcefulness and allows for a truly personalized touch that off-the-shelf items simply cannot replicate. The challenge then becomes not what you can buy, but what you can create with what you have or what you can find.
Crafting Your Vision: Key Decisions for Your DIY Project
Choosing Your Chandelier Base: Old, New, or Repurposed?
Your choice of base fixture is the cornerstone of your Mason jar chandelier project. While a thrift store find offers undeniable charm and cost savings, you have several avenues to explore. An existing chandelier, perhaps one that has seen better days or no longer matches your updated decor, can be given a new lease on life. Simply remove the old shades or elements and prepare it for its Mason jar transformation. Alternatively, if you prefer a clean slate or a specific style, new chandelier kits or basic light fixtures are readily available at hardware stores. The key is to select a fixture with enough arms or attachment points to hold the number of Mason jars you envision for your desired aesthetic and luminosity. Always consider the weight distribution once the jars are attached, especially if opting for larger or more numerous jars.
For those starting from scratch, you might even consider creating a base from reclaimed wood, metal hoops, or other sturdy materials. This approach offers maximum customization, allowing you to design the entire structure from the ground up. Whichever base you choose, ensure it is structurally sound and capable of supporting the combined weight of the jars, wiring, and any additional embellishments. A thorough cleaning and perhaps a fresh coat of paint or a distressed finish can work wonders in preparing your base for its Mason jar makeover, setting the stage for the next exciting phase of your DIY journey.
Lighting the Way: LED Bulbs vs. Romantic Candles
One of the most crucial decisions for your Mason jar chandelier involves the light source. Each option offers a distinct ambiance and comes with its own set of considerations. For a modern, safer, and energy-efficient approach, LED light bulbs are an excellent choice. They produce minimal heat, which is a significant advantage when working with enclosed glass jars and glues. LED bulbs are available in various wattages and color temperatures, allowing you to fine-tune the brightness and warmth of your chandelier’s glow. Furthermore, they boast an incredibly long lifespan, reducing the need for frequent bulb changes and making them a practical, sustainable option for everyday use. If your thrifted fixture has functional electrical wiring, integrating LED bulbs is a straightforward and highly recommended path.
Conversely, for an undeniably romantic and traditional aesthetic, candles offer a soft, flickering glow that is truly unmatched. This option is particularly appealing if your chosen fixture has very old or questionable electrical wiring, or if you simply prefer a non-electric solution. However, using candles inside Mason jars requires careful consideration of safety. The open flame produces heat, and proper ventilation is paramount. Additionally, if using real candles, you’ll need to securely suspend them within the jars to prevent tipping. Battery-operated LED tealights or pillar candles provide a safer alternative, mimicking the look of real flames without the associated fire risk or heat, and are ideal for events or areas where open flames are not permitted.
Preparing Your Mason Jars: Drilling for Success (or Simplicity)
The method you use to prepare your Mason jars will largely depend on your chosen light source. If you opt for real candles, creating ventilation holes is essential for safety and to allow the candle to burn properly. This process requires precision and the right tools. A drill press, combined with a 3/4-inch diamond drill bit, is the recommended equipment for safely cutting holes in glass. Drilling glass can be challenging and requires patience, a steady hand, and often water lubrication to prevent cracking and to keep the bit cool. If you are inexperienced with cutting glass, or if the idea makes you apprehensive, there’s no need to fret; simpler alternatives exist.
For those using LED bulbs (which generate minimal heat) or battery-operated LED candles, drilling ventilation holes is often unnecessary. In these cases, you can secure the jars to the fixture using various methods, such as wire hangers, clamps, or even by designing the fixture to cradle the jars directly. This approach simplifies the DIY process considerably, making it accessible to a wider range of skill levels while still achieving a remarkably similar and equally stunning result. Always prioritize safety and comfort with your chosen method, ensuring that your Mason jars are securely attached and ready to cast their beautiful light.
Infusing Your Personality: Customizing Your Mason Jar Masterpiece
My Journey with Blue Jars and Beaded Elegance
My personal excitement for this project stems from a long-standing affection for blue Mason jars. There’s something inherently enchanting about their vintage hue that adds an extra layer of charm to any decor. I had been envisioning a Mason jar light fixture for quite some time, but hadn’t settled on a design until I looked at the rather uninspiring chandelier in my dining room. I knew it had the potential for an amazing transformation. Discovering a tutorial that aligned with my vision was the catalyst, and soon, my dining room was graced with a bespoke chandelier. What truly personalized my creation, much like the inspiring images I’d seen, was the addition of delicate beads. This embellishment transformed the fixture into something uniquely mine, blending elegant aesthetics with a primitive, handcrafted feel. This experience underscores the profound satisfaction of crafting something that perfectly reflects your personal style.
The beauty of a DIY Mason jar chandelier lies in its boundless potential for customization. While I gravitated towards an elegant/primitive look with blue jars and beads, your options are truly limitless. If you prefer a simpler, more minimalist aesthetic, the raw charm of clear jars and unadorned fixtures can be incredibly effective. Consider the existing decor of your home: does it call for vibrant, painted jars, or perhaps frosted ones for a softer glow? Each choice, from the color of the jars to the type of embellishments, contributes to the overall narrative of your lighting fixture, making it a unique expression of your creativity and taste.
Endless Customization Possibilities
Beyond the choice of clear or colored jars and the addition of beads, the customization journey for your Mason jar chandelier can explore many exciting avenues:
- Jar Types and Sizes: Experiment with different sizes of Mason jars (pint, quart, half-gallon) or even incorporate other types of glass jars for varied textures and light diffusion. Vintage jars with unique embossing can add an extra layer of character.
- Paint and Finishes: Paint your jars to match your interior palette. Options range from opaque chalk paint for a rustic look, frosted spray paint for a diffused glow, or even transparent glass paint for subtle color. Distressing techniques can further enhance the antique appeal.
- Embellishments: Beyond beads, consider wrapping the jar necks with twine, jute, or ribbon for a country feel. Small charms, dried flowers, or even artificial greenery can be added inside the jars (if not using hot candles) for an enchanted garden effect.
- Fixture Finish: Don’t forget the base! A fresh coat of spray paint in matte black, antique bronze, brushed nickel, or even a vibrant color can completely change the fixture’s personality. Distressing the metal can also create a weathered, aged look.
- Arrangement and Number of Jars: The layout of your jars can vary. Some designs feature jars hanging at different lengths, creating a dynamic visual interest, while others arrange them uniformly for a classic cascade. The number of jars directly impacts the light output and the chandelier’s scale.
Each decision contributes to the final masterpiece, ensuring that your DIY Mason jar chandelier is not just a light fixture, but a personalized work of art that seamlessly integrates with and elevates your home’s decor.
Bringing It All Together: A Conceptual DIY Process
While this guide focuses on inspiration and options, the general conceptual steps for assembling your Mason jar chandelier typically involve:
- Disassembling and Cleaning: If starting with an old fixture, carefully remove all existing components (shades, old wiring if unsafe). Thoroughly clean the fixture and Mason jars.
- Preparing the Jars: Drill holes if using real candles, or prepare attachment points for bulbs/jars if using LEDs.
- Wiring (if applicable): For electrical fixtures, ensure all wiring is modern, secure, and properly insulated. If salvaging, consider replacing old wiring with a new light kit.
- Attaching the Jars: Securely fasten the Mason jars to the chandelier arms or base. This might involve wire wraps, custom brackets, or threaded connections designed for electrical sockets.
- Installing Light Sources: Insert LED bulbs or battery-operated candles into the prepared jars. If using real candles, ensure secure placement and adequate ventilation.
- Embellishing: Add any decorative elements like beads, twine, or paint to both the jars and the fixture base.
- Final Assembly and Hanging: Reassemble any parts of the fixture that were removed, and carefully hang your new chandelier in its desired location, ensuring it is securely mounted to a ceiling joist or appropriate support.
Always refer to detailed, step-by-step tutorials for specific instructions, especially regarding electrical work, or consult a qualified electrician if you are unsure about any wiring aspects. Precision and safety are paramount at every stage of this rewarding project.
Beyond Aesthetics: The Benefits of a DIY Mason Jar Chandelier
The decision to create a DIY Mason jar chandelier extends far beyond merely adding an appealing light fixture to your home. It’s a choice that brings a multitude of practical and personal benefits. Foremost among these is the significant cost savings. High-end, custom-designed chandeliers can be incredibly expensive, often placing them out of reach for many budgets. By utilizing recycled materials, thrift store finds, and readily available Mason jars, you can achieve a sophisticated look without the exorbitant price tag, allocating your budget to other areas of home improvement.
Moreover, the act of DIY fosters a profound sense of personal accomplishment and pride. Each time you glance at your handmade chandelier, you’ll be reminded of your creativity, effort, and skill. This tangible representation of your ingenuity adds a unique layer of satisfaction that purchasing a pre-made item simply cannot provide. Furthermore, embracing DIY and upcycling contributes to environmental sustainability by giving new life to old objects, reducing waste, and promoting a more conscious approach to consumption. Your Mason jar chandelier becomes not just a piece of decor, but a symbol of resourcefulness and eco-friendliness, aligning with a lifestyle that values uniqueness and thoughtful creation over mass production.
Perfect Placement: Where to Showcase Your Handmade Chandelier
The beauty of a custom Mason jar chandelier lies in its versatility, making it a perfect fit for a myriad of spaces and occasions. Its rustic charm can transform ordinary areas into extraordinary focal points.
- Dining Room: As seen in my own project, a Mason jar chandelier over a dining table creates a warm, inviting atmosphere for family meals and intimate gatherings. It serves as a captivating centerpiece that enhances the dining experience.
- Kitchen Island: Suspended above a kitchen island, it provides both ambient and task lighting, adding character to one of the busiest areas of the home.
- Entryway or Foyer: Greet guests with a welcoming glow. A Mason jar chandelier in your entryway sets the tone for your home’s unique style from the moment visitors step inside.
- Bedroom: For a touch of romantic or whimsical charm, a smaller Mason jar chandelier can be a delightful addition to a bedroom, creating a soft, dreamy ambiance.
- Covered Porches or Patios: Weather-resistant versions (especially with battery-operated lights) can bring farmhouse appeal to outdoor living spaces, perfect for evening entertaining.
- Weddings and Events: Mason jar chandeliers are incredibly popular for rustic-themed weddings, barn venues, or garden parties. They offer a unique, customizable, and often more affordable alternative to traditional event lighting, adding a magical touch to any celebration.
Consider the scale of the room and the overall decor when deciding on the size and style of your chandelier. A well-placed Mason jar chandelier can dramatically enhance the aesthetic appeal and functionality of almost any space, proving its adaptability and enduring charm.
Important Safety Reminders for Your DIY Project
While the creation of a Mason jar chandelier is a rewarding DIY endeavor, safety must always be your paramount concern. When dealing with electrical components, ensure that all wiring is correctly installed, insulated, and rated for the intended use. If repurposing an old fixture, thoroughly inspect the existing wiring for any fraying, cracking, or exposed sections. If in doubt, it is always best to replace old wiring entirely or consult a qualified electrician. Never work with live wires; always ensure the power is completely shut off at the circuit breaker before beginning any electrical work.
Furthermore, consider the heat generated by your chosen light source. While LED bulbs produce minimal heat, traditional incandescent bulbs can get very hot, potentially causing glass jars to crack or posing a fire risk if the heat is not properly dissipated. If opting for real candles, ensure adequate ventilation holes are present, and always monitor the flames. Securely attach the Mason jars to the fixture to prevent them from falling, and ensure the entire chandelier is firmly mounted to a ceiling joist or appropriate structural support that can bear its full weight. Taking these precautions will ensure that your beautiful, handmade chandelier remains a safe and delightful addition to your home for years to come.
Your Journey to a Unique Home: Start Creating Today!
Most of us share a profound appreciation for all things DIY, rustic-modern, and re-imagined. The Mason jar chandelier project is a testament to this collective passion, offering a delightful blend of creativity, practicality, and personal expression. It’s an opportunity to transform a simple, ubiquitous item into a dazzling piece of decor that not only illuminates your space but also reflects your unique style and craftsmanship. Whether you’re aiming for a romantic, vintage-inspired ambiance for your home or seeking a distinctive lighting solution for a special event like a wedding, this project provides a fulfilling and cost-effective path to achieving your decor dreams.
My goal has always been to inspire you to create the decor you’ve always wanted – decor that resonates with your soul and brings joy to your everyday surroundings. So, gather your materials, let your imagination soar, and embark on this wonderful DIY adventure. Watch how a humble Mason jar, with a touch of ingenuity, can become the crowning glory of your living space. Enjoy the process, and revel in the stunning results of your fabulous Mason jar chandelier!