
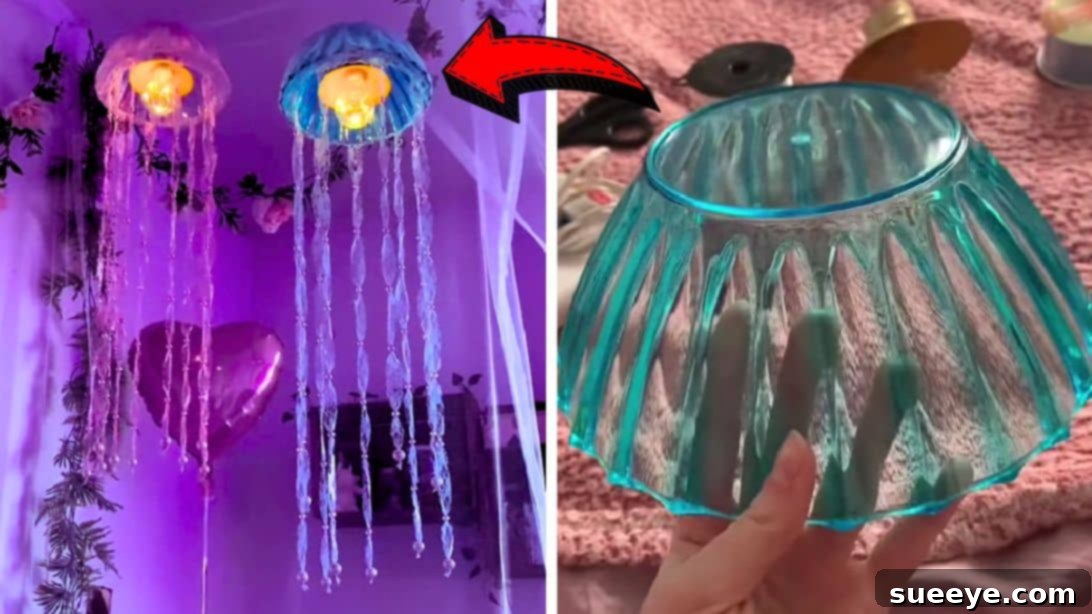
DIY Jellyfish Lamp: Craft Whimsical Lighting with Dollar Tree Treasures
Are you searching for an enchanting way to infuse a touch of magic and whimsy into your living space without breaking the bank? Look no further! This captivating DIY jellyfish lamp project, inspired by a viral TikTok creation from alinavvictoria, is sweeping the online world for its sheer simplicity, stunning visual appeal, and incredibly low cost. Imagine a glowing, ethereal jellyfish gracefully floating in your room, casting a soft, dreamy light. What’s even more impressive is that this beautiful decorative piece is entirely handmade, utilizing everyday items predominantly sourced from your local Dollar Tree, making it an accessible craft for everyone.
This project is a testament to how creativity and a few budget-friendly materials can transform into something truly extraordinary. It’s so beautifully crafted that onlookers might never guess it was a DIY project, let alone one made with dollar store finds. While it’s perfect for adding a magical vibe indoors, perhaps in a bedroom, nursery, or a cozy reading nook, its versatility also allows for outdoor display. Imagine these glowing jellyfish lamps adding a fantastical glow to your yard, patio, or garden during evening gatherings, creating an unforgettable atmosphere. This handmade decor piece offers a unique blend of charm, affordability, and the personal satisfaction that comes from creating something truly special.
RELATED: Transform Your Space with a DIY TikTok Cloud Ceiling Tutorial
Among countless DIY projects, this jellyfish lamp stands out as a personal favorite due to its unique charm and remarkable affordability compared to many decorative lamps found in online stores. If you’re a parent looking to surprise your children with an imaginative room makeover, this decor idea is absolutely perfect. Picture their faces lighting up with pure joy and excitement as they step into a room adorned with these whimsical, glowing creatures. It’s more than just a lamp; it’s an invitation to imagination and a personalized touch that makes any space feel special. The soft, ambient light can also be incredibly calming, making it an ideal addition to a nursery or a relaxing reading corner.
Beyond its aesthetic appeal, embarking on a DIY project like this offers numerous benefits. It’s a fantastic creative outlet, a rewarding experience, and a wonderful way to personalize your home decor to reflect your unique style. Plus, the satisfaction of creating something beautiful with your own hands is truly priceless. This comprehensive guide will walk you through every step, ensuring you can replicate this magical decor piece with ease, even if you’re a beginner crafter. Get ready to illuminate your home with your very own handcrafted wonder!
Why Choose a DIY Jellyfish Lamp for Your Home?
The allure of the deep sea and its mysterious creatures has fascinated humanity for centuries. Bringing a piece of that underwater magic into your home can create an incredibly soothing and captivating ambiance. A DIY jellyfish lamp offers several compelling reasons to become your next crafting adventure:
- Unmatched Whimsy and Charm: Unlike conventional lamps, a jellyfish lamp introduces a playful, ethereal, and unique element to any room. It’s a conversation starter and a focal point that instantly captures attention, making your home feel more inviting and imaginative.
- Budget-Friendly Decor: Utilizing inexpensive materials, primarily from Dollar Tree, makes this project incredibly accessible. You can achieve high-end decor aesthetics without the premium price tag, proving that beautiful home accents don’t have to be expensive.
- Personalization Potential: This project offers extensive opportunities for customization. From color schemes to tentacle materials and light types, you can tailor your jellyfish lamp to perfectly match your existing decor or create a vibrant new theme, making it truly one-of-a-kind.
- Easy to Create: Despite its elaborate appearance, the steps involved are straightforward and beginner-friendly. No specialized crafting skills are required, just a little patience, enthusiasm, and a desire to create something beautiful.
- Versatile Placement: Whether it’s to brighten a child’s bedroom, add a calming glow to a nursery, create a unique accent in a living area, or illuminate an outdoor space, this lamp fits seamlessly into various environments, enhancing the mood wherever it hangs.
- A Rewarding Craft: The satisfaction of bringing a beautiful, functional piece of art to life with your own hands is immense. It’s a fun project to undertake alone or with older children, fostering creativity, fine motor skills, and a sense of accomplishment.
Materials You’ll Need for Your DIY Jellyfish Lamp
One of the most appealing aspects of this project is its reliance on readily available and inexpensive materials. Gather these simple items, and you’ll be well on your way to crafting your magical jellyfish lamp. Remember, while most items can be found at Dollar Tree, feel free to substitute with similar materials from other craft stores or even items you already have at home. This flexibility allows for even greater personalization and budget control.
- Light Blue Wavy Plastic Bowls: These form the “bell” of your jellyfish. The wavy edges add to the organic, flowing look. Consider other translucent colors like purple or clear if you desire a different mood or theme. (Dollar Tree)
- Decorative Mesh Fabric: This will wrap around the bowl, giving it a soft, ethereal texture reminiscent of a jellyfish’s body. Look for mesh with a slight sheen or sparkle for extra magic, or choose a matte finish for a more subtle look. (Dollar Tree)
- Lace Ribbon: Essential for creating the delicate, flowing tentacles. Choose various widths, patterns, and even different textures to add depth and visual interest to your jellyfish’s trailing arms. (Dollar Tree)
- Hanging LED Lamp: The heart of your jellyfish, providing the soft glow. Battery-operated LED lamps are ideal for safety and versatility in placement, especially for outdoor use where power outlets might not be accessible. Look for lights with a warm glow for a cozy feel or cool white for a more ethereal look. (Dollar Tree)
- Scissors: A good pair of sharp scissors is crucial for cutting mesh, ribbon, and fishing line precisely, ensuring clean edges and easy crafting.
- Fishing Line: Strong, durable, and nearly invisible, fishing line is perfect for suspending the light inside the bowl and for securely hanging the finished lamp without distracting from its aesthetic.
- Needle and Thread: For securing the mesh, though a hot glue gun can also be an alternative for some steps, offering a faster no-sew option if preferred.
- Beads: Small decorative beads add weight and sparkle to the tentacles, enhancing their realistic movement and providing an elegant touch. Choose colors that complement your lamp’s overall design.
- Screw Eye Hook: For securely hanging your finished lamp from the ceiling, a sturdy beam, or an outdoor pergola. Ensure it’s installed correctly for safety.
- Hot Glue Gun and Glue Sticks: Your best friend for quick, secure adhesion of various components, especially for attaching the tentacles and other embellishments.
Step-by-Step Guide: How to Make Your DIY Jellyfish Lamp
Follow these detailed instructions to bring your beautiful jellyfish lamp to life. Take your time with each step, and don’t be afraid to add your personal touch! Safety is paramount, especially when working with hot tools, so always exercise caution.
Step 1: Preparing the Jellyfish Bell and Initial Tentacle Accents
Begin by taking your chosen decorative mesh fabric. Carefully wrap it around the exterior of your light blue wavy plastic bowl. This will help you determine the approximate size needed. Once you have a good estimate, cut the mesh, ensuring you leave a generous overlap of about 1-2 inches for sewing or gluing. The goal is to create a soft, cloud-like covering for the bowl. Next, using your needle and thread, gently sew the raw edges of the mesh together, forming a loose pouch. Alternatively, for a quicker no-sew method, you can carefully use a hot glue gun to secure the seam. Once the basic pouch is formed, gently scrunch the mesh fabric to create a ruffled, organic look that mimics the natural texture of a jellyfish’s bell. Now, carefully insert the plastic bowl into this scrunch-ready mesh pouch. Continue to sew or hot glue the remaining opening of the mesh, scrunching it as you go, until the bowl is completely enveloped and the mesh forms a beautiful, undulating canopy around it. Adjust the scrunching evenly to achieve your desired aesthetic fullness and ensure the bowl is well-covered. For the initial tentacle accents, take your lace ribbon and cut several strips of varying lengths – typically between 6 to 12 inches, depending on how long you want your shorter tentacles to be. On each lace strip, carefully insert decorative beads, spacing them evenly along the length. These beaded lace strips will add an elegant shimmer and a bit of weight, helping them hang nicely and create visual interest.
Step 2: Attaching Tentacles and Preparing the Light Source
Now it’s time to add the iconic flowing tentacles that truly give your lamp its jellyfish identity. Create many more lace strips, experimenting with different lengths (some can be significantly longer, up to 2-3 feet) and even different types of ribbon, tulle, or sheer fabric for added texture and variety. These will be the primary, longer tentacles that create a mesmerizing cascade. To prepare the bowl for the light fixture, carefully heat the pointed tip of a sewing needle using a lighter or candle flame (exercise extreme caution here, always use a well-ventilated area, and keep flammable materials away. Alternatively, a small drill bit can be used). Once heated, use the needle to create a small, neat hole precisely at the center of the bottom of the plastic bowl. This hole will be crucial for threading the fishing line that supports your LED lamp. With your hot glue gun ready and heated, begin attaching the various lace strips and other chosen tentacle materials to the inside rim of the bowl. For a more seamless and professional look, you can also glue them discreetly underneath the edges of the mesh covering, ensuring the glue is hidden. Arrange them randomly or in a pattern, ensuring a full, flowing effect that looks organic. Consider layering shorter, beaded tentacles with longer, plain ones for dynamic movement and visual depth. Finally, take your hanging LED lamp and a long piece of strong fishing line. Securely tie one end of the fishing line around the hanging mechanism of the LED light bulb. Ensure the knot is tight, double-knotted, and reliable, as this line will bear the weight of the light fixture for an extended period.
Step 3: Final Assembly and Hanging Your Masterpiece
With the light prepared and the tentacles in place, it’s time for the final assembly and installation of your magical jellyfish lamp. To ensure maximum stability and durability, especially since the light will be suspended, double the strand of fishing line that is tied to the LED lamp. This means taking the remaining long end of the fishing line and folding it back on itself, effectively creating two parallel lines. Twist them together or tie them in a simple knot near the bulb to keep them doubled. This reinforced line will be far more sturdy and capable of securely holding up your beautiful jellyfish lamp, preventing any accidental falls. Now, carefully insert the doubled end of the fishing line from the LED lamp up through the small hole you created at the center and bottom of the plastic bowl. Pull the fishing line through until the LED lamp is suspended inside the bowl, positioned to cast its light perfectly. Adjust the length of the fishing line inside the bowl so the LED lamp hangs at your desired height within the jellyfish bell – typically in the middle or slightly higher to illuminate the tentacles. Finally, choose your desired location for hanging the lamp. Using a drill and appropriate wall anchors (if needed, depending on your ceiling material), securely attach the screw eye hook to the ceiling, a sturdy beam, an outdoor pergola, or any other robust structure. Once the hook is firmly in place, simply loop the top of the doubled fishing line onto the screw eye hook, and your enchanting DIY jellyfish lamp is complete! Step back and admire your magical creation, watching as it transforms your space with its ethereal glow.
Customization Ideas to Make Your Jellyfish Lamp Truly Unique
The beauty of DIY lies in personalization. While the original design is stunning, here are some ideas to make your jellyfish lamp perfectly match your style and decor, ensuring it’s a truly unique creation that reflects your personality:
Color Variations for a Themed Look
- Oceanic Hues: Experiment with different shades of blue, green, and even purple bowls and mesh for a truly deep-sea effect. You could also incorporate silver or iridescent ribbons.
- Sunset Glow: Use orange, pink, and yellow mesh with warm-toned LED lights for a fiery, ethereal look reminiscent of a beautiful sunset over the ocean.
- Iridescent Dream: Opt for iridescent or pearlescent mesh and ribbons that shimmer with changing light, creating a truly magical and otherworldly feel.
- Monochromatic Elegance: Choose various shades of a single color, like different blues or purples, for a sophisticated and cohesive appearance.
Creative Tentacle Materials for Texture and Flow
- Tulle and Organza: These sheer fabrics add volume and a delicate, floaty appearance, especially when cut into wide strips.
- Glitter Ribbon: Incorporate ribbons with glitter or metallic threads for extra sparkle and visual movement as the lamp gently sways.
- Yarn and String: Create a more rustic or textured look with various types of yarn (e.g., fluffy, chunky) or even strips of recycled fabric for an eco-friendly touch.
- Small Plastic Sea Creatures: For a child’s room, you could hot glue small plastic fish, starfish, or shells to the ends of some tentacles, enhancing the underwater theme.
- Pearl Strands: String faux pearls onto fishing line and attach them as delicate, shimmering tentacles for an elegant touch.
Light Enhancements for Dynamic Ambiance
- Color-Changing LEDs: Many battery-operated LED lamps come with remote controls that allow you to change colors, offering a dynamic and playful effect that can shift the mood of the room.
- Fairy Lights: Instead of a single hanging lamp, you could string a small set of battery-operated fairy lights inside the mesh for a more diffused and twinkling glow, creating a star-like effect.
- Submersible LED Lights: If using outdoors in a protected area (like under a covered patio) or for a temporary setup, consider using truly waterproof submersible LEDs within the bowl for a unique effect (always ensure they are rated for their intended use).
- Timed Lights: Some LED lamps come with timers, allowing your jellyfish lamp to automatically turn on and off, perfect for a nightlight in a child’s room.
Adding Embellishments for Extra Sparkle and Detail
- Glitter and Sequins: Lightly spray the mesh with adhesive and sprinkle fine glitter or glue individual sequins for an extra magical shimmer that catches the light.
- Rhinestones and Jewels: Glue small rhinestones, flat-backed jewels, or even acrylic gems onto the bowl or mesh for a glamorous and eye-catching touch.
- Painted Details: Use acrylic paints to add subtle patterns, swirls, or details to the plastic bowl before covering it with mesh, creating a unique base layer.
- Fabric Flowers/Leaves: For a more nature-inspired look, attach small artificial flowers or leaves to the top of the bell.
Where to Display Your Enchanting Jellyfish Lamp
The versatility of this DIY jellyfish lamp means it can enhance almost any space, bringing a unique character and a touch of magic wherever it’s placed. Consider these ideas for its perfect spot:
- Kids’ Bedrooms: A perfect addition to inspire imagination, encourage storytelling, and create a magical, calming environment ideal for sleep or play. It can serve as a comforting nightlight.
- Nurseries: The gentle glow and whimsical form can be incredibly soothing for infants, adding a dreamy quality to their space and helping to create a peaceful atmosphere.
- Living Rooms/Reading Nooks: As a unique accent piece, it can draw attention and add a touch of artistic flair and soft ambient lighting to a contemporary or eclectic decor scheme.
- Outdoor Patios and Gardens: Hung from pergolas, trellises, sturdy tree branches, or gazebos, these lamps can transform your outdoor area into an illuminated wonderland for evening entertaining or quiet contemplation. Ensure they are protected from direct rain if not fully weather-sealed.
- Party Decor: Ideal for themed parties like under-the-sea, fairy tale, mystical forest, or even cosmic-themed events, creating an immersive and memorable atmosphere for guests.
- Playrooms: Enhances a playful atmosphere, sparking creativity and imagination during playtime.
Tips for a Successful DIY Jellyfish Lamp Project
To ensure your crafting experience is enjoyable and your finished jellyfish lamp is a stunning success, keep these helpful tips in mind:
- Safety First: Always supervise children when using hot glue guns or handling sharp objects like scissors and needles. If heating a needle, do so in a well-ventilated area with proper caution and ensure a fire extinguisher is nearby.
- Plan Your Colors: Before you start, consider the overall color scheme and theme of the room where the lamp will be placed to ensure your chosen materials complement it beautifully. Lay out all your materials beforehand.
- Test Your Lights: Before final assembly, always test your LED lamp to ensure it’s working correctly and has fresh batteries. It’s much easier to replace batteries or fix issues before the lamp is fully constructed.
- Vary Tentacle Lengths: Cutting tentacles of different lengths creates a more natural and dynamic look, mimicking actual jellyfish movement in water. This adds to the organic, whimsical feel.
- Secure Knots: When working with fishing line, ensure all knots are double-tied and pulled taut to prevent accidental unraveling, which could cause the light to fall. A drop of super glue on critical knots can add extra security.
- Patience is Key: While this project is easy, taking your time with each step, especially with gluing and arranging tentacles, will result in a more polished, professional-looking, and durable finished product.
- Involve the Family: This is a fantastic project for family bonding! Older children can safely help with cutting, gluing, and arranging tentacles, fostering their creativity and giving them a sense of ownership.
Bring Your Dollar Tree DIY Jellyfish Lamp to Life Today!
This easy DIY jellyfish lamp project is more than just a craft; it’s an opportunity to create something truly magical and personalized for your home or garden. By leveraging the affordability of Dollar Tree items, you can craft a piece that rivals high-end decor, all while enjoying the immense satisfaction of a handmade creation. Whether you’re aiming to delight your children with a fantastical room transformation, enhance your patio with unique lighting, or simply add a touch of whimsical glow to any room, this project offers an accessible, enjoyable, and rewarding experience for crafters of all skill levels.
So gather your materials, unleash your inner artist, and prepare to be amazed by the stunning and ethereal jellyfish lamp you can create with just a little effort and a lot of imagination. We encourage you to try this captivating project and share your unique interpretations! Don’t forget to visit alinavvictoria’s TikTok account and give her a follow for more inspiring DIY ideas and creative projects. Happy crafting!
*All images are credited to alinavvictoria via TikTok. Give her TikTok account a visit and follow her for more creative inspiration!