
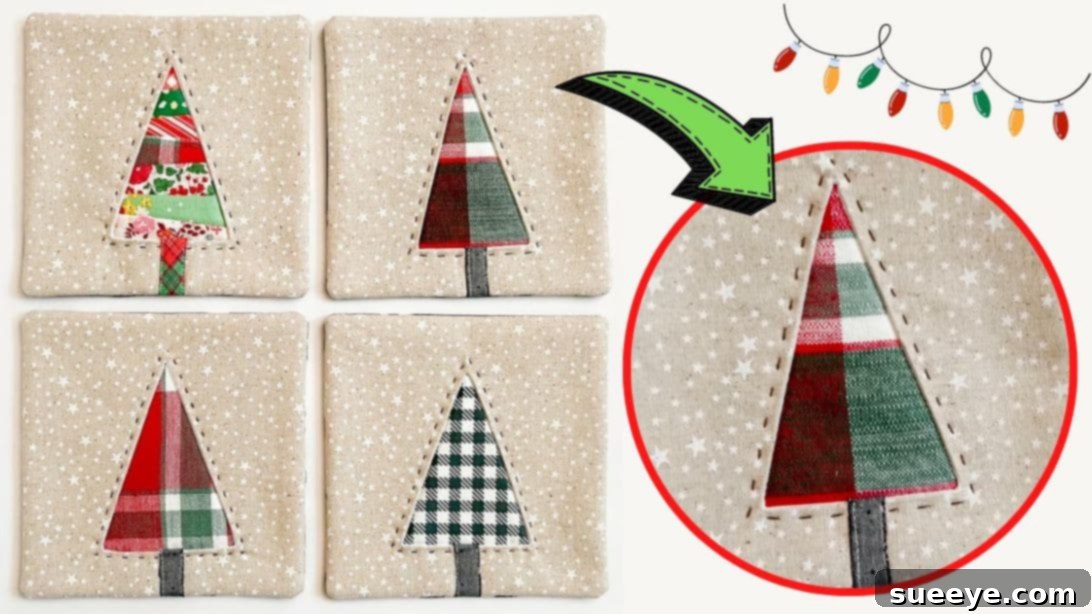
DIY Christmas Coasters: A Beginner-Friendly Sewing Tutorial for Festive Home Decor
Transform your leftover fabric scraps into beautiful, functional, and festive home decor with this delightful Christmas coaster sewing project. Inspired by the creative genius of Minki Kim on YouTube, this tutorial offers an incredibly accessible and enjoyable way to infuse your living space with the spirit of the holidays. Even if you’re new to the world of sewing, you’ll find the techniques straightforward and rewarding, making it a perfect first project to boost your confidence and create something truly special.
These charming coasters are not just practical for protecting your surfaces; they also serve as wonderful conversation starters and thoughtful handmade gifts for friends and family. Imagine sipping hot cocoa on a chilly evening, resting your mug on a coaster you crafted yourself, adorned with a whimsical Christmas tree. This project is not only an excellent way to use up those smaller pieces of fabric you’ve been saving but also a fantastic opportunity to add a personal touch to your holiday decorations. Get ready to dive into a world of creativity, where every stitch brings a little more joy and festive cheer!
Essential Materials for Your Christmas Coasters
Before you begin this exciting sewing adventure, gather all your materials. Having everything ready will ensure a smooth and enjoyable crafting experience.
- Main Fabric: Choose a sturdy cotton fabric, about 7×7 inches, for the coaster’s base. This can be a solid color that complements your holiday decor or a subtle print. Consider durability, as coasters will see regular use.
- Fabric Scraps: This is where the magic happens! Collect an assortment of small fabric strips, preferably in Christmas-themed colors (reds, greens, whites, golds, blues) or patterns. The more variety in your scraps, the more unique and vibrant your “tree” will appear. These strips should be manageable enough to piece together easily.
- Lining Fabric: A piece of cotton fabric, approximately 6.5×6.5 inches, to finish the back of your coaster. This provides a neat, professional look and adds stability.
- Batting Fabric: A 7×7 inch square of cotton batting will give your coaster its characteristic thickness and absorbency, protecting your surfaces from condensation and heat. Choose a medium-loft batting for the best results.
- Needle and Thread: Essential for both machine sewing and any hand-finishing touches. Match your thread color to your main fabric for discreet stitches, or use a contrasting color for decorative effects.
- Embroidery Thread: A dark-colored embroidery thread (such as dark green or brown) will be used to outline and add definition to your Christmas tree appliqué, giving it a delightful handcrafted appearance.
- Fusible Interfacing Fabric: A small piece of lightweight fusible interfacing, with its adhesive on one side, is key for creating crisp, stable appliqué shapes. It helps prevent fraying and makes sewing easier.
- Iron and Ironing Board: Crucial for pressing seams, fusing interfacing, and achieving a professional, flat finish throughout the project. Don’t underestimate the power of a good press!
- Sewing Machine: A standard sewing machine equipped with a universal needle will make quick work of assembling your coasters.
- Basic Sewing Tools: Scissors, rotary cutter (optional), cutting mat (optional), fabric markers or chalk, pins or fabric clips, and a seam ripper (just in case!).
Step-by-Step Directions to Sew Your Christmas Coasters
Follow these detailed instructions to create your charming Christmas coasters. Remember to take your time with each step for the best results, and don’t hesitate to consult the original video by Minki Kim for visual guidance if needed.
Step 1: Preparing the Coaster Base and Tree Outline
Begin by setting the foundation for your festive coaster. This step involves creating the textured background and preparing the appliqué shape that will form your Christmas tree.
- Gather and Piece Fabric Scraps: Collect various small strips of your chosen fabric scraps. Arrange and piece them together creatively to form a small, colorful patchwork block. The goal is to create a vibrant background for your tree. Once pieced, ensure this patchwork covers an area slightly larger than the central portion of your intended tree design.
- Prepare the Batting: Take a 7×7 inch square of cotton batting. This batting will be the core of your coaster, providing structure and absorbency. Center your pieced fabric scraps on top of this batting.
- Apply Fusible Interfacing: Cut a piece of fusible interfacing that is large enough to cover the desired shape of your Christmas tree. Lay this interfacing on top of your pieced fabric scraps, ensuring the glue side is facing down (towards the fabric).
- Draw the Tree Shape: Using a fabric marker or chalk, carefully draw a long, symmetrical triangle shape onto the interfacing. This triangle will represent your Christmas tree. Make sure the base of the triangle is wide enough to incorporate the pieced fabric scraps you laid down earlier, ensuring they are centered within the design.
- Attach Interfacing to Base Fabric: Remove the interfacing from the pieced scraps for a moment. Place the interfacing, glue-side down, onto the right side of your main 7×7 inch base fabric. Iron it gently to fuse it in place. This creates a stable layer for the tree appliqué.
- Sew the Tree Outline: Carefully sew along the traced triangle line on the interfacing, through both the interfacing and the main fabric. Use a standard stitch length. This line will define the outer edge of your Christmas tree.
Step 2: Creating the Tree Appliqué and Trunk
Now, let’s bring your Christmas tree to life by cutting and turning the appliqué, then adding the finishing touch of a tree trunk.
- Cut the Inner Triangle: With sharp scissors, carefully cut a hole at the center of the triangle you just stitched. Be precise, but don’t cut too close to your stitched line initially.
- Trim and Notch: From the hole you just cut, start cutting outwards towards your stitched line, leaving approximately a ¼-inch seam allowance around the sides and bottom of the stitched triangle. Once cut, carefully notch the corners of the triangle (making small V-shaped cuts into the seam allowance, close to but not through the stitch line). This helps reduce bulk and allows for a smooth turn.
- Turn and Press: Gently push the excess interfacing and the main fabric towards the wrong side of the base fabric through the opening you created. Use a point turner or a blunt object to carefully poke out the corners, ensuring they are crisp and well-defined. Crease all the seams nicely from the right side, using your fingers or an iron to create sharp edges.
- Position the Appliqué: Carefully place this turned and pressed piece on top of your earlier pieced fabric scraps, ensuring that the pieced fabrics are perfectly centered within the opening of your Christmas tree shape. The goal is for the colorful patchwork to show through the tree opening.
- Fuse the Appliqué: Give the entire assembly a good press with a hot iron. This will fuse the interfacing (which is now on the wrong side of the tree appliqué) to the pieced fabric scraps, securing the tree in place.
- Add the Tree Trunk: Take a small piece of fabric, fold it neatly to create a small rectangular shape for the tree’s leg or trunk. Position it at the bottom center of your tree appliqué, making sure it extends slightly underneath the tree base. Sew it securely in place, as demonstrated in Minki Kim’s video, usually with a straight stitch close to the edges.
Step 3: Assembling and Finishing the Coaster
The final steps involve bringing all the layers together, turning your coaster right side out, and adding the decorative embroidery that gives it a professional and charming finish.
- Prepare for Assembly: Take your 6½ x 6½ inch lining fabric. Place it on top of your main coaster fabric (the one with the tree appliqué), with their right sides facing together. Ensure all edges are aligned perfectly.
- Sew the Coaster Edges: Sew around all four sides of the coaster with a ¼-inch seam allowance. Crucially, remember to leave a small gap (about 2-3 inches) along one side. This opening is essential for turning the coaster right side out later. Backstitch at the beginning and end of your stitching to secure the seams.
- Trim and Notch Corners: Once sewn, carefully cut off any excess fabric around the perimeter, trimming close to your stitch line (but not cutting through it). Next, notch all four corners (trimming the corner at an angle, close to the stitching) to reduce bulk when the coaster is turned. This will help you achieve sharp, neat corners.
- Turn Right Side Out: Gently push the entire coaster fabric right side out through the gap you left. Take your time with this step.
- Shape and Press: Use a point turner or a knitting needle to carefully poke out all the corners, ensuring they are as crisp and square as possible. Then, tuck in the raw edges of the fabric at the turning gap to align them with the sewn seam. Give the entire coaster a good press with a hot iron, flattening all the seams and the edges. This step is vital for a polished finish.
- Hand Stitch the Tree: Now comes the final decorative touch! Using a dark-colored embroidery thread (as chosen in your materials), hand stitch around the entire outline of the Christmas tree. A simple running stitch or a backstitch works wonderfully to define the tree and secure the appliqué even further. This also adds a beautiful handmade charm to your coaster.
- Close the Gap: Finally, close the turning gap using a ladder stitch (also known as an invisible stitch) or a very neat topstitch close to the edge. Your beautiful Christmas coaster is now complete!
Tips for Sewing Success
To ensure your Christmas coaster project goes smoothly and yields beautiful results, consider these helpful tips:
- Pre-wash Fabrics: Always pre-wash and iron your fabrics before cutting and sewing. This prevents shrinking after your project is complete and ensures a smooth surface for sewing.
- Sharp Tools are Key: Use sharp fabric scissors or a rotary cutter with a fresh blade for clean, precise cuts. Dull tools can lead to frustration and inaccurate pieces.
- Press, Press, Press: Ironing at each stage is not just recommended; it’s essential for professional-looking results. It helps set stitches, flatten seams, and ensures your pieces fit together perfectly.
- Experiment with Scraps: Don’t be afraid to play with different color combinations and patterns for your tree patchwork. This is a great opportunity to get creative and use up those tiny cherished scraps.
- Use Good Quality Thread: A good quality polyester or cotton thread will prevent breakage and ensure strong seams.
- Pin Generously: Use plenty of pins or fabric clips to hold layers of fabric together, especially when sewing multiple layers or around curves.
- Slow and Steady: When sewing, especially for beginners, take your time. Don’t rush through the steps. Slow down around corners and intricate areas.
Creative Variations and Customization Ideas
While this tutorial focuses on a classic Christmas tree design, there are endless ways to customize your coasters and make them uniquely yours or tailor them for different occasions:
- Seasonal Themes: Instead of a Christmas tree, you could create appliqué shapes like hearts for Valentine’s Day, pumpkins for Halloween, leaves for autumn, or even simple stars for a general celestial theme.
- Monogramming: Add a small embroidered initial to the corner of the coaster for a personalized touch, especially if giving them as gifts.
- Embellishments: Consider adding tiny beads, sequins, or small fabric buttons to the tree as “ornaments” for extra sparkle and dimension.
- Quilting: Once the coaster is turned and pressed, you could do some simple straight-line quilting or free-motion quilting across the entire coaster surface to add texture and further secure the layers.
- Edge Finishing: Instead of a hand-stitched outline, you could topstitch around the entire perimeter of the coaster for a clean, finished look and to close the turning gap.
- Shape Experimentation: While a square coaster is standard, you could adapt the technique to create round, hexagonal, or even star-shaped coasters.
Care Instructions for Your Handmade Coasters
To ensure your beautiful handmade Christmas coasters last for many holiday seasons to come, proper care is important:
- Washing: Most cotton coasters can be machine washed on a gentle cycle with cold water. Use a mild detergent. For best results, place them in a mesh laundry bag to prevent snagging.
- Drying: Air dry flat to maintain their shape, or tumble dry on low heat. Remove promptly to avoid wrinkles.
- Ironing: If they become wrinkled, iron them on a medium setting. Avoid ironing directly over any added embellishments like beads or sequins.
- Stain Treatment: For spills, dab gently with a clean cloth and a small amount of mild stain remover. Avoid harsh chemicals that could damage the fabric.
This beginner-friendly Christmas coaster sewing tutorial is a fantastic project for anyone looking to add a personal, handmade touch to their holiday celebrations or create thoughtful gifts. The process, championed by Minki Kim, simplifies appliqué and coaster construction, making it accessible to even the newest sewists. So gather your beautiful fabric scraps, set up your machine, and enjoy the rewarding process of crafting these adorable, festive coasters. Your home, and perhaps the homes of your loved ones, will surely thank you for the touch of handmade holiday cheer!
*These amazing images are all credited to Minki Kim via YouTube. Check her other content and follow for more inspiring sewing tutorials!