
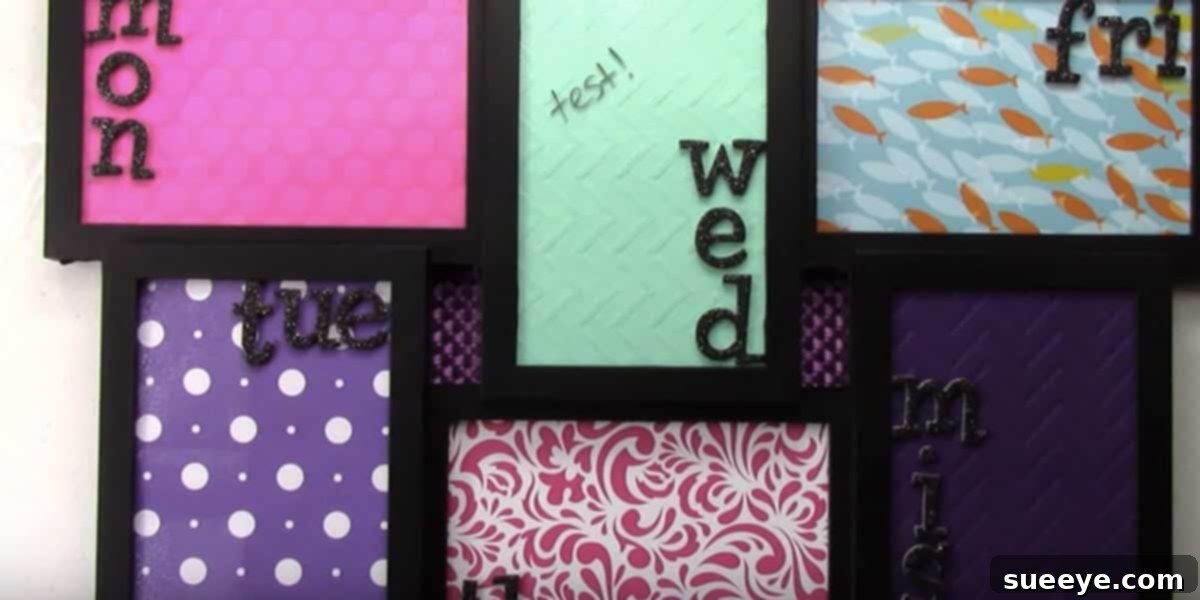
Unlock Your Productivity: Create Your Own DIY Dry Erase Daily Schedule Organizer
In our fast-paced world, staying on top of daily commitments can feel like an Olympic sport. From work deadlines to family appointments, school events to personal errands, the sheer volume of tasks can often be overwhelming. Many of us resort to scattered sticky notes, digital reminders that get lost in a sea of notifications, or mental lists that inevitably falter. The result? Missed appointments, forgotten tasks, and a pervasive sense of disorganization that adds unnecessary stress to our lives. But what if there was a simple, elegant, and incredibly effective solution that you could create yourself, helping you reclaim control over your day?
That’s exactly what the brilliant idea from Craftastically Julie offers – a clever and remarkably useful way to keep track of your daily schedule. This ingenious DIY project transforms an ordinary collage picture frame into a dynamic, reusable dry-erase daily planner. The moment I encountered this concept, I immediately recognized it as the missing piece in my quest for better organization. Say goodbye to the endless battle with disappearing post-it notes and hello to a centralized, clear, and constantly visible hub for all your daily plans.
This simple yet transformative project has the power to make a significant difference in your life. Imagine having everything you need to remember, every task you need to complete, and every appointment you need to attend, all consolidated in one accessible location, always in your direct view. No more frantic searching, no more forgotten details – just clear, actionable information right where you need it. This isn’t just about making a craft; it’s about adopting a tool that fosters a more organized, less stressful, and ultimately more productive lifestyle.
Why This DIY Dry Erase Planner Is a Game-Changer for Home Organization
There are countless reasons why this DIY dry-erase daily schedule organizer stands out as a superior solution for managing your time and tasks:
- Visual Clarity and Constant Reminder: Unlike digital calendars hidden behind screens or notebooks tucked away, this physical planner is always present. Its prominent display serves as a continuous, gentle reminder of your obligations, reducing the likelihood of missed deadlines or forgotten plans. The human brain processes visual information incredibly efficiently, and having your schedule laid out before you enhances your ability to grasp and remember your day at a glance.
- Eco-Friendly and Reusable: In an age where sustainability is paramount, this project shines. Instead of going through countless sticky notes or paper planners each month, you invest once in materials and then enjoy years of reusable organization. Simply wipe away yesterday’s tasks and prepare for a fresh, new day, contributing positively to reducing paper waste.
- Cost-Effective Organization: Professional daily planners and sophisticated digital subscriptions can be surprisingly expensive. This DIY approach allows you to achieve premium organizational benefits at a fraction of the cost. You can often find collage picture frames at bargain prices, and the rest of the materials are readily available and affordable. This makes high-quality home organization accessible to everyone, regardless of budget.
- Personalization and Creativity: This isn’t just a functional tool; it’s an extension of your personal style. From selecting decorative paper that matches your home décor to choosing specific colors of dry-erase markers and unique stickers, every element can be customized to reflect your taste. This personal touch makes the organizer more engaging and enjoyable to use, fostering a stronger connection to your organizational routine.
- Stress Reduction and Mental Clarity: A cluttered mind often stems from a cluttered schedule. By externalizing your tasks and appointments onto a visual planner, you free up valuable mental bandwidth. This reduces the cognitive load of trying to remember everything, leading to less stress, greater mental clarity, and an overall sense of calm and control over your day. Knowing what’s coming next empowers you to approach your day with confidence.
- Boosting Productivity and Accomplishment: When your schedule is clear and visible, it becomes easier to prioritize tasks, allocate time effectively, and track your progress. Ticking off completed items (or wiping them away!) provides a tangible sense of accomplishment that can be incredibly motivating. This positive feedback loop encourages you to stay organized and tackle more, pushing you towards greater productivity in all areas of your life.
What You Will Need: Gathering Your Materials for This Essential DIY Planner
One of the beauties of this project is its simplicity and the readily available nature of the materials. You likely already have some of these items, or they can be found cheaply at local craft stores, discount retailers, or even online. Here’s a detailed list:
- Collage Picture Frame: This is the cornerstone of your organizer. Look for a frame with multiple openings, as each opening will become a segment of your schedule (e.g., a day of the week, or categories like “To Do,” “Appointments,” “Notes”). I found mine at Big Lots for a steal, but you can also check thrift stores, dollar stores, or the home décor sections of department stores. Consider the size that best fits your wall space and the number of sections you desire. Frames with 4, 6, or 9 openings are popular choices for daily or weekly planners. The glass in front of each opening is what you’ll write on with your dry-erase markers.
- Decorative Paper: This is where your personality shines through! You’ll need enough decorative paper to fill each opening of your collage frame. Scrapbook paper, with its vast array of patterns, colors, and textures, is an excellent choice. I picked up some really pretty designs from the scrapbook section of Michaels. You could also use wallpaper samples, patterned cardstock, or even fabric swatches carefully cut to size. Choose a design that inspires you and complements the room where your organizer will be displayed. Lighter patterns or solid colors often work best as a backdrop for text.
- Dry Erase Markers: Essential for writing and rewriting your daily schedule. Opt for a variety of colors to color-code different activities or family members. Fine-tip markers are great for detailed notes, while chisel-tip markers are good for bolder headings. Ensure they are true dry-erase markers that wipe cleanly from glass.
- Stickers (Optional but Recommended): Alphabet stickers are fantastic for labeling sections like days of the week (“Monday,” “Tuesday”), categories (“Goals,” “Reminders,” “Errands”), or family member names. These can also be found alongside scrapbook supplies. Beyond alphabet stickers, consider decorative stickers to add flair, or even vinyl decals for a more polished look. Alternatively, you could use a permanent marker to write directly on the decorative paper before inserting it into the frame, or even use stencils for a uniform look.
Step-by-Step Tutorial: Crafting Your Personalized Dry Erase Planner
Creating your dry-erase daily schedule organizer is a straightforward and enjoyable process. Follow these steps, and you’ll have your new productivity tool ready in no time!
Step 1: Prepare Your Collage Picture Frame
Begin by carefully removing the back panel and any existing matting or paper inserts from your collage picture frame. Gently clean the glass inserts with a glass cleaner to ensure a pristine, streak-free surface for your dry-erase markers. A clean surface is crucial for easy writing and erasing. Inspect your frame for any loose pieces or imperfections that might need attention before you proceed.
Step 2: Measure and Cut Your Decorative Paper
For each opening in your collage frame, you will need a piece of decorative paper. Carefully measure the exact dimensions of each individual opening. It’s often helpful to use one of the existing paper inserts that came with the frame as a template, or to create your own template from plain paper. Cut your chosen decorative paper precisely to these dimensions. If your paper has a directional pattern, make sure it’s oriented correctly before cutting. For a multi-opening frame, you might want to use different patterns for visual interest or keep them uniform for a cohesive look.
Step 3: Insert Your Decorative Backing
Once your decorative paper pieces are cut, carefully place one into each opening of the collage frame. Ensure they lie flat against the glass, without any wrinkles or bubbles. The paper acts as the colored background for your dry-erase surface, so position it exactly as you want it to appear. This is the base layer upon which your schedule will be built.
Step 4: Design and Label Your Sections
This is where your organizer truly takes shape! Decide how you want to divide your daily schedule. Common layouts include:
- Days of the Week: If you have 7 openings, dedicate one to each day.
- Categories: For fewer openings, create categories like “To Do Today,” “Appointments,” “Notes,” “Goals,” “Errands,” or “Meal Plan.”
- Family Members: Assign a section to each family member for their individual schedules.
Once you’ve decided on your layout, use your alphabet stickers to clearly label each section. Place the stickers directly onto the decorative paper before reattaching the frame’s backing. Alternatively, if you prefer a cleaner look or don’t have stickers, you can use a fine-tip permanent marker to write directly on the paper. Just be sure your titles are concise and easily readable. Ensure the placement is consistent and aesthetically pleasing.
Step 5: Reassemble the Frame
After all your decorative paper and labels are in place, carefully reattach the back panel of your collage picture frame. Secure all the clips or fasteners to ensure the contents are held firmly in place. Your dry-erase surface is now ready!
Step 6: Mount and Utilize Your New Organizer
Choose a prominent location for your new organizer where it will be easily visible and accessible. This could be in the kitchen, a home office, a hallway, or even your personal workspace. Hang it securely on a wall or place it on a stand. Now, grab your dry-erase markers and start populating your daily schedule! Begin by noting important appointments, priority tasks, and any reminders for the day. Make it a habit to check and update your organizer daily – perhaps as part of your morning routine or the evening before.
Maximizing the Impact of Your DIY Schedule Board
Now that you’ve created your personalized dry-erase daily schedule organizer, here are some tips to ensure it becomes an indispensable tool in your daily routine:
- Color-Coding for Clarity: Assign different marker colors to various types of tasks or family members. For example, red for urgent tasks, green for appointments, blue for personal errands, or a specific color for each family member’s responsibilities. This visual distinction makes your schedule even easier to interpret at a glance.
- Daily Review and Update: Make it a habit to review your schedule every morning and update it every evening. Before bed, clear off the completed tasks from the current day and jot down initial plans for tomorrow. This keeps your organizer fresh and relevant, preventing it from becoming outdated and neglected.
- Keep Markers and Eraser Handy: Store your dry-erase markers and a small cloth or eraser right next to your organizer. This ensures you can quickly add or modify entries without having to search for tools, encouraging consistent use.
- Break Down Large Tasks: Instead of writing a single, daunting task, break it down into smaller, manageable steps. This makes your schedule feel less overwhelming and provides more opportunities for those satisfying “wiped clean” moments.
- Flexibility is Key: Life happens! Your dry-erase board is designed for flexibility. Don’t be afraid to adjust your plans as needed. The beauty of dry-erase is that changes are easy and mess-free.
- Involve the Family: If you’ve created a family organizer, encourage everyone to participate. Assigning specific sections or colors to family members can foster a sense of shared responsibility and keep everyone informed.
The Ripple Effect: From One Organizer to a More Organized Life
The journey towards a more organized life often starts with one small, manageable step. This DIY daily schedule organizer isn’t just a craft project; it’s a catalyst. When I created mine, I immediately felt a great sense of accomplishment. This feeling isn’t fleeting; it pushes you, motivates you, and inspires you to tackle other areas of disorganization in your home. It’s a direct result of experiencing the tangible benefits of structure and order. The new year, or any new beginning for that matter, is an ideal time to commit to these positive changes. I had put off getting truly organized for far too long, and witnessing the immediate, positive impact of this simple planner has profoundly influenced my approach to other tasks.
Imagine the positive ripple effect: a clear daily schedule leads to better time management, which reduces stress, freeing up mental energy for more creative pursuits or quality time with loved ones. It’s a virtuous cycle that begins with that single, visible commitment to organization. By taking control of your daily plans, you’re not just organizing tasks; you’re organizing your mind, your time, and ultimately, your peace of mind.
Start Your Journey to Organization Today!
Don’t let another day be lost to forgotten tasks or overwhelming to-do lists. Watch how Craftastically Julie expertly guides you through the process in her step-by-step tutorial. With her clear instructions, you’ll be able to create your own beautiful and functional dry-erase daily schedule organizer with ease. This project is more than just a craft; it’s an investment in your personal well-being and productivity. Take this proactive step towards a more serene, controlled, and organized life. The satisfaction of a well-planned day, made possible by your own hands, is truly unparalleled. Get ready to transform your daily routine and embrace the clarity that comes with being truly organized!