
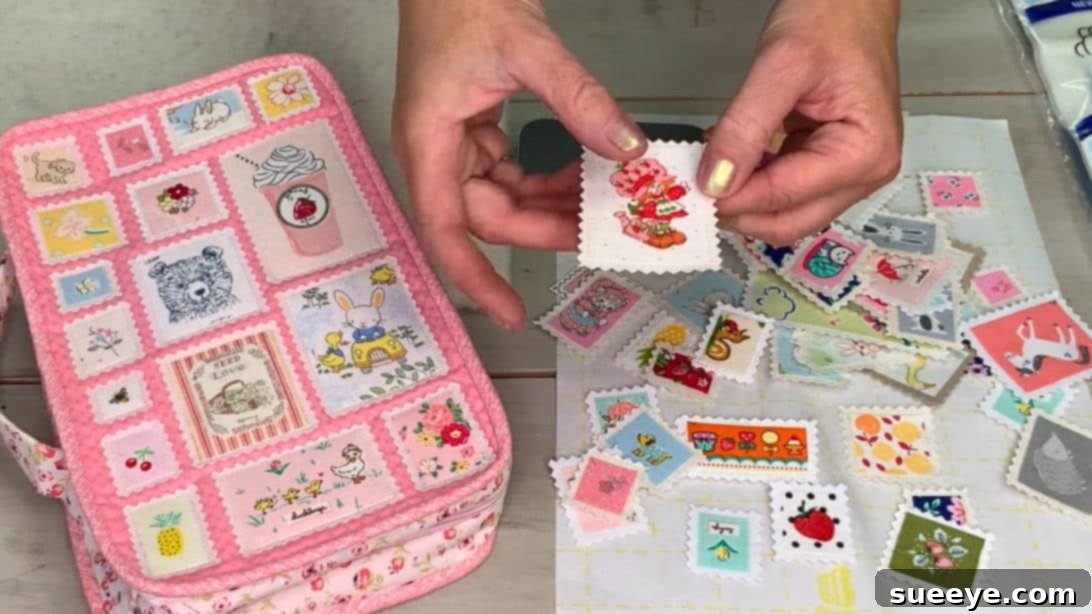
DIY Fabric Stamps: Transform Your Scraps into Unique Embellishments & Crafts
Do you have a burgeoning collection of fabric scraps overflowing from your sewing basket? Instead of letting those beautiful remnants gather dust or, worse, end up in the bin, why not transform them into something truly delightful and useful? Fabric scraps are a treasure trove waiting to be reimagined, capable of becoming magnets, key rings, fabric bows, and a myriad of other charming crafts. But today, we’re diving into a project that’s not just practical but also incredibly fun and visually appealing: homemade fabric stamps!
These adorable fabric stamps are an ingenious way to utilize even the tiniest pieces of patterned fabric. Thanks to the brilliant idea shared by Berry Birdy, you can learn how to craft these unique embellishments in just six simple steps. Get ready to add a personal, fabric-rich touch to your projects, all while decluttering your craft space and embracing sustainable crafting.
RELATED: 7 Easy and Practical Ways to Use Up Tiny Fabric Scraps
If your stash includes a variety of beautiful printed fabrics that you cherish too much to discard, this project is the perfect outlet for their potential. Fabric stamps offer immense versatility; imagine them adorning homemade pouches, acting as charming labels, or serving as unique embellishments on greeting cards, gift tags, or even clothing. They are also fantastic for journaling, adding texture and character to your pages. Or, create a batch and surprise your journaling-enthusiast friends – they are sure to adore these thoughtful, handmade gifts. This simple yet rewarding project is ideal for a relaxing afternoon of creative expression right at home.
Why Make Your Own Fabric Stamps?
Beyond being a fantastic way to use up fabric scraps, creating your own fabric stamps offers a multitude of benefits:
- Eco-Friendly Crafting: Reduce waste by repurposing materials that might otherwise be discarded.
- Cost-Effective: Save money on store-bought embellishments by utilizing materials you already own.
- Creative Expression: Design unique stamps that perfectly match your aesthetic and project needs, allowing for endless customization.
- Personalized Touch: Add a handmade, distinctive element to journals, cards, gifts, and other crafts that mass-produced items simply can’t replicate.
- Versatility: These stamps are not just decorative; they can be functional, adding texture and interest to various surfaces.
- Mindful Activity: The process of sorting scraps, cutting, and pressing can be incredibly therapeutic and relaxing.
Materials You’ll Need to Create Charming Fabric Stamps
Gathering your supplies before you begin ensures a smooth and enjoyable crafting experience. Most of these items are likely already in your sewing kit, making this an accessible project for any crafter.
- 2 sheets of Double-Stick Fusible Web: This is the magic ingredient! Fusible web, also known as iron-on adhesive, is a thin material with adhesive on both sides that becomes sticky when heated. It’s crucial for bonding your fabric scraps securely. Choose a type that’s lightweight and easy to work with.
- Fabric Scraps: This is where your creativity truly shines! Select scraps with interesting patterns, colors, or textures. Cotton fabrics work exceptionally well due to their stability, but feel free to experiment with other lightweight fabrics. Ensure the prints you wish to highlight are clearly visible and can be centered within a small cut.
- A Pair of Sharp Scissors: For precise cutting of your fabric scraps and later, the fused pieces. Sharp scissors prevent fraying and ensure clean edges.
- Teflon Sheet (or Parchment Paper): An essential barrier between your iron and the fusible web. A Teflon sheet is reusable and non-stick, preventing any adhesive residue from transferring onto your iron or workspace. Parchment paper is a good disposable alternative.
- Backing Fabric: A piece of plain, stable fabric (like cotton or felt) that will serve as the base for your stamps. This provides structure and a clean finish. Choose a color that complements your patterned scraps.
- Pinking Shears: These special scissors create a zigzag edge, which not only looks decorative but also helps prevent fabric edges from fraying. They’ll give your fabric stamps that classic “postage stamp” look.
How to Make Fabric Stamps Using Scraps: A Step-by-Step Guide
Follow these detailed steps to transform your fabric remnants into beautiful and functional fabric stamps.
Step 1: Prepare Your Fabric Scraps
Begin by carefully cutting your chosen fabric scraps into small, manageable rectangles or squares. The size will depend on your desired stamp dimensions, but aim for consistency if you plan to arrange them in a grid. The most important tip here is to ensure that the primary design or print of your fabric is centered within each cut piece. Don’t cut too close to the print initially; leaving a little extra margin around the design will give you more flexibility for the final shaping and prevent accidental trimming of the core image. Think about the overall aesthetic you want to achieve with your collection of stamps.
Step 2: Apply the First Layer of Fusible Web
Take one sheet of your double-stick fusible web. Carefully peel off one side of the paper backing to reveal the sticky adhesive layer. This exposed sticky side is where your fabric scraps will be placed. Now, arrange your cut fabric scraps onto this sticky surface. Maximize the use of the entire fusible web sheet by placing the scraps as close together as possible, leaving no significant gaps in between. This is crucial for two reasons: firstly, it makes efficient use of the fusible web, and secondly, it prevents any exposed adhesive from directly touching and potentially damaging your iron during the next step. Ensure the fabric scraps are positioned fabric-side up.
Step 3: Fuse the Fabric Scraps
Once your fabric scraps are neatly arranged on the sticky fusible web, place your Teflon sheet directly on top of the fabric-covered fusible web. The Teflon sheet acts as a protective barrier. With your iron set to the appropriate temperature for your fabric type (usually a medium-to-high heat with no steam), press down firmly and evenly over the Teflon sheet. Apply consistent pressure for about 10-15 seconds per section, ensuring the heat activates the adhesive and bonds the fabric scraps securely to the fusible web. Do NOT iron directly onto the paper layer of the fusible web or the exposed adhesive, as this will result in a sticky mess on your iron. The Teflon sheet prevents this and allows for even heat distribution.
Step 4: Attach to Backing Fabric
Retrieve your chosen backing fabric. Turn it over to its wrong side. Now, carefully pull off the remaining paper backing from the fusible web sheet (which now has your fabric scraps fused to one side). This will expose the second sticky layer of the fusible web. Place this sticky side down onto the *wrong side* of your backing fabric. Once positioned, flip the backing fabric over so the right side is facing up. Now, using your iron (again with a Teflon sheet if you prefer, especially if your backing fabric is delicate or you want extra protection), press the backing fabric from the right side. This step bonds the entire sheet of fabric scraps, now reinforced by the fusible web, onto your chosen backing fabric, creating a more substantial and durable material for your stamps.
Step 5: Preliminary Cutting of Individual Stamps
With your fabric scraps now securely bonded to the backing fabric, it’s time to cut them into individual stamp shapes. Using your regular, sharp scissors, carefully cut around each fabric scrap, ensuring you’ve trimmed the excess backing fabric and fusible web. The goal here is to separate them into distinct pieces, ready for their final decorative cut. When doing this, try to set them at least 1/4 inch apart from each other. This creates a small, even border around each “stamp” before the final shaping, ensuring that each stamp has enough space for the pinking shears in the next step without cutting into adjacent designs.
Step 6: Final Shaping with Pinking Shears
This is where your fabric stamps truly come to life! Pick up your pinking shears. For each individual stamp, carefully cut fairly close to the edge of your fabric design, leaving a neat, decorative border. The zigzag pattern created by the pinking shears gives each piece the distinctive look of a postage stamp. It also serves a practical purpose by helping to prevent the fabric edges from fraying over time, ensuring your handmade embellishments remain beautiful and durable. Take your time with this step to ensure clean, even cuts for a professional finish.
Creative Ways to Use Your Handmade Fabric Stamps
Now that you’ve created a collection of unique fabric stamps, the real fun begins! Here are some inspiring ideas for how you can incorporate them into your crafting:
- Journaling and Scrapbooking: Adorn your journal pages, planners, or scrapbooks with these textured embellishments. They add a wonderful tactile and visual element.
- Personalized Gifts: Use them to decorate gift tags, wrap presents, or embellish homemade cards for a truly personal touch.
- Sewing Project Embellishments: Attach them to pouches, tote bags, clothing, or quilts as charming decorative accents. They can cover small imperfections or simply add a pop of color and pattern.
- Unique Labels: Create custom labels for your handmade items or organizational bins.
- Mixed Media Art: Incorporate fabric stamps into mixed media canvases or collages for added dimension and texture.
- Card Making: Elevate your greeting cards with these delightful fabric elements, offering a unique alternative to paper-based designs.
- Children’s Crafts: A fun and safe way for kids to add embellishments to their projects (with adult supervision for ironing).
- Home Decor: Attach them to small decorative pillows, fabric bookmarks, or even simple wall hangings.
Tips for Success and Customization
- Test Your Iron Settings: Before applying heat to your main project, test your iron temperature and pressure on a small, spare piece of fusible web and fabric to ensure optimal bonding without scorching.
- Choose Diverse Scraps: Experiment with a variety of fabric prints and colors to create a diverse and exciting collection of stamps. Small-scale patterns work particularly well.
- Experiment with Shapes: While rectangles are classic, don’t hesitate to cut your initial fabric scraps into circles, ovals, or even more intricate shapes before applying the pinking shears for a different look.
- Add Extra Embellishments: Once your stamps are made, consider stitching a small bead, a button, or even a tiny bit of embroidery floss onto some for extra flair.
- Storage: Store your finished fabric stamps in a small jar, box, or on a piece of felt to keep them organized and protected until your next project.
- Safety First: Always use a heat-resistant surface and exercise caution when working with a hot iron.
Unleash Your Creativity with Handmade Fabric Stamps!
Transforming ordinary fabric scraps into extraordinary fabric stamps is a gratifying project that combines creativity with sustainability. It’s a testament to the fact that beautiful things can emerge from even the smallest remnants. Not only will you reduce waste and declutter your craft space, but you’ll also equip yourself with a charming array of unique embellishments, ready to infuse a personal touch into all your future projects. So, gather your scraps, heat up your iron, and embark on this delightful crafting adventure. You’ll be amazed at the wonderful creations you can achieve, one fabric stamp at a time!