
DIY Stone Bath Mat: Craft Your Own Spa-Like Oasis on a Budget
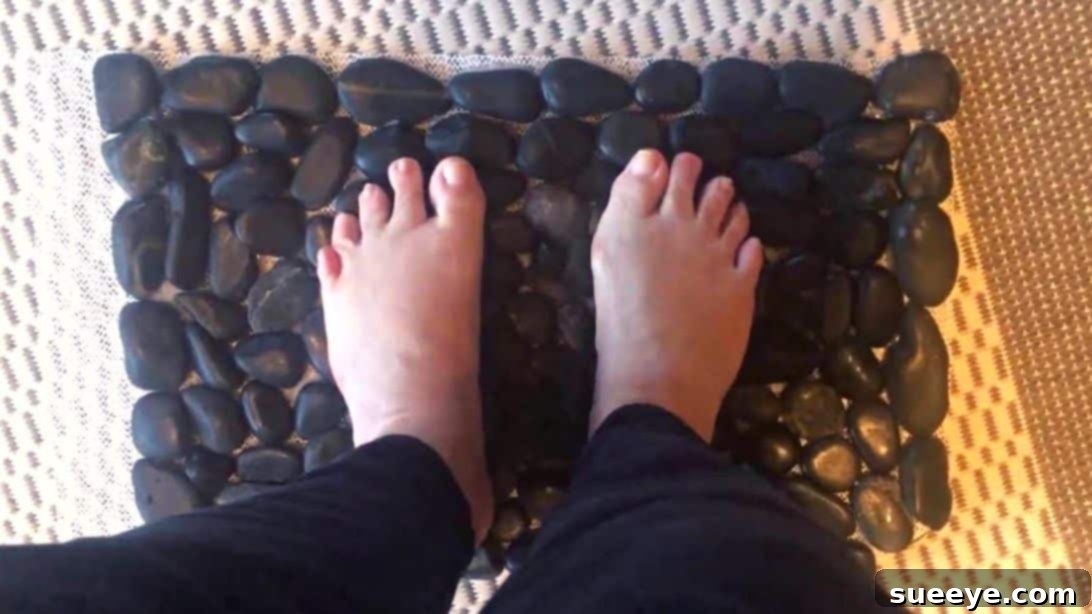
Transform your daily routine into a luxurious escape with a handcrafted stone bath mat. This elegant and highly functional DIY project, inspired by talented creators like bjb5260, offers an exceptional way to infuse your home with natural beauty and practical utility without the hefty price tag. Not only is it incredibly inexpensive to create, utilizing readily available materials, but its timeless, organic aesthetic also seamlessly complements any interior design style, from sleek modern to cozy farmhouse.
Beyond its striking visual appeal, a homemade stone bath mat provides remarkable benefits. The natural stones possess excellent water-absorbing properties, ensuring your bathroom floor remains dry and safe, preventing slips and puddles. The unique texture underfoot offers a gentle, therapeutic massage, turning a simple step out of the shower into a moment of invigorating relaxation. Furthermore, the non-slip base guarantees stability and peace of mind. This project also champions resourcefulness; any leftover materials can be ingeniously repurposed to craft matching coasters, stylish entryway doormats, or durable plant rests, extending this charming natural theme throughout your living spaces.
Embarking on this creative endeavor requires minimal materials and is surprisingly simple, making it an ideal weekend activity for both novice crafters and seasoned DIY enthusiasts. Whether your goal is to personalize your own sanctuary, design a thoughtful and unique handmade gift for loved ones, or even explore a potential craft to sell, this stone bath mat project is immensely rewarding. Eager to begin? Continue reading for a comprehensive, step-by-step guide, complete with essential tips, customization ideas, and maintenance advice. For a visual walkthrough, don’t forget to watch the inspiring video tutorial. Head to your nearest Dollar store, gather your supplies, and prepare to elevate your bathroom with this exquisite, handmade touch. Enjoy the journey of creation and the comfort of your new spa-like amenity!
Why a DIY Stone Bath Mat is a Must-Have for Your Home
In an era dominated by mass-produced items, a handmade stone bath mat stands out as a unique expression of personal style and ingenuity. Its allure extends far beyond mere aesthetics, offering a multitude of practical advantages that make it an indispensable addition to any bathroom:
- Unbeatable Affordability: By sourcing materials from dollar stores and local craft shops, you can construct a premium, designer-look bath mat for a fraction of the cost of similar retail products. This budget-friendly approach allows for luxury without extravagance.
- Superior Water Absorption: Natural stones are inherently porous and highly effective at wicking away moisture. This mat actively absorbs water from your feet, significantly contributing to a drier bathroom floor and dramatically reducing the risk of hazardous slippery surfaces.
- Enhanced Non-Slip Security: When meticulously crafted with a high-quality non-slip liner and firmly sealed stones, these mats provide a secure grip, making them a safer alternative to conventional fabric mats, especially in wet conditions.
- Spa-Like Comfort & Therapeutic Sensation: The smooth, rounded surfaces of the pebbles offer a gentle yet invigorating foot massage. Stepping onto the mat provides a unique, relaxing sensation, transforming your daily shower or bath into a mini spa experience right at home.
- Eco-Friendly & Sustainable Choice: Opting for natural stones and durable materials means you’re creating a long-lasting, eco-conscious item. This reduces reliance on synthetic products and often utilizes readily available or recycled resources, contributing to a more sustainable lifestyle.
- Endless Customization Potential: The creative possibilities are vast. From selecting diverse stone types and colors to determining the mat’s size, shape, and pattern, every aspect can be tailored to perfectly match your specific taste and existing bathroom decor. Each mat becomes a unique work of art.
- Exceptional Durability & Longevity: Once the silicone sealant has fully cured, it forms an incredibly robust, waterproof bond. This ensures your stone mat is built to withstand the rigors of daily use and constant exposure to moisture, providing lasting beauty and functionality for years to come.
Essential Materials for Your Custom Stone Bath Mat
Gathering the right supplies is the exciting first step in transforming your vision into a tangible creation. The inherent beauty of this project lies in its straightforward material list and the easy accessibility of its components. Here’s a comprehensive breakdown of everything you’ll need, along with helpful insights for selecting the best items:
- Plastic Sheet or Drop Cloth: Absolutely crucial for safeguarding your work surface. A large, inexpensive plastic tablecloth, an old shower curtain, or even heavy-duty trash bags cut open can serve this purpose perfectly, protecting your tables or floors from silicone residue.
- Flat River Stones or Pebbles: These are the undeniable stars of your bath mat. When selecting, prioritize smooth, relatively flat stones that are comfortable underfoot. Dollar Tree is an excellent, budget-friendly source for bags of decorative pebbles or river stones. Aim for a somewhat consistent size and thickness for a more even surface, although a diverse mix can also create an appealing, organic texture. Consider natural grays, whites, or earthy tones for a classic, serene look, or explore bags of colored pebbles to make a vibrant, artistic statement.
- Sharp Scissors or Craft Knife: Essential tools for precise and clean cuts when shaping your shelf liner. A craft knife, especially when paired with a cutting mat, often yields crisper edges for a professional finish.
- Clear Silicone Sealant (100% Silicone): This is your primary adhesive, and its properties are critical. It must be 100% silicone to ensure a completely waterproof and durable bond suitable for a high-moisture environment. Look specifically for “kitchen and bath” silicone, which typically includes mold and mildew inhibitors. Ensure it dries clear to preserve the natural beauty and color of your stones.
- Caulk Gun: An indispensable tool for applying the silicone sealant smoothly and efficiently. If you don’t already own one, caulk guns are inexpensive and widely available at any hardware or home improvement store.
- Yardstick or Measuring Tape and Marker: For precise measurements and clear markings on your shelf liner, ensuring your mat is the exact size and shape you desire.
- Non-Slip Shelf Liner (e.g., 12×60 inches): This forms the foundational base of your mat, providing both a comfortable cushion and the vital non-slip functionality. The suggested size offers ample material, but you should adjust the dimensions to perfectly suit your specific bathroom space and preferences. Choose a liner that is durable, flexible, and has a good grip.
- Gloves (Strongly Recommended): Silicone sealant can be quite sticky and messy. Wearing disposable gloves will protect your hands, simplify cleanup, and allow you to work more freely.
- Old Cloths or Paper Towels: Keep these readily available for immediately wiping away any accidental spills or excess sealant before it has a chance to cure and harden.
Step-by-Step Guide: Crafting Your Natural Stone Bath Mat
Follow these meticulously detailed instructions to create a durable, beautiful, and highly functional stone bath mat that will undoubtedly elevate your bathroom’s aesthetic and practicality.
Step 1: Prepare Your Workspace and Mat Base
Initiate your project by thoroughly preparing your work area. Lay a generous plastic sheet or drop cloth over your entire work surface, ensuring ample coverage. This preventative measure is absolutely critical to shield your tables or floors from any errant silicone sealant, which can be notoriously challenging to remove once dried. Next, unroll your non-slip shelf liner. Using your yardstick or measuring tape and a marker, meticulously measure and mark the precise dimensions for your bath mat. A widely popular and practical size is approximately 12×20 inches, but you have complete freedom to customize these dimensions based on the specific requirements of your bathroom space and personal preferences. For instance, a longer mat might perfectly complement a double vanity, while a more compact design could be ideal for a smaller shower area. Carefully cut the shelf liner to your marked dimensions using sharp scissors or a craft knife, striving for straight, clean edges to ensure a professional finish. Finally, prepare your caulk gun by inserting the tube of clear silicone sealant. Cut the tip of the sealant tube at a slight angle, creating an opening just large enough to dispense a consistent, manageable bead of silicone, then set the loaded caulk gun aside, ready for immediate use.
Step 2: Plan Your Stone Layout
Before any adhesive is applied, it is highly advisable to conduct a “dry run” of your stone arrangement. Begin by opening your bags of stones and carefully outlining the perimeter of your cut shelf liner with a single, neat layer of pebbles. This initial boundary will clearly define the mat’s shape and provide a valuable visual reference for the subsequent steps. Once the border is established, proceed to fill the interior area, thoughtfully placing each stone to achieve your desired pattern, coverage, and aesthetic. Pay close attention to how the individual stones fit together; your aim is to minimize large, unsightly gaps while simultaneously ensuring the mat retains a degree of flexibility. This dry layout phase is invaluable for experimentation, allowing you to try out different arrangements, accurately estimate the total number of stones required, and make any necessary adjustments to your stone selection before the permanent adhesive comes into play. You might choose to mix various stone sizes for a more organic, rustic appeal or strive for a uniform appearance with consistently sized pebbles. Once you are thoroughly satisfied with your dry layout, you can either capture a photograph for reference or meticulously remove the stones, preparing them for the crucial next step of adhesion.
Step 3: Secure the Stones with Silicone Sealant
With your layout planned, it’s time for the permanent adhesion. Working methodically in small, manageable sections, pick up one stone at a time from your pre-arranged dry layout. Using your caulk gun, squeeze a modest dab of clear silicone sealant onto the flat underside of each stone. The key is to apply just enough adhesive to create a robust bond without excessive sealant oozing out from the sides when the stone is pressed down. Typically, a dot about the size of a pea is sufficient for medium-sized pebbles. Firmly press each stone onto the shelf liner in its designated spot, ensuring it is well-seated and makes solid contact with the liner. Repeat this process, stone by stone, meticulously covering the entire surface of the shelf liner. Strive to maintain consistent small gaps between stones for a polished and aesthetically pleasing result. Should any silicone accidentally squeeze out from underneath the stones or around the edges, immediately wipe it away with an old cloth or paper towel before it begins to cure. Working systematically, perhaps completing one row or a small quadrant at a time, will help maintain organization and prevent the sealant from drying prematurely on unplaced stones.
Step 4: Allow Adequate Curing Time
Once all the stones are meticulously glued in place, the most critical step is patience. The silicone sealant requires ample time to fully cure and establish a strong, waterproof, and lasting bond. While it may appear dry to the touch within a few hours, a complete cure typically spans at least 24 to 48 hours, and potentially longer depending on environmental factors such as humidity levels and the thickness of the sealant application. It is paramount not to move, flex, or attempt to use the mat in any way during this essential curing period. Place your newly crafted mat in a well-ventilated area, ideally away from direct sunlight, and leave it completely undisturbed. Premature handling or use can significantly weaken the adhesive bond, leading to stones detaching prematurely. A fully cured mat will exhibit exceptional robustness and will be ready for regular daily use, providing the expected durability and functionality.
Step 5: Inspect and Refine Your Mat
After the recommended curing period has elapsed, carefully and thoroughly inspect your completed stone bath mat. Gently test a selection of stones across the mat’s surface to confirm they are all firmly adhered and stable. If you discover any stones that feel loose or wobbly, you can carefully lift them (if the silicone hasn’t completely solidified) or apply a small, additional dab of silicone sealant underneath, pressing firmly into place. If you added more silicone, ensure you allow extra curing time specifically for those repaired spots. You might also observe minuscule areas where the sealant isn’t entirely uniform or where there’s a slight excess. Use a sharp craft knife or a thin blade to carefully trim away any visible dried silicone residue around the edges or between stones for a much cleaner, more refined finish. For any faint silicone haze on the stones, a gentle wipe with a damp cloth can often effectively remove it. Ensure the entire surface is clean, smooth, and perfectly prepared for its intended use.
Personalizing Your Stone Bath Mat: Creative Ideas
One of the most enjoyable and rewarding aspects of this DIY project is the boundless potential for customization. Making your stone bath mat truly unique ensures it perfectly reflects your personal style and complements your home decor:
- Vary Stone Types & Colors: Expand beyond standard river stones. Experiment with beach glass for a translucent effect, polished stones for added gleam, or even small, flat seashells for a coastal theme. Mix and match colors – a monochromatic palette of grays and whites exudes sophistication, while vibrant, contrasting hues can create a playful and energetic design.
- Create Intricate Patterns: Move beyond a simple random arrangement. Lay out your stones in geometric patterns, graceful spirals, or even incorporate simple iconic shapes like hearts, stars, or initial letters. Utilize different colored stones to highlight and define these patterns.
- Adjust Size and Shape: Do not feel confined to a traditional rectangular mat. Cut your non-slip liner into an oval, a perfect circle, or even an irregular, organic shape to perfectly fit a specific corner, an unconventional bathroom layout, or simply to add an artistic touch.
- Add a Defined Border: Create visual interest and structure by using a contrasting type or color of stone to form a distinct border around the entire edge of your mat. This can frame the design beautifully.
- Incorporate Decorative Accents: Strategically place small mosaic tiles, glittering glass beads, or other waterproof decorative elements among the stones for added sparkle, texture, or thematic emphasis. Always ensure these additions are flat enough to maintain a comfortable and safe walking surface.
- Design Themed Mats: Develop a mat that aligns with a specific interior design theme. For a serene coastal theme, select light-colored stones and integrate a few small, smooth shells. For a minimalist or Zen-inspired aesthetic, opt for uniform, smooth dark grey or black stones.
Care and Maintenance for Your Stone Bath Mat
To ensure your exquisite stone bath mat remains pristine, hygienic, and fully functional for many years to come, proper and consistent care is essential. Thanks to its durable construction, maintaining your mat is remarkably straightforward:
- Regular Cleaning: For routine upkeep, simply rinse the mat thoroughly with clean water after each use, or wipe it down with a damp cloth. This helps to effectively remove any accumulating soap residue, dirt, or hair that might settle between the stones.
- Deep Cleaning: Periodically, you may wish to perform a more thorough cleaning. Use a mild, gentle soap or a diluted white vinegar solution along with a soft-bristled brush to delicately scrub the surfaces of the stones and the crevices between them. Rinse the mat thoroughly afterward to remove all cleaning agents.
- Proper Drying: After every use or cleaning, it is highly recommended to hang the mat or prop it up vertically to facilitate optimal air circulation and ensure complete drying, particularly underneath. This crucial step is vital in preventing the growth of mildew or mold on the non-slip liner and between the stones.
- Avoid Harsh Chemicals: Never use abrasive cleaners, strong acidic solutions, or bleach on your stone bath mat. These aggressive chemicals can potentially degrade or discolor the silicone sealant and may also affect the natural appearance or integrity of the stones.
- Periodic Inspection: Every few months, take a moment to quickly inspect your mat for any signs of wear or loose stones. If you identify any stones that seem less secure, simply re-adhere them with a small dab of clear silicone sealant and allow it to cure fully before the mat is put back into use.
Conclusion: Enjoy Your Handmade Spa Experience
Crafting your very own stone bath mat is a profoundly satisfying DIY project that masterfully combines affordability, exceptional practicality, and undeniable aesthetic appeal. In just a few simple, enjoyable steps, you have the power to create a truly unique, wonderfully water-absorbent, and reliably non-slip mat that will effortlessly transform your ordinary bathroom into a serene, spa-like sanctuary. With the unparalleled freedom to personalize every minute detail – from your carefully chosen stones to the mat’s precise size and bespoke design – you are guaranteed to produce a bespoke piece that perfectly reflects your individual style and significantly enhances your home decor.
Whether you are indulging yourself with a touch of affordable luxury, diligently searching for an exquisitely thoughtful handmade gift, or simply exploring the joys of a new and engaging craft, this comprehensive stone bath mat tutorial offers an unparalleled opportunity to unleash your innate creativity. So, gather your materials, meticulously follow these detailed instructions, and prepare to immerse yourself in the natural beauty and comforting, therapeutic texture of your very own handmade stone bath mat. Embrace the profound satisfaction of DIY and step into a world of comfort, style, and natural elegance every single day!
*Many thanks to bjb5260 via YouTube for inspiring this wonderful DIY craft idea and for all images used here. For more creative and inspiring video tutorials, be sure to visit and subscribe to her channel!