
DIY Dollar Tree Jack-O-Lantern Topiary: Spooktacular Halloween Decor on a Budget
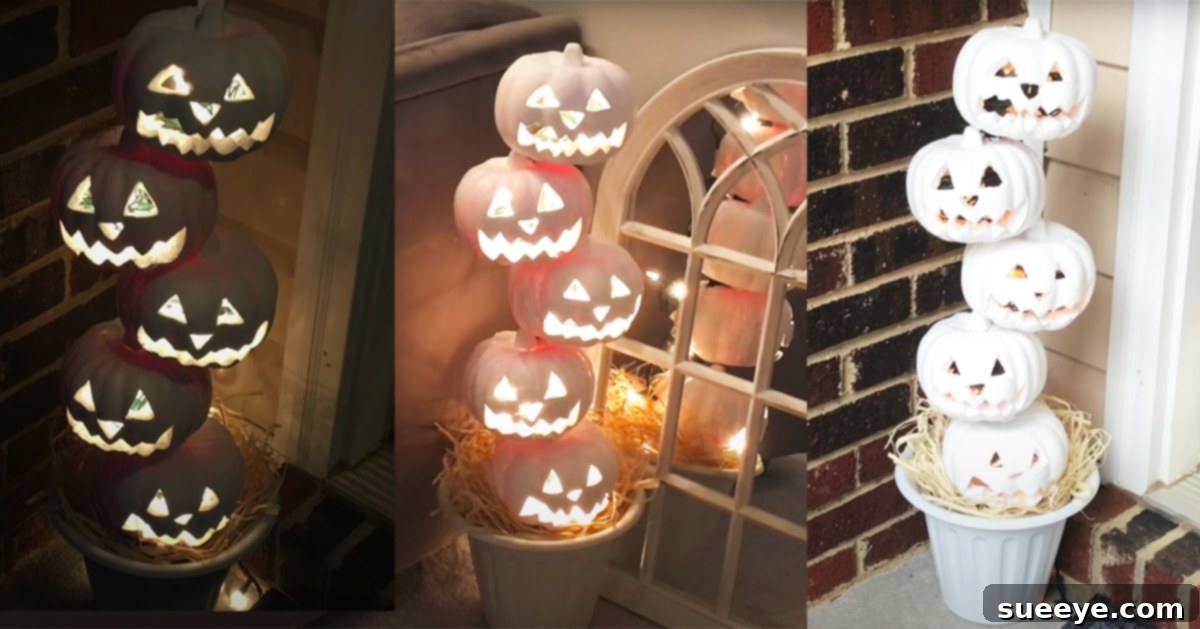
As the leaves begin to turn and a crisp chill fills the air, thoughts inevitably drift towards the exciting anticipation of Halloween. For many, this beloved holiday means transforming homes into delightfully spooky havens, but the cost of store-bought decorations can quickly become a frightening expense. This year, ditch the pricey department store aisles and unleash your inner crafter with an incredibly clever and budget-friendly project: a DIY Dollar Tree Jack-O-Lantern Topiary. Inspired by the brilliant creativity of ChicOnTheCheap on YouTube, this innovative tutorial demonstrates how to assemble a truly unique and festive Halloween display for a mere $10, not including string lights you might already have on hand. While premium materials are always an option, the beauty of this particular DIY lies in its remarkable affordability, proving that captivating decor doesn’t require a hefty investment. The distinctive criss-cross pattern of the stacked pumpkins adds an elegant yet whimsical touch, making it a standout piece for any Halloween setting. It’s undeniably one of the most ingenious Dollar Tree Halloween decor ideas seen to date, especially given the unexpected and brilliant use of a dustpan to provide structural support for the entire topiary!
Why Choose a DIY Dollar Tree Halloween Topiary?
Embracing DIY projects for seasonal decor offers a multitude of benefits, particularly when it comes to holidays like Halloween. Beyond the obvious cost savings, crafting your own decorations provides a unique sense of accomplishment and allows for unparalleled personalization. This Jack-O-Lantern topiary exemplifies all these advantages, making it an ideal choice for anyone looking to add a touch of handmade charm to their autumn festivities.
Unbeatable Affordability: Decorate More, Spend Less
The primary appeal of this project is its incredibly low cost. By utilizing items predominantly sourced from Dollar Tree, you can create a substantial piece of decor that looks far more expensive than it actually is. This means you can allocate more of your budget to other Halloween essentials, like costumes or candy, or simply enjoy the satisfaction of saving money without compromising on style. The $10 price tag (excluding optional string lights you might already own) is a game-changer for budget-conscious decorators.
Unleash Your Creativity: Personalize Your Spooky Style
While the tutorial provides a fantastic blueprint, DIY projects are all about putting your own spin on things. This topiary serves as a wonderful canvas for your imagination. You can experiment with different pumpkin colors, varying Jack-O-Lantern face designs, or even adding extra embellishments like glitter, bows, or faux spiderwebs. The ability to customize ensures your topiary will be a unique reflection of your personal Halloween aesthetic.
Eco-Friendly Decorating: Reuse and Repurpose
In an age where sustainability is increasingly important, this DIY project encourages mindful consumption. The recommendation to use existing Christmas string lights is a fantastic example of repurposing items you already own, reducing waste and extending the life of your seasonal decor. Many Dollar Tree items can also be repurposed from other crafts or found around the house, contributing to a more eco-conscious approach to holiday decorating.
Gathering Your Crafting Arsenal: The Essential Materials
One of the most appealing aspects of this Dollar Tree Jack-O-Lantern topiary is that all the core components are incredibly accessible and affordable. Before you begin, gather these simple materials to ensure a smooth and enjoyable crafting experience:
- 5 Dollar Tree carvable pumpkins
- Dollar Tree natural raffia
- Dollar Tree medium-sized planter
- Dollar Tree dustpan with a long handle
- Dollar Tree plastic wine glasses
- Acrylic paint (white recommended for a classic look, but feel free to customize)
- Foam brush
- E6000 glue (or a strong adhesive suitable for plastic)
- Christmas string lights (optional, if you have them on hand)
Sourcing Smarter, Not Harder: Tips for Finding Materials
While most items are readily available at Dollar Tree, here are a few considerations:
- Carvable Pumpkins: Look for the foam or plastic pumpkins that are specifically designed for carving or cutting. If unable to find carvable ones, regular plastic pumpkins can still be used by drawing faces and cutting out shapes with a craft knife (use caution!), or simply painting faces on.
- Raffia: Natural raffia adds a rustic, fall-like touch. You could also use burlap ribbon, twine, or even fabric strips for a different texture.
- Planter: Choose a planter that has a stable base and complements your decor style. A darker color will help the illuminated pumpkins stand out at night.
- Dustpan: The long handle is crucial for the topiary’s central support. Ensure it’s sturdy enough to hold the weight of the stacked pumpkins.
- Plastic Wine Glasses: These ingeniously provide internal support and spacing between the pumpkins. Look for basic, inexpensive ones.
- Acrylic Paint: White paint gives a beautiful, ghostly glow when illuminated, but don’t hesitate to choose orange, black, or even pastel colors to match your theme.
- E6000 Glue: This industrial-strength adhesive is highly recommended for its strong bond on plastics and foams, ensuring your topiary remains secure. Always use it in a well-ventilated area.
- Christmas String Lights: If you’re reusing lights, ensure they are in good working order. Battery-operated LED string lights are a great option for outdoor placement where outlets aren’t available, providing flexibility and safety.
Step-by-Step Guide: Crafting Your Spooktacular Jack-O-Lantern Topiary
Creating this eye-catching Halloween topiary is a rewarding experience. While we’ll break down the steps here, it’s highly recommended to watch the original ChicOnTheCheap tutorial on YouTube for comprehensive visual instructions and intricate details that can greatly assist your crafting process.
Preparing Your Foundation: Base & Pumpkins
- Assemble the Base: Begin by preparing the foundation of your topiary. This involves securely attaching the long-handled dustpan into your chosen Dollar Tree planter. The dustpan handle will serve as the central support rod for your stacked pumpkins. Use E6000 glue to firmly adhere the dustpan to the bottom and sides of the planter, ensuring it’s upright and stable. Allow sufficient time for the glue to cure completely according to package instructions. You may want to fill the planter with some stones or sand around the dustpan handle to add extra weight and stability.
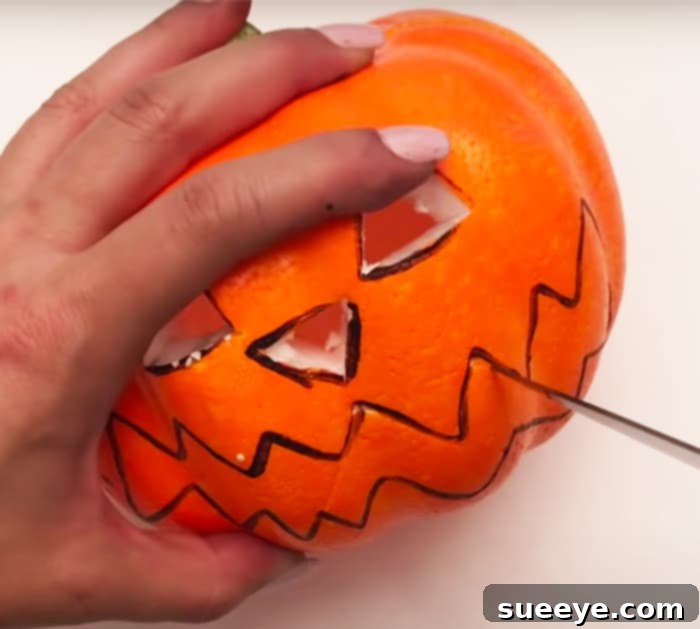
- Pumpkin Preparation: Take your five carvable Dollar Tree pumpkins. With a permanent marker, draw distinct Jack-O-Lantern faces onto each pumpkin. You can vary the expressions for added character – spooky, silly, or surprised!
- Carving the Faces: Carefully use a sharp craft knife or carving tool to cut out the outlines of the drawn faces. Exercise extreme caution during this step to avoid injury. If using a foam pumpkin, a regular craft knife should suffice. For plastic pumpkins, you might need a stronger utility knife. Repeat this process until all five pumpkins have their unique faces carved out.
- Painting Your Pumpkins: Once carved, it’s time to paint. Using a foam brush, apply acrylic paint (white is highly recommended for a classic, ghostly glow) evenly over the entire surface of each pumpkin. You might need two or three coats to achieve opaque coverage, allowing each coat to dry thoroughly between applications. White pumpkins create a striking contrast, especially when illuminated at night.
The Art of Stacking: Creating the Unique Zig-Zag Structure
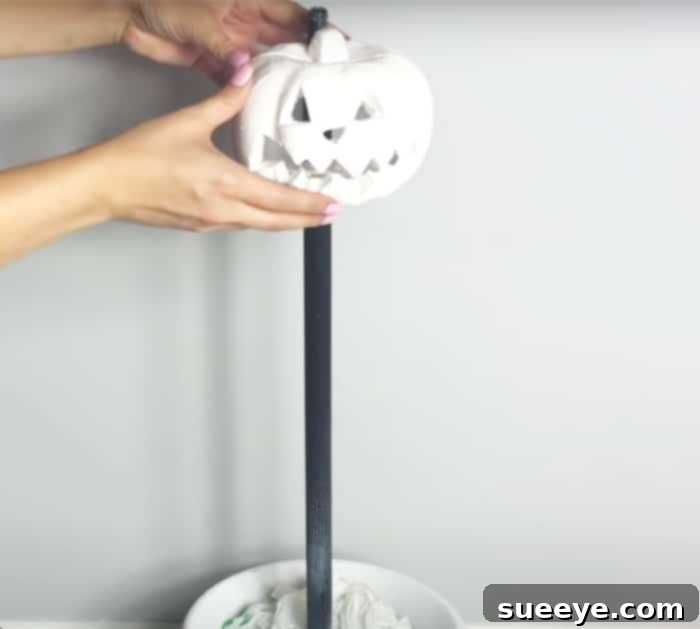
- Prepare for Stacking: Before stacking, take your plastic wine glasses. These will act as spacers and internal supports. You will likely need to cut off the stems and/or bases of the wine glasses to create sturdy cylindrical spacers. These will be glued between each pumpkin.
- Initial Pumpkin Placement: Take your first painted and carved pumpkin. Carefully make a hole in the bottom center of the pumpkin, large enough to slide over the dustpan handle. Slide this pumpkin down the handle until it rests firmly on the base or the first wine glass spacer if you choose to start with one directly on the planter.
- Creating the Zig-Zag Pattern: This is where the magic happens! For each subsequent pumpkin, instead of sliding it straight down, you’ll create a hole on opposite sides (top and bottom) of the pumpkin. This allows the dustpan handle to pass through at an angle. Before placing the next pumpkin, apply a generous amount of E6000 glue to the top of the previously stacked pumpkin (or wine glass spacer) and around the opening of the new pumpkin. Then, carefully slide the pumpkin onto the dustpan handle, creating a slight rotational shift to achieve the signature criss-cross or zig-zag pattern.
- Layering with Spacers: Between each pumpkin, you will place one of your prepared plastic wine glass spacers. Apply glue to both the bottom of the spacer (where it meets the lower pumpkin) and the top of the spacer (where it meets the next pumpkin). This not only adds stability but also creates a visual separation, enhancing the stacked effect. Continue this process – pumpkin, glue, spacer, glue, pumpkin – until all five pumpkins are securely stacked onto the dustpan handle. Ensure each layer is centered and aligned as best as possible for a cohesive look.
Adding the Finishing Touches & Illumination
- Raffia Embellishment: Once all pumpkins are stacked and the glue has dried, take your natural raffia. Begin weaving and wrapping it around the dustpan handle and into the gaps between the pumpkins. This not only conceals the handle but also adds a rustic, organic texture that complements the fall theme. Secure the ends of the raffia with a small dab of glue.
- Integrating String Lights (Optional but Recommended): This is the step that truly brings your Jack-O-Lantern topiary to life! If you choose to add string lights, carefully thread them through the carved faces and around the pumpkins. For battery-operated lights, you can discreetly place the battery pack at the base of the topiary, perhaps hidden within the planter or behind the lowest pumpkin. For plug-in lights, ensure the cord can reach an outlet safely, especially if placed outdoors. The soft glow emanating from the carved faces at night creates a truly magical and spooky ambiance.
- Final Inspection: Allow all glue to dry completely for at least 24 hours to ensure maximum stability before moving or displaying your topiary.
Displaying Your Masterpiece: Indoor or Outdoor Charm?
One of the many charms of this DIY Jack-O-Lantern topiary is its versatility. It can effortlessly enhance your Halloween decor whether placed indoors or outdoors, instantly adding a festive touch wherever it stands. The optional string lights truly come to life as dusk settles, transforming your creation into a captivating beacon of holiday spirit.
Indoor Display: Welcoming Spooky Warmth
Bringing your topiary inside allows it to become a focal point in your entryway, living room, or even a child’s bedroom. Placed near a window, it can greet trick-or-treaters with a warm glow. For indoor use, consider adding extra embellishments like faux cobwebs, small plastic spiders, or even glitter to the pumpkins. Ensure it’s placed in an area where it won’t be easily knocked over by pets or young children, and if using plug-in lights, position it near an accessible outlet.
Outdoor Display: A Grand and Ghoulish Welcome
This topiary is perfectly suited for outdoor display, where it can greet guests on your porch, patio, or along a walkway. If placing it outdoors, consider a few additional steps:
- Weatherproofing: While the Dollar Tree pumpkins are plastic, a coat of clear sealant spray (like an outdoor-friendly Mod Podge sealant) can add an extra layer of protection against rain and moisture, especially for the paint.
- Stability: If your area experiences high winds, ensure the planter is weighted down sufficiently with rocks, sand, or gravel to prevent it from toppling over.
- Electrical Safety: If using plug-in string lights outdoors, always use outdoor-rated lights and extension cords, and ensure connections are protected from moisture. Battery-operated LED lights are often the safest and most convenient option for outdoor use.
The sight of the illuminated Jack-O-Lanterns casting eerie shadows at night will undoubtedly be a conversation starter and a favorite among your Halloween visitors.
Beyond the Basics: Customization Ideas for Your Topiary
While the original tutorial offers a fantastic foundation, the true joy of DIY is the endless potential for personalization. Don’t hesitate to let your imagination run wild and adapt this Jack-O-Lantern topiary to perfectly match your unique Halloween style or theme.
- Color Schemes: Instead of classic white, paint your pumpkins in traditional orange and black, spooky purples and greens, or even elegant metallics like silver and gold for a sophisticated touch.
- Thematic Embellishments: Attach small plastic spiders, bats, or even miniature gravestones to the raffia or the pumpkins themselves. Add bows made from festive Halloween ribbon for a charming look.
- Varying Pumpkin Sizes: If you can find Dollar Tree pumpkins in slightly different sizes, use them to create a more dynamic and organic stacking effect, with larger pumpkins at the bottom and smaller ones at the top.
- Base Decoration: Enhance the planter base with faux moss, small decorative stones, plastic spiders, or even miniature spooky figures to complete the scene.
- Alternative Light Sources: If string lights aren’t available, consider placing small LED tea lights inside each pumpkin for a flicker effect, or even glow sticks for a vibrant, temporary illumination.
- Different “Faces”: Instead of traditional carved faces, consider painting intricate patterns, silhouettes of witches or ghosts, or simply abstract designs onto your pumpkins.
This DIY Dollar Tree Jack-O-Lantern topiary is more than just a decoration; it’s a testament to the power of creativity and resourcefulness. It’s a project that brings joy in its making and admiration in its display, proving that stunning Halloween decor doesn’t have to break the bank. Its unique design, budget-friendly materials, and customizable elements make it a standout piece that will undoubtedly elevate your seasonal decorations. So, gather your Dollar Tree treasures, unleash your inner artist, and get ready to craft a truly spooktacular and unique Jack-O-Lantern topiary that will enchant all who see it. Happy Halloween crafting!