
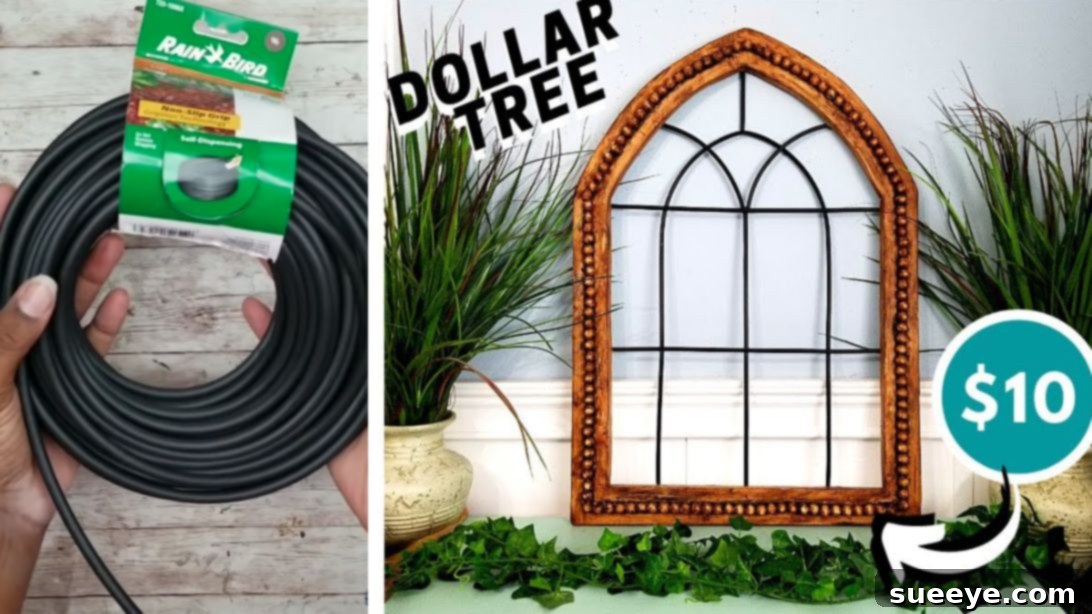
Are you searching for an exquisite yet affordable way to elevate your home decor? Look no further than this ingenious Dollar Tree DIY Cathedral Window project, inspired by the creative minds at She So CraftDee. Imagine adding a gorgeous, architectural statement piece to your wall that perfectly blends vintage charm with modern aesthetics, all while spending just a fraction of the cost of store-bought alternatives. What makes this project truly astonishing is its clever use of everyday materials: beautiful marbles and sturdy foam boards come together to mimic the sophisticated look of an authentic wooden cathedral window. You’d never guess it wasn’t real wood! This craft project is not only incredibly creative but also surprisingly simple, making it accessible for crafters of all skill levels. Dive into our comprehensive guide below to unlock the secrets of creating your own stunning, budget-friendly masterpiece.
Unveiling the Magic: Essential Materials for Your DIY Cathedral Window
One of the most appealing aspects of this project is its reliance on readily available and inexpensive materials, primarily sourced from your local Dollar Tree. These components, when combined with a touch of ingenuity, transform into a high-end decorative item that will undoubtedly draw compliments. Here’s everything you’ll need to embark on your crafting journey:
- 3 pieces of foam boards (Dollar Tree): These will form the main structure of your window frame, offering a lightweight yet surprisingly robust base. Opt for standard white foam boards for ease of painting.
- 1 piece of poster board: Essential for covering the raw edges of your foam board, providing a smooth, finished look that truly elevates the project’s aesthetic.
- 2-3 bags of marbles (Dollar Tree): The secret ingredient! These small glass spheres will simulate the intricate stained-glass effect often found in traditional cathedral windows, adding a touch of elegance and visual interest.
- Regular bamboo skewers (Dollar Tree or Walmart): Used for adding structural support and defining straight lines within the window’s design.
- Rain bird 1/4″ irrigation line (Home Depot): This flexible tubing is perfect for creating the curved, gothic arch details that are characteristic of cathedral windows, bending easily to form elegant shapes.
- Pair of scissors: For general cutting tasks, particularly for the poster board strips.
- Ruler: An indispensable tool for precise measurements and ensuring all your lines are perfectly straight, critical for a professional finish.
- Exacto knife (or craft knife): Your primary cutting tool for the foam board. A sharp blade is crucial for clean, smooth cuts, especially around intricate curves.
- Pencil: For marking measurements and tracing your pattern onto the foam boards.
- Hot glue and hot glue gun: Provides quick adhesion for many parts of the project, especially useful for securing elements instantly.
- E600 adhesive: A strong, permanent glue ideal for securing the marbles firmly in place, offering long-lasting durability.
- Painter’s tape: Useful for holding pieces temporarily, creating clean edges during gluing, and for masking areas during painting.
- Antique paint color: Choose a shade that mimics aged wood or stone, providing that classic, weathered cathedral look.
- Black acrylic paint: Perfect for detailing, outlining the marbles, and adding depth and contrast to your design.
- Pattern (click the video below and download the pattern from the description box): The essential template that guides the entire structure of your cathedral window. Don’t skip this step!
Step-by-Step Guide: Crafting Your Dollar Tree Cathedral Window
Embark on this rewarding DIY journey with confidence. Each step is designed to be straightforward, leading you closer to a beautiful finished piece. Remember, patience and precision are key to achieving a professional-looking result.
Step 1: Preparing Your Pattern and Initial Tracing
Begin by carefully assembling your downloaded pattern. This might involve printing several sheets and taping them together to form the complete arch template. Take your time to align the edges perfectly to avoid any distortions in your final design. Once the pattern is ready, place it on one of your foam boards. Using a pencil, meticulously trace the entire arch design onto the foam board. After tracing the first half, gently lift the pattern. To create the symmetrical other half of the window, flip the pattern horizontally (right side down) and position it precisely beside your initial traced arch, ensuring a seamless connection. Trace this second half, completing the full cathedral window outline. This careful tracing lays the foundation for your project, so accuracy here is paramount.
Step 2: Precision Cutting of the Frame
With your design fully traced, it’s time to bring out your Exacto knife. This step requires a steady hand and a sharp blade. Begin cutting the intricate frame in one continuous, fluid motion as much as possible, especially along the curved sections. For all the straight lines within your design, always use a ruler as a guide to ensure crisp, clean edges. Applying consistent, moderate pressure will help you cut through the foam board smoothly. Remember to work on a protective surface to avoid damaging your workspace. Take your time; a clean cut now will save you effort later in achieving a polished finish.
Step 3: Defining the Window’s Border
Now, let’s create the elegant border that will frame your cathedral window. Measure approximately 2 inches inward from all the outer edges of your initial frame. Use your pencil to mark these points carefully. Connect these dots using your ruler for all straight segments, creating a parallel inner outline. This inner line defines where the ‘glass’ or marble section will eventually sit. Next, using your ruler and Exacto knife, meticulously cut along this newly drawn inner line. Pay special attention and exercise great care when navigating the arches and curves to ensure a beautiful, clean cut. Once you’ve completed the inner cut, gently remove the central foam board section, leaving you with the outer border piece. This border will give your window its distinctive depth and character.
Step 4: Layering for Enhanced Thickness and Durability
To give your cathedral window a substantial, robust feel, we’ll be adding layers. Take your newly cut border piece and place it right side down. Apply a generous amount of hot glue along its entire back surface. Carefully align this glued border onto a fresh foam board, pressing down firmly to ensure good adhesion. Once securely attached, use your ruler and Exacto knife to precisely cut around the edges of the first border, creating an identical second layer. Repeat this entire process for the remaining foam board, resulting in a three-layered foam board border. This layering technique provides both thickness and enhanced durability, making your finished piece look and feel much more substantial than single-layer foam board.
Step 5: Concealing Raw Edges with Poster Board Strips
To achieve a truly polished and professional look, we need to conceal the raw, exposed foam board edges. Measure the exact thickness of your layered frame. Using this measurement, cut several strips from your poster board. You will likely need about 6 strips to cover all the edges of your cathedral window frame. Apply hot glue to one side of a poster board strip and carefully attach it along the outside edges of your frame, ensuring it’s flush and even. Press firmly to secure it. Once all the exterior edges are covered, repeat the process for the inside edges of the frame. These strips create a smooth, paintable surface, making your foam board project appear much more refined, almost like solid wood.
Step 6: Crafting the Marble ‘Well’
This step prepares the frame for the stunning marble details. Begin by marking the exact center line along the entire length of your frame’s inner border. Once you have a clear center line, use your Exacto knife to make two parallel cuts, approximately 1/8 inch away from each side of the center line. These cuts should only penetrate the top layer of the foam board, not all the way through. After making these shallow cuts, take a marker or a rounded tool and gently press it along the center of the line you just cut. This action will create a slight indentation or “well” in the foam board, which will perfectly cradle your marbles and make them appear seamlessly integrated into the design.
Step 7: Installing the Marbles – The Heart of Your Window
Now for the sparkling centerpiece! Apply a thin bead of E600 adhesive into the “well” you just created. For instant hold, add a few small dots of hot glue along the well as well. Carefully place each marble into the well, one by one, ensuring they fit snugly and are evenly spaced. The E600 provides long-term, strong adhesion, while the hot glue offers immediate tack to hold the marbles in place while the E600 cures. To ensure clean lines, apply a piece of painter’s tape along the edges of the marble sections. Then, apply hot glue in between the marbles to further secure them and fill any gaps. Immediately remove the painter’s tape after applying the hot glue to prevent it from sticking once dry. Repeat this process for all sections of the marble border. Once the hot glue is completely dry, gently dust off any excess. Finally, prime the marbles with an appropriate primer to ensure the subsequent paint adheres beautifully. Allow the primer to dry thoroughly according to manufacturer instructions.
Step 8: Preparing Your Decorative Tubes
Refer to the pattern or guide provided in the original video for the precise layout of the tubes that will form the decorative elements within your window border. This guide is crucial for understanding the various lengths and angles required for each tube section. Use this visual reference diligently when you cut your rain bird 1/4″ irrigation line. Remember to add a small allowance to each piece, as it’s always easier to trim a little extra than to have a piece that’s too short. Accuracy in cutting these tubes will ensure your window has a harmonious and symmetrical appearance, mimicking the delicate tracery of real cathedral windows.
Step 9: The Art of Painting Your Window
Painting brings your cathedral window to life! Begin by applying your chosen antique paint color evenly over the entire foam board frame. This will create the faux-wood or aged-stone effect that gives the window its authentic charm. Ensure full coverage, getting into all the crevices and along the poster board edges. For the edges of the marbles, carefully use black acrylic paint to create a distinct, contrasting outline. This black line will enhance the “stained glass” effect of the marbles and make them pop. Take your time with this detailing for a crisp, professional finish. Once both layers of paint are applied, set the entire piece aside in a well-ventilated area to allow it to dry completely. Rushing this step can lead to smudges or an uneven finish.
Step 10: Final Assembly and Hanging Mechanism
Almost there! Take your painted border and place it right side down on your guide or pattern. Carefully copy the markings for the tube placement onto the back of your main frame. To ensure the irrigation tubes are perfectly straight and sturdy, insert bamboo skewers into each straight tube segment. Apply hot glue to secure both the skewers and the tubes firmly in their designated positions on the frame. Hold each piece in place for about 30 seconds to guarantee a strong bond before moving on. For the curved sections of the window, gently bend the irrigation tubes to follow the arch and attach them using hot glue. Finally, to prepare your stunning cathedral window for display, cut a length of thick jute twine. Form a loop and securely glue the ends to the top back part of the frame, ensuring it’s centered and robust enough to support the window’s weight. Allow all glue to dry completely before hanging your new piece of art.
Why Choose This Dollar Tree DIY Cathedral Window Project?
Beyond its undeniable aesthetic appeal, crafting this Dollar Tree DIY Cathedral Window offers a multitude of benefits, making it an ideal project for anyone looking to add character to their home without breaking the bank.
- Unmatched Affordability: The primary advantage is the incredibly low cost. By utilizing supplies from Dollar Tree, you can create a high-impact decorative piece for less than a fraction of what a similar item would cost in a boutique or furniture store.
- Stunning Visual Impact: Despite its budget-friendly origins, the finished cathedral window exudes a sophisticated and timeless elegance. The faux-wood finish combined with the shimmering marbles creates a look that is both grand and charming, instantly becoming a focal point in any room.
- Creative Expression: This project offers ample room for personalization. While the core design is consistent, you can experiment with different antique paint colors, marble arrangements, or even add subtle embellishments to truly make it your own.
- Sense of Accomplishment: There’s immense satisfaction in creating something beautiful with your own hands. Completing this project will leave you with a sense of pride and a unique piece of decor that tells a story.
- Versatility in Decor: A cathedral window complements a wide range of interior design styles, from farmhouse and rustic to traditional and even bohemian. It can enhance living rooms, bedrooms, entryways, or even covered patios.
Expert Tips for a Flawless Finish
To ensure your Dollar Tree DIY Cathedral Window turns out spectacular, keep these valuable tips in mind throughout your crafting process:
- Invest in a Quality Exacto Knife: A sharp blade makes a world of difference. It allows for cleaner, smoother cuts through the foam board, reducing fraying and the need for excessive sanding or trimming. Replace blades frequently for best results.
- Measure Twice, Cut Once: This age-old adage is especially true for precise projects like this. Double-checking all your measurements before making any cuts will prevent costly mistakes and wasted materials.
- Patience with Gluing: Allow ample drying time for both hot glue and E600. While hot glue sets quickly, E600 needs time to fully cure to ensure a strong, lasting bond, especially for the marbles.
- Layering Paint: For a rich, antique finish, consider applying multiple thin coats of your chosen paint color rather than one thick coat. This technique provides better coverage, reduces brush strokes, and allows for subtle distressing if desired.
- Practice Makes Perfect: If you’re new to working with foam board or an Exacto knife, consider practicing on scrap pieces before tackling your main project. This will build your confidence and refine your technique.
- Customization is Key: Don’t be afraid to experiment! Consider adding a light dry-brushing of white or grey paint after the antique color to enhance the distressed wood effect. You could also use different colored marbles or even clear glass gems for a unique look.
- Ensure Ventilation: When working with glues like E600 and paints, always ensure you’re in a well-ventilated area or wear a mask to protect yourself from fumes.
Personalizing Your Masterpiece: Customization Ideas
While the original design is beautiful, there are numerous ways to inject your personal style into your Dollar Tree DIY Cathedral Window:
- Color Palette Exploration: Instead of antique wood tones, consider a distressed white for a farmhouse chic look, a deep navy for a coastal vibe, or even a vibrant jewel tone if it complements your existing decor.
- Marble Alternatives: While marbles are fantastic, you could explore other small, reflective items like glass beads, mosaic tiles, or even flat-backed rhinestones for a different sparkle.
- Faux Patina: After painting, you can apply a subtle layer of dark wax or a diluted black wash to create an aged, weathered patina, enhancing the antique look.
- Adding Greenery: Drape artificial ivy or small floral garlands around your finished window for a touch of natural beauty, perfect for bringing the outdoors in.
- Lighting Embellishments: For an enchanting evening glow, weave a string of tiny battery-operated fairy lights around the frame or behind the marble sections.
Caring for Your DIY Creation
Once your stunning cathedral window is complete and proudly displayed, a little care will ensure it remains a beautiful focal point for years to come. Dust it regularly with a soft, dry cloth or a feather duster. Avoid using harsh chemical cleaners, as these can damage the paint or adhesives. If any part of the foam board or poster board gets wet, gently blot it dry immediately. Handle your artwork with care, especially around the marble sections, to prevent accidental detachment.
Conclusion: Create Your Own Elegant Dollar Tree Masterpiece
This Dollar Tree DIY Cathedral Window project is a testament to the power of creativity and the surprising potential of budget-friendly materials. What starts as a collection of simple foam boards and marbles transforms into an elegant, eye-catching piece of wall art that rivals high-end decor. It’s more than just a craft; it’s an opportunity to infuse your home with unique charm, express your personal style, and feel the immense satisfaction of creating something beautiful with your own hands. So gather your supplies, follow these detailed steps, and prepare to be amazed by what you can achieve. Your walls are waiting for this touch of grandeur!