
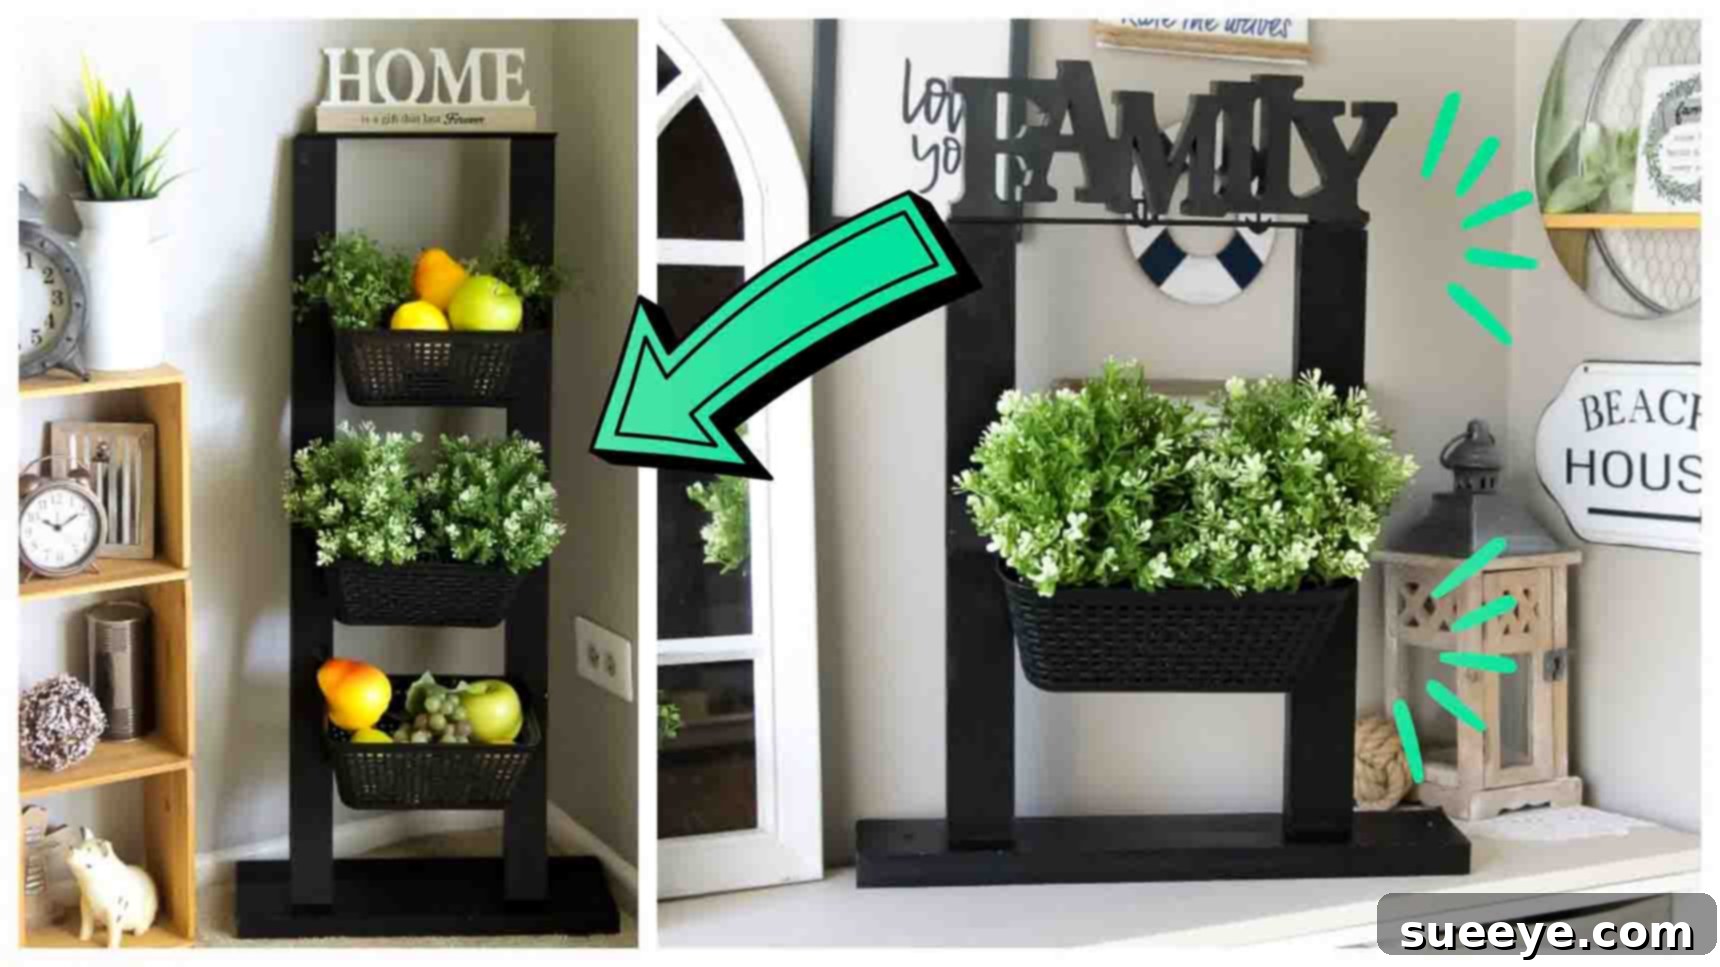
DIY Dollar Tree Basket Organizer: Effortless Storage on a Budget
Are you yearning for a more organized home but don’t want to break the bank? Clutter can quickly overwhelm any space, from the kitchen counter to a craft room. The good news is that creating functional and stylish storage doesn’t require a hefty investment or advanced carpentry skills. With a little creativity and a trip to your local Dollar Tree, you can craft ingenious organizing solutions that make a real difference. Today, we’re diving into an incredibly popular and practical DIY project championed by the brilliant Bargain Bethany on YouTube: the Dollar Tree Basket Organizer.
This fantastic project offers an affordable, customizable, and surprisingly sturdy way to add much-needed storage to any area of your home. Whether you need extra space for spices, craft supplies, toiletries, or office essentials, this versatile basket organizer can be tailored to fit your specific needs. It’s an ideal venture for DIY beginners and seasoned crafters alike, promising rewarding results without a complex process. All the essential materials are readily available at Dollar Tree, making it one of the most budget-friendly home organization hacks you’ll find. Let’s gather our supplies and get ready to transform your space with this simple, step-by-step guide.
Why Choose the Dollar Tree Basket Organizer for Your Home?
In today’s fast-paced world, maintaining an organized home can feel like a constant battle. Expensive storage solutions often deter us from tackling clutter effectively. This Dollar Tree basket organizer project stands out for several compelling reasons:
- Unbeatable Affordability: Every single item required for this project can be sourced from Dollar Tree, ensuring your total cost remains incredibly low. This makes it an accessible project for everyone, regardless of budget constraints.
- Customizable Design: The modular nature of this design allows for significant customization. You can easily adjust the height, width, and number of baskets to perfectly fit the unique dimensions of your space and the volume of items you need to store.
- Beginner-Friendly: Forget complex tools or intricate techniques. This DIY requires basic crafting skills and common household tools, making it a perfect starting point for anyone new to DIY home projects.
- Versatile Application: While excellent for kitchens, this organizer isn’t limited to one room. Imagine it holding lotions and towels in a bathroom, art supplies in a craft room, small toys in a child’s bedroom, or even mail and keys by the entryway. Its simple aesthetic blends well with various decor styles.
- Quick to Assemble: You won’t spend days on this project. With Bargain Bethany’s clear instructions, you can have your new organizer assembled and ready for use in a relatively short amount of time.
Embrace the satisfaction of creating something functional and beautiful with your own hands, all while adhering to a budget that truly works for you. This organizer isn’t just about tidying up; it’s about smart, sustainable living.
Materials You’ll Need for Your Dollar Tree Organizer
One of the most appealing aspects of this project is the simplicity and accessibility of its materials. Everything listed below can be found at your local Dollar Tree, ensuring both convenience and cost-effectiveness. Gather these items before you begin to ensure a smooth crafting experience.
- 4 or More Word Plaques from Dollar Tree: These wooden plaques serve as the foundational vertical supports for your organizer. Their sturdy nature makes them ideal for this purpose. You might find them in the craft or home decor aisle. Consider grabbing extra if you plan to make a taller or wider organizer.
- Staple Gun: An essential tool for securely joining the wooden plaques. Ensure you have appropriate staples that can penetrate the wood without splitting it.
- Rulers (Dollar Tree Variety): Surprisingly, these inexpensive rulers are not just for measuring! You’ll be using their flat, rigid structure to create the horizontal supports for your baskets. You’ll need at least two, but more if you’re building a multi-level or larger unit.
- Wood Glue: For an extra layer of durability and stability, wood glue will reinforce the staple gun connections, ensuring your organizer stands the test of time.
- Zip Ties: These versatile fasteners are key to attaching your baskets securely to the frame. A pack of assorted sizes is always handy, but standard medium-sized ties should work well for most Dollar Tree baskets.
- Baskets from Dollar Tree: The star of the show! Choose baskets that fit your aesthetic and functional needs. They come in various shapes, sizes, and materials (plastic, wire, woven). Make sure they are sturdy enough to hold your intended items and have suitable openings for zip ties.
With these affordable supplies in hand, you’re well on your way to constructing a personalized and practical storage solution. Remember to always work in a well-lit area and take appropriate safety precautions when using tools like a staple gun.
Step-by-Step Directions: Building Your Basket Organizer
Follow these detailed instructions to construct your Dollar Tree basket organizer. Take your time with each step, paying attention to measurements and secure fastenings for the best results.
Step 1: Constructing the Main Frame and Attaching Rulers
The first step involves building the foundational structure of your organizer using the word plaques and rulers. This will form the “ladder-like” frame that supports your baskets.
- Prepare the Plaques: Begin by taking two of your word plaques. Align them side-by-side, ensuring their edges are flush. These will form one side of your organizer.
- Join the Plaques (Optional for Height): If you desire a taller organizer, you can attach two plaques one on top of the other to create a longer piece. Use your staple gun to secure them together firmly. Repeat this for the other side of your organizer. For a basic, shorter organizer, you can skip this and use single plaques for each side.
- Prepare the Rulers: Take your rulers. Carefully peel off the adhesive measuring strips (inches and centimeters) if they have them, as you’ll be using the plain wooden or plastic base of the ruler.
- Positioning the Rulers: Now, position a ruler horizontally across your joined plaques. This ruler will act as the horizontal support for your first basket. Critically, ensure there’s enough height from the bottom of the plaque for your basket to comfortably sit and be accessible. Consider the height of your chosen Dollar Tree baskets when determining placement. You’ll also want to leave adequate space between subsequent rulers if you’re planning multiple levels.
- Secure the Rulers with Staples: Once you’ve determined the ideal placement for your first ruler, use your staple gun to firmly attach it to both vertical plaques. Drive staples into the ruler at several points where it overlaps with the plaques to ensure a strong hold.
- Reinforce with Wood Glue: After stapling, apply a generous amount of wood glue along the contact points where the ruler meets the plaques. This will create a much stronger and more durable bond. Allow the glue to set according to the manufacturer’s instructions.
- Add More Rulers (Optional): If you plan a multi-tiered organizer, repeat the process of positioning, stapling, and gluing for additional rulers, ensuring consistent spacing between each level to accommodate your baskets. You can place another ruler on top if desired, creating a more enclosed or robust frame.
- Paint the Rulers (Optional): For a more cohesive and polished look, consider painting the rulers black (or any color of your choice) before the glue fully cures or after. This step is optional but can significantly enhance the final appearance.
Step 2: Attaching the Baskets and Customizing Your Organizer
With your frame constructed and stable, it’s now time to add the baskets, bringing your organizer to life.
- Position the Baskets: Carefully place each basket onto its designated ruler shelf. Ensure it sits evenly and is aligned with the frame.
- Secure with Zip Ties: Take your zip ties. Thread them through the holes or weave of the basket and around the ruler. Pull them tight to securely fasten the basket to the ruler. You’ll typically need at least two zip ties per basket (one on each side) to prevent wobbling, but more can be used for extra stability. Trim any excess zip tie length for a neat finish.
- Test Stability: Once all baskets are attached, gently test the organizer’s stability. Wiggle the baskets to ensure they are firmly held in place and can support the weight of your intended items.
- Fill and Organize: Now for the fun part! Start placing your desired items into the baskets. Whether it’s spices, snacks, craft supplies, office stationery, or toiletries, your new Dollar Tree basket organizer is ready to help you declutter and beautify your space.
- Expanding Your Organizer (Optional): If you find you need more storage, the design is easily expandable. Simply acquire additional word plaques and rulers. To create a longer piece, attach two plaques on top of each other using your staple gun and wood glue, effectively extending the height of your “ladder” on both sides. Then, attach more rulers at your desired intervals and secure additional baskets with zip ties. This modular approach allows for endless possibilities to perfectly fit any wall or counter space.
Pro Tips for a Perfect Dollar Tree Basket Organizer
To ensure your DIY project is not only successful but also long-lasting and aesthetically pleasing, consider these additional tips:
- Measure Twice, Staple Once: Before making any permanent attachments, dry-fit your components. Ensure all measurements for ruler placement are accurate and that the baskets fit as intended. Consistent spacing is key for a polished look.
- Pre-Drill if Necessary: If you find the plaques or rulers are prone to splitting when stapling, consider pre-drilling very small pilot holes. This isn’t usually necessary with Dollar Tree’s softer woods but can be a good precaution.
- Let Glue Dry Completely: While staple guns offer immediate hold, wood glue provides the ultimate strength. Allow ample drying time for the glue before placing heavy items in your baskets. Overnight drying is often recommended.
- Personalize Your Finish: Don’t limit yourself to the natural wood and black ruler look. You can paint the entire frame to match your room’s decor, distress it for a rustic feel, or even apply decorative paper.
- Consider Wall Mounting: For extra stability, especially if loading with heavier items, you can add small D-rings or picture hangers to the back of the top plaques and securely mount the organizer to a wall.
- Basket Selection Matters: Choose baskets that complement your intended use. Wire baskets offer visibility, while solid plastic or woven baskets conceal contents for a tidier look. Ensure they have suitable attachment points for zip ties.
- Safety First: Always handle your staple gun with care. Keep fingers clear of the stapling area and wear safety glasses to protect your eyes.
The Transformative Power of Home Organization
Beyond the immediate satisfaction of completing a DIY project, creating effective storage solutions like this Dollar Tree basket organizer offers numerous benefits that extend to your overall well-being and daily life:
- Reduced Stress: A cluttered environment often leads to a cluttered mind. Knowing where everything is and having a dedicated place for it can significantly reduce daily stress and frustration.
- Increased Efficiency: When items are organized, you spend less time searching for what you need. This saves precious minutes each day, making routines smoother and more efficient.
- Enhanced Aesthetics: An organized space looks cleaner, more spacious, and more inviting. This DIY organizer, when customized to your taste, can actually enhance your home’s decor rather than just hiding mess.
- Improved Functionality: Good organization optimizes the use of your space. This organizer allows you to utilize vertical space effectively, which is particularly beneficial in smaller homes or apartments.
- Cost Savings: By creating your own storage, you save money compared to purchasing expensive retail options. Furthermore, when your belongings are organized, you’re less likely to buy duplicates, leading to long-term savings.
- Sense of Accomplishment: Successfully completing a DIY project, especially one that improves your living environment, fosters a sense of pride and accomplishment.
Investing a little time and effort into projects like this Dollar Tree basket organizer can lead to a more harmonious, productive, and beautiful home.