
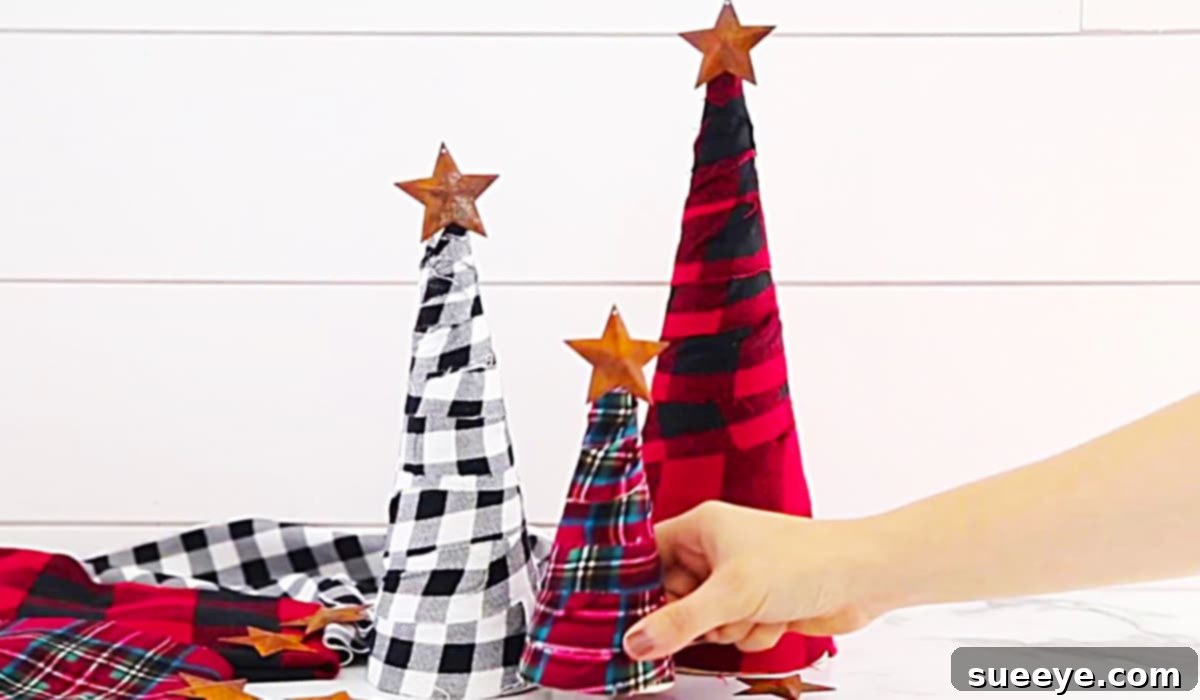
Unwrap the Magic: Easy DIY Flannel Christmas Trees for a Cozy Holiday Home
As the enchanting holiday season draws near, the excitement of transforming our homes into festive sanctuaries begins to bubble. There’s a unique charm in decorating, especially when it involves handmade touches that reflect personal style and infuse a deep sense of warmth and coziness. If you’re like me, constantly on the lookout for fresh, inspiring, and budget-friendly DIY Christmas decor ideas, you’ve landed in the perfect spot. Recently, my online quest led me to an absolutely delightful and incredibly simple project: DIY flannel trees, brilliantly showcased in a video tutorial by Down Redbud Drive on YouTube. This charming craft instantly captured my imagination, proving to be the ideal addition to my Christmas mantle decor this year.
These adorable flannel trees are not only a breeze to create but also incredibly cost-effective, utilizing materials that are readily available at any craft store or even from items you might already have at home. The satisfaction of crafting something beautiful with your own hands, without breaking the bank, is truly unparalleled. While designer-label decorative trees can often come with a hefty price tag, these handmade flannel wonders boast such a professional and exquisite finish that your guests will scarcely believe they are a product of your own creativity. Get ready to impress everyone with your festive flair and fully embrace the joyous spirit of crafting!
Why Choose DIY Flannel Christmas Trees for Your Holiday Decor?
Beyond the simple act of making something, there are numerous compelling reasons why opting for DIY flannel trees is an excellent choice for your holiday decorating strategy. Firstly, the financial aspect is a major draw. Crafting your own decorations significantly cuts down on costs compared to purchasing pre-made items. Flannel fabric scraps, simple cardboard cones, and a little hot glue are far less expensive than a professionally designed decorative piece, allowing you to allocate your holiday budget to other festive necessities or thoughtful gifts.
Secondly, personalization lies at the very heart of DIY. When you create your own decor, you wield complete control over the aesthetic. You can meticulously select flannel patterns and colors that perfectly match your existing holiday theme – whether it’s classic red and green plaid, chic buffalo check, cozy rustic earthy tones, whimsical pastels, or even sleek metallics. This unparalleled level of customization ensures that your decorations not only complement but truly reflect your unique taste and the precise ambiance you wish to cultivate in your home for the holidays.
Moreover, the entire process of making these trees offers a wonderful opportunity for creative expression and serves as a calming, therapeutic activity during the often-bustling and sometimes stressful holiday season. It can even evolve into a cherished family tradition, a delightful craft project to enjoy with loved ones, making lasting memories as you snip, glue, and create together. The resulting trees aren’t just mere decorations; they are tangible pieces of your holiday story, imbued with your effort, care, and affection. They bring a warm, inviting, and wonderfully tactile texture to any space, perfectly embodying the cozy and welcoming spirit of Christmas.
Gathering Your Creative Arsenal: Essential Materials for DIY Flannel Trees
Before diving into the fun part of crafting, ensure you have all your materials meticulously gathered and ready. The enduring beauty of this project lies in its remarkable simplicity and the widespread accessibility of its components. Here’s a comprehensive list of what you’ll need to create your enchanting flannel forest:
- Flannel Fabric Strips: These are undoubtedly the star of our festive show! You’ll likely need about 1/2 to 1 yard of flannel fabric, though this can vary depending on the specific size and total number of trees you intend to craft. Look for captivating festive patterns like classic plaid, trendy buffalo check, or even elegant solid colors that beautifully complement your existing decor. Don’t hesitate to experiment by mixing and matching different patterns, textures, and scales for a truly diverse and visually appealing display. A fantastic eco-friendly option is to upcycle old flannel shirts, cozy blankets, or unused scarves for a sustainable and unique touch.
- Decorative Stars: These charming embellishments will crown your trees with an essential touch of holiday sparkle and cheer. You have several creative options: purchase small metal stars from any well-stocked craft store, opt for unfinished wooden stars that you can personalize by painting or glittering, or for a truly unique and personal touch, craft your own! Simply cut star shapes out of sturdy cardboard and adorn them with glitter, paint, small beads, or even miniature bows. Cardboard stars are an especially wonderful canvas for younger crafters to decorate.
- Cardboard or Styrofoam Cones: These fundamental items will form the sturdy base structure of your festive trees. Craft stores typically stock a wide array of sizes for styrofoam cones, which are exceptionally lightweight and very easy to work with. As a creative alternative, you can effortlessly fashion your own cones from sturdy cardboard. Simply draw a large quarter-circle, carefully cut it out, and then roll it into a cone shape, securing the seam firmly with hot glue or strong adhesive tape. This DIY approach offers immense flexibility in determining the exact height and base diameter of your trees.
- Hot Glue Gun: This will be your indispensable tool for the entire assembly process. A standard hot glue gun equipped with a fine tip is ideally suited for precise and controlled application. Always exercise extreme caution when operating a hot glue gun, as both the tip and the molten glue can reach very high temperatures, posing a burn risk.
- Plenty of Glue Sticks: Ensure you have an ample supply of glue sticks to comfortably last throughout the entirety of your project. It’s always a good practice to have extra on hand rather than running out midway through your creative flow!
- Sharp Scissors: Investing in a good pair of fabric scissors will make the task of cutting your flannel strips significantly easier and will ensure clean, straight edges. Clean edges are absolutely key for achieving a neat, polished, and professional-looking finish on your trees.
Crafting Your Flannel Forest: Step-by-Step Directions
Creating these delightful flannel trees is an incredibly straightforward process that anyone, regardless of their crafting experience, can master with ease. Follow these detailed steps carefully, and you’ll soon have a charming collection of festive decor that will bring joy to your home in no time!
Step 1: Preparing Your Flannel Strips with Precision
Begin by taking your chosen flannel fabric and laying it flat to ensure smooth, even cuts. Carefully cut it into strips. For a standard 8-10 inch cone, strips that are approximately 1 to 1.5 inches wide typically work best, providing good coverage without being too bulky. The exact length of each strip will vary depending on how many times it wraps around the cone, but aim for strips long enough to comfortably make a few turns. While perfect uniformity isn’t strictly necessary – as slight variations can beautifully contribute to a rustic charm – strive to maintain a consistent width for a tidier, more cohesive appearance. If your specific flannel fabric tends to fray easily, you might consider using pinking shears for the edges; otherwise, simply embrace the soft, natural fray as an inherent part of the tree’s unique character.
Step 2: Securing the Foundation of Your Cone
Take your cardboard or styrofoam cone and prepare it for wrapping. Starting at the very bottom edge of the cone, apply a small, continuous line of hot glue. Carefully but firmly press one end of your first flannel strip onto this glue line, ensuring it is securely attached and perfectly flush with the base of the cone. This initial anchor point is absolutely crucial for a stable, neat, and professional-looking start. Double-check that the flannel adheres smoothly, avoiding any unsightly gaps or wrinkles at the base.
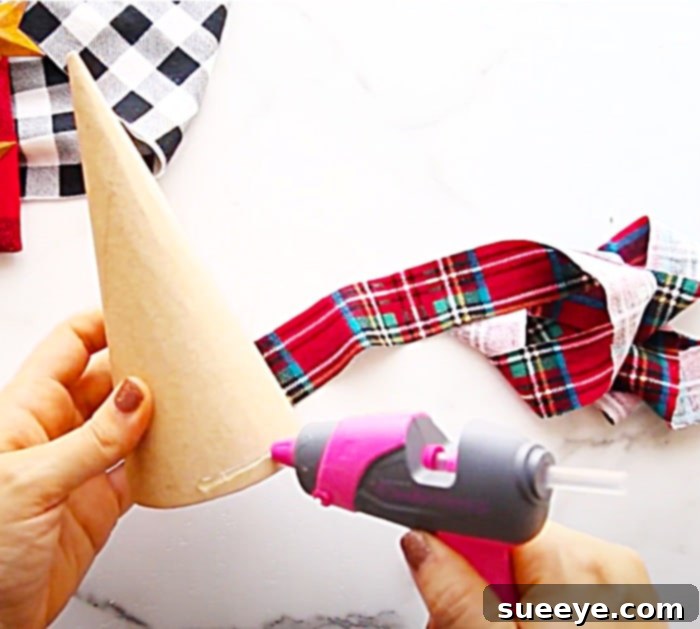
Step 3: Wrapping Your Cone with Artistic Precision
Once the initial strip is securely attached, begin the delicate process of wrapping it around the cone. Work your way upwards, applying small, controlled dots or thin lines of hot glue along the cone as you wrap. It is critically important to slightly overlap each new layer of flannel over the previous one. This creates a full, seamless, and wonderfully textured look, effectively concealing the cone beneath and giving your tree a lush appearance. Maintain a consistent angle and gentle tension as you wrap to ensure an even and symmetrical appearance all around the cone. When you reach the end of a strip, simply glue its end securely down to the cone, and then seamlessly start a new strip immediately where the last one finished, continuing the wrapping process without interruption. Continue this methodical wrapping technique until the entire cone is completely covered, right up to its very tip.
Step 4: Adorning with the Festive Star
With your cone beautifully and entirely wrapped in its cozy flannel, it’s now time for the crowning glory – the star! Apply a generous but carefully placed dot of hot glue to the very top point of your flannel-covered cone. Carefully position your chosen decorative star onto the glue, holding it firmly in place for a few seconds until the glue sufficiently sets and bonds. Ensure the star is perfectly centered and stands proudly upright, providing that quintessential Christmas tree silhouette. If your star happens to have a pre-attached loop or string, you might need to trim it discreetly or glue it flat to the back of the star before proceeding with attachment.
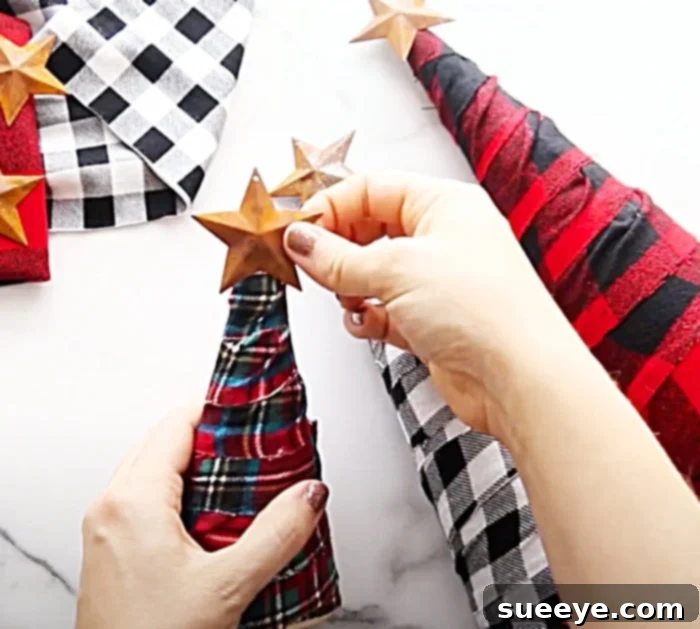
Step 5: Final Touches and Elegant Display
Once your charming flannel trees are fully assembled, take a final moment to meticulously inspect them. Carefully trim any stray, loose threads or unsightly excess glue strands that might be visible. You might also gently fluff the flannel layers to give your trees an even fuller, more inviting appearance. And just like that, your gorgeous flannel trees are now ready to be proudly placed in the location of your choice! These versatile and utterly charming handmade decorations can instantly elevate and transform any festive display, bringing an instant touch of holiday magic.
Tips for a Flawless Finish & Creative Variations for Your Flannel Trees
To ensure your DIY flannel trees look their absolute best, radiating professional craftsmanship and unique charm, here are a few expert tips and exciting ideas for customization and personal flair:
- Preventing Fraying: If the flannel fabric you’ve chosen has a tendency to fray easily, you can proactively run a very thin line of clear fabric glue or a product like Fray Check along the freshly cut edges of your strips before you begin the wrapping process. This simple step will effectively seal the edges, helping them remain neat and tidy throughout the project and beyond.
- Consistent Wrapping for a Polished Look: The ultimate key to achieving a professional and aesthetically pleasing look for your flannel trees is maintaining consistent overlap and even tension as you wrap. If you’re new to this technique, consider practicing on a small, scrap piece of material first to get a feel for it.
- Mastering Glue Control: When applying hot glue, always opt for small, precisely placed dots or very thin lines rather than large squeezes. This approach prevents excessive glue from seeping through the fabric, which can create unsightly bumps, stiff spots, or even leave visible residue. Remember, less is almost always more when it comes to hot glue!
- Creating a Dynamic Display with Varying Sizes: Design a captivating “flannel forest” by crafting trees of various heights and base diameters. A thoughtfully arranged collection of three to five trees in differing sizes looks particularly appealing and visually dynamic on a fireplace mantle, a console table, or a window sill.
- Embellish Beyond Just Stars: Don’t limit your creativity solely to stars! You can dramatically enhance your trees by adding delightful mini jingle bells, charming small buttons, delicate tiny pinecones, miniature bows, or even tiny Christmas ornaments for an extra layer of sparkle, texture, and personalization.
- Experiment with Diverse Color Schemes: Dare to experiment with different flannel colors and patterns! Beyond the much-loved traditional reds and greens, consider elegant whites and icy blues for a serene winter wonderland theme, warm browns and creams for a rustic farmhouse appeal, or even subtle metallics woven into the fabric for a modern, sophisticated touch.
- Infuse Seasonal Scents: For an extra sensory dimension, you could lightly spray your finished trees with a fabric-safe Christmas scent (such as cinnamon, fresh pine, or spiced orange) or gently tuck small, dried cinnamon sticks, star anise, or mini potpourri sachets into the flannel folds. This creates an inviting aroma that truly enhances the festive atmosphere.
Bringing Your Vision to Life: Displaying Your Charming Flannel Trees
Once you’ve completed your beautiful and unique collection of DIY flannel trees, the final, exciting step is to proudly showcase them throughout your home! These incredibly versatile festive home decorations are perfect for a multitude of spaces and creative arrangements:
- Mantlepiece Marvels: Arrange a stunning cluster of varying heights on your fireplace mantle. They look absolutely enchanting perhaps flanked by lush garlands of greenery and twinkling fairy lights for a classic and utterly festive scene that captures the eye.
- Shelf Sophistication: Gracefully nestle them among your beloved book collection or display them prominently on floating shelves in your living room, entryway, or even a cozy reading nook. They add a wonderful textural element.
- Tabletop Centerpieces: Utilize a few trees as the charming focal point for your dining table centerpiece. Surround them with flickering flameless candles, additional natural elements like pinecones or berries, or even a sprinkle of faux snow for a magical touch.
- Window Sill Whimsy: Line your window sills with these cozy trees to add instant holiday charm and visual interest, delighting both those inside and passersby outside.
- Thoughtful Gift Giving: Remember that handcrafted flannel trees make wonderfully thoughtful and uniquely personal gifts for friends, family, neighbors, or as charming hostess gifts during holiday parties. They truly embody the spirit of giving from the heart.
This project is truly a beautiful and profoundly rewarding endeavor, remarkably simple to make yet so impactful in its festive charm and aesthetic appeal. I genuinely adore the rustic elegance, the cozy tactile feel, and the personalized touch these easy DIY projects bring to my home. They serve as a wonderful, constant reminder that the most cherished holiday items are often those crafted with immense love, careful attention, and a personal flair. So, gather your chosen materials, put on some cheerful festive music, and confidently embark on this delightful holiday craft journey. You’ll be absolutely amazed at the professional-looking results you achieve and the warm, inviting, and truly unforgettable atmosphere they create throughout your home!