
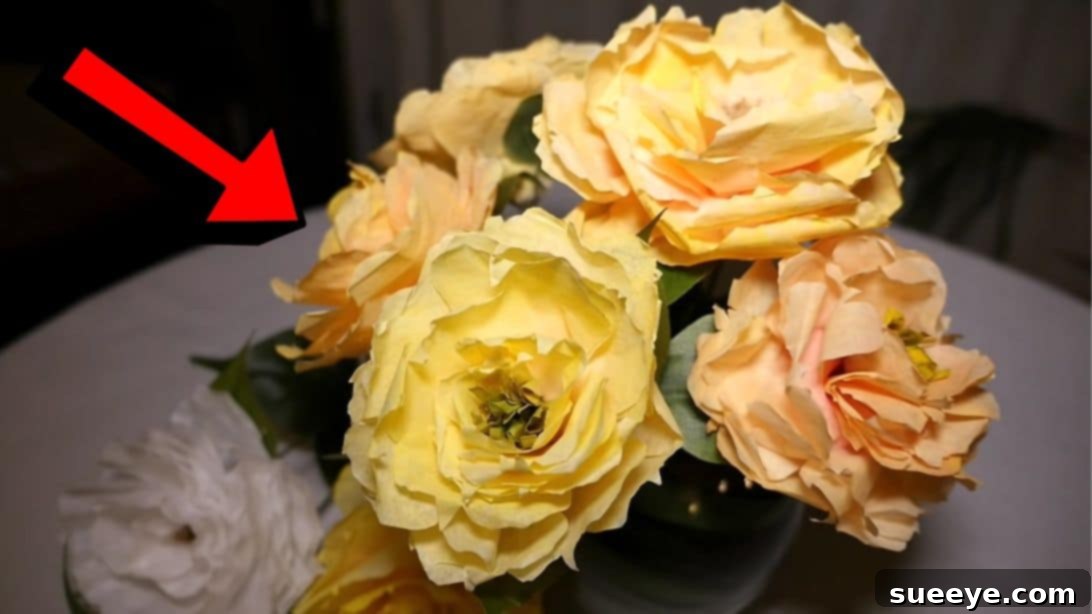
Imagine transforming everyday household items into something truly extraordinary and beautiful. With just a few humble coffee filters, you can craft stunning, lifelike peony flowers that will fool even the keenest eye. These gorgeous blooms not only add a touch of elegant charm to any space but also offer a delightful way to embrace sustainable living through upcycling. Forget expensive floral arrangements; learn how to create your own magnificent peonies from recycled materials, bringing joy and a personal touch to your home decor.
The beauty of this project lies in its simplicity and accessibility. Whether you have a stash of coffee filters readily available in your kitchen or need to pick some up from your local store, the materials are inexpensive and easy to acquire. This makes it an ideal craft for anyone looking to explore their creative side without breaking the bank. Get ready to embark on a rewarding DIY journey that culminates in a display of incredibly realistic and charming handmade flowers.
RELATED: If you’re inspired by the idea of crafting with coffee filters, you might also enjoy our guide on an Easy DIY Peony Wreath Using Coffee Filters, perfect for expanding your handmade decor collection.
Crafting these exquisite peony flowers is a wonderfully straightforward process, making it suitable for crafters of all skill levels, even absolute beginners. With clear, step-by-step instructions and a little patience, you’ll be amazed at the professional-looking results you can achieve on your very first attempt. To ensure you master every detail, be sure to follow the detailed steps outlined below. For a comprehensive visual guide and additional tips, we highly recommend watching the full video tutorial by Your House a Home TV on YouTube. Their expert demonstration will illuminate every fold and cut, helping you create perfect peonies every time.
Why Choose Coffee Filter Peonies: A Sustainable and Beautiful Craft
There are numerous reasons why coffee filter peonies stand out as an exceptional DIY project. Firstly, they offer an incredible opportunity for upcycling. Instead of discarding used coffee filters (or even new ones that might otherwise go to waste), you can transform them into something truly artistic and functional. This eco-friendly approach not only reduces waste but also promotes a mindful way of crafting.
Secondly, the cost-effectiveness of this craft is unparalleled. Coffee filters are remarkably inexpensive, especially when compared to fresh flowers or artificial silk alternatives. This allows you to create large, lush arrangements without a significant financial outlay, making beautiful home decor accessible to everyone.
Moreover, these handmade peonies are incredibly versatile. Once crafted, they can be used in a myriad of ways: as a centerpiece for your dining table, an accent in a vase, incorporated into wreaths, garland, or even as decorative elements for gifts and special occasions. Their timeless beauty ensures they complement a wide range of interior styles, from rustic farmhouse to modern minimalist.
Finally, the process of making these flowers is deeply satisfying and meditative. It provides a creative outlet, allowing you to engage your hands and mind in a relaxing activity that culminates in a tangible, beautiful reward. The ability to customize colors and sizes further enhances the appeal, letting you tailor each bloom to your exact aesthetic preferences.
Materials for DIY Coffee Filter Peony Flowers: Gather Your Essentials
Before diving into the crafting process, it’s important to gather all your materials. Ensuring you have everything at hand will make the experience smooth and enjoyable. Here’s a detailed look at what you’ll need:
- Coffee Filters: You’ll need both white and natural (brown) coffee filters. The natural filters are crucial for creating the realistic brown center of the peony, while the white ones will form the bulk of your petals. Standard basket-style filters work best due to their size and shape, offering ample material for generous petals.
- Watercolor Paint: This is where the magic of color happens! Watercolor paints are ideal because they absorb beautifully into the coffee filters, creating soft, translucent hues that mimic natural flower petals. You can use pan sets or liquid watercolors. Experiment with various shades of pinks, reds, whites, and even subtle purples to achieve diverse peony varieties.
- Artificial Stem with Leaves: To give your handmade peonies a professional finish and make them easy to arrange, an artificial stem with leaves is essential. You can repurpose stems from old artificial flowers or purchase them from craft stores. Choose stems with a flexible wire core for easy shaping and realistic-looking leaves to enhance the overall appearance of your finished flower.
- Scissors: A good pair of sharp craft scissors will be indispensable for precise cutting of the coffee filters and shaping your petals. Consider having a smaller pair for intricate details and a larger pair for general cutting.
- Pen or Pencil: This will be used for drawing petal shapes onto the folded coffee filters. A regular pencil works well as its marks can be easily covered by paint or hidden within the layers of petals.
- Paintbrush: For applying your watercolor paints, a medium-sized, soft-bristled paintbrush will allow for even application and blending of colors. You might also want a finer brush for adding subtle details or shading.
- Hot Glue Gun and Glue Sticks: A hot glue gun is critical for securely assembling the different layers of your peony. It provides a strong, fast-drying bond, ensuring your flower holds its shape. Make sure to have plenty of glue sticks on hand, especially if you plan to make multiple flowers.
How to Make DIY Coffee Filter Peony Flowers: A Step-by-Step Guide
Creating these beautiful coffee filter peonies is a process of layering and shaping, building up the flower from its core. Take your time with each step, and don’t be afraid to add your own creative flair.
Step 1: Crafting the Peony’s Distinctive Center
The core of your peony sets the foundation for its realistic appearance. Begin by selecting a natural-colored (brown) coffee filter. Carefully fold this filter in half, pressing the crease firmly to create a crisp line. Then, fold it in half again, ensuring the edges align perfectly. This double-fold prepares the filter for shaping. Unfold the filter once, revealing a central crease. Along this fold, use your scissors to cut all the way through the paper, effectively dividing the filter into two distinct semi-circles. Now, take one of these semi-circles. Along the top curved edge, meticulously cut small, shallow slits. These slits, as demonstrated in the video tutorial, are key to creating the fuzzy, intricate texture characteristic of a peony’s stamen. Once the slits are cut, tightly roll the entire semi-circle piece from one end to the other. As you roll, ensure it remains compact. Once fully rolled, hold the base firmly and gently twist the ends of the rolled paper. This twisting motion secures the roll and helps to give the center a more organic, natural look. Set this finished brown center aside; it will be integrated later.
Step 2: Preparing the Peony Petals for Layering
Now it’s time to create the voluminous petals that give peonies their signature fullness. Take approximately four layers of white coffee filters; stacking them together allows you to cut multiple petals simultaneously, saving time. Carefully fold these stacked filters in half, aligning the edges precisely. Repeat this folding motion, folding them in half once more. This will create a compact, multi-layered wedge of coffee filter paper. With your scissors, cut along the top-most fold about halfway down the width of the folded stack. This cut helps to separate the layers slightly, making it easier to shape the petals. Fold the filters one more time, creating an even smaller, denser wedge. On this final folded section, use your pen or pencil to draw the desired shape of your peony petal. Peony petals are often broad and rounded, but you can experiment with slightly wavy or irregular edges for a more natural look. Once you’re satisfied with your drawn petal shape, carefully cut along your pencil line through all the stacked layers. Take your time to make clean cuts, as this will directly impact the final appearance of your petals.
Step 3: Assembling the Peony Layers: Creating Volume and Form
With your center and petals ready, it’s time to bring your peony to life through assembly. Gently unfold all the white coffee filter layers that you just cut, separating them into individual petal sections. You’ll notice they have a distinct shape. To give your petals a natural, soft curve, gently pull and stretch the edges of each petal outward or curl them slightly around your finger. This step is crucial for achieving that characteristic peony fullness and softness. Now, take the brown flower petal piece (the center you created in Step 1) and position it along the inner edge of one of your white petal layers. This will be your starting point for building the flower. Apply a small dab of hot glue to secure the brown center to the white petal layer. From this point, slowly begin to roll the white petal layer around the brown center, continuously adding small dots of hot glue to secure each section as you roll. Continue rolling until you reach the other end of the white petal layer, ensuring the layers are snug but not overly tight. Secure the final edge with another dab of hot glue. Repeat this process with your remaining white petal layers, attaching each new layer with hot glue, slightly offsetting them to create a natural, spiraling effect and building volume. The goal is to make the flower look full and organic, with no two petals sitting exactly alike.
Step 4: The Finishing Touches: Stem and Customization
Once all your petal layers are securely glued, your peony is nearing completion! Gently open and separate each petal layer, fluffing them out nicely to create a full, open bloom. Take your time to arrange them, ensuring a realistic and appealing shape. Now, prepare your artificial stem with leaves. If the stem is too long for your intended display, carefully trim it to the desired size using wire cutters. Next, create a small hole at the very bottom center of your assembled coffee filter flower. This hole should be just large enough to snugly insert the trimmed artificial stem. Apply a generous amount of hot glue around the base of the stem and carefully insert it into the hole at the bottom of the flower. Hold it in place for a few moments until the glue sets firmly, ensuring a secure attachment. With the stem attached, your basic peony flower is complete! To explore more creative options, you can make other colors of flowers by painting the coffee filter petals *before* assembling them. Lay the individual petals flat, apply watercolor paint as desired, and allow them to dry completely before proceeding with Step 3 and assembling your colorful blooms. This pre-painting technique allows for vibrant, uniform color application and opens up a world of customization possibilities.
Tips for Creating Stunning and Durable Coffee Filter Peonies
To elevate your coffee filter peonies from good to exceptional, consider these additional tips:
- Experiment with Petal Shapes: While classic rounded petals are beautiful, try varying the size and shape of your cuts. Some petals can be slightly more pointed, others more ruffled. This variation adds depth and realism to your finished flower.
- Layering for Fullness: Don’t shy away from using plenty of coffee filters. The more layers you add, the fuller and more luxurious your peony will appear. For a truly dense bloom, you might even use more than the suggested four layers per section.
- Color Blending: When painting with watercolors, don’t just use a single shade. Try blending two complementary colors (e.g., a light pink with a touch of darker rose at the edges) to create a more natural, variegated petal color. You can also add a touch of green to the very base of some petals for a subtle, fresh look.
- Drying Time is Key: If you choose to paint your petals before assembly, ensure they are completely dry before you start gluing. Damp paper can tear easily and prevent the hot glue from adhering properly.
- Adding Scent: For an extra touch of realism, you can lightly mist your finished flowers with a floral essential oil or fragrance spray. This adds an olfactory dimension to your beautiful visual creation.
- Varying Sizes: Create peonies in different sizes by adjusting the number of coffee filter layers and the size of your petal cuts. A mix of large, medium, and small blooms makes for a more dynamic and professional-looking arrangement.
- Secure Gluing: Use small, precise dots of hot glue. Too much glue can make the paper stiff and visible, detracting from the natural look. Apply just enough to secure the layers firmly.
- Gentle Handling: Coffee filters are delicate. Handle your petals and assembled flowers gently, especially when fluffing and shaping, to avoid tearing.
Creative Applications for Your Handmade Peonies: Beyond the Vase
Once you’ve mastered the art of making coffee filter peonies, a world of decorative possibilities opens up:
- Stunning Bouquets: Combine multiple peonies with varying colors and sizes to create breathtaking, long-lasting bouquets for any occasion.
- Elegant Wreaths: Attach your finished flowers to a floral foam or wire wreath base for a charming front door decoration or an indoor accent piece.
- Party Decorations: Use them as centerpieces for weddings, baby showers, or birthday parties. They can also adorn gift tables or hang as part of a garland.
- Unique Gifts: A handmade peony bouquet makes a thoughtful and personal gift for friends, family, or teachers.
- Home Accents: Place a single bloom in a small bud vase on a shelf, nightstand, or bathroom vanity to add a delicate touch of nature.
- Garlands and Banners: String multiple smaller peonies together to create beautiful garlands for mantels, doorways, or staircases.
- Hair Accessories or Brooches: For a more whimsical touch, attach a smaller peony to a hair clip or a brooch pin.
The versatility of these eco-friendly flowers means your creativity is the only limit to how you can use and display them.
*All image credit belongs to Your House a Home TV via YouTube. Follow and subscribe to her channel for more inspiring DIY projects and home decor ideas! Your support helps creators continue sharing wonderful content.
Embrace the Joy of Easy DIY Coffee Filter Peony Flowers Tutorial
There’s immense satisfaction in creating something beautiful with your own hands, especially when it’s also environmentally conscious. These easy DIY coffee filter peonies offer a perfect blend of creativity, sustainability, and aesthetic appeal. They are a testament to how simple, everyday items can be transformed into magnificent works of art. By following this comprehensive tutorial, you’ve not only learned a new crafting skill but also discovered a delightful way to adorn your home with unique, handmade decor.
Whether you’re looking to add a permanent splash of color to your living space, craft a thoughtful gift, or simply enjoy a relaxing and rewarding creative activity, these coffee filter peonies are an excellent choice. So grab those coffee filters, unleash your inner artist, and start crafting your own collection of beautiful, realistic, and eco-friendly peony blooms today. We encourage you to share your beautiful creations and inspire others to embrace the joy of DIY!