
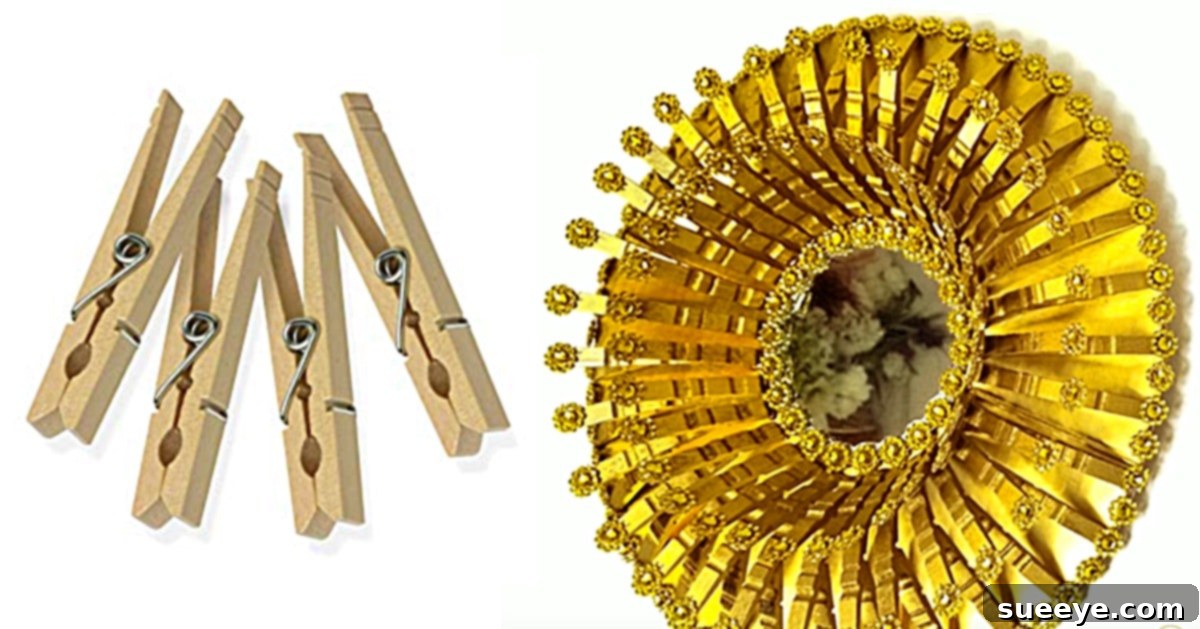
Moving into your own place is a monumental achievement, a dream many of us tirelessly work towards. After years of diligent saving and careful planning, finally unlocking the door to your very own sanctuary is an unparalleled feeling. But once the boxes are unpacked and the initial euphoria settles, a new dream often emerges: transforming those blank walls into a reflection of your personal style, all while sticking to a tight budget. The desire for a home that feels uniquely yours, adorned with beautiful, personal touches, can seem daunting when faced with the high costs of store-bought decor. This is where the magic of DIY comes in, offering a creative, cost-effective path to achieving that opulent, custom look without breaking the bank. My journey led me to discover an incredibly chic and affordable project that promised to infuse a regal touch into my new abode: the DIY Gold Clothespin Wall Art Mirror. This project not only delivered on its promise of elegance but also proved to be a wonderfully satisfying creative endeavor.
Transform Your Home on a Budget: The Ultimate DIY Gold Clothespin Wall Art Mirror Tutorial
The journey to creating a personalized living space doesn’t have to be an expensive one. In fact, some of the most stunning decor pieces are born from ingenuity and a handful of common materials. My inspiration for this particular project came from a desire for gold, regal-looking fixtures, which traditionally come with a hefty price tag. However, a deep dive into the world of DIY home decor unearthed a gem: an opulent DIY Clothespin Wall Art Mirror tutorial. It was everything I envisioned for my new place – elegant, striking, and surprisingly accessible. This tutorial transformed a simple idea into a lavish reality, proving that luxurious aesthetics are well within reach for the budget-conscious decorator.
The Allure of DIY: Crafting Elegance Without the High Cost
Why choose DIY for your home decor needs? Beyond the obvious cost savings, there’s an immense satisfaction in creating something beautiful with your own hands. Each DIY project becomes a story, a personal touch that imbues your living space with character and warmth. For this particular gold clothespin mirror, the appeal was multifaceted:
- Cost-Effectiveness: The primary materials – clothespins, cardboard, and spray paint – are incredibly inexpensive, making it a fantastic option for decorating on a shoestring budget.
- Uniqueness: Unlike mass-produced items, your DIY mirror will be a one-of-a-kind piece, tailored to your aesthetic.
- Customization: The design is highly adaptable. You can choose different paint colors, embellishments, and even arrangements of clothespins to match any decor style.
- Beginner-Friendly: No advanced crafting skills are required. The steps are straightforward, making it an ideal project for DIY novices and seasoned crafters alike.
- High Impact: Despite its simple origins, the finished mirror boasts an impressive visual impact, instantly elevating the sophistication of any room.
This project embodies the essence of “rich hippy decor” – an eclectic blend of bohemian spirit and opulent touches, proving that luxury can be handmade.
Gathering Your Treasure Trove: What You’ll Need
One of the beauties of this DIY Clothespin Mirror is that many of the materials are items you might already have lying around, or they are easily acquired without significant expense. Before embarking on your creative journey, ensure you have the following:
Primary Materials:
- Wooden Clothespins: You’ll need a good quantity, typically between 60 to 100, depending on the desired size and density of your mirror’s “sunburst” effect. Standard wooden clothespins work perfectly.
- Sturdy Cardboard: A piece large enough to serve as the backing for your mirror and clothespin arrangement. Think recycled moving boxes, poster board, or thick craft cardboard.
- Small Round Mirror: This will be the focal point of your wall art. A 6 to 10-inch diameter mirror is ideal, readily available at craft stores, dollar stores, or even online.
- Gold Spray Paint: For that opulent, regal finish. Krylon 22 Karat Spray Paint was used for its exceptional shimmer, but any good quality gold metallic spray paint will do. Consider silver, copper, or even a matte black for different aesthetics.
- Rhinestone Garland or Individual Rhinestones: To add a touch of sparkle and luxury. A cheap rhinestone garland on a string is perfect as it can be cut into individual pieces. Beads or small faux pearls are also great alternatives.
- Strong Adhesive: A hot glue gun is excellent for quick assembly, but for lasting durability, consider a stronger craft glue like E6000, particularly for attaching the mirror.
Tools:
- Pencil and Ruler/Compass: For drawing precise circles on your cardboard.
- Scissors or Craft Knife: To cut the cardboard base.
- Protective Surface: Newspaper or a drop cloth for spray painting.
- Gloves and Mask: Essential for safe spray painting in a well-ventilated area.
- Wire or Twine: For creating a hanging mechanism on the back of your finished mirror.
A quick trip to a craft store like Michael’s, especially armed with a coupon, can significantly reduce the cost of specialized items like the mirror and garland. My rhinestone garland, with a coupon, was only $4.00, proving that luxury doesn’t have to come with a high price tag.
Step-by-Step Guide: Crafting Your Luxurious Clothespin Mirror
The process of creating this stunning mirror is surprisingly simple and incredibly rewarding. Follow these steps to bring your vision to life:
Step 1: Preparing the Cardboard Base
Begin by laying your cardboard flat. Place your small round mirror in the center. Using your pencil and ruler or compass, draw a large circle around the mirror. This outer circle will define the overall diameter of your finished wall art, so make it significantly larger than your mirror – allowing enough space for the clothespins to radiate outwards. A good rule of thumb is for the outer circle to be at least twice the diameter of your mirror, or even more for a dramatic sunburst effect. Carefully cut out this cardboard circle using scissors or a craft knife, ensuring a clean edge. This will be the sturdy backing for your mirror and clothespins.
Step 2: Dismantling the Clothespins
This is a straightforward step but requires a little patience. Gently separate the two wooden halves of each clothespin by removing the small metal spring. You’ll only be using the wooden pieces. Be careful not to splinter the wood. You’ll notice each half has a flat side and a rounded side, and often a small groove where the spring was. For a uniform look, try to use the halves consistently (e.g., always the flat side facing outwards).
Step 3: Arranging and Gluing the Clothespins
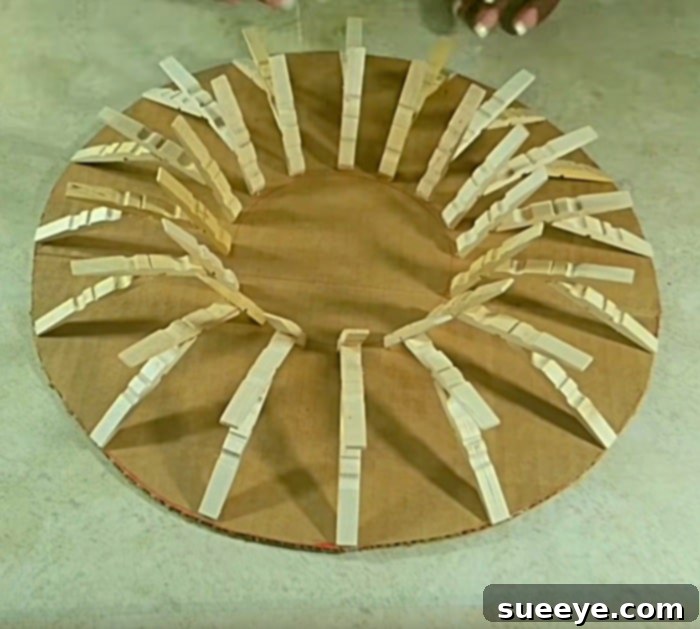
Now for the creative part! Lay your cardboard circle flat. Start by arranging the clothespin halves around the outer edge of your cardboard base. You can place them with the rounded ends facing outwards, creating a sunburst or spike-like pattern. Experiment with spacing and angles before applying glue. You can overlap them slightly, or leave small gaps for a more delicate look. Once you’re happy with the arrangement, apply a strong adhesive to the flat side of each clothespin half and firmly press it onto the cardboard. Work in sections, ensuring even spacing and a consistent pattern. Allow ample time for the glue to dry completely before moving on. This step is crucial for the structural integrity of your mirror.
Step 4: The Golden Touch: Spray Painting
Once all the clothespins are securely glued and dry, it’s time to add that luxurious gold finish. Take your project to a well-ventilated area, preferably outdoors, and lay it on a protective surface like newspaper or a drop cloth. Wearing gloves and a mask, apply your gold spray paint in light, even coats. Avoid spraying too much at once to prevent drips and uneven coverage. Allow each coat to dry according to the manufacturer’s instructions before applying the next. You might need two or three coats to achieve a rich, opaque gold finish. Don’t forget to lightly spray the edges of the cardboard and the inner areas to ensure a seamless look. The transformation at this stage is truly remarkable!
Step 5: Adding the Rhinestone Embellishments
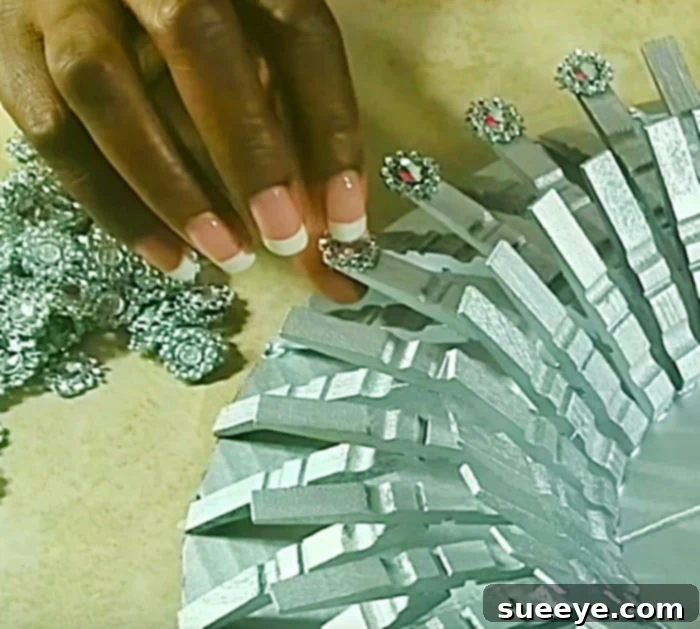
This step adds the dazzling detail that truly elevates the mirror’s opulence. If you’re using a rhinestone garland, carefully cut individual rhinestones from the string. Now, with a steady hand, apply a tiny dot of strong adhesive to the very tip of each outward-facing clothespin end. Carefully place a single rhinestone onto each glue dot. Precision is key here to achieve a polished, elegant look. The subtle sparkle from these rhinestones will catch the light beautifully, enhancing the regal feel of your wall art.
Step 6: Attaching the Mirror
The final decorative step is to affix your round mirror to the center of your cardboard base. Ensure the area where the mirror will sit is clean and free of dust. Apply a generous amount of strong adhesive (E6000 or a mirror-safe silicone adhesive is recommended for a secure, long-lasting bond) to the back of the mirror. Carefully center the mirror onto the cardboard base, pressing down firmly. If your adhesive requires clamping or weighting, gently place a book or other flat object on the mirror to ensure good contact while it dries. Allow the mirror to cure completely, often for 24-48 hours, before handling.
Step 7: Creating a Hanging Mechanism
Once everything is dry and secure, turn your mirror over. Cut a piece of strong wire, twine, or ribbon to your desired hanging length. Create a loop and securely attach both ends to the back of the cardboard base, near the top, using strong tape, hot glue, or even by piercing small holes and tying knots if your cardboard is thick enough. Ensure the hanging mechanism is sturdy and can safely support the weight of your mirror. Test its strength by gently lifting it before hanging it on your wall.
Personalizing Your Clothespin Mirror: Endless Customization Possibilities
While the gold and rhinestone version is undeniably stunning, the beauty of this DIY project lies in its incredible versatility. Don’t be afraid to experiment and adapt it to your unique taste and existing decor:
- Color Variations: Instead of gold, try silver for a sleek, modern look, copper for a rustic warmth, or matte black for a minimalist edge. Pastel shades can create a whimsical, softer aesthetic, while vibrant colors like teal or fuchsia can make a bold statement.
- Embellishments: Replace rhinestones with small pearls, beads, glitter, tiny mosaic tiles, or even miniature faux flowers for different textures and styles.
- Clothespin Arrangement: Explore different patterns. You could create a denser sunburst, a more spaced-out effect, or even a layered look with clothespins at varying depths for added dimension.
- Mirror Shape and Size: While a round mirror is classic, consider a square or oval mirror for a unique twist. Adjust the size of your cardboard backing and the number of clothespins accordingly.
- Textural Elements: Before painting, you could lightly sand or distress some of the clothespins for a shabby-chic effect, or even use fabric paint to add patterns to the wooden pieces.
The possibilities are truly endless, allowing you to create a piece that perfectly complements your home.
Where to Showcase Your Masterpiece: Decorating Ideas
Once your gorgeous DIY Clothespin Wall Art Mirror is complete, deciding where to hang it is the next exciting step. This versatile piece can enhance various areas of your home:
- Entryway: As the first thing guests see, placing it in your entryway sets an immediate tone of elegance and personal style, just as it does in my home.
- Living Room: Above a console table, mantelpiece, or as part of a gallery wall, it becomes a captivating focal point, adding sparkle and depth.
- Bedroom: Hung above a dresser or on a feature wall, it adds a touch of glamour and serves as a beautiful accent mirror.
- Bathroom: For a small powder room, it can offer an unexpected splash of luxury and brightness.
- Nursery: A pastel-colored version could add a whimsical, soft touch to a baby’s room.
- Gift Idea: Handmade gifts are always cherished. This mirror makes a thoughtful and impressive present for housewarmings, birthdays, or holidays.
Its reflective quality and radiant design will undoubtedly draw the eye and garner compliments wherever it is placed.
My Personal Experience and Why You Should Try It!
When I finally mounted my DIY Gold Clothespin Wall Art Mirror in my entryway, I was absolutely thrilled with the result. The golden gleam and the subtle sparkle of the rhinestones immediately caught the eye, setting the perfect tone for my “opulent rich hippy decor.” Every guest who walks in comments on its beauty and unique design, often surprised to learn it’s a DIY project. It’s more than just a mirror; it’s a statement piece that reflects my personality and my journey to making my new place feel like a true palace, even on a budget.
This project is a true winner because it combines affordability with high aesthetic impact. The sense of accomplishment you feel after creating something so beautiful and functional is incredibly rewarding. It’s a testament to the power of creativity and a reminder that you don’t need to spend a fortune to infuse luxury and personal charm into your home. I wholeheartedly recommend this DIY Clothespin Mirror project to anyone looking to add a touch of handmade elegance to their living space. It’s a simple, enjoyable craft that yields stunning results, proving that your biggest home decor dreams can indeed become a dazzling reality.