
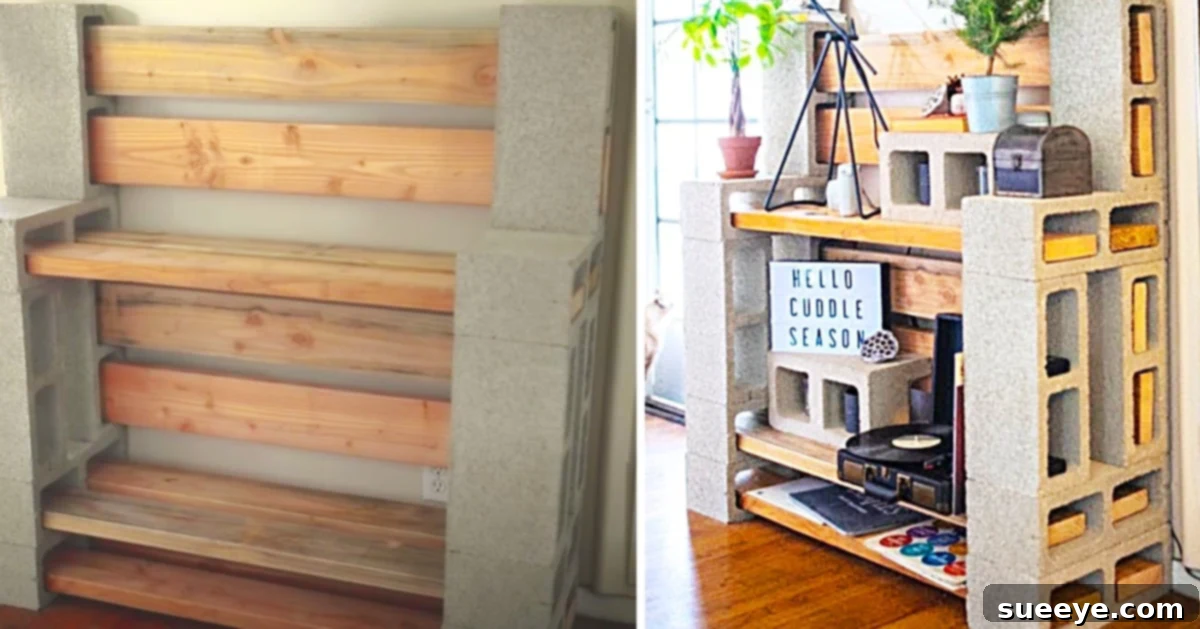
How To Build Functional & Stylish Cinder Block Shelving Units: The Ultimate DIY Guide
Cinder blocks, often overlooked as mere construction materials, are surprisingly versatile and incredibly useful for a myriad of home decor and organization projects. Whether you’re looking to tackle indoor storage challenges or enhance your outdoor living spaces, these robust and readily available blocks can be your secret weapon. Their inherent strength and minimalist aesthetic make them a fantastic foundation for everything from garden beds to industrial-chic furniture. Recently, I stumbled upon an inspiring cinder block shelving video tutorial by Audrie Storme on YouTube, and it immediately sparked an idea for a perfect addition to my husband’s newly developing “man cave” in our garage. The resulting shelves exuded a wonderful earthy, rustic charm that I knew would complement his rugged style perfectly. What truly impressed me was the sheer simplicity of this cinder block shelving unit’s construction. It’s so straightforward to put together that I envisioned creating it in just an afternoon, ready to surprise my husband with a brand-new, highly functional shelving system upon his return from work.
Why Choose Cinder Block Shelving for Your Home?
Before diving into the construction process, let’s explore why cinder block shelving stands out as an exceptional choice for DIY enthusiasts and homeowners alike. It offers a unique blend of practicality, affordability, and aesthetic appeal that few other shelving solutions can match.
Unbeatable Cost-Effectiveness
One of the primary advantages of cinder block shelving is its incredibly low cost. Cinder blocks and lumber are among the most affordable building materials available at any hardware store. This project allows you to create substantial, durable storage without breaking the bank, making it an ideal option for those on a budget or looking for a smart way to maximize their decorating dollars.
Remarkable Simplicity and Speed of Assembly
Forget complicated instructions, intricate joinery, or specialized tools. Cinder block shelves are designed for ease of assembly. The modular nature of the blocks and planks means you can put together a robust shelving unit in a matter of hours, if not quicker. This “no-fuss” approach is perfect for beginners or anyone looking for an instant gratification project.
Exceptional Durability and Load-Bearing Capacity
Cinder blocks are built to last. Made from concrete, they are incredibly strong and can support a significant amount of weight. This makes them perfect for heavy-duty storage, whether it’s tools in a garage, a large collection of books, or weighty decorative items. You won’t have to worry about these shelves sagging or failing under pressure.
Endless Versatility and Customization Potential
The beauty of cinder block shelving lies in its adaptability. You can easily adjust the height, width, and number of shelves to fit virtually any space or storage requirement. Want a taller unit? Add more blocks. Need wider shelves? Choose longer planks. This flexibility also extends to aesthetics, as we’ll explore below.
Embracing a Rustic or Industrial Aesthetic
For those who appreciate raw, honest materials and a less-than-perfect finish, cinder block shelves offer a fantastic rustic or industrial vibe. The natural texture and grey tones of the blocks, combined with the warmth of wood, create a look that is both modern and timeless. It’s a statement piece that celebrates the beauty of utilitarian design.
Materials Needed for Your Cinder Block Shelving Unit:
Gathering your materials is the first concrete step towards building your new shelves. The beauty of this project is that all the components are readily available at your local hardware store, often for very reasonable prices. Here’s a detailed look at what you’ll need:
- Cinder Blocks (approx. 12 or more): These are the foundational elements of your shelving unit. Standard hollow-core cinder blocks are typically used, measuring about 8x8x16 inches. The exact number you need will depend on the desired height and number of shelves for your unit. For a basic four-shelf unit like the one described, 12 blocks (3 per vertical stack) will create a sturdy structure. Consider buying a few extra in case of breakages or for future expansion.
- Wood Planks (approx. 10 x 2x4s or similar): These form the actual shelves where you’ll place your items. While the tutorial suggests 2x4s, you have flexibility here. You can choose different dimensions like 2x6s, 2x8s, or even wider planks (1x10s or 1x12s) depending on the depth and strength you require for your shelves. The length of the planks is entirely up to you and the space you’re filling. Common lengths are 6 or 8 feet. Pine is a popular and inexpensive choice, but you could also opt for reclaimed wood or plywood for a different look and feel. Ensure the wood is straight and free of major defects.
- Sandpaper (various grits): While optional, sanding your wood planks is highly recommended. It smooths out rough edges, prevents splinters, and creates a more refined finish, especially if you plan to paint or stain the wood. Start with a medium grit (e.g., 100-120) and finish with a finer grit (e.g., 180-220) for a silky-smooth surface.
- Paint, Stain, or Sealant (optional): This allows for significant customization. You can paint the cinder blocks a vibrant color, a neutral tone to blend in, or leave them natural for an industrial look. Similarly, wood planks can be stained to enhance their natural grain, painted to match your decor, or simply sealed with a clear coat for protection. Consider exterior-grade paint if your shelves will be outdoors.
- Basic Tools: While not listed, a few essential tools will make the process smoother:
- Tape Measure: For planning your layout and cutting wood (if needed).
- Level: Crucial for ensuring your shelves are perfectly straight and stable.
- Safety Gloves: To protect your hands from rough cinder blocks and wood.
- Saw (optional): If you need to cut your wood planks to specific lengths.
Step-by-Step Guide: Building Your Cinder Block Shelves
Building your own cinder block shelving unit is a wonderfully gratifying project that requires minimal skill but yields maximum impact. Follow these detailed steps to create a sturdy and stylish storage solution.
1. Planning and Preparation
A little planning goes a long way in ensuring your shelving unit fits perfectly and functions as intended. Before you start stacking, take some time to prepare.
- Measure Your Space: Determine the exact dimensions of the area where your shelves will reside. Consider the desired height, width, and depth. This will help you calculate the number of cinder blocks and the length of wood planks you’ll need. Mark out the footprint on the floor to visualize the unit’s size.
- Gather All Materials: Ensure you have all your cinder blocks, wood planks, sandpaper, and any paint/stain readily accessible. Having everything on hand prevents interruptions during assembly.
- Prepare the Wood Planks: If you plan to sand, paint, or stain your wood, it’s best to do this before assembly. Lay out your planks in a well-ventilated area. Sand them thoroughly to remove any splinters or rough patches. Apply your chosen paint or stain, allowing ample time for drying between coats and before proceeding to the next step. This pre-finishing step ensures a cleaner, more professional look and is much easier than trying to paint or stain once the unit is assembled.
2. Assembling the Base Layer
The foundation of your shelving unit is critical for its overall stability. This is where you’ll start forming the structure.
- Position the First Cinder Blocks: Lay down the first layer of cinder blocks on a flat, even surface. These will serve as the supports for your lowest shelf. Depending on the desired length of your shelf, you might use two or three blocks per vertical stack. For a typical unit, place one block at each end of where your first plank will go, and if your plank is quite long, place another block in the middle for extra support. Ensure the blocks are level and spaced evenly. Use a tape measure to check the distance between opposing blocks.
- Ensure Leveling: Use a spirit level to check that each block is perfectly level. Adjust as necessary by adding shims (small pieces of wood or cardboard) underneath if the floor is uneven. A level base is crucial for preventing wobbling and ensuring your shelves are straight.
3. Adding the First Shelf
With your base established, it’s time to introduce the wood planks that will form your shelves.
- Place the Wood Planks: Carefully lay your prepared wood planks across the top of the first layer of cinder blocks. Ensure the planks are centered and extend slightly beyond the blocks for an aesthetically pleasing overhang. If using multiple planks for a wider shelf, make sure they are snugly aligned.
4. Building Upwards for Subsequent Shelves
Now, you’ll repeat the layering process to create additional shelves, building your unit to its desired height.
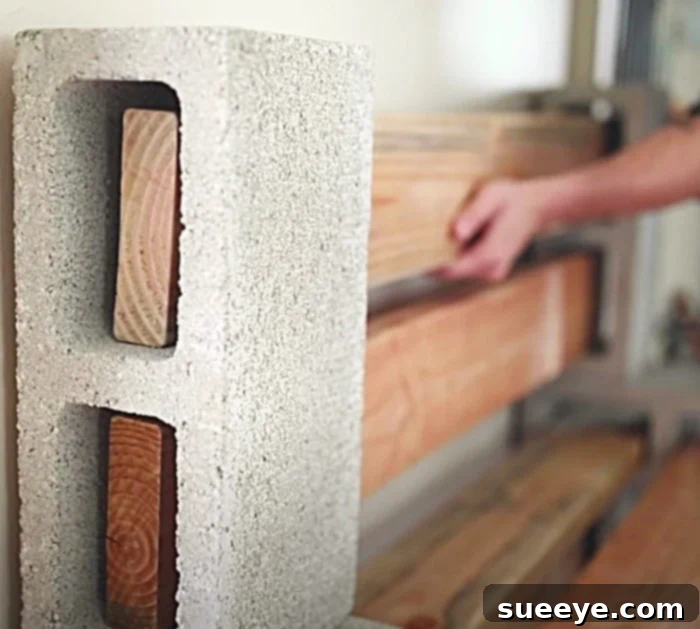
- Stack the Next Layer of Cinder Blocks: Once the first set of planks is in place, position the next layer of cinder blocks directly on top of the planks, aligning them with the blocks below. For enhanced stability and a more interesting aesthetic, consider staggering the blocks slightly, similar to how bricks are laid in a wall. This helps distribute weight more effectively and adds to the structural integrity.
- Repeat the Process: Continue alternating layers of wood planks and cinder blocks until you reach your desired number of shelves and overall height. After each layer of blocks, use your level to check for plumb and adjust if necessary.
- Visual Guidance: For a clear visual demonstration of this stacking process, refer back to the cinder block shelving video tutorial by Audrie Storme on YouTube. It offers excellent insight into the simple yet effective assembly technique.
5. Finishing Touches and Placement
Once the basic structure is complete, you can refine your shelving unit and prepare it for use.
- Secure and Level: While cinder block shelves are generally stable due to their weight, you can enhance security. For very tall units or in areas prone to seismic activity, consider using construction adhesive between blocks and planks, or even securing the unit to a wall stud with L-brackets. Always do a final check with your level to ensure everything is perfectly aligned.
- Aesthetic Enhancements: If you chose to paint or stain the blocks and planks, ensure they are fully dry. You might add felt pads or rubber stoppers to the bottom of the lowest blocks to prevent scratching floors and to provide additional stability. Now is also the time to decorate your shelves with books, plants, photos, and other personal items that bring the space to life.
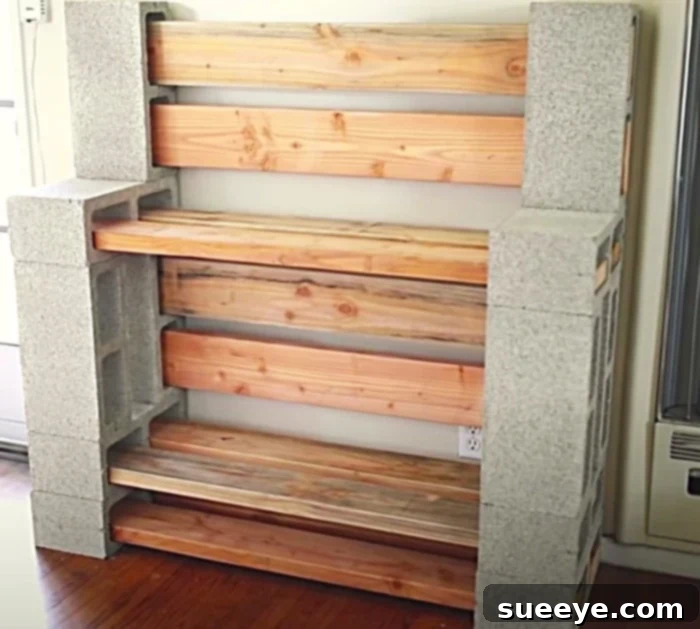
This shelving unit truly surpassed all my expectations, and my husband absolutely loved it! The practical aspect of obtaining all materials from a single trip to Home Depot, coupled with the helpful employees loading everything into my SUV, made the entire process incredibly smooth and enjoyable.
Customization Ideas for Your Cinder Block Shelves
The core design of cinder block shelving is minimalist, but this simplicity provides a fantastic canvas for personalization. Here are several ways to make your unit uniquely yours:
- Painting & Staining: Don’t limit yourself to raw concrete and wood. Paint the cinder blocks a bold color to match your decor, or a muted tone for a sophisticated look. Stain the wood planks to bring out their natural grain, or whitewash them for a farmhouse feel. You could even use stencils on the blocks for added patterns.
- Varying Wood Finishes: Experiment with different types of wood for the planks. Reclaimed barn wood offers incredible character, while smooth, polished oak can provide a more refined appearance. Plywood, when sanded and sealed, can also look modern and sleek.
- Adding Backings or Sides: For a more enclosed look, attach a sheet of plywood or MDF to the back of the unit. You can paint it, cover it with fabric, or even wallpaper it. For a semi-enclosed feel, add smaller wood panels to the sides of each section.
- Integrated Lighting: Install LED strip lights along the underside of the shelves for dramatic accent lighting. This is particularly effective for showcasing decorative items or creating ambient light in a man cave or living area.
- Making it Mobile: For smaller units, consider attaching heavy-duty casters to a sturdy wooden base that the first layer of cinder blocks sits on. This allows you to easily move your shelving unit for cleaning or reconfiguring your space.
- Multipurpose Designs: Cinder block units aren’t just for shelves. With a wider top plank, they can serve as a robust desk, a long media console, or even a sturdy workbench. Combine them with cushions on top for an impromptu bench or seating area.
Where to Place Your Cinder Block Shelving Unit
The adaptability of cinder block shelves means they can find a functional and stylish home in almost any room:
- Garage & Workshop: This is arguably their most common and practical application. Their strength makes them ideal for storing heavy tools, equipment, paint cans, and bulk supplies. The industrial aesthetic fits right in.
- Home Office: Organize books, files, and office supplies with ease. The minimalist design can contribute to a focused and clutter-free workspace.
- Living Room: When styled correctly with decorative objects, plants, and books, cinder block shelves can become a stunning focal point, adding a touch of urban or rustic chic to your main living area. They can also double as a media console for your TV and entertainment system.
- Bedroom: Use them as a unique bookcase, a bedside table, or even a dresser substitute by adding baskets or drawers to the open spaces.
- Outdoor Spaces: Due to their weather resistance, cinder blocks are perfect for outdoor use. Create garden tool storage, display potted plants, or even build a sturdy outdoor buffet for entertaining.
- Man Caves & Hobby Rooms: As proven by my husband’s new setup, these shelves are fantastic for organizing collections, displaying memorabilia, holding gaming consoles, or storing hobby supplies. Their robust nature fits the utilitarian needs of such spaces perfectly.
Pros and Cons of Cinder Block Shelving
Like any DIY project, cinder block shelving comes with its own set of advantages and considerations.
Pros:
- Highly Affordable: Extremely budget-friendly compared to pre-made shelving units.
- Easy to Assemble: No complex tools or advanced carpentry skills required.
- Incredibly Durable: Can hold substantial weight, making it ideal for heavy items.
- Flexible and Modular: Easily customized in size, height, and configuration to fit any space.
- Unique Aesthetic: Offers a trendy industrial, rustic, or minimalist look.
- Eco-Friendly Potential: Can use reclaimed wood, and cinder blocks are often made with recycled materials.
Cons:
- Very Heavy: Cinder blocks are weighty, making the unit difficult to move once assembled.
- Potential for Dust/Grime: The porous nature of blocks can accumulate dust if not sealed.
- Rough Texture: The raw blocks can be rough on surfaces if not protected with felt pads.
- Aesthetic Not for Everyone: The industrial look may not suit all interior design styles.
- Not Permanently Fixed: Unless secured, individual components are not joined, which can be a minor stability concern in active environments or with young children.
Maintenance and Care for Your Cinder Block Shelves
While exceptionally durable, a little care will keep your cinder block shelving looking great and functioning optimally for years to come.
- Regular Cleaning: Dust the wood planks and wipe down the cinder blocks periodically. If the blocks are unsealed, they might collect dust more readily. A damp cloth can be used on both surfaces.
- Stability Checks: Over time, especially if the unit is frequently loaded or unloaded, components might shift slightly. Periodically check that all blocks and planks are level and stable. Readjust as needed.
- Understanding Load Bearing: While strong, be mindful of the weight distribution. Avoid placing excessively heavy items concentrated in one small area of a plank. Spread the weight evenly across the shelves.
- Outdoor Considerations: If your unit is outdoors, ensure the wood is treated with an exterior-grade sealant or paint to protect it from moisture and UV damage. Cinder blocks themselves are highly weather-resistant.
Conclusion: Embrace the DIY Spirit with Cinder Blocks
Building your own cinder block shelving unit is more than just a home improvement project; it’s an empowering experience that combines practicality with personal style. The simplicity, affordability, and versatility of this design make it accessible to everyone, regardless of their DIY expertise. From robust garage storage to chic living room displays, these humble materials transform into functional works of art that reflect your creativity.
The satisfaction of crafting something useful and beautiful with your own hands is truly rewarding. So, grab your blocks and planks, channel your inner designer, and create a custom storage solution that not only meets your needs but also adds a unique character to your home. Embrace the DIY spirit, and let your cinder block creation stand as a testament to intelligent, stylish, and incredibly easy home organization!