
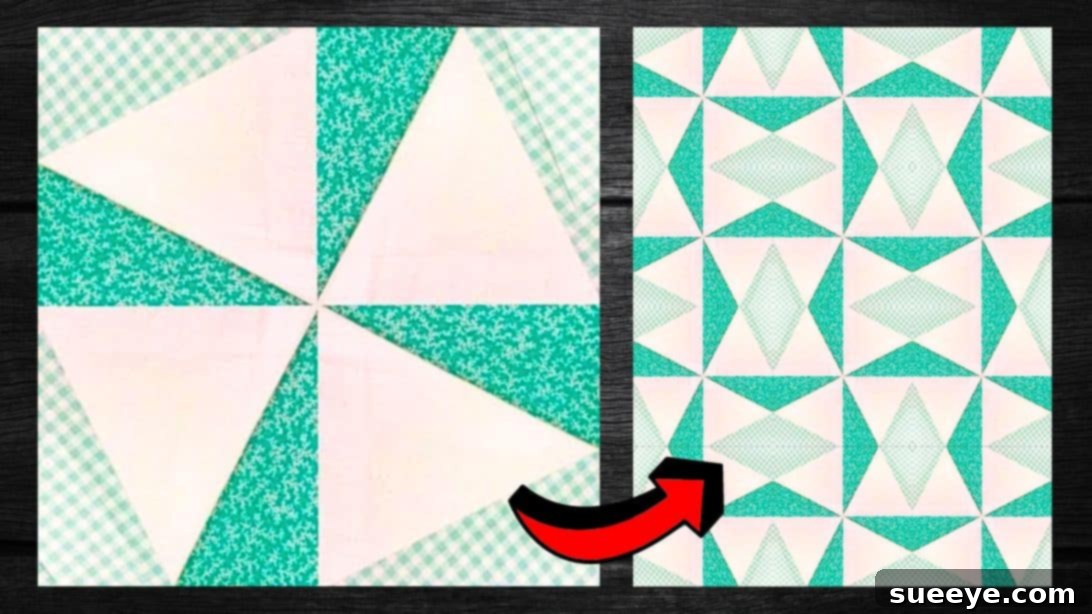
The “Triangles in a Square” quilt block stands as a testament to elegant simplicity in the world of quilting. It’s a design that effortlessly blends geometric precision with artistic flair, making it a beloved choice for quilters of all skill levels. Whether you’re taking your very first steps into quilting or you’re a seasoned crafter looking for a refreshing project, this block offers a deeply satisfying experience. Its straightforward construction belies a versatile nature, allowing it to become the foundation for a myriad of stunning quilt designs, from intricate modern patterns to timeless traditional layouts.
What truly makes the Triangles in a Square block a standout is its accessibility. You don’t need years of experience or a complex array of tools to master it. With just a few pieces of fabric – perhaps even scraps from your stash – and some basic sewing supplies, you can bring this classic block to life. For beginners, it provides an excellent opportunity to practice essential quilting techniques such as accurate cutting, precise piecing, and effective pressing, all while creating something beautiful and tangible. And for those with more experience, it serves as a wonderful canvas for experimenting with color palettes, fabric textures, and layout variations, breathing new life into a familiar form.
In this comprehensive guide, we’ll delve into the process of creating the Triangles in a Square quilt block, ensuring every step is clear, concise, and easy to follow. We’ll be utilizing the popular and highly accurate Foundation Paper Piecing (FPP) method, which guarantees sharp points and perfect squares every time, a dream come true for any quilter. To visually guide you through this rewarding journey, we’re thrilled to reference an excellent video tutorial by the talented Teresa DownUnder on YouTube. Her clear instructions and practical demonstrations complement this written guide perfectly, allowing you to see the techniques in action. Get ready to transform simple fabric pieces into a beautiful, structured block that will be the pride of your next quilting project!
RELATED: How to Sew a Simple Quilted Heart
Why Choose the Triangles in a Square Quilt Block?
Beyond its aesthetic appeal, the Triangles in a Square quilt block offers several compelling reasons for quilters to embrace it. It’s not just a pattern; it’s a foundational element that can elevate any quilting project, making it particularly advantageous for both novices and experienced crafters alike.
- Perfect for Skill Building: For newcomers, it’s an ideal way to learn the fundamentals of precision cutting, accurate ¼-inch seams, and the crucial art of pressing. The methodical nature of Foundation Paper Piecing (FPP) specifically helps in developing a meticulous approach to sewing, which is an invaluable skill for all future quilting endeavors. Mastering this block builds confidence and a strong foundation for more complex designs.
- Incredibly Versatile Design: This block is a true chameleon. By simply rotating the blocks, arranging them in different color combinations, or incorporating them with other block types, you can create a vast array of larger patterns. From traditional pinwheels and stars to more abstract, modern designs, the Triangles in a Square block integrates beautifully into sampler quilts, intricate layouts, or as a standalone motif. Its adaptability makes it a perennial favorite.
- Excellent for Scrap Busting: Do you have a collection of small fabric remnants you don’t know what to do with? The Triangles in a Square block is your answer! It requires relatively small pieces, especially for the ‘triangle’ sections, making it perfect for using up those cherished scraps. This not only helps reduce fabric waste but also adds unique character, texture, and a sense of history to your quilt, making each project truly one-of-a-kind.
- Foundation Paper Piecing (FPP) Advantages: While there are traditional methods for creating this block, FPP simplifies the process significantly, especially when striving for exactness. It ensures consistent, accurate results every time, even with complex angles that might otherwise be challenging. The paper acts as a stable guide, preventing fabric stretching and making it easier to achieve crisp points and perfect squares, which are hallmarks of high-quality quilting.
Materials Needed for Your Triangles in a Square Quilt Block:
Gathering the right tools and materials before you begin ensures a smooth and enjoyable quilting experience. Having everything prepared will help you maintain focus and achieve the best results for your Triangles in a Square quilt block project.
- Fabric Selection:
- Dark Print Fabric: Choose a fabric with a deep or vibrant color that will provide strong contrast and a visual anchor within your block. This creates definition for your shapes.
- Medium Print Fabric: A fabric with a moderate color or print intensity, sitting comfortably between your dark and light choices. This helps create depth and transition.
- Light Print Fabric: Opt for a light-colored or subtle print fabric to highlight the design elements and offer a balanced visual contrast. This often serves as the background or a key contrasting element.
- Tip for Fabric: High-quality 100% quilting cotton is highly recommended for its stability, minimal fraying, and ease of sewing. Consider pre-washing your fabrics to prevent potential shrinking and color bleeding, especially if combining very dark and very light colors. This also helps remove any manufacturing chemicals.
- Quilting Ruler: A transparent acrylic ruler (e.g., 6″x12″ or 6″x24″) is absolutely essential for precise cutting and trimming in quilting. Look for rulers with clear measurement lines and a non-slip backing or apply non-slip grippers for added safety and accuracy.
- Scissors or Rotary Cutter and a Cutting Mat:
- Rotary Cutter: Highly recommended for quilters as it allows for quick, accurate, and straight cuts through multiple layers of fabric. A 45mm or 60mm cutter is standard for general quilting.
- Self-Healing Cutting Mat: An indispensable tool that protects your work surface and significantly prolongs the life of your rotary blade. Ensure it’s large enough for your typical cutting needs.
- Fabric Scissors: Keep a sharp pair dedicated solely to fabric to ensure clean cuts for smaller pieces or when a rotary cutter isn’t suitable. Never use fabric scissors on paper!
- Needle and Thread:
- Sewing Machine Needles: A sharp universal or microtex needle, size 70/10 or 80/12, is ideal for piecing cotton fabric. Change your needle regularly (every 8-10 hours of sewing or at the start of a new project) for optimal performance and to prevent skipped stitches or fabric damage.
- Quilting Thread: High-quality 100% cotton thread in a neutral color (like white, light grey, or ecru) is typically used for piecing. It blends well with various fabric colors and is strong enough to withstand the wear and tear a quilt will endure.
- Fabric Pins or Clips: Essential for holding fabric pieces securely in place before sewing. Fine, sharp quilting pins or wonder clips are excellent choices. Pins with glass heads are easy to see and won’t melt under the iron.
- Iron and Ironing Board (for pressing): A good quality iron, preferably one with a steam function, is crucial for crisp seams and flat blocks. Pressing is a non-negotiable step in quilting for achieving flat blocks, accurate measurements, and professional-looking results.
- Sewing Machine: Any basic sewing machine capable of a reliable straight stitch will work perfectly for piecing quilt blocks. Ensure it’s clean, well-oiled, and has a fresh needle for the best results. A ¼-inch piecing foot can also be very helpful for consistent seam allowances.
- Pattern Template: The foundation paper piecing template for the Triangles in a Square block. (Click here to download the pattern from Teresa DownUnder’s site). Ensure you print it at 100% scale or “actual size” for accuracy – this is paramount for your block to finish at the correct size.
How to Make the Triangles in a Square Quilt Block with Foundation Paper Piecing:
This tutorial utilizes the Foundation Paper Piecing (FPP) method, celebrated for its precision and ability to create perfect points and angles. Follow these detailed steps to create your beautiful and accurate Triangles in a Square block.
Step 1: Prepare Your Pattern and First Fabric Piece
Begin by printing your Triangles in a Square pattern template. It is absolutely critical to print this at 100% scale (often labeled “actual size” or “do not scale”) to ensure your finished block will be the correct dimensions. After printing, carefully fold the paper pattern along each designated line on the template. These folds will act as your precise sewing guides. Next, roughly cut out your chosen fabric pieces. For each numbered section on your template (e.g., Piece 1, Piece 2, Piece 3), cut a piece of fabric that is approximately ½ inch larger on all sides than the area it will cover on the template. This generous allowance ensures you have ample room for seam allowances and minor adjustments, preventing frustration from short fabric pieces.
Now, take your first piece of fabric (this will be for the center, usually labeled “Piece 1” on the template). Turn your paper template over so the non-printed side is facing up. Place your first fabric piece on top of the Piece 1 section of the template, ensuring their right sides are facing up. The fabric should completely cover the Piece 1 area with at least ¼ inch overlap on all sides beyond the lines that define Piece 1. Pin this first fabric piece securely to the paper, making sure it won’t shift during the initial steps.
Step 2: Attaching Subsequent Fabric Pieces with Precision (FPP Technique)
With Piece 1 pinned, it’s time to attach Piece 2. Identify the line on your template that separates Piece 1 from Piece 2. Place your Piece 2 fabric directly on top of Piece 1, right sides together, aligning one edge of Piece 2 with the sewing line that separates Piece 1 and Piece 2 on your template. Now, carefully fold the paper template back along that precise sewing line (the one between Piece 1 and Piece 2). This fold will create a clear edge for trimming. Using your ruler and rotary cutter, trim the excess fabric from the combined Piece 1 and Piece 2, leaving a precise ¼-inch seam allowance beyond the folded edge of the paper. Then, unfold the paper pattern and your fabrics.
With your fabrics correctly aligned and trimmed, take your unit to the sewing machine. Stitch along the line separating Piece 1 and Piece 2 on the *printed side* of your paper template. Use a shorter stitch length (around 1.5-2.0mm) than you typically would for regular piecing. This shorter length helps perforate the paper, making it easier to remove later without damaging your seams. Once sewn, flip the Piece 2 fabric open so its right side is facing up, covering the Piece 2 section of the template. Press the seam flat using a dry iron to flatten it. You can press the seam open or towards the darker fabric, depending on your preference and design needs. The goal is a perfectly flat, crisp seam that doesn’t add bulk.
Repeat this entire process for Piece 3 and all subsequent pieces. For Piece 3, identify the next sewing line. Place Piece 3 fabric right sides together with the previously sewn unit (Piece 1 + Piece 2), aligning it along this new sewing line. Fold the paper back along this line, trim to a ¼-inch seam allowance, unfold the paper, sew along the line, and then press the seam open. Continue this sequence of placing, folding, trimming, sewing, and pressing for all remaining pieces until your entire block is covered with fabric, and all numbered sections of your paper template have fabric sewn over them.
Once all fabric pieces are sewn and pressed into place, carefully trim the excess fabric and paper from around the outer edges of the block. Use the outermost solid line on your template as your precise guide for this final trim. You should now have a perfectly sized and perfectly pieced Triangles in a Square block! Proceed to make more blocks as needed to assemble your full quilt or project. Remember to gently remove the paper foundation from the back of your block only when you are ready to join it with other blocks or use it in your final project.
Tips for Quilting Success with FPP:
To ensure your quilting journey with the Triangles in a Square block is as smooth and rewarding as possible, keep these invaluable tips in mind. Precision and patience are your best friends in FPP!
- Accuracy is Key: In quilting, even a tiny error can compound quickly and throw off your entire block. Take your time with every step: cutting your fabric generously, pinning accurately, and maintaining a consistent ¼-inch seam allowance. Precision at each stage will lead to a beautifully square and perfectly pieced block.
- Pressing Matters: Don’t underestimate the power of a good press! Pressing after each seam helps your block lie perfectly flat and ensures your points match up beautifully when joining blocks. Always “press” (lift and place the iron straight down) rather than “ironing” (sliding the iron back and forth), as sliding can stretch your fabric on the bias and distort your block.
- Test Your Stitch Length: Before sewing your actual block, practice on a scrap piece of fabric with a small piece of paper. This allows you to find the ideal stitch length that perforates the paper enough for easy removal later, but not so much that it weakens the fabric or makes it prone to tearing during handling.
- Chain Piecing: If you’re making multiple blocks, consider chain piecing to save a significant amount of time and thread. Sew the first seam on one block, then feed the next block directly into your machine without cutting the thread between them. This creates a chain of sewn units.
- Fabric Grain Awareness: While FPP helps immensely with stability, being mindful of the fabric grain (especially keeping stretchy bias edges away from outer seams where they might get distorted) can further improve the accuracy and longevity of your quilt blocks.
- Don’t Rush the Paper Removal: When the time comes to remove the paper foundation (usually after all blocks are sewn together, or just before joining), be gentle. Slowly tear it away, working carefully around the seam allowances where the stitches are densest. A pair of tweezers can be helpful for small pieces.
Exploring Fabric Choices for Your Triangles in a Square Block:
The beauty of your Triangles in a Square block lies not just in its precise construction, but also in the fabrics you choose. Thoughtful fabric selection can elevate a simple block into a stunning focal point, telling a unique color story.
- Contrast is Crucial: The “Triangles in a Square” design relies heavily on visual contrast to make its shapes pop and define the block’s structure. Ensure your dark, medium, and light fabrics are distinct enough from each other in value (how light or dark they appear). Hold them up together to see how they interact. A common mistake is choosing fabrics that are too similar in value, which can make the design appear flat and muddy.
- Color Palette: Decide on a cohesive color scheme. Do you want a warm palette (reds, oranges, yellows), a cool one (blues, greens, purples), or a monochromatic look (varying shades and tones of one color)? Consider the overall mood and aesthetic you want to evoke with your finished quilt.
- Print Scale: Mix up your print scales for visual interest. If you use a large, bold print for the center square, perhaps opt for smaller, more subtle prints, blenders, or solids for the triangles. This adds depth and prevents any single fabric from overwhelming the design.
- Fabric Type: While 100% quilting cotton is the industry standard due to its stable weave and ease of handling, don’t be afraid to experiment with other stable woven fabrics. Linen blends, shot cottons, or even some lightweight home decor fabrics can add interesting texture, provided they have a similar weight and care requirements to prevent issues when washing. Always pre-wash new fabrics to remove excess dyes and prevent shrinkage.
- Scrap Friendly: This block is a fantastic way to use up cherished scraps! Dive into your scrap bin and pull out coordinating or even intentionally clashing pieces for a vibrant, eclectic look. It’s an excellent way to create a unique, scrappy quilt with a lot of character and a narrative built from your past projects.
Project Ideas and Variations with Triangles in a Square:
Once you’ve mastered the Triangles in a Square block, a world of creative possibilities opens up. This incredibly versatile block can be used in countless ways, allowing you to personalize projects large and small.
- Classic Quilt: Combine multiple Triangles in a Square blocks to create a traditional quilt top. Experiment with rotating blocks in different directions to form mesmerizing secondary patterns like pinwheels, radiating stars, or checkerboards across your quilt. The potential for intricate designs is vast!
- Pillow Covers: A single, well-executed Triangles in a Square block can make a striking and elegant focal point for a decorative throw pillow. This is a quick and satisfying project that allows you to experiment with color without committing to a full quilt.
- Table Runners or Placemats: A series of these blocks, sashed or unsashed, can create beautiful table linens. Imagine a set of placemats in coordinating colors or a festive table runner for holidays, perfect for adding a touch of handmade charm to your home decor.
- Tote Bags or Pouches: Integrate a Triangles in a Square block into the design of a handmade tote bag, zippered pouch, or cosmetic bag for a unique and stylish accessory. This adds a personalized, quilted touch to everyday items.
- Sampler Quilt: Combine your Triangles in a Square blocks with other quilt block designs for a diverse and challenging sampler quilt. This is a wonderful way to showcase a variety of techniques and patterns in one cohesive project.
- Modern Interpretations: Play with negative space by leaving some sections or adjacent blocks as solid fabrics, or use a limited, striking color palette for a contemporary, minimalist look. Consider creating oversized Triangles in a Square blocks for a bold, modern statement quilt.
- Mini Quilts and Wall Hangings: These blocks are perfect for small projects that allow you to experiment with new color combinations or techniques without committing to a full-sized quilt. A miniature Triangles in a Square quilt can make a lovely wall hanging or a thoughtful gift.
A heartfelt thanks to Teresa DownUnder via YouTube for all the illustrative images used here and for the fantastic, easy-to-follow video tutorial. If you enjoyed this sewing project and found her guidance helpful and inspiring, then you’ll surely love her other quilting, sewing, and crafting videos too. We highly recommend giving her channel a visit and subscribing for more inspiring content and expert tips!