
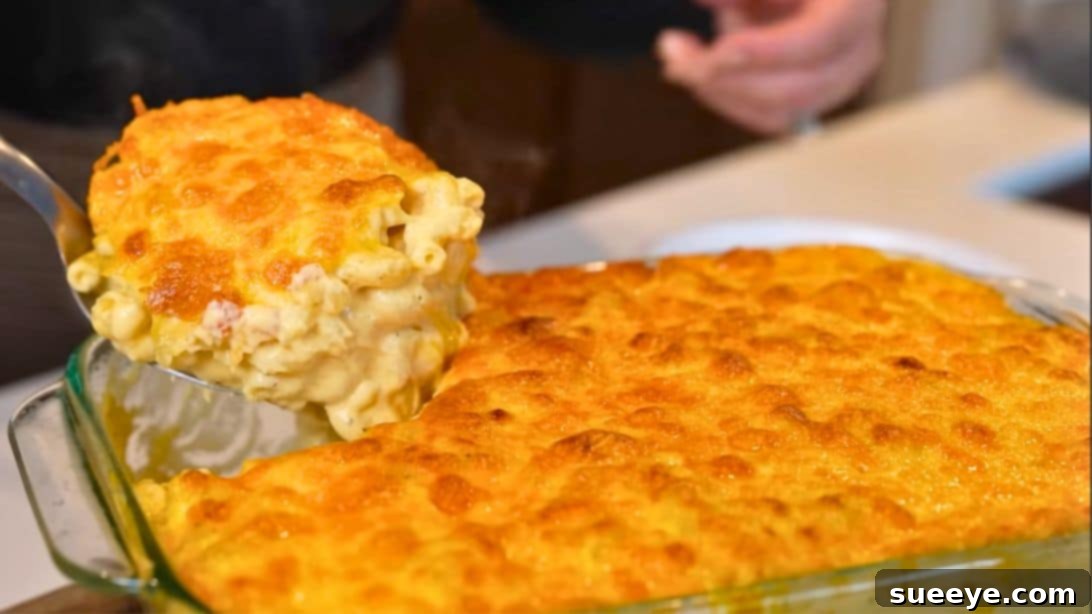
The Ultimate Creamy, Cheesy Oven-Baked Mac and Cheese Recipe
Indulge in the unparalleled comfort of homemade, oven-baked mac and cheese with this incredible recipe, perfected and shared by the talented Cooking Con Claudia. This isn’t just any mac and cheese; it’s a culinary masterpiece that consistently amazes guests and vanishes from the dinner table in record time. Beloved in our family as a staple for every holiday gathering, this recipe has quickly become our new go-to, celebrated for its rich creaminess, irresistible cheesiness, and profoundly delicious flavor profile. Prepare to elevate your comfort food game to an entirely new level, creating a dish that truly embodies warmth and satisfaction.
This heavenly rendition of mac and cheese owes its profound flavor to a glorious combination of three distinct cheeses: sharp cheddar, medium cheddar, and Colby Jack. Each cheese contributes its unique characteristics, building layers of savory depth and melt-in-your-mouth texture that no single cheese could achieve alone. The foundation of this spectacular dish is a velvety, homemade cheese sauce crafted from a classic roux of butter and flour, expertly seasoned with a blend of aromatic spices, then richly enhanced with heavy cream and whole milk. The undeniable secret to its superior texture and taste? Grating your own cheese from blocks. This crucial step ensures a smooth, luscious sauce without the powdery, sometimes gritty, mouthfeel often found with pre-shredded varieties. Make no mistake, this creamy baked mac and cheese is a must-add to your Holiday menu this year, promising to be the star of any feast and a dish your family will request again and again!
RELATED: Looking for more quick and delicious pasta dishes that are easy on the budget? Check out this Super Easy Stovetop Cheeseburger Macaroni Recipe for another family favorite that delivers big flavor in one pot!
Essential Ingredients for the Perfect Creamy Baked Mac and Cheese
Crafting the perfect mac and cheese begins with selecting the right ingredients. Here’s everything you’ll need to achieve that luxurious, cheesy goodness, along with notes on why each component is vital:
- 1 lb of Elbow Pasta: While elbow macaroni is the traditional choice for its classic shape and ability to hold sauce, feel free to experiment with other short pasta shapes like cavatappi, shells, or campanelle for varied texture and visual appeal.
- 5 tablespoons of Unsalted Butter: This forms the essential fat base of our roux, the thickening agent for the sauce. Using unsalted butter gives you precise control over the overall saltiness of your dish.
- 5 tablespoons of All-Purpose Flour: The second component of the roux, crucial for thickening the liquid base and creating a smooth, stable, and creamy cheese sauce that won’t separate.
- 1 ½ teaspoons of Ground Mustard: Don’t let this ingredient surprise you! Ground mustard doesn’t make the mac and cheese taste like mustard; instead, it acts as a phenomenal flavor enhancer, significantly amplifying the natural cheesiness and adding a subtle tang.
- 1 teaspoon of Garlic Powder: Adds a subtle, pervasive aromatic depth that complements the richness of the cheese without overpowering it.
- 1 teaspoon of Onion Powder: Works in harmony with garlic powder to contribute another layer of savory, umami flavor, building complexity in the sauce.
- 1 teaspoon of Black Pepper: Provides a gentle warmth and classic spice that balances the creamy richness of the dish. Freshly ground pepper is always recommended for the best flavor.
- ½ teaspoon of Cayenne Pepper: This is a secret ingredient for a slight, pleasant kick that cuts through the richness and adds a dynamic edge to the flavor profile, without making the dish overtly spicy. Adjust the quantity to match your personal heat preference.
- 1 teaspoon of Salt: Absolutely crucial for properly seasoning the sauce. Remember to taste and adjust the saltiness as you go, especially after adding the cheese.
- 3 cups of Heavy Cream: The cornerstone of a truly rich and decadent cheese sauce. Heavy cream provides unparalleled creaminess and mouthfeel, making this mac and cheese exceptionally luxurious.
- 2 cups of Whole Milk: Adds to the liquid base of the sauce, offering a slightly lighter texture than pure heavy cream while still maintaining substantial richness and flavor.
- 2 cups of Sharp Cheddar Cheese (plus 1 more cup for topping): This cheese delivers a robust, tangy, and intensely cheesy flavor that is characteristic of a classic, full-bodied mac and cheese. It provides the essential “cheddar bite.”
- 2 cups of Medium Cheddar Cheese (plus 1 more cup for topping): Offers a milder, more balanced cheddar flavor than its sharp counterpart. It contributes to the overall cheesiness without overwhelming the palate, creating a harmonious blend.
- 2 cups of Colby Jack Cheese (plus 1 more cup for topping): A fantastic melting cheese, Colby Jack (a blend of Colby and Monterey Jack) contributes a wonderfully smooth, creamy texture and a mild, buttery flavor. It helps create that desirable gooey, stretchable quality in the finished dish.
A Crucial Tip for Superior Texture: For the ultimate creamy and delicious mac and cheese with a truly velvety sauce, always grate your own cheese from blocks. Pre-shredded cheeses commonly contain anti-caking agents like cellulose or potato starch, which can prevent them from melting smoothly and often result in a grainy or clumpy sauce. Freshly grated cheese melts beautifully and integrates seamlessly, creating that desired luscious consistency.
Step-by-Step Guide: Crafting the Best Oven-Baked Mac and Cheese
Follow these detailed steps carefully to create a show-stopping dish that will undoubtedly become a treasured staple in your recipe collection. Precision and a little patience will reward you with a magnificent mac and cheese that’s perfect every time.
Step 1: Perfectly Cook Your Pasta
Begin by cooking your elbow macaroni (or chosen pasta shape) in a large pot of generously salted boiling water. It’s vital to salt the water as you would for pasta, as this is your primary opportunity to season the pasta itself from the inside out. Cook the pasta until it reaches an al dente stage, meaning it should still have a slight bite and firmness to it. Avoid overcooking, as the pasta will continue to cook slightly when baked in the oven, ensuring it doesn’t become mushy. Throughout the cooking process, give the pasta a good stir frequently to prevent the individual pieces from sticking together. Once cooked to al dente, drain the pasta thoroughly through a colander and set it aside. Do not rinse the pasta; the residual starch on its surface actually helps the cheese sauce adhere better, leading to a richer, more cohesive dish.
Step 2: Prepare the Flavorful Roux
In the same large pot used for the pasta (ensure it’s completely dry before proceeding), or a separate heavy-bottomed pot or Dutch oven, melt the 5 tablespoons of unsalted butter over medium heat. Once the butter is fully melted and shimmering, add your blend of aromatic spices: ground mustard, garlic powder, onion powder, black pepper, cayenne pepper, and salt. Stir constantly for about 30 to 60 seconds to allow the spices to “bloom” in the hot butter, releasing their full fragrance and intensifying their flavor. Next, sprinkle in the 5 tablespoons of all-purpose flour. Immediately begin whisking continuously for approximately 2 minutes. This step is crucial for cooking out the raw flour taste, creating a smooth, lightly golden-brown roux that will serve as the perfectly flavored thickening agent for your glorious cheese sauce.
Step 3: Build the Velvety Sauce Base
With the roux prepared, it’s time to build the liquid base of your cheese sauce. Gradually pour in the 3 cups of heavy cream and 2 cups of whole milk into the pot, whisking continuously and gently to prevent any lumps from forming. Start by adding a small amount of liquid to the roux to create a smooth, thick paste, then slowly incorporate the remaining cream and milk. Continue to whisk consistently over medium heat. The mixture will slowly begin to thicken over approximately 5 to 7 minutes, transforming into a luxurious, smooth sauce base. It should reach a consistency where it’s thick enough to generously coat the back of a spoon, indicating it’s ready for the star ingredient.
Step 4: Incorporate the Cheeses for Ultimate Gooeyness
Now for the most exciting part – adding the cheese! In one large bowl, combine 2 cups of each freshly grated cheese (sharp cheddar, medium cheddar, and Colby Jack). In a separate, smaller bowl, set aside the remaining 1 cup of each cheese for the topping. Crucially, turn the heat OFF under the pot before adding the cheese to prevent it from separating, becoming stringy, or developing an oily texture. Add the larger bowl of freshly grated cheese (a total of 6 cups) to your thickened cream sauce. Stir gently but thoroughly with a whisk or a wooden spoon until all the cheese is completely melted and beautifully incorporated, creating a rich, homogenous, and incredibly smooth cheese sauce. The residual heat from the sauce will be perfectly sufficient to melt the cheese flawlessly, ensuring a creamy, velvety texture.
Step 5: Assemble Your Mac and Cheese Layers
Add the cooked and thoroughly drained macaroni directly into the glorious cheese sauce. Stir gently but persistently until every single piece of pasta is thoroughly coated in the rich, creamy sauce. Ensure an even distribution for maximum flavor in every bite. Lightly grease a large baking dish (a standard 9×13 inch dish or similar size works perfectly for this recipe). Transfer exactly half of the mac and cheese mixture into the prepared baking dish, spreading it out evenly to form the first layer. Sprinkle a generous amount of the reserved cheese mixture (from the smaller bowl) over this bottom layer. Then, carefully pour the remaining mac and cheese mixture on top, spreading it out smoothly to form the second, top layer. Finally, sprinkle the rest of the reserved cheese evenly over the very top. This strategic layering technique ensures cheesiness throughout the entire dish, not just on the surface, creating an incredible textural and flavor experience.
Step 6: Bake to Golden Perfection and Serve
Preheat your oven to 375°F (190°C). Once hot, carefully place your assembled mac and cheese into the preheated oven and bake for approximately 15 to 18 minutes. The primary goal during this baking stage is to heat the dish through, allow the magnificent flavors to meld beautifully together, and get that top layer of cheese wonderfully bubbly, molten, and slightly golden. If you desire an extra golden-brown, slightly crisp crust on top, carefully switch your oven to broil on high for an additional 1 to 2 minutes. During broiling, it is absolutely essential to keep a very close eye on it, as cheese can burn quickly under the broiler! Once baked to your liking, remove the dish from the oven. Allow the mac and cheese to rest for about 5 minutes before serving. This crucial resting time allows the sauce to set slightly and prevents it from being too runny or soupy when scooped. Serve warm and savor every single comforting, cheesy, utterly delicious bite!
Why This Three-Cheese Oven-Baked Mac and Cheese Stands Out
What makes this particular recipe by Cooking Con Claudia so exceptionally delicious and a guaranteed crowd-pleaser? It’s the perfect harmony of textures and flavors achieved through meticulous steps. The thoughtful combination of sharp cheddar, medium cheddar, and Colby Jack cheeses creates a complex, rich, and deeply satisfying flavor profile that is both comforting and incredibly sophisticated. The foundation of a homemade roux ensures a consistently smooth, velvety sauce, offering a superior texture that simply cannot be matched by any processed alternatives or shortcuts. Baking it in the oven not only creates a beautiful, bubbly, golden-brown crust but also allows the myriad of flavors to deepen, meld, and intensify, resulting in a dish that’s incredibly satisfying and profoundly flavorful. It’s truly the ultimate comfort food for any occasion, from simple weeknight dinners to elaborate holiday feasts, promising to be a highlight your guests will rave about.
Expert Tips for the Perfect Baked Mac and Cheese
Achieving mac and cheese perfection is easy with these insider tips:
- Always Grate Your Own Cheese: We cannot stress this enough! It’s the single most important step for a smooth, lump-free, and truly creamy cheese sauce. Pre-shredded cheeses are the enemy of velvety mac and cheese.
- Don’t Overcook Your Pasta: Remember, the pasta will continue to cook slightly in the hot cheese sauce while baking in the oven. Cooking it al dente initially is key to preventing mushy pasta and maintaining a desirable texture.
- Season Generously and Taste: Don’t be shy with salt in the pasta water and in the sauce. Salt enhances all the other flavors. Always taste the sauce before adding the pasta and adjust the seasoning as needed.
- Gentle Heat for Cheese Integration: Always turn off the heat before adding the cheese to the hot sauce. High, direct heat can cause the cheese proteins to seize and separate, resulting in a grainy or oily texture. The residual heat is sufficient for perfect melting.
- Allow for Resting Time: A few minutes of resting after baking (and especially after broiling) allows the sauce to set slightly and prevents it from being too runny or watery when scooped, ensuring a more cohesive dish.
- Customize Your Spices: While the spice blend is perfect as is, feel free to adjust the cayenne pepper for more or less heat. For an extra layer of gourmet flavor, a tiny pinch of freshly grated nutmeg can also subtly enhance the cheese flavor.
Delicious Serving Suggestions and Creative Variations
This creamy baked mac and cheese is robust enough to be a hearty meal in itself, but it also shines brilliantly as an unforgettable side dish for various entrees:
- Classic Pairings: Serve alongside comforting classics like perfectly roasted chicken, smoky BBQ ribs, tender pulled pork, a succulent grilled salmon, or a juicy steak for a truly satisfying and complete meal.
- Refreshing Vegetable Sides: Balance the richness with a fresh, crisp green salad dressed with a light vinaigrette, vibrant steamed broccoli, or perfectly roasted asparagus.
- Flavorful Add-ins for Extra Delight:
- Crispy Bacon: Crumbled crispy bacon is a divine addition, offering a salty, smoky crunch. Stir it directly into the mac and cheese mixture or sprinkle generously on top before baking.
- Spicy Jalapeños: For a delightful spicy kick, add finely diced fresh or pickled jalapeños into the cheese sauce.
- Protein Boost: Transform this side dish into a complete main course by stirring in shredded rotisserie chicken, diced cooked ham, or seasoned cooked ground beef.
- Crunchy Breadcrumbs: For an extra layer of textural contrast and a golden-brown crust, mix panko breadcrumbs with a tablespoon of melted butter and sprinkle them evenly over the top before baking, either instead of or in addition to the reserved cheese.
- Different Cheese Profiles: Don’t hesitate to experiment with other melting cheeses like Gruyère, Fontina, smoked Gouda, or even a touch of Pecorino Romano for different flavor profiles and added complexity.
Storage and Reheating Best Practices
While leftovers of this irresistible mac and cheese are a rare occurrence, if you do find yourself with some, here’s how to store and reheat them to maintain their deliciousness:
- Proper Storage: Store any leftover mac and cheese in an airtight container in the refrigerator for up to 3-4 days. Prompt cooling and proper sealing will ensure freshness.
- Reheating in the Oven (Recommended): For the best results that retain creaminess, reheat covered in an oven-safe dish at a moderate 300°F (150°C) until warmed through, typically about 20-30 minutes. To restore moisture and prevent drying, you may want to add a splash (1-2 tablespoons) of milk or cream before reheating.
- Reheating on Stovetop: For smaller portions, gently reheat in a saucepan over low heat, adding a tablespoon or two of milk or cream and stirring occasionally until creamy and hot. This method helps prevent the sauce from breaking.
- Microwave (Convenient, but with caution): While convenient, the microwave can sometimes dry out mac and cheese or make the cheese oily. Reheat in short bursts (30-60 seconds), stirring in between each interval, and add a little milk if needed to loosen the sauce.
Frequently Asked Questions About Baked Mac and Cheese
- Can I make this mac and cheese ahead of time for an event?
- Yes, absolutely! You can assemble the mac and cheese completely, up to the point of baking. Cover it tightly with plastic wrap and aluminum foil, then refrigerate for up to 24 hours. When you’re ready to bake, let it sit at room temperature for about 30 minutes before placing it in the oven, and you might need to add an extra 5-10 minutes to the baking time to ensure it heats through.
- Why is my cheese sauce grainy or oily?
- A grainy sauce is most often caused by using pre-shredded cheese (due to the anti-caking agents) or by adding cheese to a sauce that is too hot, which can cause the cheese proteins to seize. Always grate your own cheese from blocks, and remember to turn off the heat before stirring in the cheese to ensure a smooth, velvety consistency.
- What kind of pasta is truly best for mac and cheese?
- While elbow macaroni is the traditional and classic choice, any small, sturdy pasta shape with plenty of nooks and crannies to trap and hold the rich cheese sauce works wonderfully. Excellent alternatives include cavatappi, shells, campanelle, or rotini.
- Can I use different types of milk, such as low-fat or skim milk?
- While whole milk and heavy cream provide the absolute richest and creamiest results, you can use 2% milk if you prefer. However, skim milk is generally not recommended as it will result in a much thinner sauce with significantly less body and flavor, compromising the luxurious texture of this recipe.
- How do I prevent the mac and cheese from drying out in the oven?
- Several factors help prevent dryness: ensuring your pasta is cooked al dente initially, making sure you have a generous amount of creamy sauce, and most importantly, avoiding over-baking the dish. When reheating leftovers, adding a bit of extra milk or cream can also help restore moisture and creaminess.
Conclusion: Your New Favorite Comfort Food Awaits!
This ultimate creamy, cheesy oven-baked mac and cheese recipe is more than just a dish; it’s an unforgettable culinary experience waiting to happen in your kitchen. From the careful selection of three distinct cheeses to the precise creation of a velvety, homemade sauce, every step is designed to deliver maximum flavor, luxurious texture, and unparalleled comfort. Whether you’re preparing it for a festive holiday feast, a comforting family dinner, or simply treating yourself to a moment of pure culinary bliss, this recipe by Cooking Con Claudia guarantees a rich, satisfying, and utterly delicious result that will impress everyone at your table. Get ready to create lasting memories around a dish that truly embodies the warmth of home and the joy of shared meals. Happy cooking, and prepare for endless compliments!