
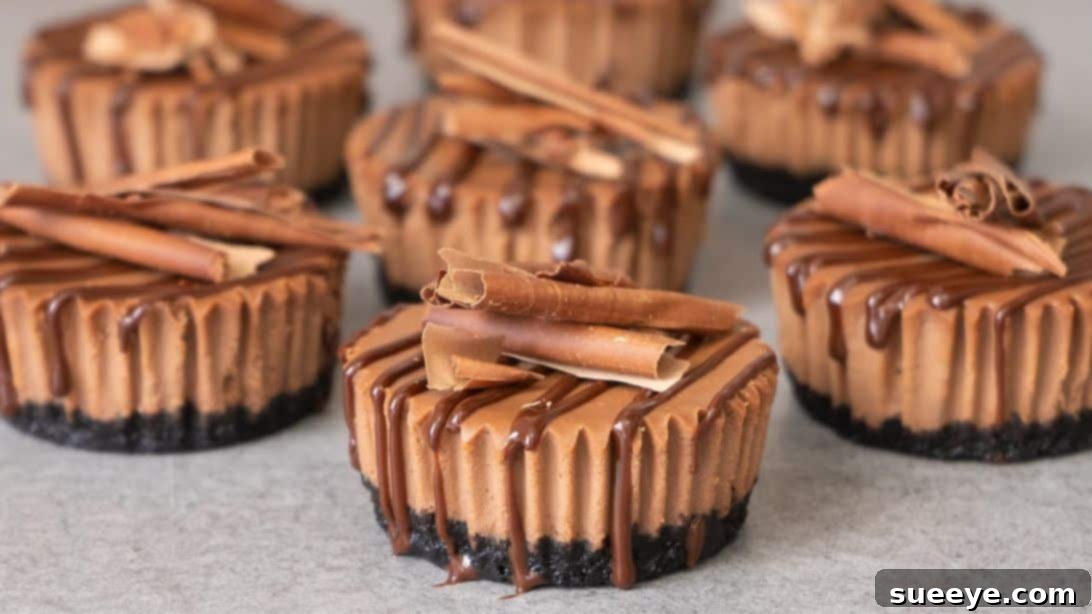
Prepare to delight your taste buds with these truly irresistible mini chocolate cheesecakes, featuring a luscious Oreo cookie crust and an incredibly rich, decadent chocolate cream cheese filling. This exceptional recipe, brought to us by the culinary brilliance of El Mundo Eats, is an absolute game-changer for anyone with a sweet tooth. Whether you’re planning a grand celebration, a cozy family gathering, or simply craving a personal indulgence, these bite-sized wonders are guaranteed to be the star of the show. Their convenient individual portions make them perfect for serving, and be warned – they disappear in minutes! So, when anticipating a crowd, it’s always a good idea to prepare multiple batches to ensure everyone gets to savor this delightful treat.
Mini cheesecakes offer all the luxurious flavor of a classic cheesecake but with the added benefits of easy portion control and elegant presentation. No need for slicing a large cake; each guest receives their own perfectly formed dessert. The combination of a crunchy, buttery Oreo base and a smooth, creamy chocolate filling creates a textural and flavor harmony that is simply divine. Follow our detailed guide to create these masterpieces that look as impressive as they taste.
Essential Ingredients for Your Mini Chocolate Cheesecakes
Crafting the perfect mini chocolate cheesecake starts with selecting high-quality ingredients. Pay close attention to temperatures and types, as these details significantly impact the final texture and flavor of your dessert. We’ve broken down what you’ll need for both the signature Oreo crust and the silky-smooth chocolate cheesecake filling.
For the Decadent Oreo Crust:
- 7 oz of Oreo cookies: Opt for regular Oreos, not double-stuffed, for the ideal crumb consistency. The classic chocolatey wafer and cream filling create a wonderfully balanced base that pairs perfectly with the rich cheesecake.
- 3 tablespoons of unsalted butter: Melted. Unsalted butter allows you to control the overall saltiness of the crust. It acts as the binding agent, ensuring your crust is firm but still delightfully crumbly.
For the Silky Chocolate Cheesecake Filling:
- 10 oz of full-fat cream cheese (room temperature): This is crucial! Full-fat, block-style cream cheese (not whipped or spreadable) provides the necessary richness and structure. Ensure it’s at room temperature to prevent lumps and ensure a smooth, easily blendable filling.
- 1/3 cup of granulated sugar: Provides the perfect amount of sweetness to balance the tang of the cream cheese and the bitterness of the chocolate.
- 1 cup of sour cream (room temperature): Adds moisture, a subtle tang, and contributes to the cheesecake’s incredibly smooth texture. Like the cream cheese, having it at room temperature is key for a uniform mixture.
- 1 teaspoon of vanilla extract: Use good quality pure vanilla extract to enhance the overall flavor profile and add a warm, aromatic depth.
- 1/4 teaspoon of salt: A small amount of salt is essential to balance the sweetness and elevate the chocolate notes, making the flavors truly pop.
- 4 oz semisweet chocolate: High-quality semisweet chocolate (chips or finely chopped bar) will provide the best flavor. This will be melted and incorporated into the cream cheese mixture for that deep, rich chocolate taste.
- 2 large eggs (room temperature): Again, room temperature is vital. Eggs act as a binder and help set the cheesecake. Lightly whisking them ensures they incorporate smoothly without overmixing the batter.
Gathering all your ingredients and ensuring they are at the correct temperature before you begin will make the baking process smoother and contribute significantly to the success of your mini cheesecakes.
Step-by-Step Guide to Baking Perfect Mini Chocolate Cheesecakes
Creating these divine mini chocolate cheesecakes is an enjoyable process, and by following these detailed instructions, you’ll achieve professional-level results every time. Take your time with each step, and you’ll be rewarded with a batch of irresistible desserts.
Step 1: Prepare the Irresistible Oreo Crust
Begin by making the foundation of your cheesecakes: the Oreo crust. Place the entire 7 oz of Oreo cookies into a food processor. Process the cookies until they are finely ground into even crumbs. You want a texture similar to fine sand, but not powdery like flour. Transfer these finely crushed Oreos into a medium-sized mixing bowl. Pour in the 3 tablespoons of melted unsalted butter. Mix thoroughly with a spoon or your hands until all the cookie crumbs are moistened and resemble wet sand. This ensures that your crust will hold together beautifully once pressed.
Step 2: Form and Chill the Crusts
Line a 12-cup muffin pan with paper cupcake liners. If you don’t have liners, you can lightly grease each cup. Distribute the Oreo-butter mixture evenly among the 12 muffin cups. Aim for roughly equal portions in each. Using the back of a spoon, your fingers, or a small glass, firmly press the crumbs into the bottom of each cup to create a compact and even crust. The firmer you press, the less likely your crust will crumble when serving. Once all crusts are formed, place the muffin pan into the freezer for a minimum of 30 minutes. This chilling period is crucial as it helps the butter solidify, setting the crust and making it firm enough to hold up to the filling.
Step 3: Melt the Chocolate
While the crusts are chilling, prepare your chocolate. Finely chop the 4 oz of semisweet chocolate if you are using a bar, or measure out your chocolate chips. Place the chocolate in a microwave-safe bowl. Heat in the microwave on medium power in 20-30 second intervals, stirring well after each interval, until the chocolate is smooth and fully melted. Be careful not to overheat it, as chocolate can burn easily. Alternatively, you can use a double boiler for a more controlled melting process. Once melted, set the chocolate aside and allow it to cool slightly. It should still be liquid, but not piping hot, as hot chocolate can curdle the cream cheese mixture.
Step 4: Create the Creamy Cheesecake Base
In a large mixing bowl, add the 10 oz of room temperature full-fat cream cheese. Using an electric mixer, beat the cream cheese on the lowest speed possible, just until it becomes creamy and smooth. The key here is not to overmix or incorporate too much air, which can lead to cracks in your baked cheesecake. Next, add the granulated sugar, sour cream (also at room temperature), vanilla extract, and salt. Continue to mix on low speed until all the ingredients are just combined and the mixture is smooth. Scrape down the sides of the bowl as needed to ensure everything is thoroughly incorporated.
Step 5: Combine Chocolate and Cream Cheese
Gently pour the slightly cooled, melted chocolate into the cream cheese mixture. Fold the chocolate into the cream cheese mixture using a rubber spatula. Mix until the chocolate is evenly distributed and the batter is a uniform chocolate color, but again, avoid overmixing. Overmixing at this stage can introduce too much air, leading to a less dense texture and potential cracking during baking.
Step 6: Incorporate Eggs and Fill the Muffin Pan
In a separate small bowl, lightly whisk the 2 room temperature large eggs. You just want to break up the yolks and whites; do not whip them vigorously. Gently fold the whisked eggs into the chocolate cream cheese mixture using your spatula. The goal is to incorporate the eggs without developing too much air. Once combined, retrieve your muffin pan with the chilled Oreo crusts. Divide the chocolate cheesecake batter evenly among the 12 prepared muffin cups, filling each almost to the top. Smooth the tops with the back of a spoon if desired.
Step 7: Bake and Cool to Perfection
Preheat your oven to 285°F (140°C). A lower baking temperature is ideal for cheesecakes as it prevents rapid expansion and contraction, which can lead to cracks. Carefully place the muffin pan into the preheated oven and bake for approximately 25 minutes. You’ll know they are done when the edges appear set and firm, but the center still has a slight jiggle or “wiggle” when you gently shake the pan. Do not overbake! Overbaking will result in a dry texture and potential cracks.
Once baked, turn off the oven and prop the oven door open slightly (you can use a wooden spoon). Allow the cheesecakes to cool gradually inside the oven for about 30 minutes. This gradual cooling prevents sudden temperature changes that can also cause cracking. After 30 minutes, remove the cheesecakes from the oven and let them cool completely at room temperature on a wire rack. Once fully cooled, transfer the muffin pan to the refrigerator and chill for a minimum of 8 hours, or ideally, overnight. This prolonged chilling time is essential for the cheesecakes to fully set, firm up, and for the flavors to deepen and meld beautifully.
Step 8: Garnish and Serve Your Masterpiece
Once thoroughly chilled and set, it’s time to enjoy your creations! Carefully remove the mini cheesecakes from the muffin pan. You can use a thin knife or an offset spatula to gently loosen the edges if needed. Peel off the paper liners. Arrange your beautiful mini chocolate cheesecakes on a serving plate. For an extra touch of elegance and flavor, drizzle additional melted chocolate over the tops of each cheesecake and sprinkle with chocolate shavings, cocoa powder, or even a few fresh berries. Now, they are ready to be devoured! Enjoy the rich, creamy, and utterly delicious experience of these homemade treats.
Why Mini Chocolate Cheesecakes Are a Must-Try
Beyond their undeniable deliciousness, mini chocolate cheesecakes offer several compelling reasons to make them your go-to dessert for any occasion. Their individual size makes them incredibly versatile and appealing.
- Perfect Portion Control: Say goodbye to awkward slicing and uneven servings. Each mini cheesecake is a perfectly portioned dessert, ideal for catering to individual appetites and dietary considerations.
- Elegant Presentation: These bite-sized beauties are naturally aesthetically pleasing. Arranged on a platter, they make a stunning visual statement that elevates any dessert table, from casual brunches to formal dinners.
- Ease of Serving: No need for plates and forks to be passed around for slicing. Guests can easily pick up their own cheesecake, making them ideal for stand-up receptions, potlucks, and buffet-style events.
- Reduced Baking Time (for Individual Units): While the total process still requires chilling, the individual units bake quicker than a large cheesecake, allowing for more precise cooking.
- Customization Opportunities: Each mini cheesecake can be individually decorated or topped, allowing for a creative outlet and catering to diverse tastes without altering the main recipe.
Expert Tips for Cheesecake Perfection
Achieving a flawless cheesecake, even in mini form, often comes down to a few key techniques and considerations. Keep these expert tips in mind for consistently perfect results:
- Room Temperature Ingredients are Non-Negotiable: This is arguably the most important tip. Cold cream cheese, sour cream, and eggs will not combine smoothly, leading to a lumpy batter and an uneven texture in the final product. Plan ahead and take them out of the fridge at least an hour or two before you start baking.
- Avoid Overmixing: Overmixing cream cheese incorporates too much air into the batter. This air expands rapidly during baking, causing the cheesecake to puff up, then collapse and crack as it cools. Mix only until just combined and smooth, especially after adding eggs.
- Don’t Overbake: An overbaked cheesecake will be dry and tough, and also highly prone to cracking. Trust the “wiggle” test: a slight jiggle in the center is a sign of a perfectly baked cheesecake that will continue to set as it cools.
- Embrace Gradual Cooling: Sudden temperature changes are the enemy of smooth, crack-free cheesecakes. Cooling slowly in the oven with the door ajar, then at room temperature, and finally in the refrigerator, minimizes thermal shock and helps maintain a beautiful, unblemished surface.
- Quality Ingredients Matter: Since the flavor profile is so focused on chocolate and cream cheese, using high-quality full-fat cream cheese and good-tasting semisweet chocolate will significantly enhance the overall deliciousness.
- Patience with Chilling: The 8-hour (or overnight) chilling period is not just a suggestion; it’s essential. This time allows the cheesecake to fully set, develop its rich flavor, and achieve its signature dense, creamy texture. Rushing this step will result in a soft, unset cheesecake.
Delicious Variations and Topping Ideas
While the classic El Mundo Eats mini chocolate cheesecake is perfect as is, it also serves as a fantastic base for creativity. Here are some ideas to customize your cheesecakes and elevate their presentation:
Crust Variations:
- Graham Cracker Crust: Substitute crushed graham crackers mixed with butter for a more traditional cheesecake base.
- Different Cookie Crusts: Experiment with shortbread cookies, digestive biscuits, or even ginger snaps for a unique flavor twist.
Filling Enhancements:
- Espresso Boost: Add 1-2 teaspoons of instant espresso powder (dissolved in a tiny bit of hot water) to the chocolate filling to deepen the chocolate flavor.
- Mint Chocolate: A few drops of peppermint extract in the filling can create a refreshing mint chocolate cheesecake.
- Orange Zest: A teaspoon of finely grated orange zest can brighten the chocolate notes beautifully.
Topping Extravaganza:
- Whipped Cream and Berries: A dollop of fresh whipped cream and a few raspberries or strawberries adds a lovely contrast in color and tanginess.
- Caramel Drizzle: A swirl of homemade or store-bought caramel sauce is always a welcome addition.
- Chocolate Ganache: For ultimate indulgence, top with a rich chocolate ganache instead of simple melted chocolate.
- Toffee Bits or Chopped Nuts: Add some crunch with sprinkled toffee bits, chopped pecans, or walnuts.
- Edible Gold Dust or Sprinkles: For a festive touch, especially during holidays or celebrations.
Storing Your Mini Chocolate Cheesecakes
If by some miracle you have any leftover mini chocolate cheesecakes, proper storage is key to maintaining their freshness and delicious taste:
- Refrigeration: Store leftover cheesecakes in an airtight container in the refrigerator for up to 3-4 days. This prevents them from absorbing odors from other foods and keeps them moist.
- Freezing: For longer storage, mini cheesecakes freeze exceptionally well. Place them on a baking sheet and freeze until firm (about 1-2 hours). Once firm, transfer them to an airtight freezer-safe container or individual freezer bags. They can be frozen for up to 1 month. Thaw them in the refrigerator overnight or at room temperature for a few hours before serving.
These mini chocolate cheesecakes truly embody the perfect balance of convenience, elegance, and incredible flavor. With their delightful Oreo crust and rich chocolate cream cheese filling, they are destined to become a staple in your dessert repertoire. Whether you’re baking for a special occasion or simply treating yourself, this El Mundo Eats recipe promises a memorable culinary experience. So, roll up your sleeves, gather your ingredients, and get ready to create a batch of these enchanting treats that will have everyone asking for more!